If you’ve been afraid to start making yogurt in your Instant Pot, this Pressure Cooker Vietnamese Yogurt recipe is the perfect recipe with which to get started.

First, let me start off by saying that this is not my original recipe. I found it somewhere, and much to my frustration I can’t remember where I saw it, so I can’t give credit to the right person and that’s bothering me. If you know whose this is, please let me know so I can credit them.
Why You’ll Love This Yummy Yogurt
So why is this the best yogurt ?
- No boiling to 180F.
- No cooling. In fact, no heating at all.
- Forget the straining. Totally delicious. Just pour and go .
- Needs no adding. Delicious without topping, nothing.
- Best of all? Less than 5 ingredients .
Doesn’t even need a measuring cup, let alone a thermometer. You will use your condensed milk can as the measuring device. When I say one can of water, I mean use the condensed milk can to measure the water.
Why Make Instant Pot Yogurt?
Why not? I love experimenting in the kitchen. However, I understand not everyone enjoys cooking as much as I do. So if you’re one of those people that cook out of necessity instead of pleasure, here are some reasons to make your own:
- It’s inexpensive . Some of the higher end yogurts you find in the grocery store can be quite expensive.
- Ingredients . You can control which additives you put into your yogurt.
- It makes a lot . If you love yogurt and like to reach for it at breakfast time or for a snack, this is perfect.
- Delicious . It’s just really dang good.
What Makes This Vietnamese Yogurt?
Vietnamese yogurt (called sữa chua or da ua) is unique because of its sweetness, creaminess, and signature use of sweetened condensed milk, which sets it apart from other yogurt styles around the world.
Is Pressure Cooker Yogurt Low Carb?
This particular It’s not low carb, as it has 22 gms of carbs in it.
I do have another Instant Pot Yogurt recipe that is lower carb if you’re counting carbs.
While I think it’s a good starter yogurt recipe, once you feel confident in your yogurt-making abilities, you may want to reserve this for special occasions.
If you’re not watching carbs that closely however, this Vietnamese yogurt recipe makes a great-tasting, easy yogurt.
Which Instant Pot Makes Yogurt?
Technically, they all do. But they’re not all created equal. Some have the Yogurt function built-in, while others, like the Instant Pot Lux does not. The following are the models that do have a yogurt button.
- Instant Pot Duo
- Instant Pot Duo Plus
- Instant Pot Ultra
- Instant Pot Smart
- Instant Pot Duo Nova
- Instant Pot Duo Evo
Ingredients You’ll Need
- 1 can Sweetened Condensed Milk - This is the primary sweetener and flavor base of Vietnamese yogurt. It gives the yogurt its signature sweetness, creamy richness, and silky texture.
- 1 can Hot Water - Measured using the same condensed milk can, the hot water helps dissolve and thin the condensed milk, ensuring a smooth mixture. Rinsing the can also captures any leftover sweetness so nothing goes to waste.
- 2 cans Whole Milk - Whole milk creates the main body of the yogurt. Using the condensed milk can ensures the proper ratio. Whole milk provides the ideal balance of creaminess and structure for thick, smooth yogurt.
- 1 can Half and Half - Adds extra creaminess and fat, making the yogurt luxuriously thick and giving it the signature velvety texture Vietnamese yogurt is known for.
- 5.3 ounces Full-Fat Greek Yogurt - This acts as the starter culture. The live active cultures in the Greek yogurt ferment the milk mixture, turning it into yogurt. Using full-fat yogurt ensures a richer and more stable result.
How To Make Vietnamese Yogurt
- Use the can of condensed milk as your measuring device.
- Use hot water to get the last of the condensed milk out
- Mix everything together, pour into jars, and incubate. This mixture is your yogurt starter (and finisher?)
- Refrigerate yogurt once done before serving. That’s it.
Tips And Tricks
Making Vietnamese yogurt in the Instant Pot is easy, but a few small techniques can take the texture and flavor to the next level.
- Use fresh, full-fat ingredients. Whole milk, half-and-half, and full-fat Greek yogurt create the richest, silkiest yogurt. Lower-fat versions won’t set as well.
- Mix the sweetened condensed milk and hot water thoroughly. Ensuring they dissolve completely prevents graininess and ensures the final yogurt is smooth and evenly sweet.
- Whisk the starter yogurt until lump-free. Before adding Greek yogurt to the milk mixture, whisk it separately so it blends in smoothly and evenly distributes the cultures.
Variations
Vietnamese yogurt is wonderfully versatile, and with just a few simple ingredient swaps or additions, you can create endless flavor combinations while maintaining its signature silky consistency.
- Vanilla Vietnamese Yogurt - Stir in 1–2 teaspoons of pure vanilla extract after fermentation for a smooth, sweet, universally loved flavor.
- Coconut Vietnamese Yogurt - Replace half of the whole milk with full-fat coconut milk to add tropical richness and a subtle coconut aroma.
- Coffee Vietnamese Yogurt (Sữa Chua Cà Phê) - Mix in 1–2 tablespoons of instant espresso or a few tablespoons of strong brewed coffee after incubation for a Vietnamese coffee–inspired treat.
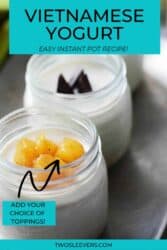
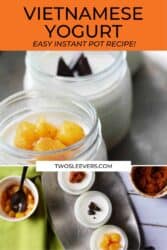
- Fruit-on-the-Bottom Yogurt - Spoon fruit preserves or cooked fruit compote into the bottom of jars before adding the yogurt mixture. Peach, mango, strawberry, and blueberry all work wonderfully.
What To Enjoy With Vietnamese Yogurt
Vietnamese yogurt is incredibly versatile. Its silky texture and gentle sweetness make it the perfect base for toppings and mix-ins that add crunch, freshness, or extra richness.
- Fresh Fruit - Mango, strawberries, blueberries, banana, dragon fruit, or lychee add natural sweetness and brightness.
- Granola - Adds crunch and contrast to the yogurt’s silky texture.
- Chia Seeds - Boosts nutrition and thickens the yogurt slightly as they hydrate.
- Honey or Maple Syrup Drizzle - Enhances the sweetness and adds a rich, glossy finish.
- Toasted Coconut Flakes - Adds tropical flavor and gentle crunch.
How Long Does It Last?
Instant Pot Vietnamese yogurt lasts 5–7 days in the refrigerator when stored in airtight containers or jars.
The flavors stay sweet and creamy, and the texture actually improves as it chills. Just be sure to keep it tightly sealed to prevent absorbing other fridge odors.
Forthe best quality, enjoy it within a week.
Can Instant Pot Yogurt Be Frozen?
I would not recommend freezing this Instant Pot yogurt recipe . After freezing, the texture tends to change and become gritty. It also slightly changes the flavor of the yogurt.
Want More Yogurt Recipes?
- Hot Start Yogurt - Uses the heating method.
- Cold Start Yogurt - Makes a slightly thinner yogurt.
- Homemade Greek Yogurt - Makes a slightly thicker yogurt.
- Cardamom Yogurt - A copycat Noosa yogurt recipe
- Shrikhand Greek Yogurt - a delicious dessert .
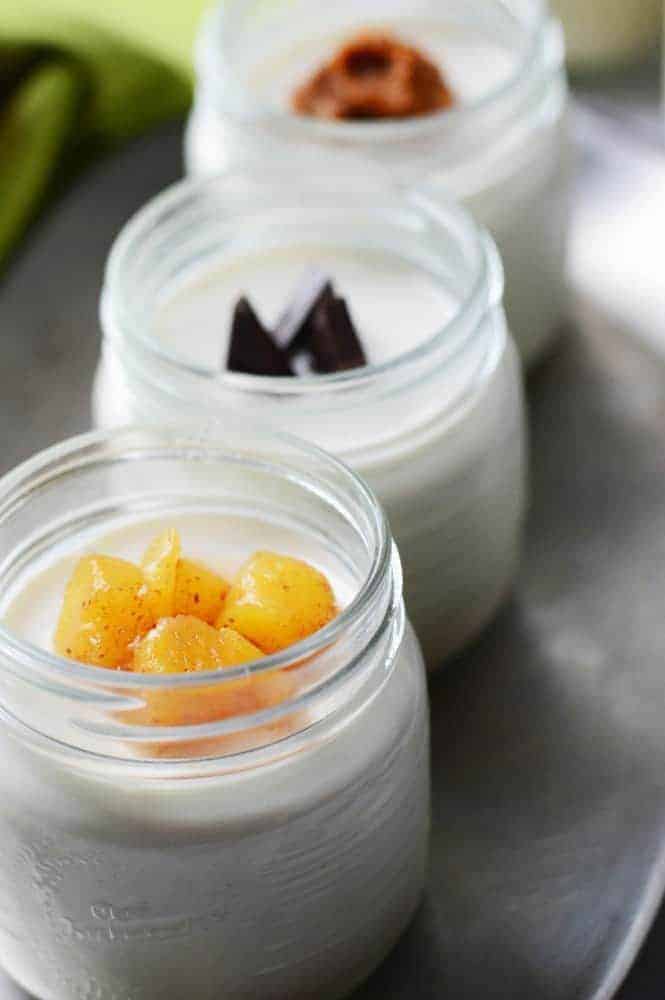
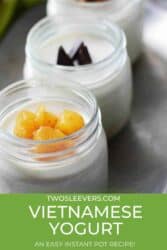
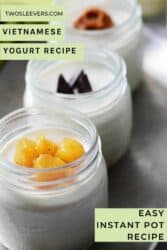
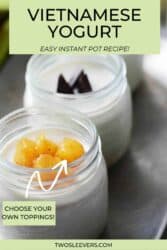
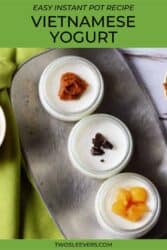
In the pictures, I added some fun toppings like dark chocolate, cinnamon peaches, and some pureed pumpkin with pumpkin pie spice for some additional flavor and to mix it up. But, feel free to eat this Vietnamese yogurt plain or add toppings!

Vietnamese Yogurt Recipe | Instant Pot Vietnamese Yogurt
Ingredients
- ▢ 1 can ( 1 can ) Sweetened Condensed Milk
- ▢ 1 can ( 1 can ) hot water , ( use condensed milk can, pour hot water, and use it to rinse out the condense milk left overs)
- ▢ 2 cans ( 2 cans ) Whole Milk , (use condensed milk can as your measure)
- ▢ 1 can ( 1 can ) Half and Half , (use condensed milk can as your measure)
- ▢ 5.3 ounces ( 150.25 g ) Full-Fat Greek Yogurt
Instructions
- In a large bowl with a spout, pour the condensed milk.
- Fill the condensed milk can with hot water from your faucet, and stir well to get the last bit of goodness out of that can. This is a good time to get a little lick of that condensed milk, just to make sure it’s good.
- Pour in the hot water into the bowl and using a whisk, stir it well.
- Using the now-empty can of condensed milk, measure out the milk and half and half, and stir well.
- Mix in yogurt, and ensure it’s well-incorporated.
- Pour into small jars with lids.
- Turn your electric Instant Pot on, and press the Yogurt button. It may show 8 hours by default.
- Set your jars into the pot directly (no trivet, no water, just the pot and your jars). Cover with a glass lid or the Instant Pot lid. This recipe makes about 10 jars of 6-7 ounces each.
- Once 8 hours are up, refrigerate the jars overnight before serving your thick, slightly sweetened, creamy yogurt as is.
Get support & connect with our community on Facebook!
Nutrition
Don’t forget to check out my otherBest-selling Instant Pot Cookbooks!
Indian Instant Pot , Keto Instant Pot, Instant Pot Fast and Easy , Healthy Instant Pot & Vegetarian Instant Pot .

If you’ve been afraid to start making yogurt in your Instant Pot, this Pressure Cooker Vietnamese Yogurt recipe is the perfect recipe with which to get started.
First, let me start off by saying that this is not my original recipe. I found it somewhere, and much to my frustration I can’t remember where I saw it, so I can’t give credit to the right person and that’s bothering me. If you know whose this is, please let me know so I can credit them.
Why You’ll Love This Yummy Yogurt
So why is this the best yogurt ?
- No boiling to 180F.
- No cooling. In fact, no heating at all.
- Forget the straining. Totally delicious. Just pour and go .
- Needs no adding. Delicious without topping, nothing.
- Best of all? Less than 5 ingredients .
Doesn’t even need a measuring cup, let alone a thermometer. You will use your condensed milk can as the measuring device. When I say one can of water, I mean use the condensed milk can to measure the water.
Why Make Instant Pot Yogurt?
Why not? I love experimenting in the kitchen. However, I understand not everyone enjoys cooking as much as I do. So if you’re one of those people that cook out of necessity instead of pleasure, here are some reasons to make your own:
- It’s inexpensive . Some of the higher end yogurts you find in the grocery store can be quite expensive.
- Ingredients . You can control which additives you put into your yogurt.
- It makes a lot . If you love yogurt and like to reach for it at breakfast time or for a snack, this is perfect.
- Delicious . It’s just really dang good.
What Makes This Vietnamese Yogurt?
Vietnamese yogurt (called sữa chua or da ua) is unique because of its sweetness, creaminess, and signature use of sweetened condensed milk, which sets it apart from other yogurt styles around the world.
Is Pressure Cooker Yogurt Low Carb?
This particular It’s not low carb, as it has 22 gms of carbs in it.
I do have another Instant Pot Yogurt recipe that is lower carb if you’re counting carbs.
While I think it’s a good starter yogurt recipe, once you feel confident in your yogurt-making abilities, you may want to reserve this for special occasions.
If you’re not watching carbs that closely however, this Vietnamese yogurt recipe makes a great-tasting, easy yogurt.
Which Instant Pot Makes Yogurt?
Technically, they all do. But they’re not all created equal. Some have the Yogurt function built-in, while others, like the Instant Pot Lux does not. The following are the models that do have a yogurt button.
- Instant Pot Duo
- Instant Pot Duo Plus
- Instant Pot Ultra
- Instant Pot Smart
- Instant Pot Duo Nova
- Instant Pot Duo Evo
Ingredients You’ll Need
- 1 can Sweetened Condensed Milk - This is the primary sweetener and flavor base of Vietnamese yogurt. It gives the yogurt its signature sweetness, creamy richness, and silky texture.
- 1 can Hot Water - Measured using the same condensed milk can, the hot water helps dissolve and thin the condensed milk, ensuring a smooth mixture. Rinsing the can also captures any leftover sweetness so nothing goes to waste.
- 2 cans Whole Milk - Whole milk creates the main body of the yogurt. Using the condensed milk can ensures the proper ratio. Whole milk provides the ideal balance of creaminess and structure for thick, smooth yogurt.
- 1 can Half and Half - Adds extra creaminess and fat, making the yogurt luxuriously thick and giving it the signature velvety texture Vietnamese yogurt is known for.
- 5.3 ounces Full-Fat Greek Yogurt - This acts as the starter culture. The live active cultures in the Greek yogurt ferment the milk mixture, turning it into yogurt. Using full-fat yogurt ensures a richer and more stable result.
How To Make Vietnamese Yogurt
- Use the can of condensed milk as your measuring device.
- Use hot water to get the last of the condensed milk out
- Mix everything together, pour into jars, and incubate. This mixture is your yogurt starter (and finisher?)
- Refrigerate yogurt once done before serving. That’s it.
Tips And Tricks
Making Vietnamese yogurt in the Instant Pot is easy, but a few small techniques can take the texture and flavor to the next level.
- Use fresh, full-fat ingredients. Whole milk, half-and-half, and full-fat Greek yogurt create the richest, silkiest yogurt. Lower-fat versions won’t set as well.
- Mix the sweetened condensed milk and hot water thoroughly. Ensuring they dissolve completely prevents graininess and ensures the final yogurt is smooth and evenly sweet.
- Whisk the starter yogurt until lump-free. Before adding Greek yogurt to the milk mixture, whisk it separately so it blends in smoothly and evenly distributes the cultures.
Variations
Vietnamese yogurt is wonderfully versatile, and with just a few simple ingredient swaps or additions, you can create endless flavor combinations while maintaining its signature silky consistency.
- Vanilla Vietnamese Yogurt - Stir in 1–2 teaspoons of pure vanilla extract after fermentation for a smooth, sweet, universally loved flavor.
- Coconut Vietnamese Yogurt - Replace half of the whole milk with full-fat coconut milk to add tropical richness and a subtle coconut aroma.
- Coffee Vietnamese Yogurt (Sữa Chua Cà Phê) - Mix in 1–2 tablespoons of instant espresso or a few tablespoons of strong brewed coffee after incubation for a Vietnamese coffee–inspired treat.
- Fruit-on-the-Bottom Yogurt - Spoon fruit preserves or cooked fruit compote into the bottom of jars before adding the yogurt mixture. Peach, mango, strawberry, and blueberry all work wonderfully.
What To Enjoy With Vietnamese Yogurt
Vietnamese yogurt is incredibly versatile. Its silky texture and gentle sweetness make it the perfect base for toppings and mix-ins that add crunch, freshness, or extra richness.
- Fresh Fruit - Mango, strawberries, blueberries, banana, dragon fruit, or lychee add natural sweetness and brightness.
- Granola - Adds crunch and contrast to the yogurt’s silky texture.
- Chia Seeds - Boosts nutrition and thickens the yogurt slightly as they hydrate.
- Honey or Maple Syrup Drizzle - Enhances the sweetness and adds a rich, glossy finish.
- Toasted Coconut Flakes - Adds tropical flavor and gentle crunch.
How Long Does It Last?
Instant Pot Vietnamese yogurt lasts 5–7 days in the refrigerator when stored in airtight containers or jars.
The flavors stay sweet and creamy, and the texture actually improves as it chills. Just be sure to keep it tightly sealed to prevent absorbing other fridge odors.
Forthe best quality, enjoy it within a week.
Can Instant Pot Yogurt Be Frozen?
I would not recommend freezing this Instant Pot yogurt recipe . After freezing, the texture tends to change and become gritty. It also slightly changes the flavor of the yogurt.
Want More Yogurt Recipes?
- Hot Start Yogurt - Uses the heating method.
- Cold Start Yogurt - Makes a slightly thinner yogurt.
- Homemade Greek Yogurt - Makes a slightly thicker yogurt.
- Cardamom Yogurt - A copycat Noosa yogurt recipe
- Shrikhand Greek Yogurt - a delicious dessert .
In the pictures, I added some fun toppings like dark chocolate, cinnamon peaches, and some pureed pumpkin with pumpkin pie spice for some additional flavor and to mix it up. But, feel free to eat this Vietnamese yogurt plain or add toppings!
Vietnamese Yogurt Recipe | Instant Pot Vietnamese Yogurt
Ingredients
- ▢ 1 can ( 1 can ) Sweetened Condensed Milk
- ▢ 1 can ( 1 can ) hot water , ( use condensed milk can, pour hot water, and use it to rinse out the condense milk left overs)
- ▢ 2 cans ( 2 cans ) Whole Milk , (use condensed milk can as your measure)
- ▢ 1 can ( 1 can ) Half and Half , (use condensed milk can as your measure)
- ▢ 5.3 ounces ( 150.25 g ) Full-Fat Greek Yogurt
Instructions
- In a large bowl with a spout, pour the condensed milk.
- Fill the condensed milk can with hot water from your faucet, and stir well to get the last bit of goodness out of that can. This is a good time to get a little lick of that condensed milk, just to make sure it’s good.
- Pour in the hot water into the bowl and using a whisk, stir it well.
- Using the now-empty can of condensed milk, measure out the milk and half and half, and stir well.
- Mix in yogurt, and ensure it’s well-incorporated.
- Pour into small jars with lids.
- Turn your electric Instant Pot on, and press the Yogurt button. It may show 8 hours by default.
- Set your jars into the pot directly (no trivet, no water, just the pot and your jars). Cover with a glass lid or the Instant Pot lid. This recipe makes about 10 jars of 6-7 ounces each.
- Once 8 hours are up, refrigerate the jars overnight before serving your thick, slightly sweetened, creamy yogurt as is.
Get support & connect with our community on Facebook!
Nutrition
Don’t forget to check out my otherBest-selling Instant Pot Cookbooks!
Indian Instant Pot , Keto Instant Pot, Instant Pot Fast and Easy , Healthy Instant Pot & Vegetarian Instant Pot .

If you already signed up, you should have received an email with a password to give you unlimited access to our FREE Printable Library. The password is case sensitive. Enter it below and get printing!
Password:

Vietnamese Yogurt Recipe | Instant Pot Vietnamese Yogurt
Ingredients
- 1 can Sweetened Condensed Milk
- 1 can hot water ( use condensed milk can, pour hot water, and use it to rinse out the condense milk left overs)
- 2 cans Whole Milk (use condensed milk can as your measure)
- 1 can Half and Half (use condensed milk can as your measure)
- 5.3 ounces Full-Fat Greek Yogurt
Instructions
- In a large bowl with a spout, pour the condensed milk.
- Fill the condensed milk can with hot water from your faucet, and stir well to get the last bit of goodness out of that can. This is a good time to get a little lick of that condensed milk, just to make sure it’s good.
- Pour in the hot water into the bowl and using a whisk, stir it well.
- Using the now-empty can of condensed milk, measure out the milk and half and half, and stir well.
- Mix in yogurt, and ensure it’s well-incorporated.
- Pour into small jars with lids.
- Turn your electric Instant Pot on, and press the Yogurt button. It may show 8 hours by default.
- Set your jars into the pot directly (no trivet, no water, just the pot and your jars). Cover with a glass lid or the Instant Pot lid. This recipe makes about 10 jars of 6-7 ounces each.
- Once 8 hours are up, refrigerate the jars overnight before serving your thick, slightly sweetened, creamy yogurt as is.
Vietnamese Yogurt Recipe | Instant Pot Vietnamese Yogurt https://twosleevers.com/vietnamese-yogurt/
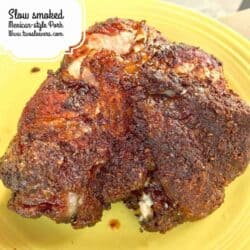
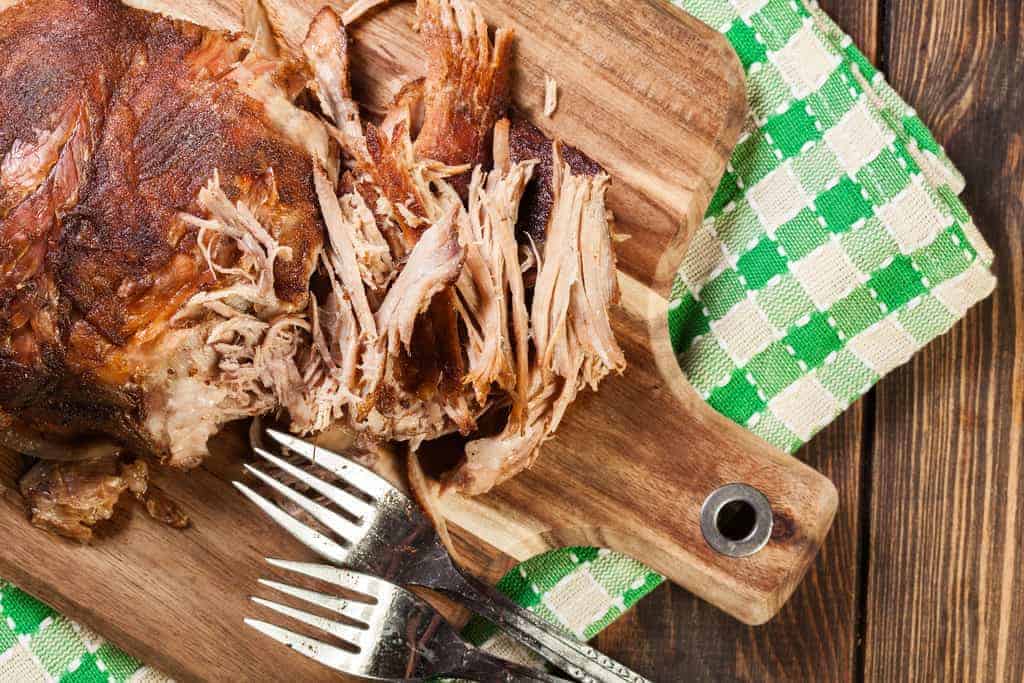
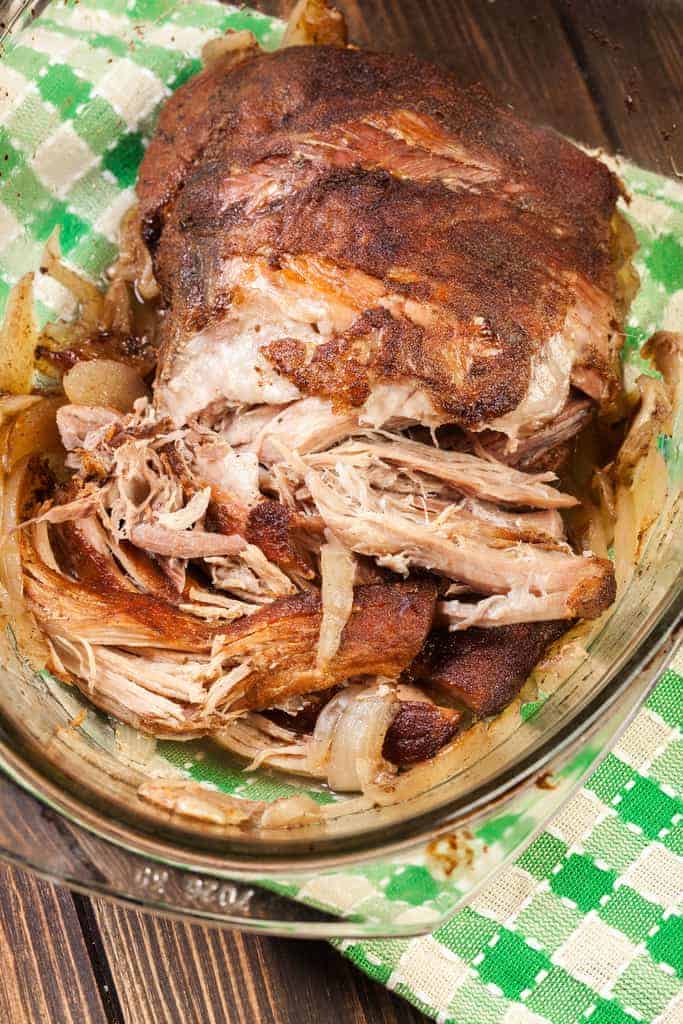
Slow Smoked Pork Shoulder Tacos is a smoked pulled-pork taco filling made with pork shoulder and a simple dry rub of brown sugar, garlic powder, onion powder, ancho chile powder, cumin, and other pantry spices. It’s traditional and celebratory and works well for feeding a crowd on taco night, game day, or weekend cookouts, since low-and-slow smoking delivers big flavor with minimal hands-on work. Unlike oven-braised pork tacos or quick pressure-cooker pulled pork, this version leans on the smoker (with the fat cap left on) to self-baste and build a flavorful bark using an easy Mexican-style rub.
Why This Smoked Pork Is Worth The Wait
I got a new smoker a few weeks ago, and I’ve made a couple of things in it. I haven’t really had much time to play with it. First, I tried making chicken tikka bites in it. While they got nice and smoky-tasting, I committed the newbie mistake of putting them into a foil pan. So I had chicken that was cooked–but it sat in a lot of liquid. No bueño. Next, I used it for chicken tikka masala . When I had a few pounds of pork leftover from making Carne adovada , I figured I’d try to create a Mexican-style rub and try smoking again.
I don’t think it would have mattered what rub I used. It’s really just the smoking that adds all the flavor. But if you don’t have a smoker, and you did this in the oven with the pork wrapped in foil, the rub would make a difference. So I’m going to share the rub mix below so you can try it.
Either way, it is full of amazing flavor. Leaving the fat cap on the pork allowed it to self-baste and protect the pork from drying out.
Ingredients You’ll Need
- 1 tablespoon Brown Sugar - Adds a subtle sweetness that balances the savory spices. It also helps create caramelization on the outside of the pork, contributing to a rich, flavorful bark during smoking.
- 1 teaspoon Garlic Powder - Brings a savory depth and aromatic flavor that enhances the natural richness of the pork without overpowering it.
- 1 teaspoon Onion Powder - Adds a mild, sweet-savory note that rounds out the spice blend and gives the rub a well-balanced background flavor.
- 1 teaspoon Smoked Paprik - Provides a smoky, earthy flavor that complements the smoking process and deepens the color of the crust.
- 1 teaspoon Ground Cumin - Contributes a warm, earthy undertone that enhances the overall savory profile and pairs well with the smoky spices.
- 1 teaspoon Salt - Essential for seasoning, it penetrates the pork to enhance flavor throughout and helps the meat retain moisture during the long cook.
- 1/2 teaspoon Ancho Chile Powder - Adds a mild heat with subtle fruity and smoky notes, giving the rub complexity without making it too spicy.
- 1/2 teaspoon Ground Black Pepper - Provides a sharp, pungent kick that balances the sweetness of the sugar and rounds out the seasoning.
- 2 pounds Boneless Pork Shoulder - The star of the dish, this cut is rich in connective tissue and fat, which break down beautifully during smoking. The result is tender, juicy, and flavorful pork that’s perfect for pulling or slicing.
How To Make Smoked Pork Shoulder
- Mix the rub
- Make long slashes in the fat and the meat to help the marinade penetrate. This will also not let the fat curl up too much during cooking
- Smoke until the internal temperature is about 195-200°F.
- If you don’t have a smoker , wrap in foil. Then bake at 250 for 4-6 hours. Unwrap and bake for another hour until the internal temperature reaches 195-200°F
Tips And Tricks
When smoking pork shoulder, success comes down to balancing preparation, seasoning, temperature control, and patience. Here are some tips and tricks to help you achieve tender, smoky, and flavorful pork shoulder every time:
- Trim, but Don’t Over-Trim . Remove any excess hard fat, but leave a thin layer to help keep the pork moist and flavorful during the long smoking process.
- Shred While Warm . Pull the pork apart using forks or meat claws while it’s still warm for the best texture.
- Maintain Low & Slow Heat . Smoke at 225–250°F. This allows the connective tissue to break down, resulting in fall-apart tenderness.
Variations
Smoked pork shoulder is endlessly versatile, and you can easily adjust the flavors to suit your taste or the occasion. Here are some delicious variations to try:
- Mustard-Rubbed - Coat the pork with yellow mustard before applying the dry rub. This adds tang and helps the spices adhere while forming a rich bark.
- Smoky Chipotle - Add ground chipotle peppers, cumin, and smoked paprika to your rub, and pair with a smoky adobo sauce for a bold southwestern flair.
- Sweet & Spicy - Add cayenne pepper and chili powder to your rub, then glaze the pork with honey, maple syrup, or hot honey during the last hour of smoking.
What To Eat With Smoked Pork Shoulder
Smoked pork shoulder is rich, savory, and full of smoky flavor, which means it pairs beautifully with both classic barbecue sides and lighter, fresh options. Here are some of the best dishes to serve alongside it:
- Coleslaw - A tangy, creamy slaw balances the richness of the pork and adds crunch.
- Cornbread - Sweet and buttery, it’s a perfect complement to smoky meat.
- Macaroni and Cheese - Creamy, cheesy pasta makes for an indulgent side dish that everyone loves.
How Long Does It Last?
Smoked pork shoulder can be enjoyed for several days if stored properly.
Once cooked, it should be cooled to room temperature within two hours and stored in an airtight container in the refrigerator. There, it will stay fresh for about 3 to 4 days while retaining its flavor and texture.
Can You Freeze It?
For longer storage, you can freeze smoked pork shoulder (either whole or shredded) for up to 2 to 3 months. To maintain the best quality, wrap it tightly in foil or freezer-safe bags to prevent freezer burn, and reheat gently to avoid drying it out.
When reheating, adding a splash of broth or barbecue sauce helps restore moisture and enhances flavor.
To fix dry Mexican smoked pulled pork shoulder after it’s cooked, shred it and reheat gently (covered) with a little warm broth or reserved drippings plus a quick Mexican pulled pork finishing sauce Try adobo, a squeeze of orange/lime, and a spoon of salsa verde or salsa rojauntil it’s moist again. Avoid high heat or uncovered microwaving so it doesn’t dry out further.
For Mexican smoked pork shoulder or smoked pork butt for tacos, pull for shredding when the internal temp is typically around 200°F to 205°F, but use tenderness as the final cue by probing for a butter-soft feel, especially in the thickest part. If you pull closer to 195°F it may slice instead of shred, so most cooks aim to finish near 203°F, then rest the smoked pork shoulder at least 30 to 60 minutes before pulling to keep the Mexican pulled pork juicy.
For Mexican smoked pulled pork shoulder tacos, plan about 4 to 6 ounces of cooked shredded pork per adult for a typical meal, which usually works out to around 1/3 pound per person if you are serving sides like rice, beans, and salsa. If it’s a taco party with heavy eaters or fewer sides, bump that to 6 to 8 ounces per person. Since smoked pork shoulder loses weight during cooking, a good rule is to buy roughly 1/2 pound of raw pork shoulder per person, or closer to 2/3 pound per person for big crowds or leftovers.
For Mexican smoked pork shoulder, oak is usually the better default because it gives a steady, medium smoke that builds a clean bark without overpowering the meat, which is ideal for smoked pork shoulder for tacos where chiles, citrus, and adobo need to shine. Mesquite is stronger and can turn sharp or bitter if overused, but it works great in small amounts or blended with oak when you want a bold, Texas-style edge on Mexican pulled pork. If you are new to wood choice, start with mostly oak and add a little mesquite once you like the smoke level.
Want More Pork Recipes?
- Pulled Pork - loaded with delicious Mexican flavor.
- Pork Carnitas - Make these in your Instant Pot .
- Instant Pot Pulled Pork - tacos seasoned with Indian spices.
- Smoked Mexican Pork Shoulder - lovely smoked flavors.
- Pressure Cooker Carne Adovada - a low carb delight.
- Schezuan Pork Soup - Sichuan cuisine made at home.
- Chile Verde - a quick and easy pork recipe.
- Instant Pot Pork Stew - a hearty low carb soup .
If you love this Smoked Pork Shoulder recipe as much as we do, make sure you share it with your friends on Facebook and Pinterest so they can make it too!

Smoked Pork Shoulder | Mexican-Style Pork Shoulder
Equipment
- Measuring Cups
- OVAL MEASURING SPOONS
- NORDICWARE INDOOR OUTDOOR SMOKER
- Meat Thermometer
- Mixing Bowl
Ingredients
- ▢ 1 tablespoon ( 1 tablespoon ) Brown Sugar
- ▢ 1 teaspoon ( 1 teaspoon ) Garlic Powder
- ▢ 1 teaspoon ( 1 teaspoon ) Onion Powder
- ▢ 1 teaspoon ( 1 teaspoon ) Smoked Paprika
- ▢ 1 teaspoon ( 1 teaspoon ) Ground Cumin
- ▢ 1 teaspoon ( 1 teaspoon ) Kosher Salt
- ▢ 1/2 teaspoon ( 0.5 teaspoon ) Ancho Chile Powder
- ▢ 1/2 teaspoon ( 0.5 teaspoon ) Ground Black Pepper
- ▢ 2 pounds ( 907.18 g ) Boneless Pork Shoulder
Instructions
- Slash the pork in multiple locations with a knife, especially on the fat cap so it doesn’t curl during cooking, and also to allow the marinade to penetrate.
- In a small bowl, mix together all the other ingredients, and rub into both sides of the pork.
- Set your smoker to 250F, for 5-6 hours.
- Cook until internal temperature reaches 195F, remove and cover with foil and let it rest for 10-15 minutes to finish cooking.
- Shred and use for tacos, eat it plain, or use in a tamale pie recipe.
Oven instructions
- Wrap in foil after seasoning, and cook it for 4-5 hours until temperature reaches 175F. Remove foil and either bake for another hour until temperature reaches 195F. You may choose to broil toward the end to get a well-browned exterior.
Get support & connect with our community on Facebook!
Nutrition
Don’t forget to check out my other Ketocookbooks.
Keto Instant Pot, Keto Fat Bombs, Sweets, & Treats , and Easy keto in 30 minutes.

