
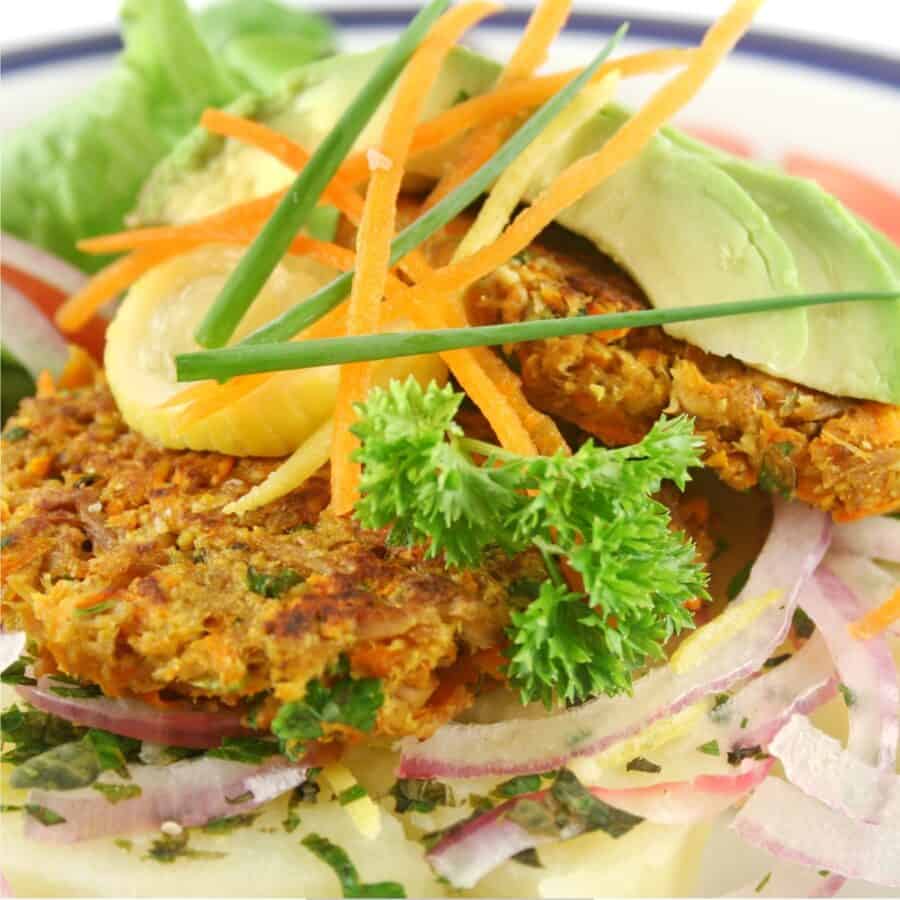
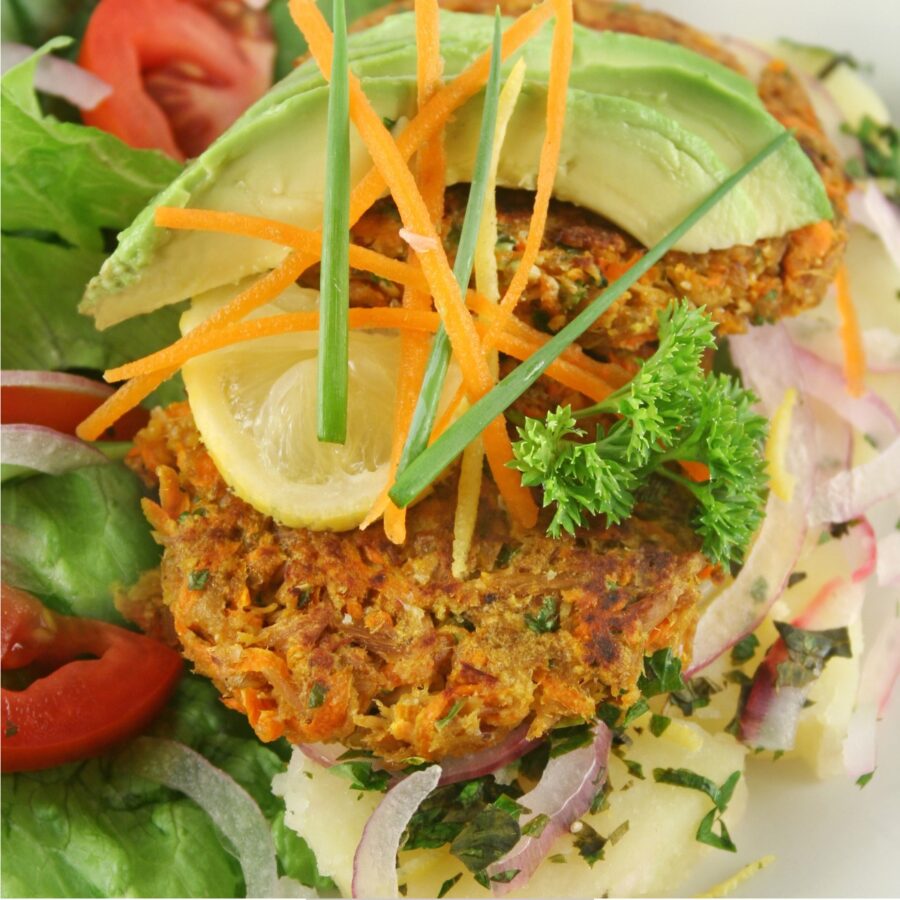
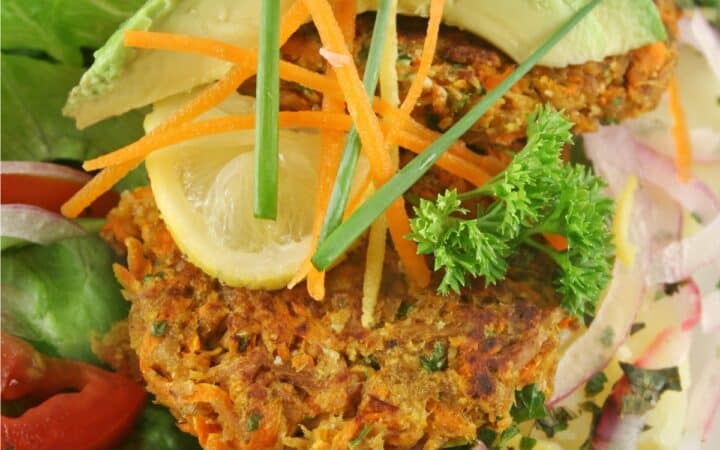
Looking for a quick, budget-friendly meal that doesn’t skimp on flavor? These easy Tuna Patties are the perfect solution! Crispy on the outside, tender and savory on the inside, they’re a protein-packed favorite made with pantry staples. Whether you’re prepping lunch for the week or serving up a family dinner, these tuna cakes are guaranteed to please.
Why You’ll Love This Fantastic Fish Recipe
- Quick & Easy. Ready in under 30 minutes with minimal prep.
- Budget-Friendly. Uses canned tuna and basic pantry ingredients.
- Customizable. Add your favorite herbs, veggies, or spices.
- Delicious. Crisp edges, tender center, and bursting with flavor.
These tuna patties are a meal-prep hero, an easy weeknight dinner, or even a high-protein snack. Plus, they’re freezer-friendly for busy days ahead!
Are Tuna Patties Good?
Absolutely! Tuna patties are a versatile dish that transforms humble canned tuna into a golden, crispy, flavor-packed bite. When combined with aromatic herbs, breadcrumbs, and just the right seasoning, they’re incredibly satisfying.
You can enjoy them on their own, serve them burger-style, or plate them with a fresh salad or side of roasted veggies.
Are They Healthy?
Yes, tuna patties can be a healthy meal option, especially when prepared with wholesome ingredients and cooked using lighter methods like pan-searing or air frying instead of deep frying. Here’s why:
- High in Protein - Tuna is rich in lean protein, which helps build and repair tissues, and keeps you feeling full longer.
- Reduced Carbs - Most tuna patties use breadcrumbs in moderate amounts, making them relatively low in carbohydrates, especially if you use almond flour or oat flour as a substitute.
- Heart-Healthy Fats - Tuna contains omega-3 fatty acids that support heart and brain health. Using olive oil for cooking adds more good fats.
Tuna patties are a nutritious, budget-friendly, and versatile option when made with balanced ingredients and cooked healthfully.
Ingredients You’ll Need
- Canned Tuna - The main protein and star of the dish. Tuna provides a meaty texture and savory flavor. Be sure to drain it well to avoid soggy patties.
- Breadcrumbs - Help absorb moisture and act as a binder to hold the patties together. They also add a bit of texture to each bite.
- Egg - Works as a binding agent, ensuring the patties don’t fall apart during shaping or cooking.
- Mayonnaise - Adds moisture, richness, and creaminess to balance the dry texture of the tuna and breadcrumbs.
- Dijon Mustard - Provides a subtle tangy sharpness that cuts through the richness and enhances overall flavor.
- Garlic Powder & Onion Powder - These dry aromatics build savory depth without adding extra moisture, making the patties more flavorful.
- Salt & Pepper - Basic seasonings that bring out the natural flavors of the other ingredients and ensure the patties are well-seasoned.
- Fresh Parsley or Dill - Optional, but adds a pop of freshness, color, and brightness to balance the richer flavors.
- Olive Oil - Used to pan-fry the patties, giving them a crisp, golden-brown exterior and adding a bit of healthy fat for richness.
How To Make Tuna Patties
- Prep the Mixture. In a large bowl, combine drained tuna, breadcrumbs, egg, mayo, mustard, garlic powder, onion powder, salt, pepper, and herbs. Mix until well combined.
- Shape the Patties. Use your hands or a scoop to form the mixture into 6 to 8 even-sized patties. Press firmly to ensure they hold their shape.
- Pan-Fry Until Golden. Heat a bit of olive oil in a skillet over medium heat. Cook the patties for 3–4 minutes per side, or until golden and heated through.
- Serve & Enjoy! Serve warm with your favorite dipping sauce, salad, or side.
Tips And Tricks
Here are some tried-and-true tips and tricks for making the best tuna patties that are crispy on the outside, tender inside, and full of flavor:
- Drain the Tuna Well. Too much moisture will make the mixture soggy and hard to shape.
- Chill Before Cooking. If time allows, chilling the patties for 15–20 minutes helps them hold together better.
- Don’t Crowd the Pan. Fry in batches for a crispy crust.
- Air Fry Option. For a lighter version, air fry at 375°F for 8–10 minutes, flipping halfway.
Variations
Here are some delicious variations for making tuna patties that allow you to customize flavor, texture, and dietary preferences:
- Spicy- Add chopped jalapeños or a pinch of cayenne.
- Cheesy- Mix in shredded cheddar or Parmesan.
- Asian-Inspired - Add soy sauce, green onions, and a bit of grated ginger.
- Mediterranean - Include feta, olives, and oregano for a briny twist.
What To Eat With Tuna Patties
Tuna patties are versatile and pair wonderfully with a variety of sides—whether you want something light and fresh or hearty and filling. Here’s a list of the best sides to serve with them:
- Salad - Fresh greens with a lemon vinaigrette.
- Rice or Quinoa - A wholesome base to soak up any sauces.
- Roasted Veggies - Think asparagus, carrots, or Brussels sprouts.
- Dipping Sauces - Try tartar sauce, garlic aioli, or spicy mayo .
How Long Do They Last?
Store leftover tuna patties in an airtight container in the refrigerator for up to 3 days. Reheat in a skillet or air fryer to retain their crispiness.
Can You Freeze Them?
Yes! Freeze uncooked or cooked patties on a baking sheet until solid, then transfer to a freezer-safe bag or container. They’ll keep for up to 3 months. Thaw in the fridge before cooking or reheating.
More Simple Seafood Recipes
- Sheet Pan Shrimp
- Cioppino Seafood Stew
- Thai Green Curry Mussels
- Instant Pot Jambalaya
- Mexican Shrimp Cocktail

Tuna Patties | Easy And Flavorful Tuna Cakes
Ingredients
- ▢ 10 ounces Canned Tuna , drained
- ▢ 1/2 cup Bread Crumbs
- ▢ 1 Egg
- ▢ 1 tsp Dijon Mustard
- ▢ 2 tbsp Mayonnaise
- ▢ 1/2 tsp Garlic Powder
- ▢ 1/2 tsp Onion Powder
- ▢ 1/2 tsp Kosher Salt
- ▢ 1/4 tsp Ground Black Pepper
- ▢ 2 tbsp Dill , chopped
- ▢ 2 tbsp Olive Oil
Instructions
- Prep the Mixture. In a large bowl, combine drained tuna, breadcrumbs, egg, mayo, mustard, garlic powder, onion powder, salt, pepper, and herbs. Mix until well combined.
- Shape the Patties. Use your hands or a scoop to form the mixture into 6 to 8 even-sized patties. Press firmly to ensure they hold their shape.
- Pan-Fry Until Golden. Heat a bit of olive oil in a skillet over medium heat. Cook the patties for 3–4 minutes per side, or until golden and heated through.
- Serve & Enjoy! Serve warm with your favorite dipping sauce, salad, or side.
Get support & connect with our community on Facebook!
Nutrition
Looking for a quick, budget-friendly meal that doesn’t skimp on flavor? These easy Tuna Patties are the perfect solution! Crispy on the outside, tender and savory on the inside, they’re a protein-packed favorite made with pantry staples. Whether you’re prepping lunch for the week or serving up a family dinner, these tuna cakes are guaranteed to please.
Why You’ll Love This Fantastic Fish Recipe
- Quick & Easy. Ready in under 30 minutes with minimal prep.
- Budget-Friendly. Uses canned tuna and basic pantry ingredients.
- Customizable. Add your favorite herbs, veggies, or spices.
- Delicious. Crisp edges, tender center, and bursting with flavor.
These tuna patties are a meal-prep hero, an easy weeknight dinner, or even a high-protein snack. Plus, they’re freezer-friendly for busy days ahead!
Are Tuna Patties Good?
Absolutely! Tuna patties are a versatile dish that transforms humble canned tuna into a golden, crispy, flavor-packed bite. When combined with aromatic herbs, breadcrumbs, and just the right seasoning, they’re incredibly satisfying.
You can enjoy them on their own, serve them burger-style, or plate them with a fresh salad or side of roasted veggies.
Are They Healthy?
Yes, tuna patties can be a healthy meal option, especially when prepared with wholesome ingredients and cooked using lighter methods like pan-searing or air frying instead of deep frying. Here’s why:
- High in Protein - Tuna is rich in lean protein, which helps build and repair tissues, and keeps you feeling full longer.
- Reduced Carbs - Most tuna patties use breadcrumbs in moderate amounts, making them relatively low in carbohydrates, especially if you use almond flour or oat flour as a substitute.
- Heart-Healthy Fats - Tuna contains omega-3 fatty acids that support heart and brain health. Using olive oil for cooking adds more good fats.
Tuna patties are a nutritious, budget-friendly, and versatile option when made with balanced ingredients and cooked healthfully.
Ingredients You’ll Need
- Canned Tuna - The main protein and star of the dish. Tuna provides a meaty texture and savory flavor. Be sure to drain it well to avoid soggy patties.
- Breadcrumbs - Help absorb moisture and act as a binder to hold the patties together. They also add a bit of texture to each bite.
- Egg - Works as a binding agent, ensuring the patties don’t fall apart during shaping or cooking.
- Mayonnaise - Adds moisture, richness, and creaminess to balance the dry texture of the tuna and breadcrumbs.
- Dijon Mustard - Provides a subtle tangy sharpness that cuts through the richness and enhances overall flavor.
- Garlic Powder & Onion Powder - These dry aromatics build savory depth without adding extra moisture, making the patties more flavorful.
- Salt & Pepper - Basic seasonings that bring out the natural flavors of the other ingredients and ensure the patties are well-seasoned.
- Fresh Parsley or Dill - Optional, but adds a pop of freshness, color, and brightness to balance the richer flavors.
- Olive Oil - Used to pan-fry the patties, giving them a crisp, golden-brown exterior and adding a bit of healthy fat for richness.
How To Make Tuna Patties
- Prep the Mixture. In a large bowl, combine drained tuna, breadcrumbs, egg, mayo, mustard, garlic powder, onion powder, salt, pepper, and herbs. Mix until well combined.
- Shape the Patties. Use your hands or a scoop to form the mixture into 6 to 8 even-sized patties. Press firmly to ensure they hold their shape.
- Pan-Fry Until Golden. Heat a bit of olive oil in a skillet over medium heat. Cook the patties for 3–4 minutes per side, or until golden and heated through.
- Serve & Enjoy! Serve warm with your favorite dipping sauce, salad, or side.
Tips And Tricks
Here are some tried-and-true tips and tricks for making the best tuna patties that are crispy on the outside, tender inside, and full of flavor:
- Drain the Tuna Well. Too much moisture will make the mixture soggy and hard to shape.
- Chill Before Cooking. If time allows, chilling the patties for 15–20 minutes helps them hold together better.
- Don’t Crowd the Pan. Fry in batches for a crispy crust.
- Air Fry Option. For a lighter version, air fry at 375°F for 8–10 minutes, flipping halfway.
Variations
Here are some delicious variations for making tuna patties that allow you to customize flavor, texture, and dietary preferences:
- Spicy- Add chopped jalapeños or a pinch of cayenne.
- Cheesy- Mix in shredded cheddar or Parmesan.
- Asian-Inspired - Add soy sauce, green onions, and a bit of grated ginger.
- Mediterranean - Include feta, olives, and oregano for a briny twist.
What To Eat With Tuna Patties
Tuna patties are versatile and pair wonderfully with a variety of sides—whether you want something light and fresh or hearty and filling. Here’s a list of the best sides to serve with them:
- Salad - Fresh greens with a lemon vinaigrette.
- Rice or Quinoa - A wholesome base to soak up any sauces.
- Roasted Veggies - Think asparagus, carrots, or Brussels sprouts.
- Dipping Sauces - Try tartar sauce, garlic aioli, or spicy mayo .
How Long Do They Last?
Store leftover tuna patties in an airtight container in the refrigerator for up to 3 days. Reheat in a skillet or air fryer to retain their crispiness.
Can You Freeze Them?
Yes! Freeze uncooked or cooked patties on a baking sheet until solid, then transfer to a freezer-safe bag or container. They’ll keep for up to 3 months. Thaw in the fridge before cooking or reheating.
More Simple Seafood Recipes
- Sheet Pan Shrimp
- Cioppino Seafood Stew
- Thai Green Curry Mussels
- Instant Pot Jambalaya
- Mexican Shrimp Cocktail
Tuna Patties | Easy And Flavorful Tuna Cakes
Ingredients
- ▢ 10 ounces Canned Tuna , drained
- ▢ 1/2 cup Bread Crumbs
- ▢ 1 Egg
- ▢ 1 tsp Dijon Mustard
- ▢ 2 tbsp Mayonnaise
- ▢ 1/2 tsp Garlic Powder
- ▢ 1/2 tsp Onion Powder
- ▢ 1/2 tsp Kosher Salt
- ▢ 1/4 tsp Ground Black Pepper
- ▢ 2 tbsp Dill , chopped
- ▢ 2 tbsp Olive Oil
Instructions
- Prep the Mixture. In a large bowl, combine drained tuna, breadcrumbs, egg, mayo, mustard, garlic powder, onion powder, salt, pepper, and herbs. Mix until well combined.
- Shape the Patties. Use your hands or a scoop to form the mixture into 6 to 8 even-sized patties. Press firmly to ensure they hold their shape.
- Pan-Fry Until Golden. Heat a bit of olive oil in a skillet over medium heat. Cook the patties for 3–4 minutes per side, or until golden and heated through.
- Serve & Enjoy! Serve warm with your favorite dipping sauce, salad, or side.
Get support & connect with our community on Facebook!
Nutrition

If you already signed up, you should have received an email with a password to give you unlimited access to our FREE Printable Library. The password is case sensitive. Enter it below and get printing!
Password:

Tuna Patties | Easy And Flavorful Tuna Cakes
Ingredients
- 10 ounces Canned Tuna drained
- 1/2 cup Bread Crumbs
- 1 Egg
- 1 tsp Dijon Mustard
- 2 tbsp Mayonnaise
- 1/2 tsp Garlic Powder
- 1/2 tsp Onion Powder
- 1/2 tsp Kosher Salt
- 1/4 tsp Ground Black Pepper
- 2 tbsp Dill chopped
- 2 tbsp Olive Oil
Instructions
- Prep the Mixture. In a large bowl, combine drained tuna, breadcrumbs, egg, mayo, mustard, garlic powder, onion powder, salt, pepper, and herbs. Mix until well combined.
- Shape the Patties. Use your hands or a scoop to form the mixture into 6 to 8 even-sized patties. Press firmly to ensure they hold their shape.
- Pan-Fry Until Golden. Heat a bit of olive oil in a skillet over medium heat. Cook the patties for 3–4 minutes per side, or until golden and heated through.
- Serve & Enjoy! Serve warm with your favorite dipping sauce, salad, or side.
Tuna Patties | Easy And Flavorful Tuna Cakes https://twosleevers.com/tuna-patties/
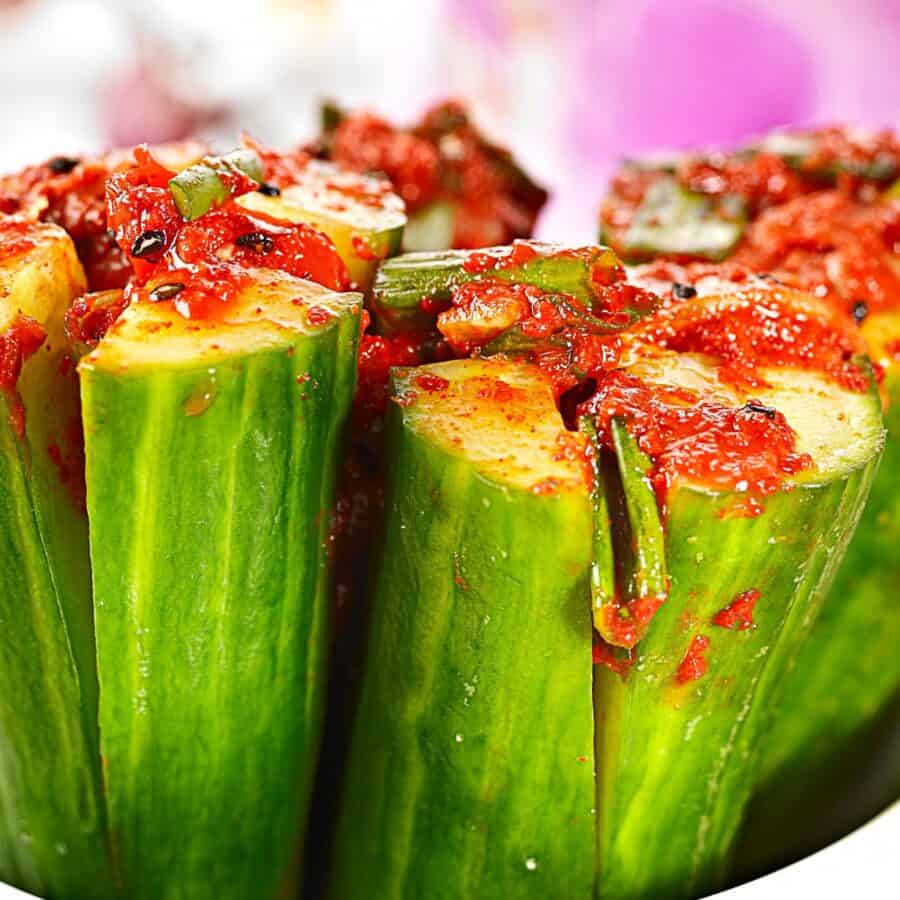
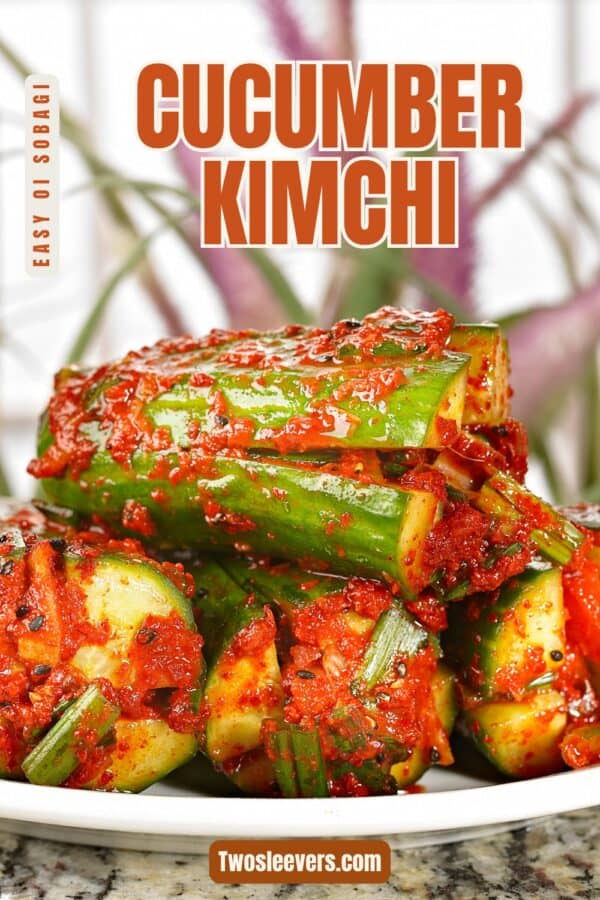
If you’re craving something bold, spicy, and refreshing, this Cucumber Kimchi (Oi Sobagi) is your next go-to Korean side dish! Learn how to make this crunchy, tangy, and slightly spicy kimchi that’s ready to enjoy in just a few hours.

Why You’ll Love This Spectacular Side Dish
- Quick Ferment. Unlike traditional napa kimchi, this recipe only takes a few hours to a couple of days to develop flavor.
- Fresh & Spicy. Crisp cucumbers balance beautifully with spicy, garlicky chili paste.
- No Fish Sauce Needed. This is a vegetarian-friendly kimchi recipe that doesn’t sacrifice flavor.
- Perfect Side Dish. Add it to rice bowls, Korean BBQ, or any weeknight meal for a flavor punch!
Whether you’re new to Korean cooking or a longtime kimchi fan, this recipe brings you all the classic umami with minimal effort.
What Is Cucumber Kimchi?
Cucumber kimchi, also known as Oi Sobagi, is a quick, water-rich kimchi made with fresh cucumbers stuffed with a spicy seasoning paste.
It’s crunchy, flavorful, and slightly tangy, making it a refreshing banchan (Korean side dish) that’s perfect for warmer months or when you want something bright and fermented fast.
Is It Healthy?
Cucumber kimchi is a flavorful, nutrient-rich, and gut-friendly dish that’s a great addition to a balanced diet, especially when made at home with wholesome ingredients.
Ingredients You’ll Need
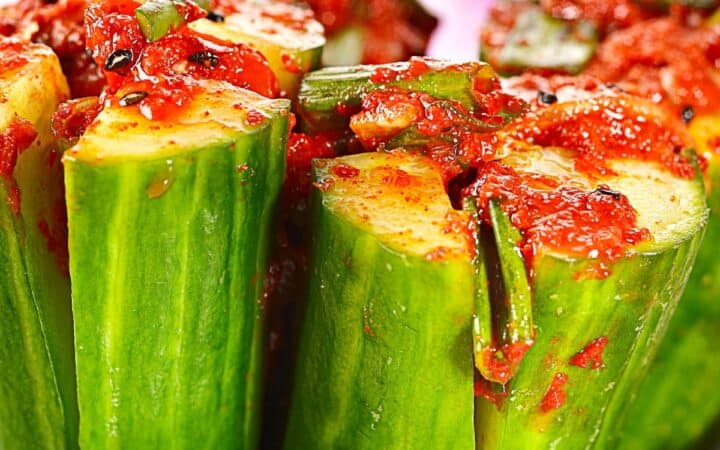
- Persian or Kirby Cucumbers - These small, crisp cucumbers are perfect for kimchi because they hold their crunch during salting and fermenting. Their minimal seeds prevent sogginess, and their firm texture soaks up flavor while staying refreshing.
- Salt - Essential for drawing out excess moisture from the cucumbers, salt also kickstarts the fermentation process and helps preserve the kimchi, keeping it crisp and flavorful.
- Korean Red Pepper Flakes (Gochugaru) - Gochugaru is the heart of the spice mix, giving cucumber kimchi its vibrant red color, smoky heat, and signature Korean flavor profile.
- Garlic - Brings strong, savory depth and aromatic intensity to the seasoning paste, helping to balance the bright flavors of the cucumbers and vinegar.
- Ginger - Adds subtle heat and warmth, complementing the garlic and giving the kimchi a more rounded, spicy base.
- Green Onion - Offers a fresh, sharp note and adds visual and textural variety. It also enhances the umami flavor of the overall dish.
- Carrots (Optional) - Thinly sliced or julienned carrots provide extra crunch and sweetness while adding a splash of color to the mix.
- Sugar - A small amount of sugar tempers the heat from the gochugaru and enhances the natural sweetness of the cucumbers, creating a more balanced, flavorful kimchi.
- Rice Vinegar or Apple Cider Vinegar - These vinegars add a bright, tangy acidity to the kimchi, especially helpful in quick-pickled or non-fermented versions. They intensify the fresh flavor without overpowering it.
- Sesame Seeds - Sprinkled in for a final touch, sesame seeds contribute a nutty flavor and a bit of texture contrast that complements the crisp vegetables.
How To Make Cucumber Kimchi
- Prep the Cucumbers. Wash and trim the cucumbers. Slice them lengthwise into quarters, leaving one end attached so they form a cross. Sprinkle with salt, then let them sit for 30 minutes. Rinse and drain.
- Make the Kimchi Paste. In a bowl, mix gochugaru, garlic, ginger, sugar, green onions, and carrots (if using). Stir in a splash of vinegar for brightness if desired.
- Stuff the Cucumbers. Carefully stuff each salted cucumber with the spicy filling, making sure the mixture gets between all sections.
- Pack & Rest. Place the stuffed cucumbers in an airtight container. Let them sit at room temperature for 4–6 hours to ferment slightly, then refrigerate.
- Enjoy. Your cucumber kimchi is ready to enjoy once chilled, and it gets even better after a day or two in the fridge.
Tips And Tricks
Here are some helpful tips and tricks for making cucumber kimchi that will ensure it turns out crisp, flavorful, and balanced:
- Choose the Right Cucumbers. Persian or Kirby cucumbers are best. They’re crisp and not overly watery. Avoid English cucumbers, which are too soft.
- Salt Properly. Salting draws out moisture and enhances the crunch. Be sure to rinse well afterward.
- Don’t Skip the Sugar. A little sugar balances out the spice and speeds up fermentation.
- Chill Before Serving. Cold cucumber kimchi is extra refreshing and the flavors meld better after a short rest in the fridge.
Variations
Absolutely! Here’s a helpful list of tips and tricks for making cucumber kimchi that ensures your batch turns out crisp, flavorful, and balanced every time:
- Add Radish. Thin strips of Korean radish or daikon add crunch and ferment well.
- Make It Vegan. This version is already fish sauce-free, but you can enhance the umami with a dash of soy sauce or miso paste.
- More Heat. Add a splash of gochujang for an even deeper spice profile.
- Herb Boost. Add fresh chives or perilla leaves for an herbal twist.
What To Eat With Cucumber Kimchi
Cucumber kimchi pairs beautifully with almost any dish, especially Korean fare:
- Bulgogi or Korean BBQ - The fresh crunch offsets the richness of grilled meats.
- Bibimbap - Adds texture and heat to rice bowls.
- Miso or Doenjang Soup - Cuts through the richness of fermented soybean stews.
- Fried Rice - Use cucumber kimchi as a topping or mix-in for extra flavor.
- Tofu Lettuce Wraps - Add inside wraps for zing and crunch.
How Long Does It Last?
Store cucumber kimchi in an airtight container in the refrigerator for up to 1 week. It’s best eaten fresh within the first 3–5 days for peak crunch, though the flavor will deepen as it ferments.
Can You Freeze It?
No, cucumber kimchi does not freeze well. Freezing will compromise the crisp texture and turn the cucumbers mushy. Stick to refrigeration for best results.
More Korean Recipes
- Korean Dak Galbi
- Yukgaejang
- Korean Cucumber Salad
- Beef Bulgogi
- Korean Beef Bowls
Cucumber Kimchi Recipe | Easy Oi Sobagi
Ingredients
- ▢ 4 Cucumbers , Persian or Kirby
- ▢ 1 tsp Kosher Salt
- ▢ 1 1/2 tbsp Korean Red Pepper Flakes
- ▢ 2 cloves Garlic , minced
- ▢ 1 tsp Ginger , grated
- ▢ 2 Green Onions , sliced
- ▢ 1/2 Carrot , julienned
- ▢ 1 tsp Granulated Sugar
- ▢ 1 tbsp Rice Vinegar
- ▢ 1 tsp Sesame Seeds
Instructions
- Prep the Cucumbers. Wash and trim the cucumbers. Slice them lengthwise into quarters, leaving one end attached so they form a cross. Sprinkle with salt, then let them sit for 30 minutes. Rinse and drain.
- Make the Kimchi Paste. In a bowl, mix gochugaru, garlic, ginger, sugar, green onions, and carrots (if using). Stir in a splash of vinegar for brightness if desired.
- Stuff the Cucumbers. Carefully stuff each salted cucumber with the spicy filling, making sure the mixture gets between all sections.
- Pack & Rest. Place the stuffed cucumbers in an airtight container. Let them sit at room temperature for 4–6 hours to ferment slightly, then refrigerate.
- Enjoy. Your cucumber kimchi is ready to enjoy once chilled, and it gets even better after a day or two in the fridge.
