
This list covers the best wing recipes in all their glory. You’ll learn how to make air fryer wings, oven-baked wings with crackly skin, and the perfect sauced wings. I’ll also show you exactly how to avoid the biggest wing problems like rubbery skin, soggy wings, and how to sauce them to perfection.

Why You’ll Love These Wonderful Wings
- Crispy methods that actually work . Air fryer and oven techniques that get crackly skin without deep frying.
- Something for every heat level . Everything from minimal spice to something that will impress even the biggest spice enthusiast.
- Party-proof, crowd-friendly picks . Easy to scale up for game day, potlucks, and big hungry groups.
- Fast weeknight wins included . You’ll love the recipes for air fryer wings that come together in under 30 minutes.
Wings are one of those foods that instantly improve the mood in a room. Game day? Wings. Random Tuesday? Wings. “I need something crunchy and comforting immediately”? Also wings. The best part? You don’t need a deep fryer or a restaurant kitchen to make crispy chicken wings at home. You just need the right method, the right timing, and a sauce situation that makes you feel mildly unstoppable.
How Do You Make Wings Crispy Without Deep Frying?
To make wings crispy without deep frying, start by patting them very dry, then cook them with plenty of airflow and high heat.
Don’t overcrowd the basket or pan, and for extra crispness (especially in the oven), toss the wings with a small amount of baking powder plus salt before cooking.
Finish by saucing after they’re crisp, and if you want the sauce to cling, pop them back in the heat for 1–2 minutes to set.
How Do You Get Sauce To Stick To Wings?
To get the sauce to stick to the wings, make sure the wings are fully cooked and crispy first, then toss them while they’re still hot so the sauce clings instead of sliding off.
Use a sauce that’s slightly thick (or simmer it for a minute or two to reduce), and if you want extra “grip,” toss wings with a tiny bit of melted butter (for buffalo-style) or a light drizzle of oil before saucing.
For the stickiest finish, return sauced wings to the air fryer or oven for 1–3 minutes. That quick blast helps the sauce caramelize and set onto the skin.
Are Flats Or Drums Better?
Neither is “better” universally. When you’re choosing which type of wing is better, it’s all about what you like.
- Flats (wingettes) - more skin-to-meat ratio, so they get crispier and hold sauce really well. Downside: a bit more fiddly to eat (bones, technique required).
- Drums (drumettes) - meatier, easier to grab and eat, and feel more substantial. Downside: slightly less crispy surface area.
If you’re feeding a crowd, get a mix. You’ll love the flats for the crispy/sauce lovers, and drums for the meat-and-easy crowd.
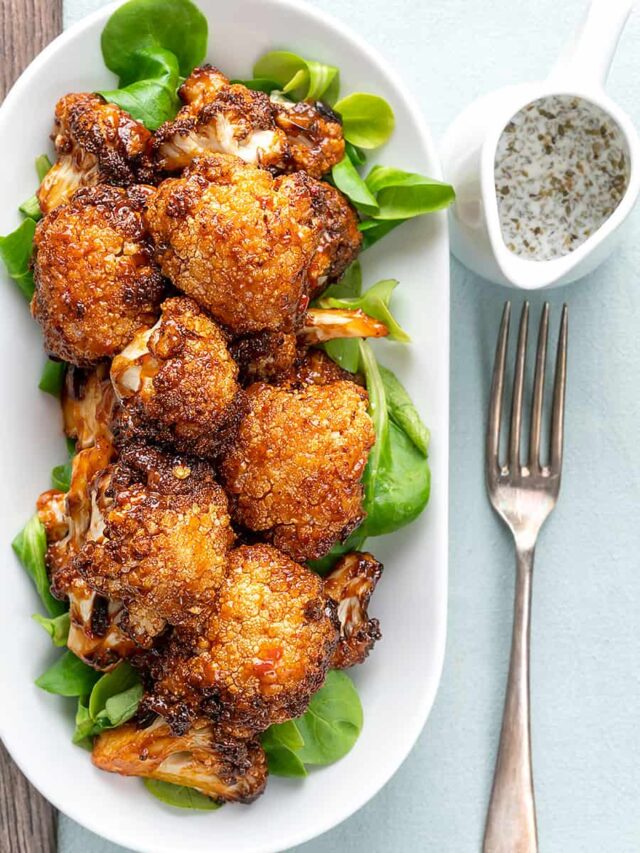
Keto Buffalo Cauliflower | Crispy & Spicy
These Keto Buffalo Cauliflower Bites are crispy, spicy air fryer cauliflower “wings” tossed in a bold buffalo sauce made with hot sauce, butter, and Worcestershire for classic game day flavor without the carbs. Ready in about 34 minutes, this easy low carb, vegan-friendly buffalo cauliflower recipe is perfect with ranch or blue cheese dressing for dipping.

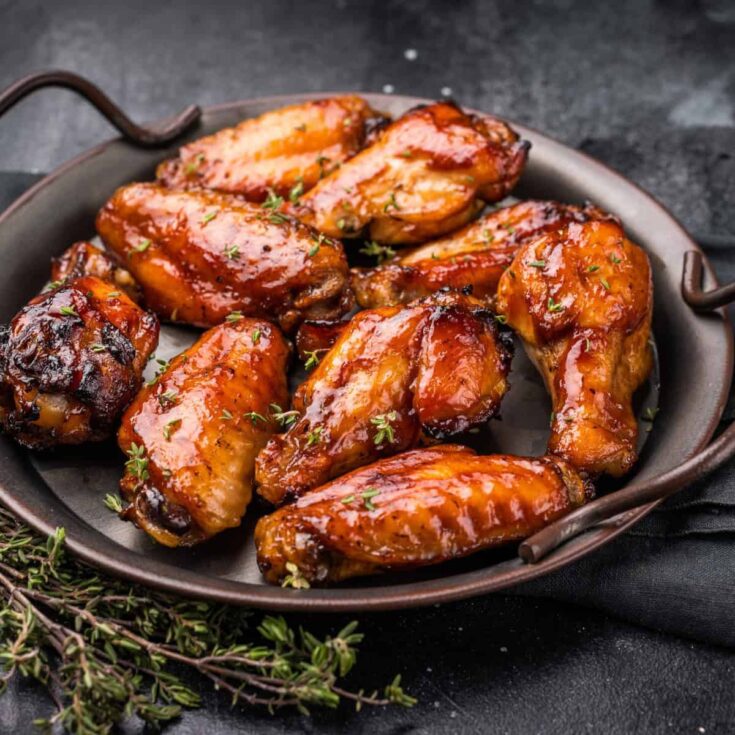
Sticky Chicken Wings | Oven Baked Chinese Chicken Wings
These Sticky Chicken Wings are crispy oven-baked wings coated in a sweet and savory honey soy glaze with brown sugar, garlic, ginger, rice vinegar, and an optional sriracha kick for irresistible takeout-style flavor at home. Bake, toss, then broil for an extra sticky caramelized finish, and top with sesame seeds and green onions for the perfect party appetizer or game day snack.

Mango Habanero Wings | Air Fryer Mango Habanero Wing Recipe
These Air Fryer Mango Habanero Wings are perfectly crispy chicken wings tossed in a homemade sweet and spicy mango habanero sauce blended with ripe mango, habanero pepper, garlic, honey, and lime juice. Ready in about 40 minutes, this easy mango habanero chicken wings recipe delivers bold, fiery flavor that’s perfect for game day, parties, and wing night at home.
Hot Honey Wings Recipe | Sweet And Spicy Chicken Wings
These Air Fryer Hot Honey Wings are crispy, golden chicken wings tossed in a sticky sweet-and-spicy hot honey glaze made with honey and hot sauce for the ultimate crowd-pleasing flavor. Ready in under 30 minutes, this easy hot honey wings recipe is perfect for game day, parties, or a quick weeknight dinner with your favorite dipping sauce.

Lemon Pepper Wings | Air Fryer Lemon Pepper Chicken Wings
These Air Fryer Lemon Pepper Wings are crispy, zesty chicken wings tossed with olive oil, fresh lemon juice and zest, and a bold homemade lemon pepper seasoning blend for bright citrus flavor in every bite. Ready in under 30 minutes, this easy lemon pepper wings recipe is a quick, low carb, gluten-free appetizer that’s perfect for game day, parties, or weeknight cravings.

Garlic Parmesan Wings | Air Fryer Parmesan Garlic Wings
These Air Fryer Garlic Parmesan Wings are ultra crispy chicken wings cooked at 400°F, then tossed in a rich garlic butter Parmesan coating for classic wing flavor without deep frying. Ready in about 25 minutes, this easy low carb wing recipe is perfect for game day, parties, or a quick weeknight dinner.

Baked Chicken Wings | Crispy Chicken Wings Recipe
These Baked Chicken Wings are the crispiest oven-baked wings with no deep frying, using a simple baking powder seasoning blend to create golden, crunchy skin and juicy meat every time. Bake at high heat (around 425°F) for easy game day wings that pair perfectly with your favorite sauces and dips.

Korean Chicken Wings | Air Fryer Gochujang Wing Recipe
These Keto Air Fryer Korean Chicken Wings are tangy, sweet, and spicy gochujang wings with a glossy glaze made from gochujang, mayo, sesame oil, ginger, and garlic for bold Korean flavor in every bite. Ready in about 30 minutes, this easy low carb air fryer wings recipe is perfect for game day, parties, or a quick dinner with sesame seeds and scallions on top.

Breaded Wings | Air Fried Chicken Wings
These Air Fried Breaded Chicken Wings deliver extra-crispy, fried-style crunch without deep frying, using a simple seasoned flour coating with smoked paprika and garlic for big flavor. Air fry at 400°F for about 20 minutes, flipping halfway, then serve them plain or toss in your favorite wing sauce for an easy game day appetizer.
The best wing recipes are all about two things: crispy wings first, and a flavor strategy that makes you want “just one more.” Start with crispy air fryer wings if you’re new to wing-making, or go oven-baked if you’re feeding a crowd. Then pick one classic, one savory, and one sticky, and you’ve got a lineup that makes you look like the wing genius you’ve always wanted to be.

If you already signed up, you should have received an email with a password to give you unlimited access to our FREE Printable Library. The password is case sensitive. Enter it below and get printing!
Password:

If you’re looking for a reliable, no-fail broccoli quiche recipe that’s creamy, flavorful, and endlessly versatile, you’re in the right place. This easy broccoli quiche is perfect for brunch, breakfast-for-dinner, meal prep, or even a light lunch with a salad. It’s the kind of recipe you make once, and then keep coming back to because it just works.

Why You’ll Love This Easy Quiche
- Easy to make. Simple prep, basic ingredients, and no special equipment required.
- Perfect texture. Creamy custard filling with tender broccoli in every bite.
- Versatile. Serve it hot, warm, or cold, and it reheats beautifully.
- Great for meal prep. Make it once and enjoy it all week.
- Customizable. Add cheese, meat, or swap vegetables to suit your taste.
This is the kind of recipe that works whether you’re cooking for company or just trying to get dinner on the table without stress.
What Is A Quiche?
Broccoli quiche is a classic savory egg custard baked in a pie crust, traditionally made with eggs, cream or milk, cheese, and broccoli florets. Originating from French cuisine, quiche has become a staple in American kitchens because it’s forgiving, adaptable, and incredibly satisfying.
Unlike scrambled eggs or omelets, quiche has a silky, sliceable texture that feels special without being complicated.
What Does Broccoli Quiche Taste Like?
Broccoli quiche tastes like a rich, savory egg-and-cream custard baked in a buttery crust, with mild, slightly sweet “green” broccoli flavor throughout.
The texture is soft and silky in the center, almost like a creamy frittata, while the broccoli adds tender little bites, and the crust gives it a flaky or crumbly contrast.
With the addition of cheese, the overall taste becomes more melty, salty, and comforting. The cheese keeps the broccoli from tasting too strong or “vegetable-heavy.”
Is It Healthy?
Broccoli quiche can absolutely be part of a balanced diet. It’s packed with protein from eggs, fiber and nutrients from broccoli, and healthy fats from dairy.
For a lighter version, use milk instead of cream, reduce cheese slightly, or make it crustless.
Ingredients You’ll Need
- Broccoli Florets - The star of the dish, broccoli adds texture, color, and nutrition. Lightly cooking it first ensures the florets are tender without becoming mushy or releasing excess moisture into the quiche.
- Eggs - The foundation of the custard, eggs provide structure and richness, allowing the quiche to set properly while still staying creamy and sliceable.
- Milk or Half & Half - This adds moisture and creates the smooth, custard-like texture that defines a good quiche. Half & half makes the filling richer, while milk keeps it lighter.
- Cheese - Adds flavor, creaminess, and body to the quiche. Cheddar brings sharpness, Swiss and Gruyère add nutty depth, and mozzarella offers mild flavor with excellent meltability.
- Onion or Shallot - Contributes subtle sweetness and savory depth, enhancing the overall flavor without overpowering the broccoli.
- Sun Dried Tomatoes - Adds a pop of color and natural sweetness to the quiche.
- Salt & Black Pepper - Essential for properly seasoning the egg custard and balancing the richness of the dairy and cheese.
- Nutmeg (optional) - A classic quiche seasoning that adds gentle warmth and enhances the savory flavors without tasting overtly spiced.
- Prepared Pie Crust - Holds the custard filling together and provides a buttery, flaky contrast to the creamy interior. Store-bought crust keeps the recipe quick and approachable, while homemade or crustless options allow for customization based on preference or dietary needs.
How To Make Broccoli Quiche
- Prepare the Broccoli. Preheat your oven to 375°F. Lightly steam or blanch the broccoli florets just until tender-crisp, then drain well. Excess moisture is the enemy of a good quiche, so let the broccoli cool and dry slightly.
- Prep the Crust. Place the pie crust into a 9-inch pie dish or tart pan. Crimp the edges if desired. For best results, lightly pre-bake (blind bake) the crust for 8–10 minutes. This helps prevent a soggy bottom.
- Make the Egg Custard. In a large bowl, whisk together the eggs, milk or half & half, salt, pepper, and nutmeg if using. Whisk until fully combined, but don’t overbeat. You don’t want too much air.
- Assemble the Quiche. Sprinkle the broccoli and sun-dried tomatoes evenly over the crust. Add onions and cheese, distributing them evenly. Slowly pour the egg mixture over the fillings.
- Bake. Bake uncovered for 35–45 minutes, or until the center is just set and no longer jiggly. A knife inserted near the center should come out mostly clean.
- Rest and Serve. Let the quiche rest for at least 10–15 minutes before slicing. This allows the custard to set fully and makes cleaner slices.

Tips And Tricks
Making quiche is straightforward, but these tips make the difference between good and great:
- Drain the broccoli well. Any extra moisture can make the quiche watery.
- Don’t overbake. The quiche will continue to set as it cools.
- Use full-fat dairy if possible. It creates a creamier texture.
- Season generously. Eggs need more salt than you think.
- Let it rest before slicing. This improves texture and presentation.
Variations
Broccoli quiche is wonderfully versatile, making it easy to customize based on what you have on hand or the flavors you’re craving. Here are several delicious variations to try:
- Broccoli Cheddar Quiche - Use sharp cheddar cheese for a bold, classic flavor that pairs perfectly with tender broccoli.
- Broccoli and Bacon Quiche - Add cooked, crumbled bacon for a smoky, savory twist that makes the quiche extra satisfying.
- Broccoli Ham and Swiss Quiche - Fold in diced ham and Swiss cheese for a hearty, deli-inspired version that’s great for brunch.
- Broccoli Mushroom Quiche - Sautéed mushrooms add earthy depth and pair beautifully with the creamy egg custard.
What To Eat With Broccoli Quiche
Broccoli quiche pairs beautifully with fresh, light sides that balance its rich, creamy texture, making it perfect for breakfast, brunch, or even dinner. Here are some delicious ideas for what to serve with it:
- Salad - Mixed greens with a light vinaigrette help cut through the richness of the quiche.
- Fresh Fruit Salad - A mix of berries, melon, or citrus adds brightness and a touch of sweetness.
- Roasted Potatoes - Crispy breakfast potatoes or roasted baby potatoes make it more filling.
- Tomato Salad - Sliced tomatoes with olive oil, salt, and basil keep things fresh and simple.
How Long Does It Last?
Stored in an airtight container in the refrigerator, broccoli quiche will last 3–4 days. It reheats well in the oven or air fryer, and it’s also delicious eaten cold.
Can You Freeze It?
Yes, broccoli quiche freezes very well. Let it cool completely, then wrap tightly or store in a freezer-safe container.
Freeze your leftovers for up to 2 months. Thaw the quiche overnight in the fridge and reheat gently in the oven.
More Excellent Egg Recipes
- Egg Loaf
- Chorizo And Eggs
- Egg Muffins
- Keto Scotch Eggs
- Eggs Benedict


Broccoli Quiche Recipe | Easy Quiche With Broccoli And Cheese
Ingredients
- ▢ 1 Refrigerated Pie Crust
- ▢ 2 cups Broccoli Florets
- ▢ 1/2 cup Onion , diced
- ▢ 1/3 cup Sun Dried Tomatoes
- ▢ 1 1/2 cups Cheddar Cheese
- ▢ 4 Eggs
- ▢ 1 cup Half And Half
- ▢ 3/4 tsp Kosher Salt
- ▢ 1/2 tsp Ground Black Pepper
- ▢ 1/4 tsp Nutmeg
Instructions
- Prepare the Broccoli. Preheat your oven to 375°F. Lightly steam or blanch the broccoli florets just until tender-crisp, then drain well. Excess moisture is the enemy of a good quiche, so let the broccoli cool and dry slightly.
- Prep the Crust. Place the pie crust into a 9-inch pie dish or tart pan. Crimp the edges if desired. For best results, lightly pre-bake (blind bake) the crust for 8–10 minutes. This helps prevent a soggy bottom.
- Make the Egg Custard. In a large bowl, whisk together the eggs, milk or half & half, salt, pepper, and nutmeg if using. Whisk until fully combined, but don’t overbeat. You don’t want too much air.
- Assemble the Quiche. Sprinkle the broccoli and sun-dried tomatoes evenly over the crust. Add onions and cheese, distributing them evenly. Slowly pour the egg mixture over the fillings.
- Bake. Bake uncovered for 35–45 minutes, or until the center is just set and no longer jiggly. A knife inserted near the center should come out mostly clean.
- Rest and Serve. Let the quiche rest for at least 10–15 minutes before slicing. This allows the custard to set fully and makes cleaner slices.
