
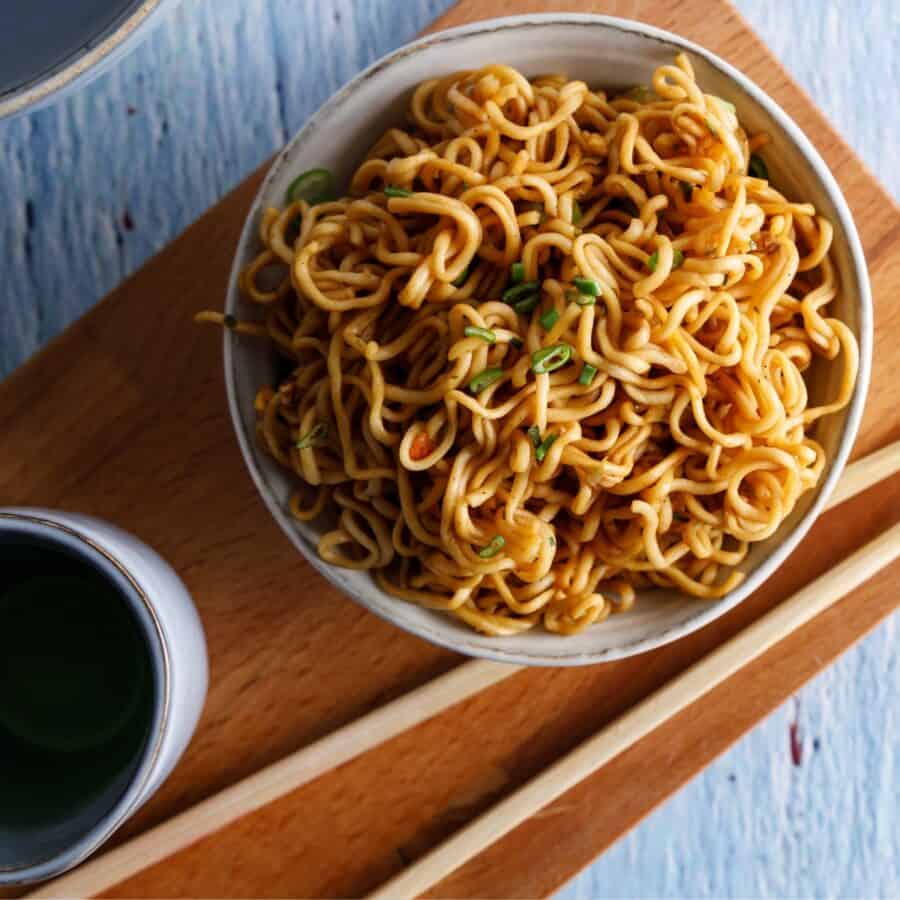
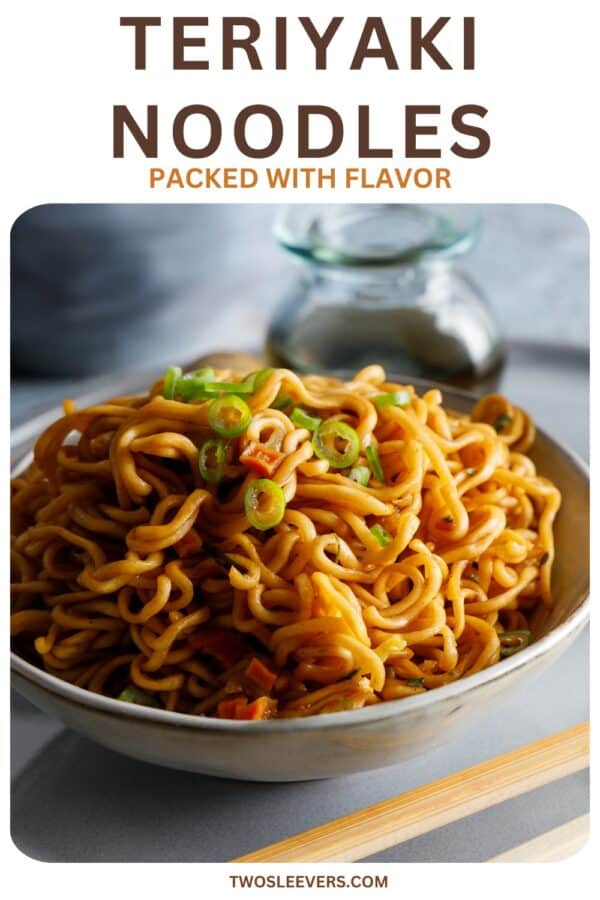
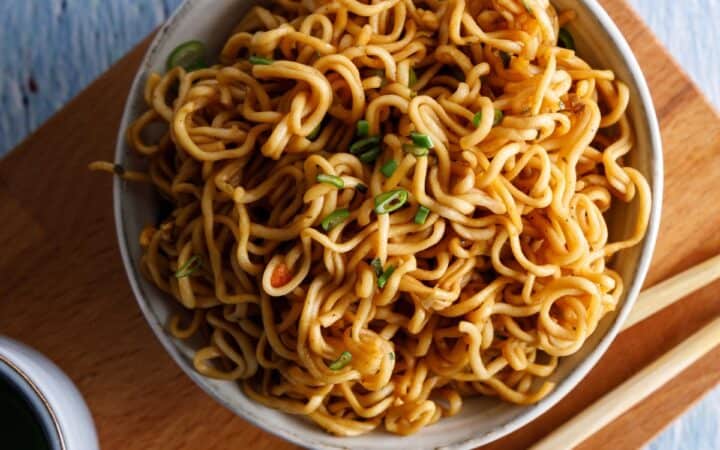
If you love sweet, savory, and umami-packed flavors, then these Teriyaki Noodles are for you! This easy dish features chewy noodles tossed in a homemade teriyaki sauce, creating a perfect balance of sweet and savory goodness. Ready in under 30 minutes, it’s great for weeknight dinners, meal prep, or a quick Asian-inspired meal. Serve it with grilled chicken, shrimp, tofu, or stir-fried veggies for a complete and satisfying dish!

Why You’ll Love This Perfect Pasta Dish
- Quick and Easy . Ready in under 30 minutes, making it a perfect weeknight meal.
- Customizable . Works with any protein or veggies you have on hand.
- Better Than Takeout . Enjoy a fresh, homemade meal with simple pantry ingredients.
- Meal-Prep Friendly . Makes great leftovers for lunch or dinner.
This Teriyaki Noodles recipe is a perfect balance of sweet and savory, easy to make, and incredibly versatile. Whether you’re craving a quick meal, meal-prepping for the week, or looking for a new takeout-inspired dish, this recipe is guaranteed to satisfy!
What Do Teriyaki Noodles Taste Like?
Teriyaki Noodles are a popular Japanese-inspired dish featuring tender noodles tossed in a homemade teriyaki sauce made from soy sauce, brown sugar, garlic, and ginger. The sauce coats the noodles perfectly, creating a deliciously rich and glossy dish.
You can enjoy them on their own or pair them with grilled chicken, shrimp, tofu, or stir-fried veggies for a complete meal.
Ingredients You’ll Need
- Noodles - The base of the dish, providing the perfect texture to soak up the flavorful sauce. Lo mein, udon, ramen, or even spaghetti work well, offering a chewy and hearty bite.
- Sesame Oil - Adds a rich, nutty flavor while preventing the noodles from sticking together. It also enhances the authentic Asian-inspired taste .
- Soy Sauce - The salty, umami-rich base of the sauce, bringing deep, savory flavor that balances the sweetness of the other ingredients.
- Brown Sugar - Adds a subtle caramel-like sweetness to balance the saltiness and enhances the glossy texture of the sauce.
- Honey - Provides a natural sweetness and helps create a thick, glaze-like consistency that coats the noodles beautifully.
- Garlic - Gives the dish a bold, aromatic flavor, adding depth and enhancing the overall savory profile.
- Ginger - Brings a warm, slightly spicy, and zesty kick, which is essential in teriyaki sauce for an authentic taste.
- Rice Vinegar - Adds a mild acidity and tang, balancing the sweetness and richness of the sauce. It enhances the depth of flavor without overpowering the dish.
- Cornstarch + 2 Tablespoons Water - A thickening agent that creates a smooth, velvety sauce that clings perfectly to the noodles.
- Sesame Seeds - Adds a light crunch and nutty flavor, enhancing the overall texture and presentation of the dish.
- Green Onions - Brings a fresh, mild onion flavor and a pop of color to the dish, adding contrast to the sweet and savory noodles.
The noodles provide a chewy, satisfying base, while the teriyaki sauce balances sweet, savory, and tangy flavors with a silky, glossy texture. The sesame seeds and green onions add the finishing touch, creating a delicious and visually appealing dish that’s packed with umami goodness!
How To Make Teriyaki Noodles
- Cook the Noodles . Bring a pot of salted water to a boil. Cook the noodles according to the package instructions until al dente. Drain and toss with 1 tablespoon sesame oil to prevent sticking.
- Make the Teriyaki Sauce . In a small bowl, whisk together soy sauce, brown sugar, honey, garlic, ginger, and rice vinegar. In a separate bowl, mix cornstarch and water until smooth, then stir it into the sauce. Heat the sauce in a pan over medium heat, stirring until it thickens (about 2 minutes).
- Toss the Noodles in the Sauce . Add the cooked noodles to the pan with the teriyaki sauce. Toss until the noodles are evenly coated and glossy.
- Garnish and Serve . Sprinkle with sesame seeds and sliced green onions. Serve immediately and enjoy!
Tips And Tricks
Want to make restaurant-quality Teriyaki Noodles at home? Follow these expert tips to ensure your dish is flavorful, perfectly textured, and absolutely delicious:
- Use the Right Noodles . Lo mein, udon, ramen, or even spaghetti work well.
- Don’t Overcook the Noodles . Keep them al dente so they don’t get mushy.
- Balance the Sauce . Adjust the sweetness or saltiness by adding more soy sauce or brown sugar.
- Thicken the Sauce Properly . Always mix cornstarch with water before adding it to avoid lumps.
- Add Protein for a Full Meal . Try chicken, shrimp, tofu, or beef for extra protein.
Variations
Looking to customize your Teriyaki Noodles? Whether you want extra protein, more vegetables, a spicy kick, or a different sauce base, these variations will help you create a fresh take on this classic dish:
- Spicy - Add ½ teaspoon red pepper flakes or sriracha for heat.
- Vegetable - Toss in broccoli, bell peppers, carrots, or snap peas.
- Chicken - Add grilled or stir-fried chicken for extra protein.
- Shrimp - Cook shrimp separately and toss with the noodles at the end.
- Vegan - Swap honey for maple syrup and use tofu or mushrooms.
What To Eat With Teriyaki Noodles
Whether you’re looking for a balanced meal, extra protein, or a variety of textures, here are some perfect side dishes and pairings to serve with teriyaki noodles!
- Dumplings - Try steamed or pan-fried dumplings as a side dish.
- Stir-Fried Vegetables - A mix of bok choy, mushrooms, and bell peppers pairs perfectly.
- Edamame - A light, protein-packed snack to complement the noodles.
- Miso Soup - A warm, comforting side to complete the meal.
- Iced Green Tea or Sake - A refreshing drink option to enhance the flavors.
How Long Do They Last?
Teriyaki Noodles can be stored in the refrigerator for up to 4 days when kept in an airtight container. To maintain the best texture and flavor, let the noodles cool completely before storing them to prevent excess moisture buildup.
When reheating, warm them in a pan over medium heat with a splash of water or soy sauce to revive the sauce and prevent the noodles from drying out.
Can You Freeze Them?
While teriyaki noodles are best enjoyed fresh, they hold up well for meal prep. However, freezing is not recommended, as the noodles can become mushy and the sauce may separate when thawed.
For the best experience, enjoy them within the first couple of days for a flavorful and satisfying meal!
More Simple Meal Ideas
- Hawaiian Roll Sliders
- Air Fryer Halibut
- Chicken And Peppers
- Crockpot Swedish Meatballs
- Rotisserie Chicken And Noodles
Teriyaki Noodles | Tasty Teriayki Noodle Recipe
Ingredients
- ▢ 8 ounces Pasta , udon, spagheti, or ramen
- ▢ 1 tbsp Sesame Oil
- ▢ 1/4 cup Soy Sauce
- ▢ 2 tbsp Brown Sugar
- ▢ 2 tbsp Honey
- ▢ 2 cloves Garlic , minced
- ▢ 1 tsp Ginger , grated
- ▢ 1 tbsp Rice Vinegar
- ▢ 1 tsp Cornstarch
- ▢ 2 tbsp Water
- ▢ 1 tbsp Sesame Seeds
- ▢ 2 Green Onions , sliced
Instructions
- Cook the Noodles . Bring a pot of salted water to a boil. Cook the noodles according to the package instructions until al dente. Drain and toss with 1 tablespoon sesame oil to prevent sticking.
- Make the Teriyaki Sauce . In a small bowl, whisk together soy sauce, brown sugar, honey, garlic, ginger, and rice vinegar. In a separate bowl, mix cornstarch and water until smooth, then stir it into the sauce. Heat the sauce in a pan over medium heat, stirring until it thickens (about 2 minutes).
- Toss the Noodles in the Sauce . Add the cooked noodles to the pan with the teriyaki sauce. Toss until the noodles are evenly coated and glossy.
- Garnish and Serve . Sprinkle with sesame seeds and sliced green onions. Serve immediately and enjoy!
Get support & connect with our community on Facebook!
Nutrition

If you already signed up, you should have received an email with a password to give you unlimited access to our FREE Printable Library. The password is case sensitive. Enter it below and get printing!
Password:

Teriyaki Noodles | Tasty Teriayki Noodle Recipe
Ingredients
- 8 ounces Pasta udon, spagheti, or ramen
- 1 tbsp Sesame Oil
- 1/4 cup Soy Sauce
- 2 tbsp Brown Sugar
- 2 tbsp Honey
- 2 cloves Garlic minced
- 1 tsp Ginger grated
- 1 tbsp Rice Vinegar
- 1 tsp Cornstarch
- 2 tbsp Water
- 1 tbsp Sesame Seeds
- 2 Green Onions sliced
Instructions
- Cook the Noodles . Bring a pot of salted water to a boil. Cook the noodles according to the package instructions until al dente. Drain and toss with 1 tablespoon sesame oil to prevent sticking.
- Make the Teriyaki Sauce . In a small bowl, whisk together soy sauce, brown sugar, honey, garlic, ginger, and rice vinegar. In a separate bowl, mix cornstarch and water until smooth, then stir it into the sauce. Heat the sauce in a pan over medium heat, stirring until it thickens (about 2 minutes).
- Toss the Noodles in the Sauce . Add the cooked noodles to the pan with the teriyaki sauce. Toss until the noodles are evenly coated and glossy.
- Garnish and Serve . Sprinkle with sesame seeds and sliced green onions. Serve immediately and enjoy!
Teriyaki Noodles | Tasty Teriayki Noodle Recipe https://twosleevers.com/teriyaki-noodles/

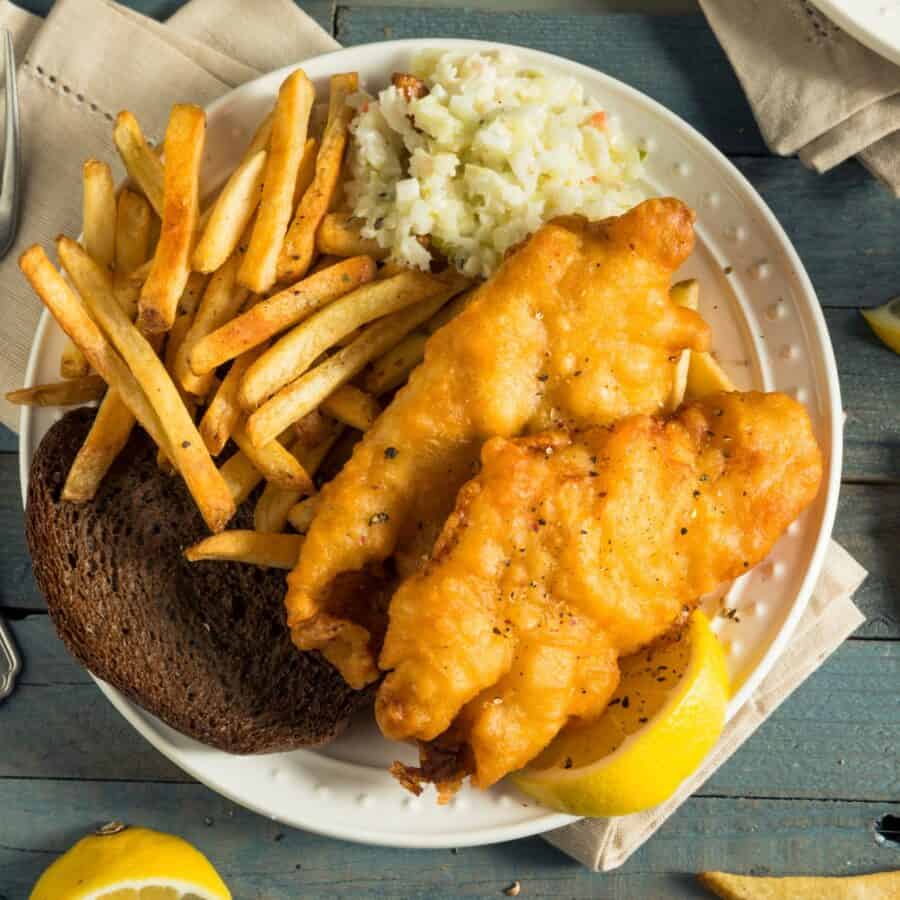
If you’re a fan of crispy, golden-brown fish with a light, airy coating, you’re going to love this Beer Battered Fish recipe! Whether you’re preparing a classic fish and chips dinner or looking for a crowd-pleasing appetizer, this recipe delivers irresistibly crispy fish with a deliciously seasoned batter.

Why You’ll Love This Fantastic Fish Recipe
- Crispy Perfection . The beer batter creates an ultra-crispy, golden crust.
- Easy to Make. Simple ingredients and straightforward steps.
- Flavor-Packed . The beer and spices bring a subtle depth of flavor.
- Versatile . Pairs perfectly with fries, coleslaw, or a fresh salad.
With just a few key ingredients and easy steps, you’ll achieve restaurant-quality fish that your family and friends will rave about.
What Does Beer Battered Fish Taste Like?
Beer battered fish is known for its crispy exterior and tender, flaky interior. The carbonation in the beer makes the batter light and airy, while the combination of flour and seasonings ensures every bite is full of flavor.
Whether you’re a seafood lover or just looking for a delicious meal, this dish is a winner.
Why Use Beer In Fish Batter?
Using beer in fish batter is a popular technique that enhances both the flavor and texture of the dish. Here’s why beer is a key ingredient in achieving the perfect crispy and airy coating:
- Light and Crispy Texture . The carbonation in beer creates tiny bubbles in the batter, which results in a light, airy, and crispy crust when fried. This helps prevent the batter from becoming too dense or heavy.
- Leavening Effect . The bubbles from the beer work alongside baking powder to expand the batter, giving it a delicate, puffy texture that adheres beautifully to the fish.
- Flavor Enhancement . Beer imparts a subtle depth of flavor to the batter, adding malty and slightly yeasty notes that complement the mild taste of the fish. Different types of beer (lagers, ales, or stouts) can offer unique flavor profiles.
Overall, beer is the secret to achieving that irresistibly crispy, golden, and flavorful fish batter that’s a favorite in classic pub-style dishes.
Ingredients You’ll Need
- White Fish Fillets – Cod, haddock, or tilapia are ideal choices due to their mild flavor and flaky texture, which hold up well to the crispy batter without overpowering the taste.
- All-Purpose Flour – Serves as the foundation of the batter, creating a smooth coating that crisps up beautifully when fried.
- Cornstarch – Enhances the batter’s crunch by adding a light, crispy texture to the coating.
- Baking Powder – Acts as a leavening agent, helping to create a light and airy batter that puffs up during frying.
- Beer – The star ingredient that provides carbonation for a light, airy texture. A light lager is commonly used to impart subtle flavor while ensuring a crispy finish.
- Garlic Powder – Adds a touch of savory depth to the batter, enhancing the overall flavor of the fish.
- Paprika – Introduces a smoky, slightly sweet undertone while also contributing a rich color to the coating.
- Salt & Pepper – Essential for seasoning, they enhance the natural flavors of both the batter and the fish.
- Vegetable Oil – Used for deep-frying, it ensures the fish achieves a golden-brown, crispy exterior while locking in moisture.
- Lemon Wedges – Served as a garnish, they add a bright, zesty contrast that cuts through the richness of the fried fish, balancing the flavors perfectly.
How To Make Beer Battered Fish
- Prepare the Batter . In a large bowl, whisk together flour, cornstarch, baking powder, garlic powder, paprika, salt, and pepper. Slowly pour in the beer, whisking continuously until you achieve a smooth, lump-free batter. Let it rest for 10 minutes to allow flavors to meld.
- Coat the Fish . Pat the fish fillets dry with a paper towel to remove excess moisture. Lightly coat the fish with a dusting of flour before dipping them into the batter to help it adhere better.
- Fry to Crispy Perfection . Heat vegetable oil in a deep skillet or fryer to 375°F. Carefully place battered fish into the hot oil, frying in batches to avoid overcrowding. Fry for 3-4 minutes per side or until the fish is golden brown and crispy. Transfer to a wire rack or paper towels to drain excess oil.
- Garnish and Serve . Serve immediately with lemon wedges and your favorite dipping sauces.
Tips And Tricks
Whether you’re a seasoned cook or trying this dish for the first time, these suggestions will help you get that light, crunchy texture and delicious flavor every time:
- Choose the Right Beer . A light lager works best for a crispy and airy batter without overpowering the fish’s flavor.
- Keep Everything Cold . Cold batter results in a crispier coating, so refrigerate it if necessary before dipping.
- Don’t Overcrowd the Pan . Fry in batches to maintain the oil temperature and achieve an even fry.
- Use a Thermometer . Ensure the oil stays at 375°F to prevent the batter from absorbing too much oil.
- Serve Immediately . Beer battered fish is best enjoyed fresh and hot for the crispiest texture.
Variations
There are several delicious variations you can try when making beer battered fish to suit different tastes and dietary preferences. Here are some creative ideas to elevate it:
- Spicy - Add cayenne pepper or hot sauce to the batter for a kick of heat.
- Herb-Infused - Mix in finely chopped parsley or dill for added freshness.
- Gluten-Free - Use gluten-free flour and a gluten-free beer for a dietary-friendly option.
- Shrimp - Swap the fish for shrimp to enjoy a crispy seafood twist.
- Lemon Pepper - Add lemon zest and black pepper to the batter for a zesty flavor boost.
What To Eat With Beer Battered Fish
Beer battered fish is a crispy, golden delight that pairs wonderfully with a variety of sides and accompaniments to create a satisfying meal. Here are some delicious options to serve with it:
- Classic French Fries - The perfect pairing for a traditional fish and chips experience.
- Coleslaw - A creamy, crunchy side that complements the crispy fish beautifully.
- Tartar Sauce - A tangy, creamy sauce that enhances the flavors of the fish.
- Salad - A fresh, crisp salad for a lighter pairing.
- Pickles - A tangy bite that cuts through the richness of the fried fish.
- Steamed Vegetables - For a healthier option with a burst of color and flavor.
How Long Does It Last?
Beer battered fish is best enjoyed fresh, but if you have leftovers, they can be stored properly. Store in an airtight container for up to 2 days.
Reheat the fish in an oven or in the air fryer to crisp it up when you’re ready to dig in.
Can You Freeze It?
Yes, you can freeze beer battered fish! Once fried and cooled, store in a single layer on a baking sheet before transferring to a freezer bag for up to 2 months.
When you’re ready to enjoy your leftover fish, bake directly from frozen for the best results.
More Flavorful Fish Dishes
- Fish Nuggets
- Ginger Scallion Fish
- Air Fryer Halibut
- Fish Cakes
- Fish Curry
- Tuna Wrap


Beer Battered Fish Recipe | Crispy Fried Fish
Ingredients
- ▢ 4 White Fish Fillets
- ▢ 1 cup All Purpose Flour
- ▢ 2 tbsp Cornstarch
- ▢ 1 tsp Baking Powder
- ▢ 3/4 cup Beer
- ▢ 1/2 tsp Garlic Powder
- ▢ 1/2 tsp Paprika
- ▢ 1/2 tsp Kosher Salt
- ▢ 1/4 tsp Ground Black Pepper
- ▢ Vegetable Oil , for frying
- ▢ Lemon Wedges , for serving
Instructions
- Prepare the Batter . In a large bowl, whisk together flour, cornstarch, baking powder, garlic powder, paprika, salt, and pepper. Slowly pour in the beer, whisking continuously until you achieve a smooth, lump-free batter. Let it rest for 10 minutes to allow flavors to meld.
- Coat the Fish . Pat the fish fillets dry with a paper towel to remove excess moisture. Lightly coat the fish with a dusting of flour before dipping them into the batter to help it adhere better.
- Fry to Crispy Perfection . Heat vegetable oil in a deep skillet or fryer to 375°F. Carefully place battered fish into the hot oil, frying in batches to avoid overcrowding. Fry for 3-4 minutes per side or until the fish is golden brown and crispy. Transfer to a wire rack or paper towels to drain excess oil.
- Garnish and Serve . Serve immediately with lemon wedges and your favorite dipping sauces.
