
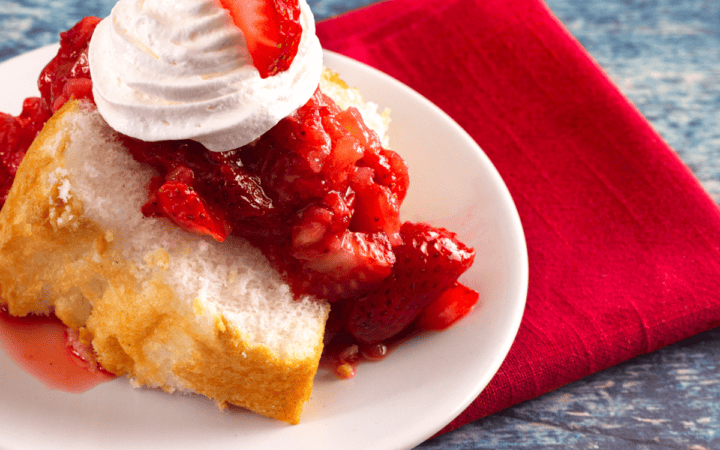
If you’re craving a light and airy dessert that’s bursting with fruity flavor, look no further than this delightful Strawberry Angel Food Cake recipe! Discover how to create this heavenly treat that will impress your family and friends at any gathering.

Why You’ll Love This Fruit Flavored Cake
- Light and Fluffy . Angel food cake is renowned for its delicate texture, which is achieved through the use of whipped egg whites. Each bite melts in your mouth like a sweet cloud.
- Fresh and Fruity . The addition of fresh strawberries not only adds a vibrant pop of color but also infuses the cake with juicy sweetness, making it perfect for spring and summer celebrations.
- Simple Ingredients . With just a handful of basic ingredients, including eggs, sugar, flour, and strawberries, you can whip up this impressive dessert in no time.
- Versatile Dessert . Whether you’re serving it as a refreshing finale to a dinner party or enjoying a slice with your morning coffee, this strawberry angel food cake is sure to delight.
What Does Strawberry Angel Food Cake Taste Like?
Strawberry Angel Food Cake offers a delightful combination of lightness, sweetness, fruity freshness, and subtle vanilla undertones.
It’s a perfect dessert for those who enjoy desserts that are not overly rich or heavy, making it ideal for warmer weather or as a refreshing treat after a hearty meal.
Why Is My Angel Food Dense?
If your angel food cake turns out dense instead of light and airy, a few factors may be at play:
- Overmixing Be careful not to overmix the batter, especially when folding in the flour. Overmixing can deflate the whipped egg whites, resulting in a denser texture.
- Underbeating the Egg Whites Ensure that the egg whites are beaten until stiff peaks form. Properly whipped egg whites provide the structure and lift needed for a fluffy angel food cake.
- Incorrect Pan Preparation Angel food cake relies on the sides of the pan for support as it rises. Make sure your tube pan is clean, ungreased, and free from any residue that could prevent the cake from climbing.
Ingredients You’ll Need
For the Cake
- Egg Whites - The key ingredient in angel food cake, egg whites are whipped until stiff peaks form, creating a light and airy texture.
- Granulated Sugar - Sweetens the cake and stabilizes the whipped egg whites.
- Cake Flour - Provides the structure for the cake without weighing it down.
- Cream of Tartar - Helps stabilize the whipped egg whites and prevent them from deflating.
- Vanilla Extract - Adds flavor to the cake.
For the Strawberry Topping
- Fresh Strawberries - Sliced or diced strawberries are mixed with a touch of sugar to release their juices and create a delicious topping for the cake.
Optional Garnish:
- Whipped Cream - Adds a creamy finishing touch to each slice of cake.
- Fresh Mint Leaves - Garnish the cake with fresh mint leaves for a pop of color and a hint of herbal flavor.
How To Make Strawberry Angel Food Cake
- Prepare the Pan . Preheat your oven and prepare a tube pan by ensuring it is clean and ungreased.
- Whip the Egg Whites . In a large bowl, beat the egg whites until foamy, then add the cream of tartar and continue beating until stiff peaks form.
- Gradually Add Sugar . Slowly add the sugar while continuing to beat the egg whites until they are glossy and hold stiff peaks.
- Fold in Flour . Gently fold in the sifted cake flour and vanilla extract until just combined, being careful not to deflate the egg whites.
- Bake . Transfer the batter to the prepared tube pan and bake until the cake is golden brown and springs back when lightly pressed.
- Cool . Invert the pan and let the cake cool completely before removing it.
- Prepare the Strawberry Topping . Toss the sliced strawberries with sugar and let them macerate while the cake cools.
- Serve . Slice the angel food cake and top each serving with the macerated strawberries and a dollop of whipped cream, if desired.

Tips And Tricks
Here are some tips and tricks to help you make a delicious and airy strawberry angel food cake:
- Sift the Dry Ingredients . Sift the flour and powdered sugar together multiple times to ensure they are well combined and free of lumps. This helps create a lighter and fluffier cake.
- Whip Egg Whites to Stiff Peaks . Whip the egg whites until they form stiff peaks, but be careful not to overbeat them. Overbeating can result in a dry and tough cake.
- Invert the Pan After Baking . Immediately after removing the cake from the oven, invert the pan onto a cooling rack. This prevents the cake from collapsing as it cools and helps maintain its light and fluffy texture.
Variations
Here are some delicious variations for strawberry angel food cake:
- Strawberry Swirl- Create a marbled effect by gently folding strawberry puree into the cake batter before baking. Swirl it through the batter with a knife for a beautiful and flavorful effect.
- Strawberry Lemon- Add a hint of citrus to your cake by incorporating lemon zest into the batter. The bright lemon flavor complements the sweetness of the strawberries perfectly.
- Chocolate Covered Strawberry- Drizzle melted chocolate over the cooled cake and top with fresh sliced strawberries for an indulgent twist on the classic dessert combination.
What To Serve With Strawberry Angel Food Cake
When serving Strawberry Angel Food Cake, you’ll want to complement its light and fruity flavor with sides and accompaniments that enhance its taste and presentation. Here are some delicious options to consider:
- Whipped Cream - A classic choice that adds a creamy texture and a hint of sweetness to each bite of angel food cake. You can serve it dolloped on top of each slice or on the side for guests to help themselves.
- Fresh Berries - Since strawberries are already featured in the cake, consider serving a medley of fresh berries on the side. Raspberries, blueberries, and blackberries can provide a burst of color and additional fruity flavor.
- Vanilla Ice Cream - For a decadent treat, serve slices of angel food cake with a scoop of vanilla ice cream. The creamy, cold ice cream contrasts beautifully with the light and fluffy cake.
How Long Does It Last?
Store the cake in an airtight container or cover it tightly with plastic wrap to prevent it from drying out. Place it in the refrigerator for up to 5 days to maintain its freshness.
Can You Freeze It?
If you want to extend the shelf life of your Strawberry Angel Food Cake, you can freeze it. Wrap individual slices tightly in plastic wrap and then aluminum foil before placing them in an airtight container or freezer bag. Frozen angel food cake can last for several months in the freezer.
More Delicious Cake Recipes
- Banana Pudding Cake
- Marble Cake
- Gluten Free Chocolate Cake
- Cream Cheese Pound Cake
- Peanut Butter Cake

Strawberry Angel Food Cake Recipe
Ingredients
For The Cake
- ▢ 1 cup Cake Flour
- ▢ 1 1/2 cups Granulated Sugar
- ▢ 12 Egg Whites , at room temperature
- ▢ 1 1/2 tsp Cream Of Tartar
- ▢ 1/4 tsp Kosher Salt
- ▢ 1 1/2 tsp Vanilla Extract
Topping
- ▢ 1 pound Strawberries , hulled and sliced
- ▢ 8 ounces Whipped Cream
- ▢ Mint Leaves , for garnish
Instructions
- Prepare the Pan . Preheat your oven and prepare a tube pan by ensuring it is clean and ungreased.
- Whip the Egg Whites . In a large bowl, beat the egg whites until foamy, then add the cream of tartar and continue beating until stiff peaks form.
- Gradually Add Sugar . Slowly add the sugar while continuing to beat the egg whites until they are glossy and hold stiff peaks.
- Fold in Flour . Gently fold in the sifted cake flour and vanilla extract until just combined, being careful not to deflate the egg whites.
- Bake . Transfer the batter to the prepared tube pan and bake until the cake is golden brown and springs back when lightly pressed.
- Cool . Invert the pan and let the cake cool completely before removing it.
- Prepare the Strawberry Topping . Toss the sliced strawberries with sugar and let them macerate while the cake cools.
- Serve . Slice the angel food cake and top each serving with the macerated strawberries and a dollop of whipped cream, if desired.
Get support & connect with our community on Facebook!
Nutrition

If you already signed up, you should have received an email with a password to give you unlimited access to our FREE Printable Library. The password is case sensitive. Enter it below and get printing!
Password:

Strawberry Angel Food Cake Recipe
Ingredients
For The Cake
- 1 cup Cake Flour
- 1 1/2 cups Granulated Sugar
- 12 Egg Whites at room temperature
- 1 1/2 tsp Cream Of Tartar
- 1/4 tsp Kosher Salt
- 1 1/2 tsp Vanilla Extract
Topping
- 1 pound Strawberries hulled and sliced
- 8 ounces Whipped Cream
- Mint Leaves for garnish
Instructions
- Prepare the Pan . Preheat your oven and prepare a tube pan by ensuring it is clean and ungreased.
- Whip the Egg Whites . In a large bowl, beat the egg whites until foamy, then add the cream of tartar and continue beating until stiff peaks form.
- Gradually Add Sugar . Slowly add the sugar while continuing to beat the egg whites until they are glossy and hold stiff peaks.
- Fold in Flour . Gently fold in the sifted cake flour and vanilla extract until just combined, being careful not to deflate the egg whites.
- Bake . Transfer the batter to the prepared tube pan and bake until the cake is golden brown and springs back when lightly pressed.
- Cool . Invert the pan and let the cake cool completely before removing it.
- Prepare the Strawberry Topping . Toss the sliced strawberries with sugar and let them macerate while the cake cools.
- Serve . Slice the angel food cake and top each serving with the macerated strawberries and a dollop of whipped cream, if desired.
Strawberry Angel Food Cake Recipe https://twosleevers.com/strawberry-angel-food-cake/

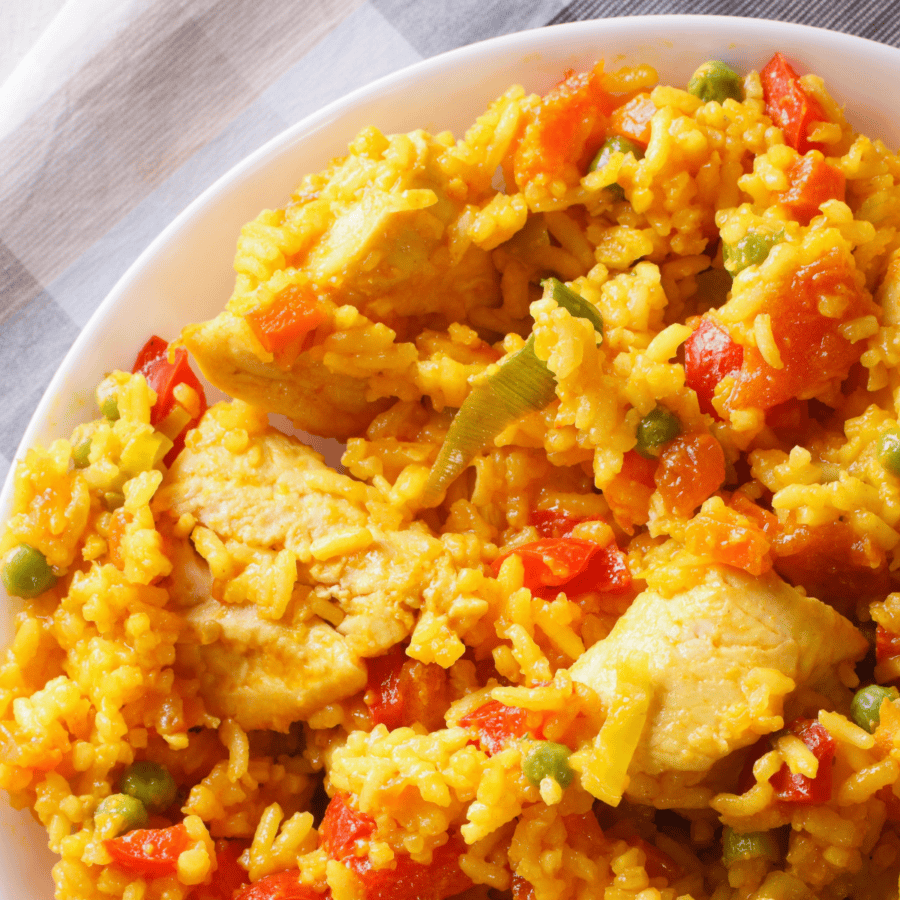
Bring the vibrant flavors of Brazil to your table with this delicious Galinhada recipe! This one-pot chicken and rice dish is infused with aromatic spices and fresh herbs, making it a comforting and flavorful meal perfect for any occasion.

Why You’ll Love This Brazilian-Inspired Dish
- Hearty Meal . A complete meal with protein, vegetables, and rice all in one pot.
- Flavorful . Infused with a blend of spices and herbs that create a rich and aromatic dish.
- Comforting . Perfect for family dinners or gatherings, providing a warm and satisfying meal.
With this easy-to-follow recipe, you’ll create a dish that’s not only delicious but also visually appealing with its vibrant colors.
What Is Galinhada?
Galinhada is a traditional Brazilian dish made with chicken and rice, cooked together with vegetables and spices. The name comes from “galinha,” which means chicken in Portuguese.
This dish is popular in the state of Goiás and is often served at family gatherings and celebrations.
What Does Galinhada Taste Like?
Galinhada is a comforting and flavorful dish that encapsulates the essence of Brazilian home cooking. It’s a dish that appeals to the senses with its aromatic spices, vibrant colors, and harmonious flavors.
Each bite offers a delightful combination of tender chicken, fluffy rice, and savory, umami-rich broth, making it a perfect meal for any occasion.
Ingredients You’ll Need
- Chicken Thighs and Drumsticks - The main protein of the dish, providing rich flavor and tenderness.
- Olive Oil - For sautéing the chicken and vegetables.
- Onion - Adds sweetness and depth to the dish.
- Garlic - Enhances the overall flavor with a savory note.
- Bell Peppers - Adds color and a mild sweetness.
- Tomatoes - Adds acidity and richness to the dish.
- Peas - Provides color and an earthy sweetness.
- Long Grain Rice - Absorbs all the flavors and creates a hearty base.
- Chicken Broth - Provides moisture and additional flavor.
- Turmeric - Adds a beautiful golden color and a subtle earthy flavor.
- Bay Leaves - Infuses the dish with a mild herbal flavor.
- Fresh Parsley - For garnish and a fresh, aromatic touch.
How To Make Galinhada
- Season the Chicken . Season the chicken thighs and drumsticks with salt and pepper. Set aside.
- Sauté the Chicken . In a large pot or Dutch oven, heat the olive oil over medium-high heat. Add the chicken pieces and cook until browned on all sides. Remove the chicken and set aside.
- Sauté the Vegetables . In the same pot, add the chopped onion and garlic. Sauté until the onion is translucent and fragrant. Add the bell peppers and tomatoes, cooking until they begin to soften.
- Add Rice and Spices . Stir in the rice, turmeric, and bay leaves, mixing well to coat the rice with the spices. Return the chicken to the pot.
- Add Broth and Cook . Pour in the chicken broth, ensuring the chicken and rice are submerged. Bring to a boil, then reduce the heat to low, cover, and simmer for 20-25 minutes, or until the rice is cooked and the chicken is tender.
- Garnish and Serve . Remove the bay leaves and garnish with fresh parsley before serving. Enjoy your Galinhada hot, straight from the pot.
Tips And Tricks
Creating a delicious and authentic Galinhada involves attention to detail and a few helpful techniques. Here are some tips and tricks to ensure it turns out perfectly every time:
- Use Bone-In Chicken . Bone-in chicken pieces add more flavor and tenderness to the dish.
- Don’t Overcook the Rice . Keep an eye on the rice to ensure it’s cooked perfectly and doesn’t become mushy.
- Season Well . Be sure to taste and adjust the seasoning with salt and pepper as needed.
Variations
Galinhada is a versatile and flavorful Brazilian dish that can be customized in many ways to suit different tastes and dietary preferences. Here are some creative variations to try:
- Spicy- Add chopped chili peppers or a pinch of cayenne pepper for a spicy kick.
- Vegetable- Include additional vegetables like peas, carrots, or green beans for more color and nutrition.
- Herbed- Mix in other fresh herbs like cilantro or basil for an aromatic twist.
What To Eat With Galinhada
Galinhada is a hearty and flavorful Brazilian dish that pairs well with a variety of sides and accompaniments. Here are some delicious options to complement it:
- Salad - The fresh and crisp salad provides a refreshing contrast to the rich and savory Galinhada.
- Pão de Queijo - The cheesy and slightly chewy texture of Pão de Queijo pairs perfectly with the hearty rice and chicken in Galinhada.
- Farofa - Farofa adds a crunchy texture and a slightly nutty flavor that complements the softness of the rice and chicken.
How Long Does It Last?
Store any leftovers in an airtight container in the refrigerator for up to 3 days. Reheat in the microwave or on the stovetop, adding a splash of chicken broth if needed to keep it moist.
Can You Freeze It?
Yes, you can freeze Galinhada. Allow the dish to cool completely, then transfer to a freezer-safe container. Freeze for up to 3 months. Thaw in the refrigerator overnight and reheat on the stovetop.
More Craveworthy Chicken Dishes
- Instant Pot Butter Chicken
- Slow Cooker Chipotle Chicken
- Air Fryer Chicken Tenders
- Chicken Saag
- Bourbon Chicken


Galinhada Recipe | Best Brazilian Chicken And Rice
Ingredients
- ▢ 4 Chicken Thighs
- ▢ 4 Chicken Drumsticks
- ▢ 3 tbsp Olive Oil
- ▢ 1 Onion , diced
- ▢ 4 Cloves Garlic , minced
- ▢ 2 Bell Peppers , chopped
- ▢ 3 Tomatoes , chopped
- ▢ 1 cup Peas
- ▢ 2 cups Long Grain Rice
- ▢ 4 cups Chicken Broth
- ▢ 1 tsp Turmeric
- ▢ 2 Bay Leaves
- ▢ 1/4 cup Parsley , chopped
- ▢ 1 tsp Kosher Salt
- ▢ 1/4 tsp Black Pepper
Instructions
- Season the Chicken . Season the chicken thighs and drumsticks with salt and pepper. Set aside.
- Sauté the Chicken . In a large pot or Dutch oven, heat the olive oil over medium-high heat. Add the chicken pieces and cook until browned on all sides. Remove the chicken and set aside.
- Sauté the Vegetables . In the same pot, add the chopped onion and garlic. Sauté until the onion is translucent and fragrant. Add the bell peppers and tomatoes, cooking until they begin to soften.
- Add Rice and Spices . Stir in the rice, turmeric, and bay leaves, mixing well to coat the rice with the spices. Return the chicken to the pot.
- Add Broth and Cook . Pour in the chicken broth, ensuring the chicken and rice are submerged. Bring to a boil, then reduce the heat to low, cover, and simmer for 20-25 minutes, or until the rice is cooked and the chicken is tender.
- Garnish and Serve . Remove the bay leaves and garnish with fresh parsley before serving. Enjoy your Galinhada hot, straight from the pot.
