
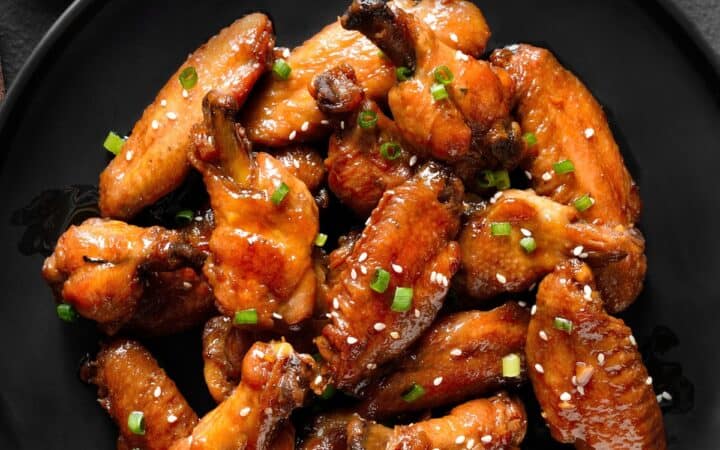
If you’re a fan of tender chicken wings coated in a sweet, sticky glaze, you’re going to love these Oven Baked Sticky Chicken Wings! These wings come out perfectly caramelized on the outside, while still juicy and flavorful inside.

Why You’ll Love This Wonderful Wing Recipe
- Easy to Make. The oven does all the hard work, meaning you get delicious sticky wings with minimal effort!
- Sticky & Sweet. The glaze is perfectly balanced between sweet, savory, and a hint of spice.
- Perfect for Parties. Ideal for sharing as an appetizer at gatherings or as a main course .
- No Frying Necessary. Enjoy that crispy texture without the mess of deep frying.
Whether you’re hosting game day, a family gathering, or just treating yourself, this chicken recipe is a crowd-pleaser that’s super easy to make at home.
Why Are They Called Sticky Chicken Wings?
Sticky chicken wings get their name from the thick, sweet, and savory glaze that coats them during the cooking process. The “sticky” texture comes from ingredients like honey, brown sugar, or soy sauce, which caramelize as the wings bake or cook, creating a deliciously tacky layer.
This sticky glaze clings to the wings, making them flavorful, juicy, and slightly messy to eat — but in the best way possible! It’s that irresistible combination of flavors and textures that makes sticky chicken wings a fan favorite.
What Do Sticky Chicken Wings Taste Like?
Oven baked sticky chicken wings are incredibly delicious and just as good as, if not better than, fried wings. The high heat from the oven helps the skin crisp up, while the sticky glaze adds a perfect coating of flavor.
With the right balance of sweet, savory, and sticky, these wings will leave you licking your fingers in delight.
Ingredients You’ll Need
- 24 Chicken Wings - These are the star of the recipe. Using a mix of drums and flats ensures even cooking and great texture. Wings become wonderfully crispy on the outside while staying juicy inside.
- 1/2 cup Soy Sauce - This adds deep umami, saltiness, and savory backbone to the glaze. It balances the sweetness of the honey and sugar and helps the sauce cling to the wings.
- 1/2 cup Honey - Honey provides thickness, shine, and stickiness. As it cooks, it caramelizes beautifully, giving the wings their glossy, sticky coating and sweet flavor.
- 3 cloves Garlic - Fresh garlic adds bold, aromatic flavor that cuts through the sweetness. It enhances the savory notes of the sauce and adds depth to every bite.
- 1/4 cup Brown Sugar - Brown sugar boosts the caramelization and intensifies the sticky texture. Its molasses undertones make the glaze richer and more complex.
- 2 tbsp Rice Vinegar - This adds acidity to balance the sweet and salty flavors. It prevents the glaze from becoming overly sweet and brightens the overall taste.
- 1 tbsp Sriracha - Sriracha introduces heat, tang, and a subtle garlic-chili flavor. It doesn’t make the wings overly spicy but gives a warm kick that rounds out the glaze.
- 2 tbsp Olive Oil - Used to lightly coat the wings before baking or air frying. It promotes browning, crispiness, and helps the seasonings adhere to the skin.
- Sesame Seeds - These add a nutty flavor and a pleasant crunch. They also give the wings a classic Asian-inspired finishing touch.
- Green Onion - Green onions bring freshness, color, and a mild onion bite. They balance the richness of the glaze and brighten the presentation.
How To Make Sticky Chicken Wings
- Prep the Wings. Start by patting the chicken wings dry with paper towels to ensure the wings crisp up nicely. Toss the wings in olive oil and season with a bit of salt and pepper.
- Bake the Wings. Preheat your oven to 400°F. Place the wings on a lined baking sheet in a single layer, making sure they aren’t too crowded. Bake for 40-45 minutes, flipping halfway through. The wings should be golden brown and crispy on the outside.
- Make the Sticky Sauce. While the wings are baking, prepare the sticky glaze. In a saucepan over medium heat, combine soy sauce, honey, brown sugar, garlic, ginger, rice vinegar, and sriracha (if using). Let it simmer for 5-10 minutes, stirring occasionally until the sauce thickens.
- Toss the Wings in the Sauce. Once the wings are done baking, toss them in the sticky sauce until they’re fully coated.
- Broil for Extra Stickiness. For an extra sticky finish, place the coated wings back on the baking sheet and broil them for 3-4 minutes. This helps caramelize the glaze, making the wings extra sticky and flavorful.
- Garnish and Serve. Transfer the sticky wings to a serving platter and sprinkle with sesame seeds and chopped green onions for added flavor and texture.

Tips And Tricks
Here are some incredibly helpful tips and tricks for making sticky chicken wings, so you get perfectly caramelized, finger-licking wings every single time.
- Dry the Wings Thoroughly . Drying the wings ensures they get crispy in the oven. Pat them down with paper towels before seasoning.
- Don’t Skip the Flip . Flip the wings halfway through baking to ensure even crisping on all sides.
- Simmer the Sauce . Let the sticky sauce simmer until it thickens. This intensifies the flavors and creates that irresistible sticky texture.
- Broil for Extra Stickiness . After tossing the wings in the sauce, broiling for a few minutes caramelizes the glaze, giving you the perfect finish.
Variations
Here are some incredibly helpful tips and tricks for making sticky chicken wings, so you get perfectly caramelized, finger-licking wings every single time.
- Spicy- Add extra sriracha, red pepper flakes, or cayenne pepper for a fiery kick.
- Sweet & Tangy- Swap the soy sauce for a mix of honey and balsamic vinegar for a sweeter, tangier flavor.
- Asian-Inspired- Add a splash of fish sauce and lime juice to the glaze for an authentic Thai twist.
- Gluten-Free- Use tamari in place of soy sauce for a gluten-free version of these wings.
What To Eat With Sticky Chicken Wings
These sticky wings are versatile and pair well with a variety of side dishes:
- Coleslaw - The tangy crunch of coleslaw perfectly complements the sweetness of the wings.
- Fries or Sweet Potato Wedges - Serve with crispy fries or roasted sweet potato wedges for a hearty meal.
- Vegetable Sticks - Keep it light by serving with fresh carrot and celery sticks.
- Rice - For a more filling option, serve the wings with a side of steamed rice.
How Long Do They Last?
These baked sticky wings are best enjoyed fresh, but you can store leftovers in an airtight container in the refrigerator for up to 3 days. When ready to eat, reheat them in the oven at 350°F until warmed through.
Can You Freeze Them?
Yes, you can freeze the wings after baking. Let them cool completely, then store them in a freezer-safe bag or container for up to 2 months.
To reheat, bake the frozen wings in a preheated oven at 375°F until hot and crispy.
OurBest Wing Recipes
- Korean Chicken Wings
- Breaded Wings
- Mango Habanero Wings
- Baked Chicken Wings
- Hot Honey Wings
- Garlic Parmesan Wings
- Lemon Pepper Wings
- Cauliflower Buffalo Wings

Ingredients
- ▢ 24 Chicken Wings , drums and flats
- ▢ 1/2 cup Soy Sauce
- ▢ 1/2 cup Honey
- ▢ 3 cloves Garlic , minced
- ▢ 1/4 cup Brown Sugar
- ▢ 2 tbsp Rice Vinegar
- ▢ 1 tbsp Sriracha
- ▢ 2 tbsp Olive Oil
- ▢ Sesame Seeds , for garnish
- ▢ Green Onion , sliced, for garnish
Instructions
- Prep the Wings. Start by patting the chicken wings dry with paper towels to ensure the wings crisp up nicely. Toss the wings in olive oil and season with a bit of salt and pepper.
- Bake the Wings. Preheat your oven to 400°F. Place the wings on a lined baking sheet in a single layer, making sure they aren’t too crowded. Bake for 40-45 minutes, flipping halfway through. The wings should be golden brown and crispy on the outside.
- Make the Sticky Sauce. While the wings are baking, prepare the sticky glaze. In a saucepan over medium heat, combine soy sauce, honey, brown sugar, garlic, ginger, rice vinegar, and sriracha (if using). Let it simmer for 5-10 minutes, stirring occasionally until the sauce thickens.
- Toss the Wings in the Sauce. Once the wings are done baking, toss them in the sticky sauce until they’re fully coated.
- Broil for Extra Stickiness. For an extra sticky finish, place the coated wings back on the baking sheet and broil them for 3-4 minutes. This helps caramelize the glaze, making the wings extra sticky and flavorful.
- Garnish and Serve. Transfer the sticky wings to a serving platter and sprinkle with sesame seeds and chopped green onions for added flavor and texture.
Get support & connect with our community on Facebook!
Nutrition

If you already signed up, you should have received an email with a password to give you unlimited access to our FREE Printable Library. The password is case sensitive. Enter it below and get printing!
Password:

Ingredients
- 24 Chicken Wings drums and flats
- 1/2 cup Soy Sauce
- 1/2 cup Honey
- 3 cloves Garlic minced
- 1/4 cup Brown Sugar
- 2 tbsp Rice Vinegar
- 1 tbsp Sriracha
- 2 tbsp Olive Oil
- Sesame Seeds for garnish
- Green Onion sliced, for garnish
Instructions
- Prep the Wings. Start by patting the chicken wings dry with paper towels to ensure the wings crisp up nicely. Toss the wings in olive oil and season with a bit of salt and pepper.
- Bake the Wings. Preheat your oven to 400°F. Place the wings on a lined baking sheet in a single layer, making sure they aren’t too crowded. Bake for 40-45 minutes, flipping halfway through. The wings should be golden brown and crispy on the outside.
- Make the Sticky Sauce. While the wings are baking, prepare the sticky glaze. In a saucepan over medium heat, combine soy sauce, honey, brown sugar, garlic, ginger, rice vinegar, and sriracha (if using). Let it simmer for 5-10 minutes, stirring occasionally until the sauce thickens.
- Toss the Wings in the Sauce. Once the wings are done baking, toss them in the sticky sauce until they’re fully coated.
- Broil for Extra Stickiness. For an extra sticky finish, place the coated wings back on the baking sheet and broil them for 3-4 minutes. This helps caramelize the glaze, making the wings extra sticky and flavorful.
- Garnish and Serve. Transfer the sticky wings to a serving platter and sprinkle with sesame seeds and chopped green onions for added flavor and texture.
https://twosleevers.com/sticky-chicken-wings/

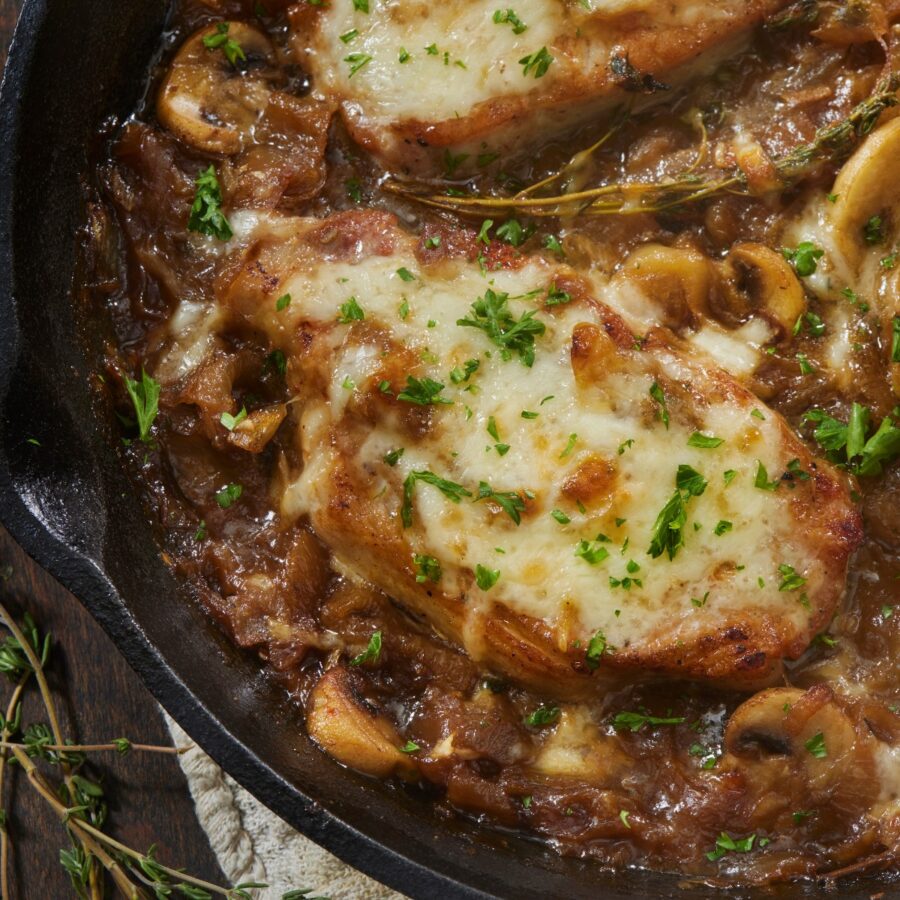
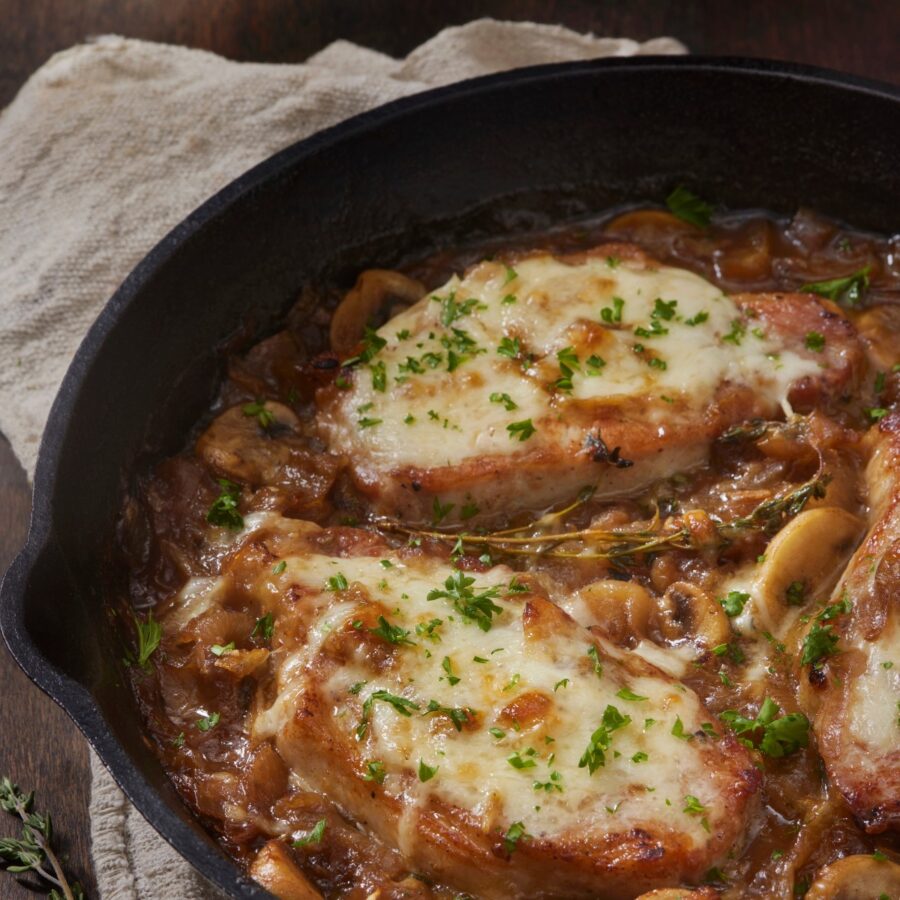
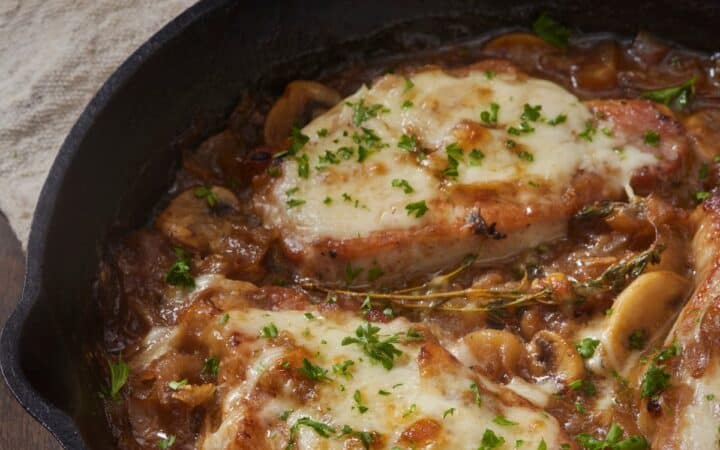
If you’re a fan of savory, caramelized onions and rich, comforting flavors, you’re going to love French Onion Pork Chops! This dish brings together tender, juicy pork chops with the irresistible taste of French onion soup in one delectable package. It’s perfect for a cozy family dinner or when you want to impress guests with a restaurant-worthy meal made right in your kitchen.
Why You’ll Love This Perfect Pork Recipe
- Hearty . This dish is full of rich, bold flavors that are comforting and satisfying. Perfect for a cozy dinner on a chilly evening.
- Simple Ingredients . Made with easy-to-find ingredients like onions, cheese, and pork chops, this recipe brings restaurant-quality flavors to your table with minimal effort.
- Make-Ahead Friendly . You can prepare the caramelized onions in advance, making this recipe even easier to pull together for a quick weeknight dinner.
With just a few simple steps, you’ll have a dish that’s worthy of a French bistro but made with love right in your kitchen!
What Do French Onion Pork Chops Taste Like?
French Onion Pork Chops are a flavorful, savory delight. The sweet caramelized onions paired with melted cheese atop tender pork chops offer a balance of rich and savory goodness.
If you love French onion soup, this recipe takes those familiar flavors and brings them to a new level by pairing them with perfectly cooked pork chops.
What Is The Secret For Tender Pork Chops?
The secret to tender pork chops lies in a few key techniques that help keep the meat juicy and flavorful. Here are some essential tips for achieving perfectly tender pork chops:
- Monitor Internal Temperature . Pork chops should be cooked to an internal temperature of 145°F. Use a meat thermometer to check doneness. Overcooking pork chops makes them dry and tough, so remove them from the heat as soon as they reach 145°F and let them rest for a few minutes before serving.
- Resting Time . After cooking, let the pork chops rest for 5-10 minutes before slicing. This allows the juices to redistribute, ensuring a moist and tender bite with every slice.
- Thick-Cut Pork Chops . Opt for thick-cut pork chops, around 1 to 1.5 inches thick. Thin cuts tend to dry out quickly, making them tougher.
Ingredients You’ll Need
- 4 Thick Cut Boneless Pork Chops - The star of the dish. Thick-cut chops stay juicy and tender during cooking, providing a hearty base that soaks up the rich French onion sauce.
- 2 Yellow Onions - The key to the “French onion” flavor. When caramelized, the onions develop a deep sweetness and savory richness that forms the backbone of the sauce.
- 1/4 cup Mushrooms - Add earthy flavor and extra umami depth, complementing both the onions and pork.
- 3 cloves Garlic - Adds aromatic sharpness and enhances the savory notes of the dish.
- 1 teaspoon Thyme - Adds a subtle herbal note that complements the caramelized onions and balances the richness of the sauce.
- 1/2 teaspoon Salt - Enhances the natural flavors of the pork and onions.
- 1/4 teaspoon Ground Black Pepper - Provides mild heat and depth, balancing the sweetness of the onions.
- 1 cup Beef Broth - Forms the flavorful base of the French onion sauce. It adds savory depth and helps deglaze the pan after caramelizing the onions.
- 2 tablespoons All-Purpose Flour - Thickens the sauce, creating a luscious gravy that coats the pork chops.
- 2 tablespoons Butter - Used for caramelizing onions and adding richness to the sauce. It also helps create a smooth, velvety texture when combined with flour.
- 2 tablespoons Olive Oil - Used to sear the pork chops and sauté the onions. It helps achieve a nice golden crust and prevents sticking.
- 1 cup Mozzarella Cheese - Melts beautifully for a gooey, stretchy layer on top of the pork chops.
- 1 cup Gruyère Cheese - Traditional in French onion soup; adds nutty, complex flavor and helps create that irresistible golden, bubbly topping.
How To Make French Onion Pork Chops
- Caramelize the Onions . Start by caramelizing the onions. In a large skillet, melt butter over medium heat. Add the sliced onions and cook, stirring occasionally, for about 25-30 minutes until the onions are soft, golden, and caramelized. Add the garlic and thyme during the last 5 minutes for extra flavor.
- Sear the Pork Chops . While the onions are caramelizing, season the pork chops generously with salt and pepper. Heat olive oil in another large skillet over medium-high heat. Sear the pork chops for about 3-4 minutes on each side until they’re nicely browned. Remove from the skillet and set aside.
- Make the Sauce . After the pork chops are seared, add a little more butter to the skillet. Stir in flour and cook for 1 minute. Slowly add the beef broth, whisking to avoid lumps, and let the sauce simmer until it thickens slightly.
- Assemble the Dish . Return the caramelized onions to the skillet with the sauce and sliced mushrooms and stir to combine. Place the seared pork chops on top of the onions. Sprinkle the mozzarella and Gruyère cheese over the pork chops.
- Bake to Perfection . Preheat your oven to 375°F. Transfer the skillet to the oven and bake for about 15-20 minutes, or until the pork chops are fully cooked and the cheese is bubbly and golden.
- Garnish and Serve . Remove the skillet from the oven and garnish with a sprinkle of fresh thyme. Serve the French Onion Pork Chops hot, with the delicious caramelized onions and sauce spooned over the top.
Tips And Tricks
Making French Onion Pork Chops is easier than you might think, and these tips will help you get the best results:
- Caramelizing Onions . Don’t rush the caramelizing process! Low and slow is key to getting that deep golden color and sweet flavor.
- Cheese Choices . Gruyère is traditional for French onion dishes, but you can also use Swiss cheese if you prefer. Mozzarella adds a gooey texture, but feel free to mix and match with your favorite cheeses.
- Searing the Pork . Searing the pork chops before baking locks in flavor and gives the pork a beautiful crust.
Variations
If you love this dish, here are some creative twists to try:
- French Onion Chicken - Swap out the pork chops for chicken breasts or thighs. Follow the same method for caramelizing the onions and making the sauce.
- Add Mushrooms - For an earthy touch, sauté mushrooms along with the onions for an extra layer of flavor.
- Cheese Variations - Try adding sharp cheddar or Parmesan for a different flavor profile in the cheesy topping.
What To Serve With French Onion Pork Chops
This rich and flavorful dish pairs wonderfully with a variety of sides:
- Mashed Potatoes - Creamy mashed potatoes are a classic pairing that soaks up the flavorful sauce.
- Green Beans - Roasted or steamed green beans add a fresh contrast to the richness of the pork chops.
- Bread - Serve with slices of crusty French bread to mop up every bit of the delicious onion and cheese sauce.
How Long Do They Last?
French Onion Pork Chops can be stored in an airtight container in the refrigerator for up to 3-4 days. Reheat in the oven or microwave until warmed through.
Can You Freeze Them?
Yes! You can freeze these pork chops for up to 2-3 months. Simply store them in a freezer-safe container after cooking. When ready to eat, thaw in the refrigerator overnight and reheat in the oven.
More Protein-Rich Recipes
- Sous Vide Steak
- Grilled Chicken Thighs
- Instant Pot Brisket
- Mississippi Pot Roast
- Keto Chicken Tenders
- Sweet and Sour Pork
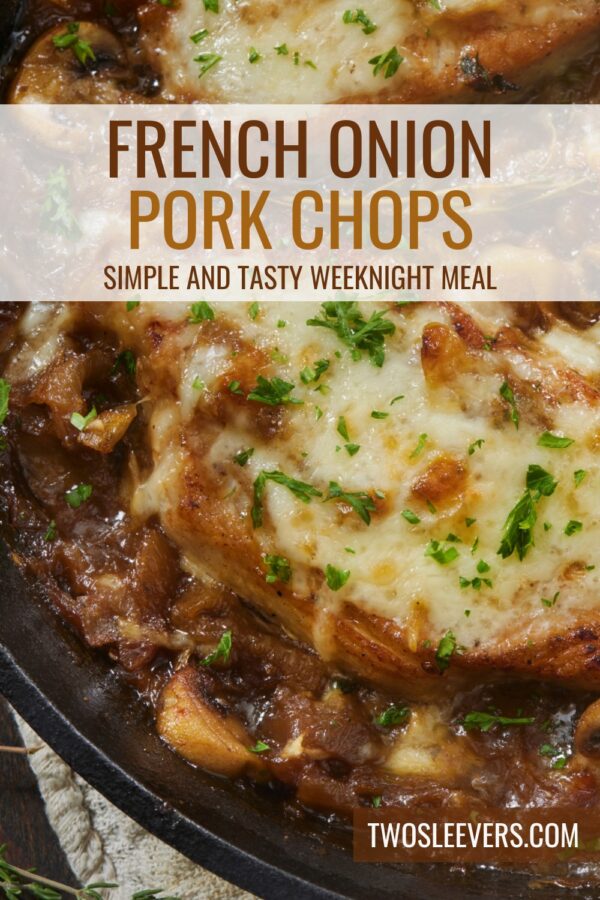
French Onion Pork Chops | Onion Smothered Pork Chop Recipe
Ingredients
- ▢ 4 Thick Cut Boneless Pork Chops
- ▢ 2 Yellow Onions , thinly sliced
- ▢ 1/4 cup Mushrooms , sliced
- ▢ 1 cup Beef Broth
- ▢ 3 cloves Garlic , minced
- ▢ 1 tsp Thyme
- ▢ 2 tbsp Butter
- ▢ 1 cup Mozzarella Cheese , shredded
- ▢ 1 cup Gruyère Cheese , shredded
- ▢ 2 tbsp All Purpose Flour
- ▢ 2 tbsp Olive Oil
- ▢ 1/2 tsp Kosher Salt
- ▢ 1/4 tsp Ground Black Pepper
Instructions
- Caramelize the Onions . Start by caramelizing the onions. In a large skillet, melt butter over medium heat. Add the sliced onions and cook, stirring occasionally, for about 25-30 minutes until the onions are soft, golden, and caramelized. Add the garlic and thyme during the last 5 minutes for extra flavor.
- Sear the Pork Chops . While the onions are caramelizing, season the pork chops generously with salt and pepper. Heat olive oil in another large skillet over medium-high heat. Sear the pork chops for about 3-4 minutes on each side until they’re nicely browned. Remove from the skillet and set aside.
- Make the Sauce . After the pork chops are seared, add a little more butter to the skillet. Stir in flour and cook for 1 minute. Slowly add the beef broth, whisking to avoid lumps, and let the sauce simmer until it thickens slightly.
- Assemble the Dish . Return the caramelized onions to the skillet with the sauce and stir to combine. Place the seared pork chops on top of the onions. Sprinkle the mozzarella and Gruyère cheese over the pork chops.
- Bake to Perfection . Preheat your oven to 375°F. Transfer the skillet to the oven and bake for about 15-20 minutes, or until the pork chops are fully cooked and the cheese is bubbly and golden.
- Garnish and Serve . Remove the skillet from the oven and garnish with a sprinkle of fresh thyme. Serve the French Onion Pork Chops hot, with the delicious caramelized onions and sauce spooned over the top.
Get support & connect with our community on Facebook!
Nutrition
Don’t forget to check out my other Ketocookbooks.
Keto Instant Pot, Keto Fat Bombs, Sweets, & Treats , and Easy keto in 30 minutes.

