
If you’re looking to make a show-stopping turkey with juicy meat and crispy skin in less time, this Spatchcock Turkey recipe is perfect for you! Learn how to spatchcock, season, and roast a turkey for a faster, evenly cooked, and flavorful bird that’s sure to impress.

Why You’ll Love This Tasty Turkey Recipe
- Cooks Faster . Spatchcocking reduces cooking time significantly.
- Juicy and Even Cooking . Flattening the turkey allows it to cook more evenly, so the breast meat stays juicy while the thighs cook through.
- Crispy Skin . More skin is exposed, resulting in perfectly crispy skin all over.
- Easy to Season . Flattened turkey makes it easy to season every inch with your favorite herbs and spices.
This Spatchcock Turkey is the ultimate way to cook turkey efficiently without sacrificing any of the flavor or texture that makes a holiday meal memorable.
What Is A Spatchcock Turkey?
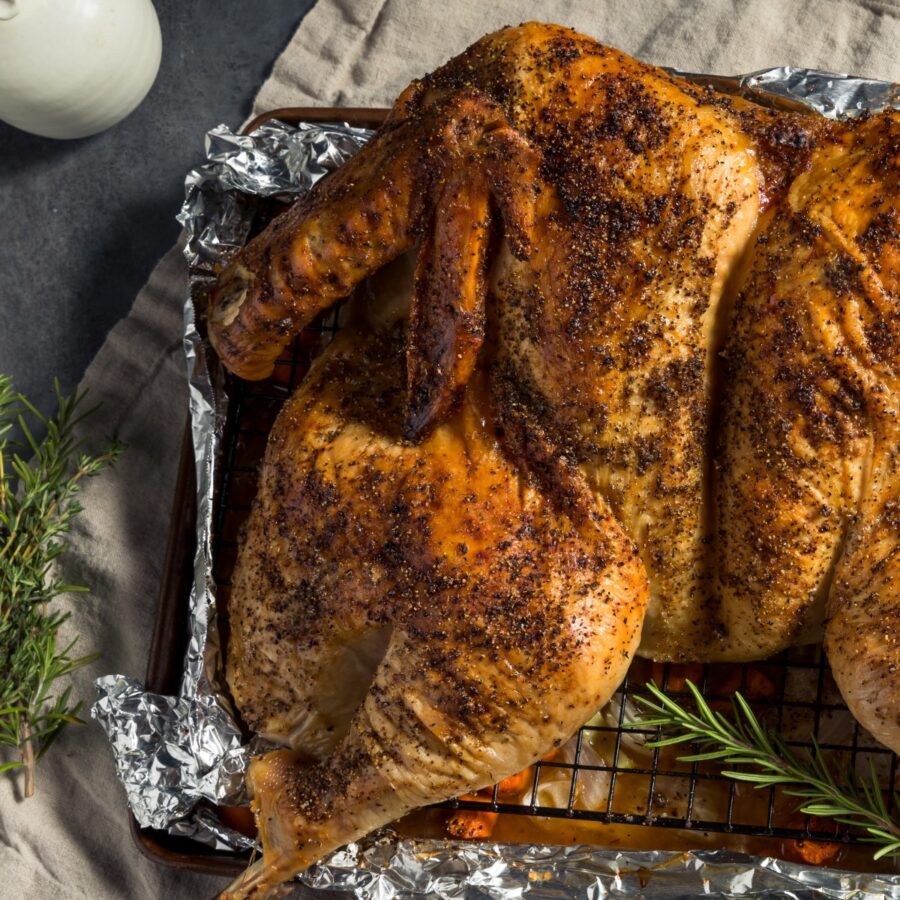
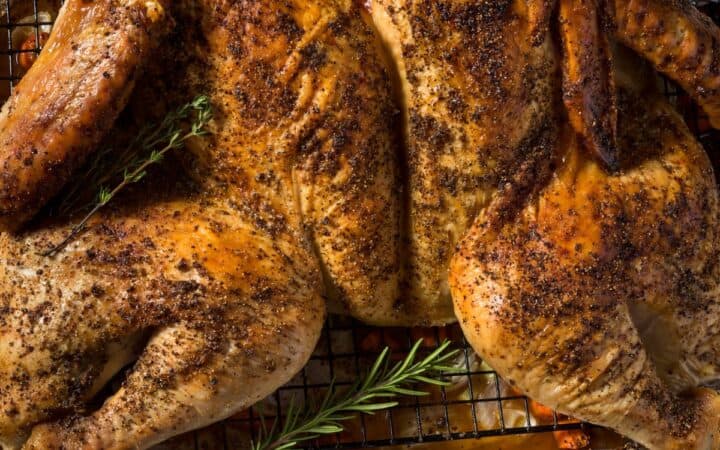
Spatchcocking, also known as butterflying, is a method where the backbone is removed so the turkey can be flattened before cooking. This technique allows the bird to cook faster and more evenly, making it ideal for achieving juicy meat and crispy skin in less time.
Is It Worth Spatchcocking A Turkey?
Absolutely! The faster cooking, juicier meat, and crispy skin make spatchcocking a turkey a great choice, especially for holiday meals or gatherings. If you’re willing to try this prep method, you’ll likely find it enhances the cooking process and the end result.
Ingredients You’ll Need
- Whole Turkey (10-14 lbs) – Choose a fresh or thawed turkey for best results.
- Olive Oil or Melted Butter – Helps crisp up the skin while keeping the meat moist.
- Salt and Black Pepper – Essential seasonings for flavor.
- Garlic Powder – Adds depth and aroma.
- Fresh Herbs (rosemary, thyme, sage) – Provides aromatic flavor; fresh herbs work best for roasting.
- Lemon or Orange Zest (optional) – Adds a hint of citrus freshness to brighten the flavors.
How To Make A Spatchcock Turkey
- Prepare the Turkey . Place the turkey breast-side down on a cutting board. Using kitchen shears, cut along both sides of the backbone to remove it. Turn the turkey breast-side up and press down firmly on the breastbone until the turkey flattens.
- Season . Pat the turkey dry with paper towels to ensure crispy skin. Rub olive oil or melted butter all over the turkey. Season generously with salt, black pepper, and garlic powder. Sprinkle fresh herbs and lemon zest, if using, over the skin.
- Arrange on Baking Sheet . Line a rimmed baking sheet with foil and place a wire rack on top. Place the spatchcocked turkey on the rack, breast-side up, with the legs splayed outward.
- Roast the Turkey . Preheat your oven to 425°F. Roast the turkey for about 1.5-2 hours, or until the internal temperature reaches 165°F in the thickest part of the thigh and breast. Use an instant-read thermometer to check doneness.
- Rest and Serve . Let the turkey rest for at least 20 minutes before carving. This allows the juices to redistribute, keeping the meat tender and moist. Garnish with extra herbs for a beautiful presentation.
Tips And Tricks
Here are some tips to ensure your Spatchcock Turkey turns out juicy, flavorful, and perfectly cooked:
- Dry the Skin Thoroughly . Pat the turkey dry to achieve that crispy, golden skin.
- Season Generously . Don’t hold back on salt and herbs for the best flavor. Rubbing seasoning under the skin is a great way to infuse flavor into the meat.
- Use a Meat Thermometer . Check for doneness in multiple spots to ensure the turkey is fully cooked without overcooking.
- Let it Rest . Resting the turkey keeps it juicy. If you carve it too soon, the juices will run out, leaving the meat dry.
Variations
Once you’ve mastered the basic Spatchcock Turkey, try some of these flavor variations to change things up:
- Herb Butter- : Rub softened herb butter under and over the skin for a rich, buttery flavor.
- Citrus Herb - Add lemon or orange slices under the turkey and a squeeze of citrus over the bird for a fresh twist.
- Smoked Paprika - Mix smoked paprika with olive oil and rub it on the turkey for a smoky, savory flavor.
- Maple Glazed - Brush maple syrup over the turkey halfway through cooking for a touch of sweetness and beautiful caramelization.
What To Eat With A Spatchcock Turkey
This juicy, flavorful turkey pairs perfectly with a variety of classic sides. Here are a few options to create a memorable meal:
- Mashed Potatoes - Creamy mashed potatoes are a must for soaking up the turkey’s juices.
- Green Bean Casserole - A classic holiday side that complements the rich flavors of the turkey.
- Stuffing - Traditional bread stuffing or cornbread stuffing is a great pairing.
- Cranberry Sauce - Sweet-tart cranberry sauce adds a bright contrast to the savory turkey.
- Roasted Vegetables - Roasted carrots, Brussels sprouts, or squash make a colorful, delicious addition to your plate.
How Long Does It Last?
Leftover Spatchcock Turkey can be stored in an airtight container in the refrigerator for up to 3-4 days. The meat can be used in sandwiches, soups, or salads for delicious meals after the big feast.
Can You Freeze It?
Yes, you can freeze leftover turkey for future meals!
Let the turkey cool completely, then slice and transfer to a freezer-safe container or bag. Remove as much air as possible to prevent freezer burn. To reheat the turkey, thaw it in the refrigerator overnight, then reheat it in the oven at 350°F until warmed through.
Frozen turkey can last in the freezer for up to 3 months, making it a convenient option for meal prep.
More Terrific Ways To Use Turkey
- Turkey Stew
- Roasted Turkey Breast
- Turkey Pot Pie
- Club Sandwich
- Turkey Lettuce Wraps

Spatchcock Turkey Recipe | How To Spatchcock A Turkey
Ingredients
- ▢ 12 pound Turkey
- ▢ 1/4 cup Melted Butter
- ▢ 2 tsp Kosher Salt
- ▢ 1 tsp Black Pepper
- ▢ 1 tsp Garlic Powder
- ▢ 1 tbsp Fresh Rosemary
- ▢ 1 tbsp Fresh Thyme
- ▢ 1 tbsp Fresh Sage
- ▢ 1 tsp Lemon Zest , optional
- ▢ 1 tsp Orange Zest , optional
Instructions
- Prepare the Turkey . Place the turkey breast-side down on a cutting board. Using kitchen shears, cut along both sides of the backbone to remove it. Turn the turkey breast-side up and press down firmly on the breastbone until the turkey flattens.
- Season . Pat the turkey dry with paper towels to ensure crispy skin. Rub olive oil or melted butter all over the turkey. Season generously with salt, black pepper, and garlic powder. Sprinkle fresh herbs and lemon zest, if using, over the skin.
- Arrange on Baking Sheet . Line a rimmed baking sheet with foil and place a wire rack on top. Place the spatchcocked turkey on the rack, breast-side up, with the legs splayed outward.
- Roast the Turkey . Preheat your oven to 425°F. Roast the turkey for about 1.5-2 hours, or until the internal temperature reaches 165°F in the thickest part of the thigh and breast. Use an instant-read thermometer to check doneness.
- Rest and Serve . Let the turkey rest for at least 20 minutes before carving. This allows the juices to redistribute, keeping the meat tender and moist. Garnish with extra herbs for a beautiful presentation.
Get support & connect with our community on Facebook!
Nutrition

If you already signed up, you should have received an email with a password to give you unlimited access to our FREE Printable Library. The password is case sensitive. Enter it below and get printing!
Password:

Spatchcock Turkey Recipe | How To Spatchcock A Turkey
Ingredients
- 12 pound Turkey
- 1/4 cup Melted Butter
- 2 tsp Kosher Salt
- 1 tsp Black Pepper
- 1 tsp Garlic Powder
- 1 tbsp Fresh Rosemary
- 1 tbsp Fresh Thyme
- 1 tbsp Fresh Sage
- 1 tsp Lemon Zest optional
- 1 tsp Orange Zest optional
Instructions
- Prepare the Turkey . Place the turkey breast-side down on a cutting board. Using kitchen shears, cut along both sides of the backbone to remove it. Turn the turkey breast-side up and press down firmly on the breastbone until the turkey flattens.
- Season . Pat the turkey dry with paper towels to ensure crispy skin. Rub olive oil or melted butter all over the turkey. Season generously with salt, black pepper, and garlic powder. Sprinkle fresh herbs and lemon zest, if using, over the skin.
- Arrange on Baking Sheet . Line a rimmed baking sheet with foil and place a wire rack on top. Place the spatchcocked turkey on the rack, breast-side up, with the legs splayed outward.
- Roast the Turkey . Preheat your oven to 425°F. Roast the turkey for about 1.5-2 hours, or until the internal temperature reaches 165°F in the thickest part of the thigh and breast. Use an instant-read thermometer to check doneness.
- Rest and Serve . Let the turkey rest for at least 20 minutes before carving. This allows the juices to redistribute, keeping the meat tender and moist. Garnish with extra herbs for a beautiful presentation.
Spatchcock Turkey Recipe | How To Spatchcock A Turkey https://twosleevers.com/spatchcock-turkey-recipe/
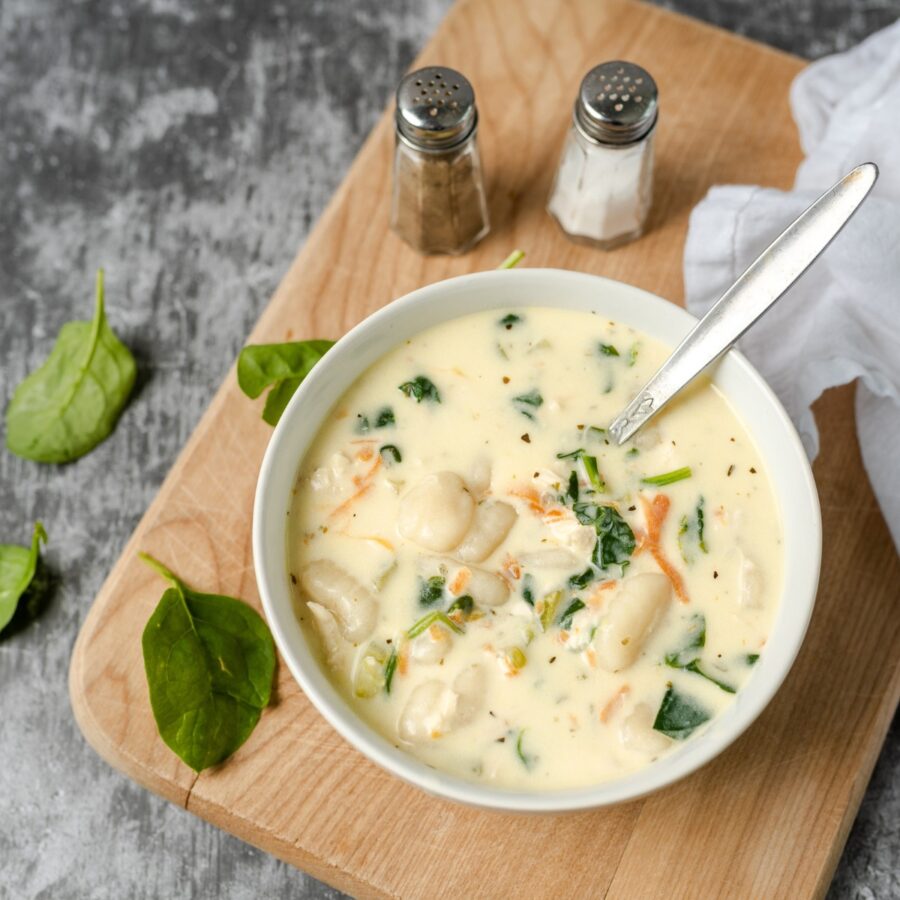
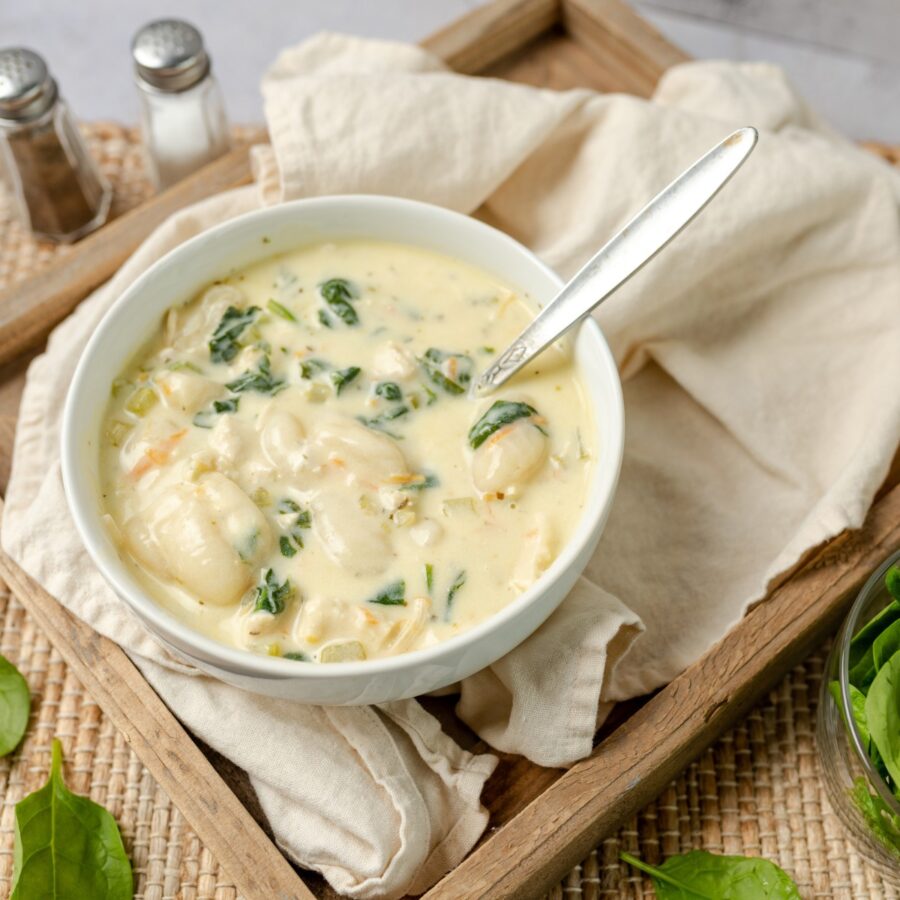
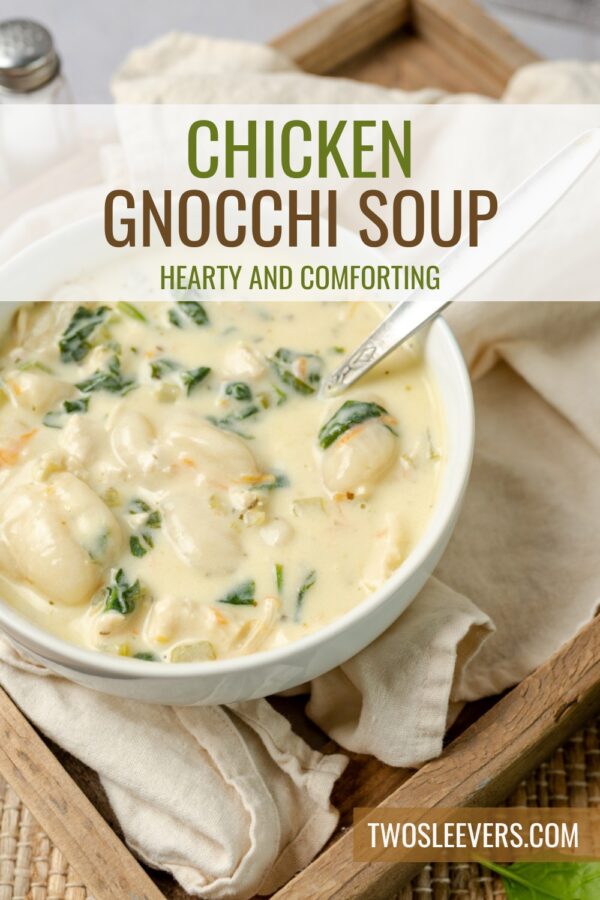
If you’re a fan of creamy, hearty soups, you’re in for a treat! Learn how to make the easiest Chicken Gnocchi Soup that’s loaded with tender chicken, pillowy gnocchi, and a medley of vegetables. It’s the perfect comfort food for chilly days or whenever you’re craving something satisfying and soul-warming.
Why You’ll Love This Spectacular Soup Recipe
- Rich and Creamy. A velvety base made with cream and chicken broth.
- Easy to Make. This soup recipe comes together in under an hour with simple ingredients.
- Hearty and Filling. Loaded with chicken, gnocchi, and veggies for a complete main course .
- Customizable. Easily adapt to your dietary preferences or what’s in your fridge.
Whether it’s for a weeknight dinner or a cozy weekend lunch, this soup is guaranteed to be a family favorite!
What Does Chicken Gnocchi Soup Taste Like?
Chicken Gnocchi Soup combines creamy, savory flavors with the soft, chewy texture of gnocchi and the fresh crunch of vegetables. Every bite is a delightful balance of textures and tastes, making it one of the best comfort foods to savor.
Should I Cook Gnocchi Before Adding It To Soup?
No, you typically do not need to cook gnocchi before adding it to soup. Gnocchi cooks quickly and can be added directly to the simmering soup, where it will cook through and absorb the flavors of the broth.
Ingredients You’ll Need
- Chicken Breasts or Thighs - Boneless, skinless chicken for tender, shredded bites.
- Potato Gnocchi - Light, pillowy dumplings that absorb the soup’s flavors.
- Vegetables - Onion, celery, carrots, and spinach for added nutrition and texture.
- Chicken Broth - The base of the soup, providing rich, savory flavor.
- Heavy Cream - For that creamy consistency we all love.
- Garlic - Adds a fragrant, savory depth.
- Olive Oil - For sautéing the vegetables.
- Salt and Pepper - Essential for seasoning.
- Thyme and Italian Seasoning - A fragrant blend of herbs to elevate the flavor.
How To Make Chicken Gnocchi Soup
- Cook the Chicken . In a large pot, heat olive oil over medium heat. Season the chicken with salt and pepper, then cook until golden on both sides. Remove from the pot and shred once cooled.
- Sauté the Vegetables . In the same pot, sauté the onions, carrots, and celery until softened. Add garlic and cook until fragrant.
- Create the Base . Add the chicken broth, shredded chicken, and seasonings to the pot. Bring to a gentle simmer.
- Add Gnocchi and Spinach . Stir in the gnocchi and cook until tender, about 4-5 minutes. Add the spinach and let it wilt.
- Finish with Cream . Reduce the heat and slowly stir in the heavy cream. Simmer for another 5 minutes until the soup is creamy and well combined.
- Serve . Ladle into bowls and garnish with fresh parsley or Parmesan cheese for an extra touch.
Tips And Tricks
Chicken Gnocchi Soup is a creamy, hearty dish that’s perfect for any occasion. To ensure your soup turns out delicious every time, follow these expert tips and tricks:
- Use Rotisserie Chicken . Save time by using pre-cooked chicken instead of cooking it yourself.
- Don’t Overcook the Gnocchi . Gnocchi cooks quickly, so watch closely to avoid a mushy texture.
- Thicken the Soup . For a thicker consistency, mix a tablespoon of cornstarch with water and stir it into the soup before adding the cream.
- Add Parmesan . Stir in grated Parmesan cheese for an extra layer of richness.
Variations
Chicken Gnocchi Soup is a comforting classic, but you can easily customize it to suit your preferences or add exciting twists. Here are some delicious variations to inspire your next batch:
- Low-Carb Option - Swap gnocchi with cauliflower florets or zucchini noodles in this chicken recipe .
- Dairy-Free Version - Replace heavy cream with coconut milk or almond milk for a lighter option.
- Spicy Kick - Add a pinch of red pepper flakes or a dash of hot sauce.
- Vegetarian - Use vegetable broth and skip the chicken, adding more veggies like mushrooms or bell peppers.
What To Eat With Chicken Gnocchi Soup
Chicken Gnocchi Soup is rich, creamy, and packed with flavor, making it a satisfying meal on its own. However, pairing it with complementary sides can elevate your dining experience. Here are some delicious ideas:
- Garlic Bread - The buttery, garlicky flavor of garlic bread enhances the savory elements of the soup.
- Salad - A light, crisp salad balances the richness of the soup.
- Roasted Vegetables - Roasted veggies bring out natural sweetness and add a healthy side option.
How Long Does It Last?
Chicken Gnocchi Soup can be stored in the refrigerator for up to 3-4 days in an airtight container. Reheat gently on the stovetop, adding a splash of broth or cream if needed to thin it out.
Can You Freeze It?
Yes, but with a caveat. The cream and gnocchi may not freeze well, as they can separate or become mushy when reheated.
To freeze, prepare the soup without the cream and gnocchi. Add those fresh when reheating the thawed soup.
More Of OurBest Chicken Soup Recipes
- Caldo de Pollo
- Low Carb Chicken Pot Pie Soup
- Chicken Mushroom Soup
- Chicken Curry Soup
- Rotisserie Chicken Soup

Chicken Gnocchi Soup Recipe | Comforting And Hearty Soup
Ingredients
- ▢ 2 tbsp Olive Oil
- ▢ 1 pound Chicken Thighs
- ▢ 1 Onion , diced
- ▢ 2 Carrots , diced
- ▢ 2 stalks Celery , diced
- ▢ 3 cloves Garlic , minced
- ▢ 1 tsp Italian Seasoning
- ▢ 1/2 tsp Dried Thyme
- ▢ 6 cups Chicken Broth
- ▢ 16 ounces Potato Gnocchi
- ▢ 1 cup Heavy Cream
- ▢ 2 cups Spinach
- ▢ Kosher Salt , to taste
- ▢ Ground Black Pepper , to taste
Instructions
- Cook the Chicken . In a large pot, heat olive oil over medium heat. Season the chicken with salt and pepper, then cook for 12-14 minutes until golden on both sides and the internal temperature reaches 165F. Remove from the pot and shred once cooled.
- Sauté the Vegetables . In the same pot, sauté the onions, carrots, and celery until softened. Add garlic and cook until fragrant.
- Create the Base . Add the chicken broth, shredded chicken, and seasonings to the pot. Bring to a gentle simmer.
- Add Gnocchi and Spinach . Stir in the gnocchi and cook until tender, about 4-5 minutes. Add the spinach and let it wilt.
- Finish with Cream . Reduce the heat and slowly stir in the heavy cream. Simmer for another 5 minutes until the soup is creamy and well combined.
- Serve . Ladle into bowls and garnish with fresh parsley or Parmesan cheese for an extra touch.
