
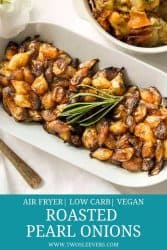

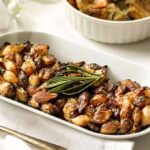
Try this tangy, sweet, spicy roasted pearl onions recipe with balsamic vinegar. They are a snap to make in your air fryer for an easy, vegan side dish.
Why You’ll Love These Perfect Pearl Onions
I am a huge fan of side dishes made in an air fryer. Since most of my recipes ask you to throw things into an air fryer and just go, it’s easy enough to get a side dish cooking while your main dish cooks.
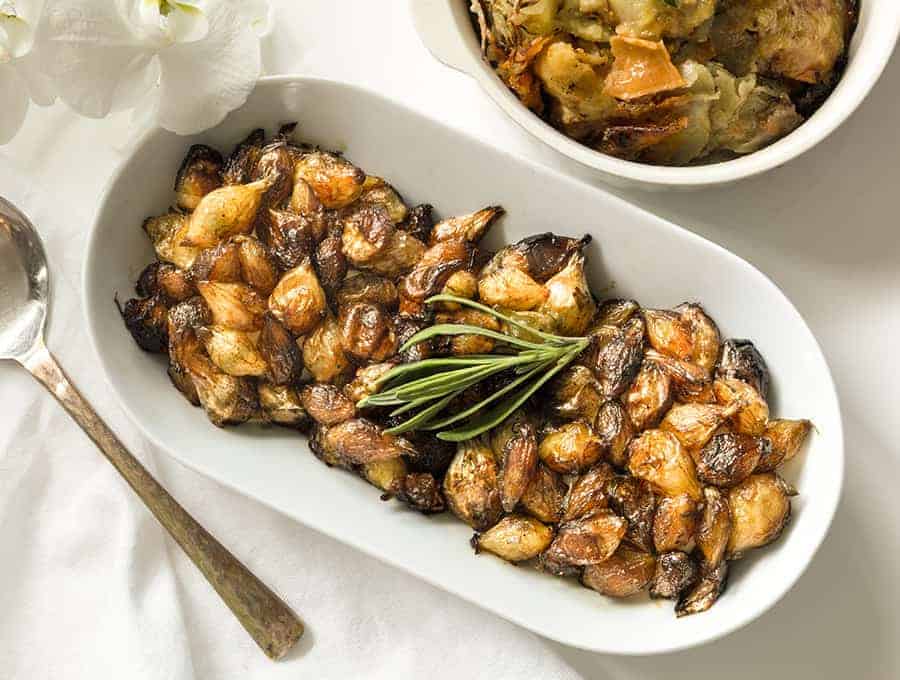
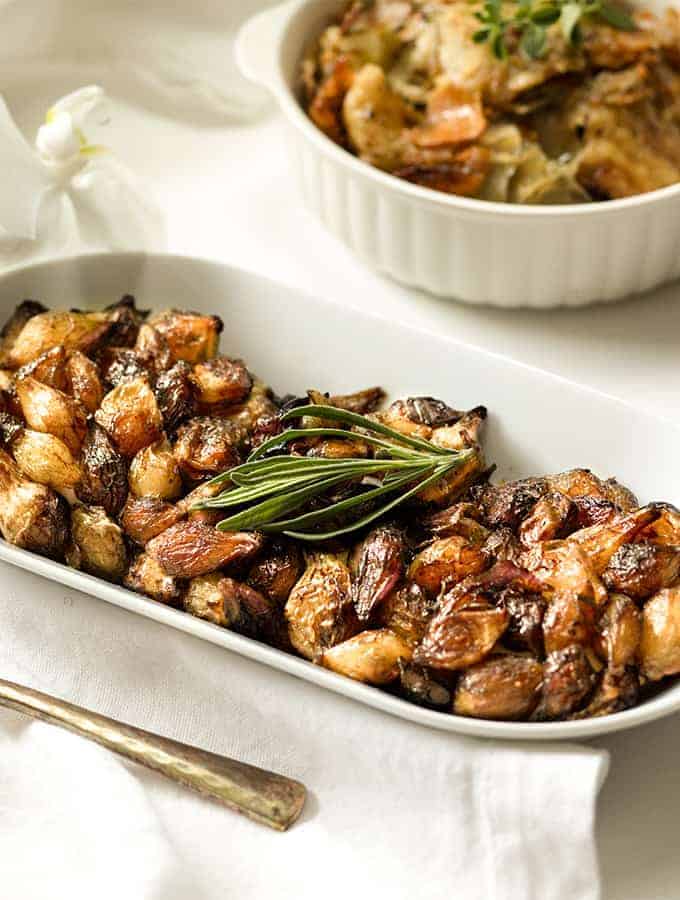
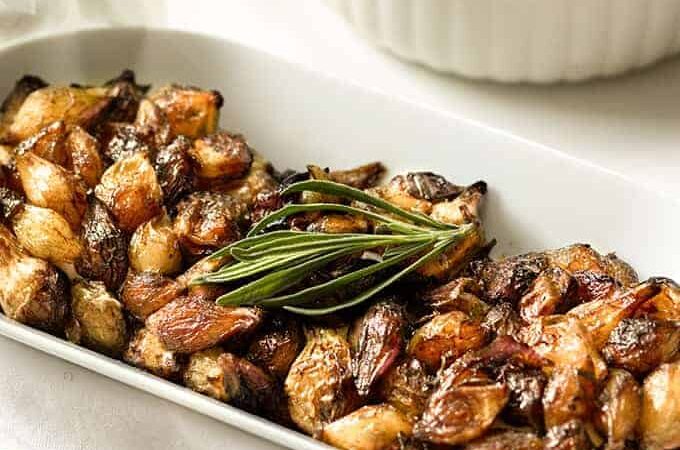
This roasted pearl onions recipe takes one of my favorite things–onions–and makes them the star of the dish by themselves.
While onions can be pungent, if prepared correctly, they can take on a wonderful, slightly sweet flavor. Air frying pearl onions makes them sweet on the inside, and crispy in bits on the outside. If you ask me, this is a killer combination.
I’ve also since discovered that many people love Roasted Pearl Onions just as much as I do, largely due to this sweetness. They truly make for a tasty side dish with most meals. The roasting brings out a delicious aspect of onions that many people might be unaware of.
Can You Cook Pearl Onions In The Air Fryer?
I wasn’t sure how these Roasted Pearl Onions were going to turn out in the Air Fryer. The Air Fryer has never let me down before so I had high hopes. I was a little concerned they would burn before they cooked, but as long as you use FROZEN pearl onions, and set the temperature to 400F, your pearl onions will turn out really well.
I think in fact, that an air fryer is perfect for air frying pearl onions, or even regular onions, largely because the hot, dry heat in the airfryer, thanks to the fan, helps them caramelize faster than they would in a moister environment, like in a saucepan on the stove.
Ingredients You’ll Need
- Frozen Pearl Onions - The star ingredient of the dish. Frozen pearl onions roast beautifully in the air fryer, becoming sweet, tender, and lightly caramelized. Using frozen onions eliminates the need to peel fresh ones, making the recipe quick and convenient.
- 2 tablespoons Olive Oil - Helps the onions roast evenly and develop a golden, caramelized exterior. The oil also carries the seasonings and herbs, ensuring each onion is well coated and flavorful.
- 2 tablespoons Balsamic Vinegar - Adds tangy sweetness and depth. As the onions roast, the balsamic reduces slightly, creating a glossy coating and enhancing natural caramelization.
- 1/2 teaspoon Salt - Seasons the onions and brings out their natural sweetness. Kosher salt also helps draw moisture to the surface, aiding in browning.
- 1/3 teaspoon Ground Black Pepper - Adds gentle heat and earthy warmth that balances the sweetness of the onions and balsamic glaze.
- 2 teaspoons Finely Chopped Fresh Rosemary - Provides fragrant, piney, savory flavor that pairs beautifully with roasted onions. Rosemary enhances the aroma and adds a fresh herbal note to the finished dish.
How To Make Roasted Pearl Onions
- Coat onions. Place onions in a medium bowl. Pour in olive oil, vinegar, salt, pepper, and rosemary. Toss to coat.
- Add to air fryer. Transfer the seasoned onions to the air fryer basket.
- Roast to perfection. Set the air fryer to 400°F for 18-20 minutes or until onions are tender and lightly charred, stirring once or twice during the cook time.
Tips and Tricks for Making Air Fryer Onions
Roasting pearl onions in the air fryer is quick and effortless, but these simple tips will help you achieve perfectly browned, flavorful onions with a soft, melt-in-your-mouth center.
- Use frozen pearl onions. Do not thaw them before you start. The steam from the thawing onions helps them cook.
- Use the sweetest balsamic vinegar you have at hand.
- You can mix up all the ingredients ahead of time and put the mixture in the fridge until you are ready to cook.
- I used this air fryer to make these onions.
- This is the balsamic vinegar I used.
Variations
Roasted pearl onions are incredibly versatile, and these easy variations let you change the flavor profile to match your meal—whether you want something rich and caramelized, bright and zesty, or savory and herbaceous.
- Honey Balsamic Pearl Onions - Add 1–2 teaspoons of honey to the balsamic mixture before roasting for extra caramelization and sweetness.
- Garlic Herb Pearl Onions - Toss the onions with 1 teaspoon garlic powder or 2 minced garlic cloves and replace rosemary with thyme or parsley for a classic, aromatic blend.
- Savory Butter-Roasted Pearl Onions - Swap the olive oil for 2 tablespoons melted butter for a richer, deeper flavor.
What To Eat With Roasted Pearl Onions
Roasted pearl onions are wonderfully versatile. Their sweet, caramelized flavor and tender texture pair beautifully with a wide variety of main dishes, vegetables, and holiday classics. Here are some delicious ways to serve them:
- Roast Beef or Prime Rib - Their sweetness complements the richness of hearty roasted meats.
- Grilled or Roasted Chicken - Pearl onions add a flavorful, slightly tangy side to simple roasted poultry.
- Pork Tenderloin or Pork Chops - The caramelized edges pair beautifully with savory pork dishes.
- Steak or Lamb Chops - A perfect steakhouse-style side that brings brightness to rich red meat.
- Meatloaf - Adds a sweet-savory contrast to a comforting classic.
How Long Do They Last?
Roasted pearl onions store surprisingly well, making them a great make-ahead side dish for busy weeknights or holiday meals.
When kept in an airtight container in the refrigerator, roasted pearl onions will last 3 to 4 days. Their flavors often deepen as they sit, and the balsamic or seasoning blend becomes even more pronounced.
To reheat, warm them gently in the air fryer, oven, or microwave until heated through.
Can You Freeze Them?
If you’d like even longer storage, roasted pearl onions can also be frozen for up to 2 months, though they may soften slightly upon thawing.
More Spectacular Sides
- If you’re looking for more awesome vegan-friendly side dishes, check out my Rosemary Roasted Potatoes . They’re a super easy side dish and are a great use for those extra potatoes in your pantry.
- If you’re want to keep things low carb and are looking for more great side options, try my Air Fried Cauliflower with Tahini . It makes a great side dish, a healthy snack or just a way to use up extra cauliflower in your fridge.
Did I mention that these Roasted Pearl Onions are vegan . Not to mention, they’re also low carb and make for a healthy snack or side dish. You won’t want to skip this recipe.
Roasted Pearl Onions Recipe | Air Fryer Pearl Onions
Ingredients
- ▢ 1 14.5 oz ( 1 14.5 ounce ) Frozen Pearl Onions
- ▢ 2 tablespoons ( 2 tablespoons ) Olive Oil
- ▢ 2 tablespoons ( 2 tablespoons ) Balsamic Vinegar
- ▢ 1/2 teaspoon ( 0.5 teaspoon ) Kosher Salt
- ▢ 1/3 teaspoon ( 0.33 teaspoon ) Ground Black Pepper
- ▢ 2 teaspoons ( 2 teaspoons ) finely chopped fresh rosemary
Instructions
Place onions in a medium bowl. Pour in olive oil, vinegar, salt, pepper, and rosemary. Toss to coat.
Transfer the seasoned onions to the air fryer basket.
Set the air fryer to 400°F for 18-20 minutes or until onions are tender and lightly charred, stirring once or twice during the cook time.
Use frozen pearl onions. Do not thaw them before you start. The steam from the thawing onions helps them cook.
Use the sweetest balsamic vinegar you have at hand.
You can mix up all the ingredients ahead of time and put the mixture in the fridge until you are ready to cook.
I used this air fryer to make these onions.
This is the balsamic vinegar I used.
Get support & connect with our community on Facebook!
Nutrition

If you already signed up, you should have received an email with a password to give you unlimited access to our FREE Printable Library. The password is case sensitive. Enter it below and get printing!
Password:
Roasted Pearl Onions Recipe | Air Fryer Pearl Onions
Ingredients
- 1 14.5 oz Frozen Pearl Onions
- 2 tablespoons Olive Oil
- 2 tablespoons Balsamic Vinegar
- 1/2 teaspoon Kosher Salt
- 1/3 teaspoon Ground Black Pepper
- 2 teaspoons finely chopped fresh rosemary
Instructions
Place onions in a medium bowl. Pour in olive oil, vinegar, salt, pepper, and rosemary. Toss to coat.
Transfer the seasoned onions to the air fryer basket.
Set the air fryer to 400°F for 18-20 minutes or until onions are tender and lightly charred, stirring once or twice during the cook time.
Use frozen pearl onions. Do not thaw them before you start. The steam from the thawing onions helps them cook.
Use the sweetest balsamic vinegar you have at hand.
You can mix up all the ingredients ahead of time and put the mixture in the fridge until you are ready to cook.
I used this air fryer to make these onions.
This is the balsamic vinegar I used.
Roasted Pearl Onions Recipe | Air Fryer Pearl Onions https://twosleevers.com/roasted-pearl-onions/
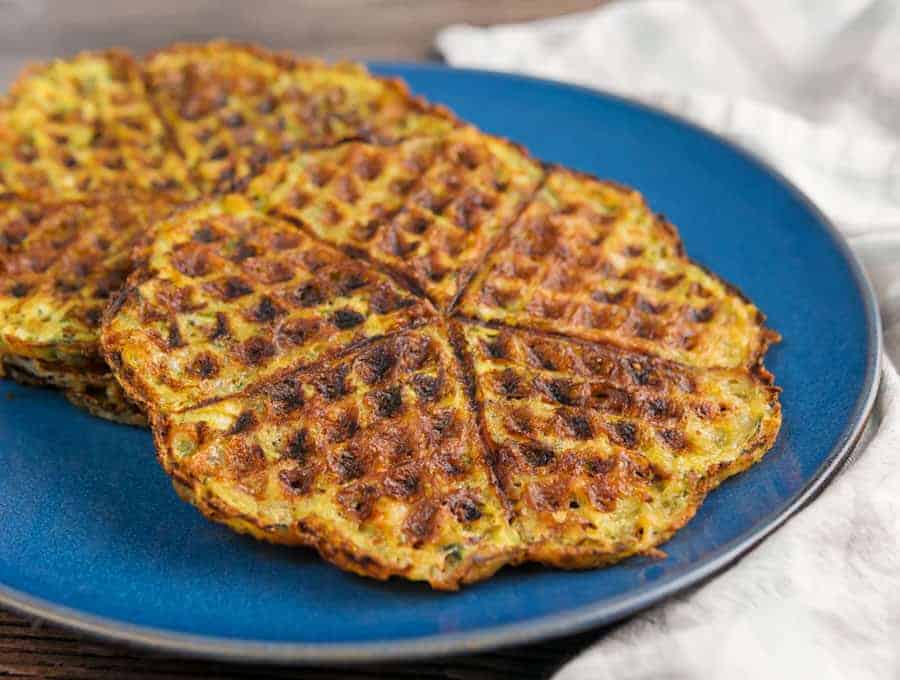
This savory chaffle recipe with zucchini is a great way to sneak in some vegetables while enjoying a delicious keto sandwich bread. Eat this zucchini waffle as a sandwich or just enjoy it as a warm bite of comfort.
These awesome Zucchini Chaffles were originally a contribution to a recipe thread in my Keto support and recipes group (if you’re doing Keto you should join!) by Marian R. I made some modifications to her recipe, and this is what I came up with!
Why Should I Make These Zucchini Chaffles?
- Fast. Made in under 30 minutes . These take about 15 minutes total.
- Easy. Simply mix the ingredients and cook in your Dash Waffle Maker .
- Keto . Only 3 net carbs per serving.
- Vegetarian . A great vegetarian option to add to your lunch or snack .
There are so many reasons. I make them because they’re delicious. It’s like a savory zucchini bread , and the flavors are warm and inviting. It’s also a great way to utilize zucchini and add some greens into your diet.
What Is A Chaffle?
Good question! A chaffle is an incredible way to eat waffles while you’re eating low-carb. The word chaffle comes from a combination of the words cheese and waffle . The most basic version of the recipes can be made with only cheese and eggs in a waffle iron.
Ingredients You’ll Need
- 1 cup Zucchini - The star of the recipe, zucchini adds moisture, mild flavor, and a tender texture to the waffles while boosting their nutritional value with fiber and vitamins.
- 1 Egg - Acts as a binder that holds the grated zucchini and cheeses together, ensuring the waffles maintain their shape and don’t fall apart during cooking.
- 1/2 cup Shredded Parmesan Cheese - Adds a salty, nutty flavor and helps crisp up the waffles, creating a golden, cheesy crust as it melts.
- 1/4 cup Shredded Mozzarella Cheese - Contributes a gooey, melty texture and mild creaminess that balances the sharper Parmesan flavor.
- 1 teaspoon Dried Basil - Infuses the waffles with a fragrant, slightly sweet, and peppery herb flavor that complements the zucchini and cheese perfectly.
- 3/4 teaspoon Salt - Enhances the overall flavor and helps draw out excess moisture from the grated zucchini before mixing it with the other ingredients.
- 1/2 teaspoon Ground Black Pepper - Adds a subtle heat and depth of flavor, balancing the richness of the cheese and the freshness of the zucchini.
How Do You Make Zucchini Chaffles?
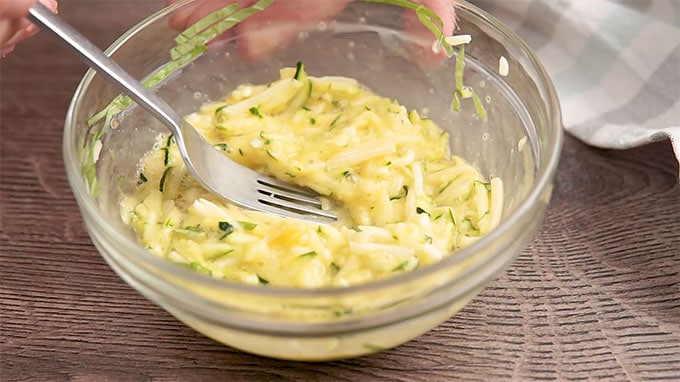
Sprinkle about 1/4 teaspoon of salt on the zucchini and let it sit while you gather your ingredients. Just before using, wrap the zucchini in a paper towel, and press to squeeze out all the excess water,
In a small bowl, beat the egg. Add in grated zucchini, mozzarella, basil, 1/2 teaspoon salt, and pepper.
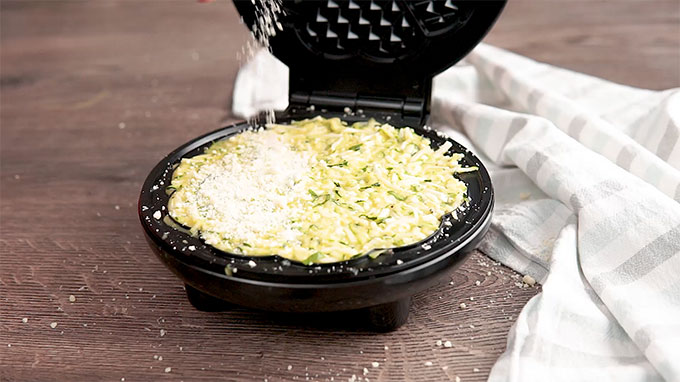
- Sprinkle 1-2 tablespoons of shredded parmesan to cover the bottom of the waffle iron.
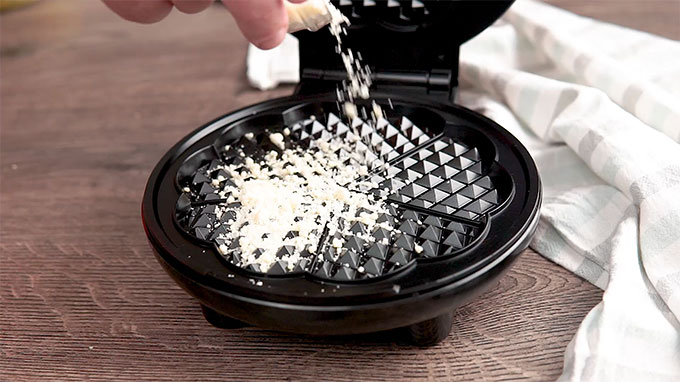
- Spread 1/4 of the zucchini mixture. Top with another 1-2 tablespoons of shredded parmesan and close the lid. Use enough to cover the surface. Watch the video to see how.
- Allow the zucchini chaffle to cook for 4-8 minutes depending on the size of your waffle maker. Typically, when the chaffle has stopped emitting clouds of steam, it is almost done. For best results, allow it to cook until well browned.
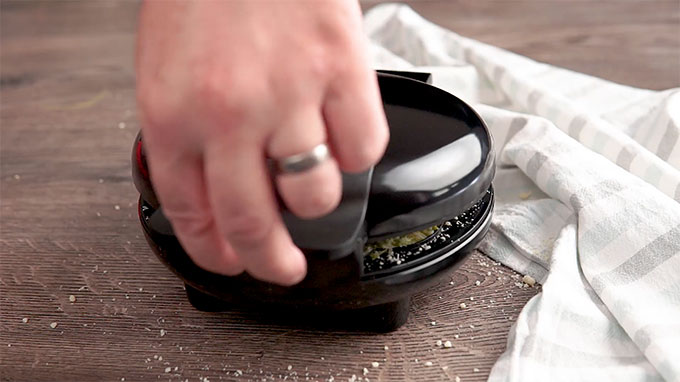
- Remove and repeat for the next waffle(s).
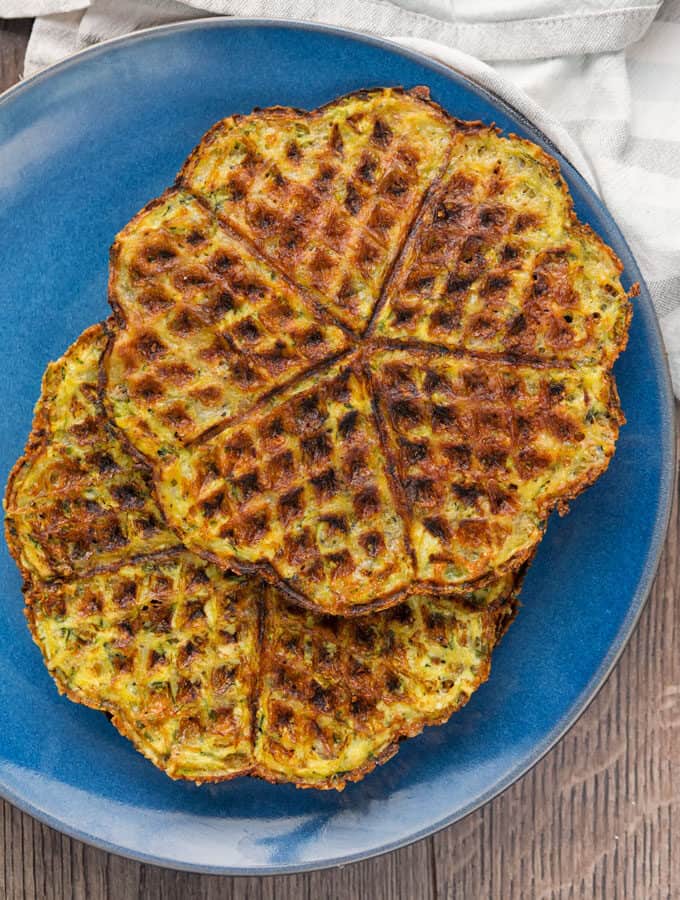
Makes 2 full-size chaffles or 4 small chaffles in the Dash Mini Waffle Maker .
Watch a Video on How to Make Savory Zucchini Waffles
Can Waffles Be Savory?
Chaffles are actually one of the ways people who choose to eat Keto or low-carb are eating sandwiches and burgers. The Dash Mini Waffle Maker makes these chaffles the perfect size for sandwiches or burgers. These zucchini chaffles make excellent sandwich bread, with incredible flavor!
Tips And Tricks
Making zucchini chaffles is simple, but a few smart tips can help you achieve the perfect crispy texture and balanced flavor every time. Here are some helpful tricks to keep in mind:
- Patience . That’s the best tip. They don’t take very long but if you want a crisp keto waffle, you are just going to have to be a little patient and let it take the 5-7 minutes that it takes to crisp up. Just when you think it’s done? Give it another minute or two. Don’t rush.
- Layering . Don’t skimp on the cheese on the top and bottom. Use more than the recipe calls for if you think you need it. It’s the crispy cheese on the bottom and top that will make them crispy.
- Shallow waffles. If you want crispy waffles, the shallower the waffle iron, the easier/faster it is to crisp up the chaffle.
- No overfilling. Overfilled chaffle makers… well, they overflow of course. Which makes a huge mess! So if in doubt, underfill rather than overfill. No more than 1/4 cup of TOTAL ingredients at a time.
- No peeking . I can tell you from LOTS of personal experience, that opening the waffle iron every 30 seconds “just to check” doesn’t help the chaffle cook any faster. Your best bet is to not even open it for 4-5 minutes.
- Get hot. Wait until the waffle iron is hot before you add ingredients, and they’re a lot less likely to stick, and a lot easier to clean up.
- Crispy Cooling. Allow the chaffles to cool before eating. They get crisper as they cool, so try not to stuff the hot chaffle into your mouth right away.
- Make lots . Make enough to share, everyone will want them, no matter whether they’re keto or not.
Variations
If you love the versatility of zucchini chaffles, there are plenty of ways to switch up the flavors and textures to suit your taste. Here are some delicious variations to try:
- Cheesy Garlic Zucchini - Add a clove of minced garlic and a sprinkle of Italian seasoning for a savory, garlicky twist.
- Spicy Jalapeño - Mix in diced jalapeños or a pinch of red pepper flakes for a bit of heat.
- Breakfast - Stir in cooked bacon crumbles or sausage bits for a hearty, protein-packed morning meal.
- Herb and Feta - Replace mozzarella with crumbled feta and add chopped dill or parsley for a Mediterranean flair.
How To Eat Zucchini Waffles
These Zucchini Chaffles also make excellent buns for burgers , or bread for sandwiches. There’s nothing like a gooey, hot ham and cheese with a Zucchini Chaffle as the bread!
How Long Do They Last?
Zucchini chaffles can last for about 3 to 4 days when stored properly in the refrigerator. After cooking, let them cool completely to prevent condensation, then store them in an airtight container or wrap them in parchment paper between layers to keep them from sticking together.
When you’re ready to enjoy them again, simply reheat them in a toaster oven or air fryer for a few minutes to restore their crispy texture.
Can You Freeze Them?
If you’d like to keep them longer, zucchini chaffles also freeze well for up to 2 months. Just place them in a freezer-safe bag with parchment between each one.
Reheat directly from frozen for a quick, low-carb snack or meal anytime.
Our Best Zucchini Recipes
- Zucchini Pancakes
- Roasted Zucchini
- Air Fryer Zucchini
- Zucchini Noodles
- Air Fryer Zucchini Fries
If you love these Zucchini Chaffles as much as I do, make sure you share them on Facebook and Pinterest so your friends can try them too.
Keto Zucchini Chaffle Recipe | Low Carb Zucchini Waffles
Equipment
- Dash Mini Waffle Maker
- Cuisinart Classic Waffle Maker
- Honeycomb Silicone Mat
Ingredients
- ▢ 1 cup Zucchini , grated
- ▢ 1 Eggs , beaten
- ▢ 1/2 cup shredded parmesan cheese
- ▢ 1/4 cup shredded mozzarella cheese
- ▢ 1 teaspoon Dried Basil , or 1/4 cup fresh basil, chopped
- ▢ 3/4 teaspoon Kosher Salt , divided
- ▢ 1/2 teaspoon Ground Black Pepper
Instructions
- Sprinkle about 1/4 teaspoon of salt on the zucchini and let it sit while you gather your ingredients. Just before using, wrap the zucchini in a paper towel, and press to squeeze out all the excess water.
- In a small bowl, beat the egg. Add in grated zucchini, mozzarella, basil, 1/2 teaspoon salt, and pepper.
- Sprinkle 1-2 tablespoons of shredded parmesan to cover the bottom of the waffle iron.
- Spread 1/4 of the zucchini mixture. Top with another 1-2 tablespoons of shredded parmesan and close the lid. Use enough to cover the surface. Watch the video to see how.
- Allow the zucchini chaffle to cook for 4-8 minutes depending on the size of your waffle maker. Typically, when the chaffle has stopped emitting clouds of steam, it is almost done. For best results, allow it to cook until well browned.
- Remove and repeat for the next waffle(s).
- Makes 2 full-size chaffles or 4 small chaffles in the Dash Mini .
Watch The Video
- Don’t overfill! Use a max of 1/4 cup of the chaffle mixture in the Dash Mini at one time.
- These freeze well. Freeze them, and then re-heat them in the toaster or your air fryer to re-gain crispiness.
- Use these to eat alone with some butter, or as a sandwich bread alternative.
Get support & connect with our community on Facebook!
Nutrition
Don’t forget to check out my other Ketocookbooks.
Keto Instant Pot, Keto Fat Bombs, Sweets, & Treats , and Easy keto in 30 minutes.

