


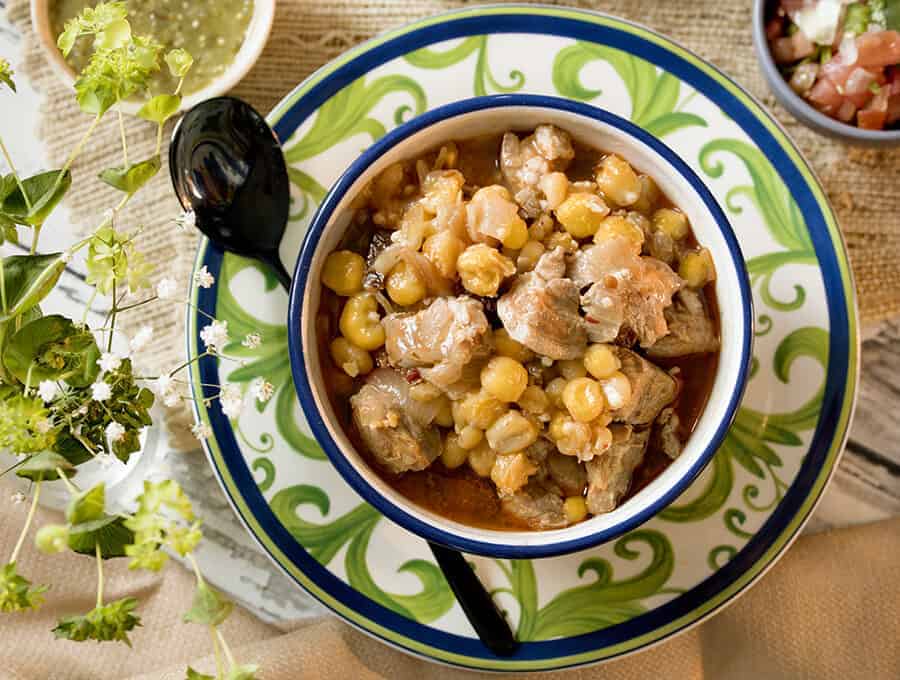
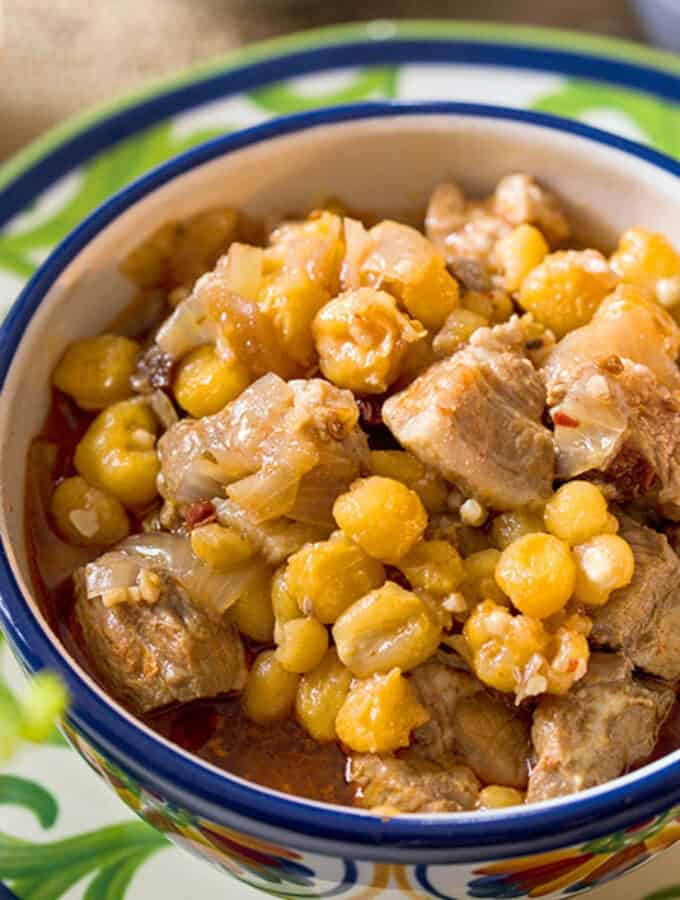
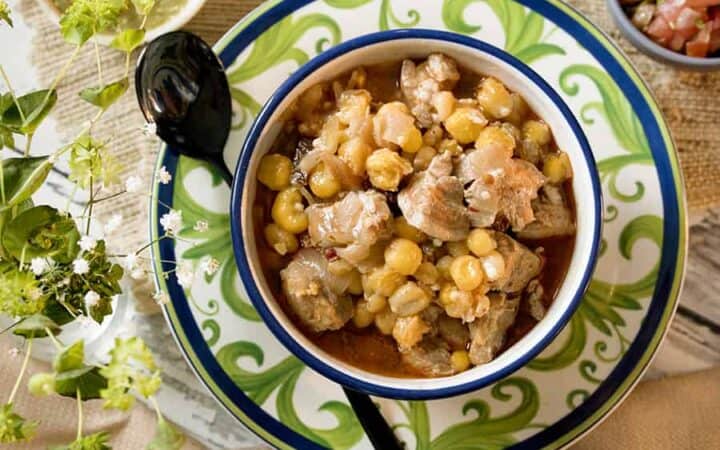
Pozole Rojo is a traditional Mexican pork-and-hominy soup/stew made with pork shoulder, posole (hominy), onion, garlic, and red chile flavor from chipotle in adobo plus spices like oregano and cumin. It’s traditional and weeknight-friendly and works well for a cozy family dinner when you want bold, comforting flavors without an all-day simmer. Unlike classic pozole rojo recipes that simmer pork with dried chiles for hours, this version uses the Instant Pot and a “dump-and-cook” shortcut with chipotle in adobo for a rich red broth in under an hour.
What Is Posole?
First of all, it’s delicious. So you could stop reading right there and know you should make this recipe. However, I know you probably actually want to know what is in it.
Posole is a pork-based soup that is loaded with meat, vegetables, spices, and lots of hominy to make it a hearty, comfort food.
What Makes ThisInstant Pot RecipeSo Good?
The secret to this Pozole Rojo recipe is the shortcut. What’s the short cut you ask me? Well, there’s two of them.
One, I wanted to make something without dried guajillo and ancho chiles because they aren’t sold in every part of the country.
Two, I wanted to see if I could approximate the taste of a Pork Pozole recipe without creating the sauce with the guajillo/ancho blended sauce, which is one additional step. You know how I love " pour it in a pot and go " type of cooking.
Pozole Ingredients
- Pork Shoulder meat - cut into bite-sized pieces
- Chopped Onion - enhances the flavor of the dish.
- Garlic - 3-4 cloves, but who is counting?
- Canned Hominy (White Pozole) - avoid using dried hominy.
- Red Chile Sauce - I used chipotle chile in adobo.
- Chicken Broth - I used water, but chicken broth is good too. Add more than directed for this to eat more like soup.
- Lime Wedges - add some extra flair for finishing.
- Radishes - add some freshness with a sliced radish topping.
- Shredded Cabbage - Another great topping.
How Does This Differ From A Traditional Red Pozole Recipe?
Traditionally, you’d use dried guajillo chiles, dried chiles de Arbol, and/or dried ancho chilis. You’d heat these in hot water, blend the chilis and the water once the chilis are softened, and that would be your sauce.
I used canned chipotle chilis in adobo sauce to approximate the taste of this in my Pozole recipe .
Be warned, I put in 3 chilis because I wanted it spicy. If you want to go easy on the spice, use only one and see how it tastes to you. You can always add more later.
I also used canned posole in this Instant Pot Pork Posole recipe because I didn’t have dried ones. And I used pork shoulder (also called pork butt) because it is a cheap cut of meat that is fatty and can be tough, but very tender when pressure cooked.
In fairness, I do think those shortcuts impact the taste a bit, but not enough to prevent me from making this Pozole Rojo again. A Mexican friend, as well as my husband who ate a lot of Pork Posole in Mexico, felt it was authentic enough, and it is still very tasty!
How To Make Pozole Rojo
Place all ingredients except cilantro in your Instant Pot , stir well, and set for 30 minutes at High Pressure.
Allow to release pressure naturally, check pork for doneness, check stew for flavor, add chilis or salt as needed, garnish with cilantro and serve.
Is It Spelled Posole or Pozole?
Both. It seems that in Mexico, the preferred spelling is Pozole . However, in other countries, Posole tends to be commonly used as well. My recipe for Pozole Rojo will be so delicious you’ll be too busy eating to worry about how it’s spelled.
How To Make Pork Pozole In A Slow Cooker
With the help of your slow cooker, this is a totally easy posole recipe . Here’s how you do it:
- Cut pork into bite-size pieces.
- Add all ingredients except for cilantro to your slow cooker.
- Cook on high for 4-5 hours or 8 hours on slow.
- Add cilantro to finish.
Tips And Tricks For Making Instant Pot Posole
- If you like your hominy stew to have a little bite, I suggest you put in half the can while cooking so it flavors and thickens a bit, and save the other half to add after cooking. I put all mine in.
- You can also use hominy grits (with liquid) if you’d prefer.
- If you’d prefer to make this pozole with chicken, I suggest you use boneless, skinless chicken thighs and cook for 10 minutes under pressure. At the end of the cooking time, allow the pot to rest undisturbed for 10 minutes, and then release all remaining pressure. Just like that, you will have a fabulous pozole de pollo, or a chicken pozole.
For Instant Pot pozole rojo, the best pork cut is pork shoulder (also called pork butt/Boston butt) because its fat and collagen break down under pressure, giving you tender, shreddable meat and a richer pozole rojo broth. If you prefer a leaner soup, pork loin works, but it can turn dry and less flavorful in a pressure cooker, so keep pieces larger and avoid overcooking. For the most authentic, cozy instant pot pork pozole with hominy, shoulder is the most forgiving and delivers the best texture every time.
To thicken Instant Pot pozole rojo without ruining it, the safest method is to simmer it uncovered on Sauté for a few minutes so the broth reduces and concentrates. This keeps the flavor true without making it gummy. If you need more body, stir in a small amount of masa harina slurry (mix masa harina with cool water first) and simmer gently until it thickens. Start with a little because it can go from silky to pasty fast. You can also blend a cup of the hominy + broth and stir it back in for natural thickness. This is great for instant pot pork pozole with hominy while keeping that classic red chile flavor intact.
Yes, it’s a good idea to rinse and drain canned hominy before making Instant Pot pozole rojo. Rinsing washes off the canning liquid, which can taste a little starchy or “tinny,” so your pozole rojo broth tastes cleaner and the hominy texture stays pleasantly chewy. Just dump the hominy into a colander, rinse under cold water, and drain well before adding it to your instant pot pork pozole with hominy.
Looking For More Delicious Mexican Food Recipes?
- Low Carb Taco Chile Relleno Casserole - Takes the best of both tacos and Chile Rellenos and molds them into one.
- Mexican Pulled Pork . A traditional pulled pork recipe that adds a Mexican twist.
- Mexican Corn Eloté - Sweet, savory and you’ll want to eat up every bit of it.
Pozole Rojo | Easy Instant Pot Pork Posole Recipe
Equipment
- Instant Pot
Ingredients
- ▢ 1 pound ( 453.59 g ) Boneless Pork Shoulder , cut into bite size cubes
- ▢ 1 ( 1 ) Onion , chopped
- ▢ 3-4 cloves ( 3 cloves ) Garlic
- ▢ 25 ounces ( 708.74 g ) posole , or hominy grits with liquid
- ▢ 1-3 ( 1 ) Chipotle Chile in Adobo Sauce , chopped, and with 1-3 teaspoons of the sauce (about half a small can)
- ▢ 1 teaspoon ( 1 teaspoon ) Dried Oregano
- ▢ 2 teaspoons ( 2 teaspoons ) Ground Cumin
- ▢ 2 teaspoons ( 2 teaspoons ) Ancho Chile Powder
- ▢ 1 teaspoon ( 1 teaspoon ) Kosher Salt
- ▢ 3/4 cup ( 187.5 g ) Water
- ▢ 1/4 cup ( 4 g ) Cilantro , chopped
Instructions
Place all ingredients except cilantro in your Instant Pot , stir well, and set for 30 minutes at High Pressure.
Allow to release pressure naturally, check pork for doneness, check stew for flavor, add chilis or salt as needed, garnish wth cilantro and serve.
If you like your hominy to have a little bite, I suggest you put in half the can while cooking so it flavors and thickens a bit, and save the other half to add after cooking. I put all mine in.
You can also use hominy grits (with liquid) if you’d prefer.
If you’d prefer to make this with chicken, I suggest you use boneless, skinless chicken thighs and cook for 10 minutes under pressure. At the end of the cooking time, allow the pot to rest undisturbed for 10 minutes, and then release all remaining pressure. Just like that, you will have a fabulous pozole de pollo, or a chicken pozole.
Get support & connect with our community on Facebook!
Nutrition
Don’t forget to check out my otherBest-selling Instant Pot Cookbooks!
Indian Instant Pot , Keto Instant Pot, Instant Pot Fast and Easy , Healthy Instant Pot & Vegetarian Instant Pot .

First Published April 2017

If you already signed up, you should have received an email with a password to give you unlimited access to our FREE Printable Library. The password is case sensitive. Enter it below and get printing!
Password:

Pozole Rojo | Easy Instant Pot Pork Posole Recipe
Ingredients
- 1 pound Boneless Pork Shoulder cut into bite size cubes
- 1 Onion chopped
- 3-4 cloves Garlic
- 25 ounces posole or hominy grits with liquid
- 1-3 Chipotle Chile in Adobo Sauce chopped, and with 1-3 teaspoons of the sauce (about half a small can)
- 1 teaspoon Dried Oregano
- 2 teaspoons Ground Cumin
- 2 teaspoons Ancho Chile Powder
- 1 teaspoon Kosher Salt
- 3/4 cup Water
- 1/4 cup Cilantro chopped
Instructions
Place all ingredients except cilantro in your Instant Pot , stir well, and set for 30 minutes at High Pressure.
Allow to release pressure naturally, check pork for doneness, check stew for flavor, add chilis or salt as needed, garnish wth cilantro and serve.
If you like your hominy to have a little bite, I suggest you put in half the can while cooking so it flavors and thickens a bit, and save the other half to add after cooking. I put all mine in.
You can also use hominy grits (with liquid) if you’d prefer.
If you’d prefer to make this with chicken, I suggest you use boneless, skinless chicken thighs and cook for 10 minutes under pressure. At the end of the cooking time, allow the pot to rest undisturbed for 10 minutes, and then release all remaining pressure. Just like that, you will have a fabulous pozole de pollo, or a chicken pozole.
Pozole Rojo | Easy Instant Pot Pork Posole Recipe https://twosleevers.com/pozole-rojo/


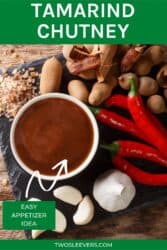
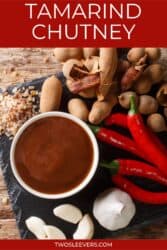
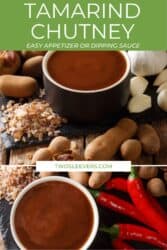
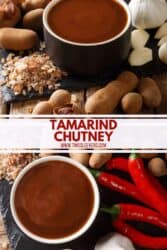
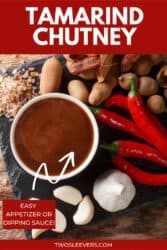


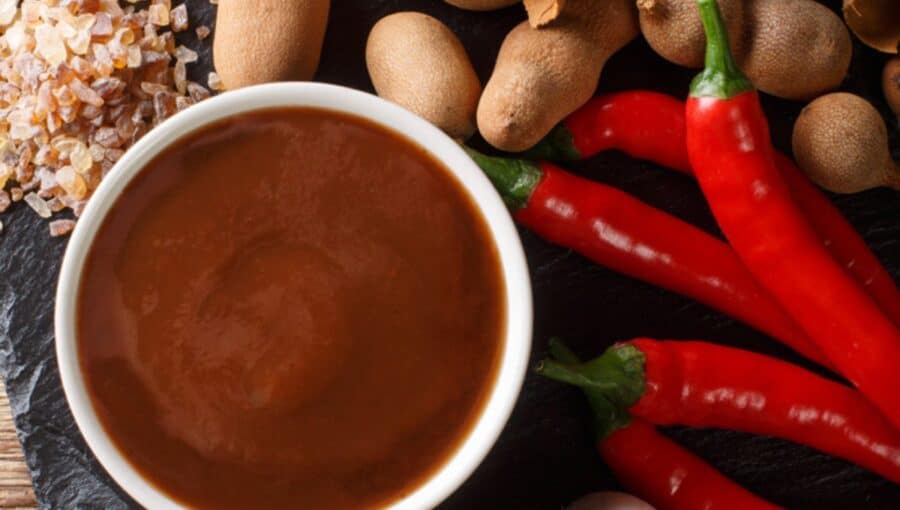
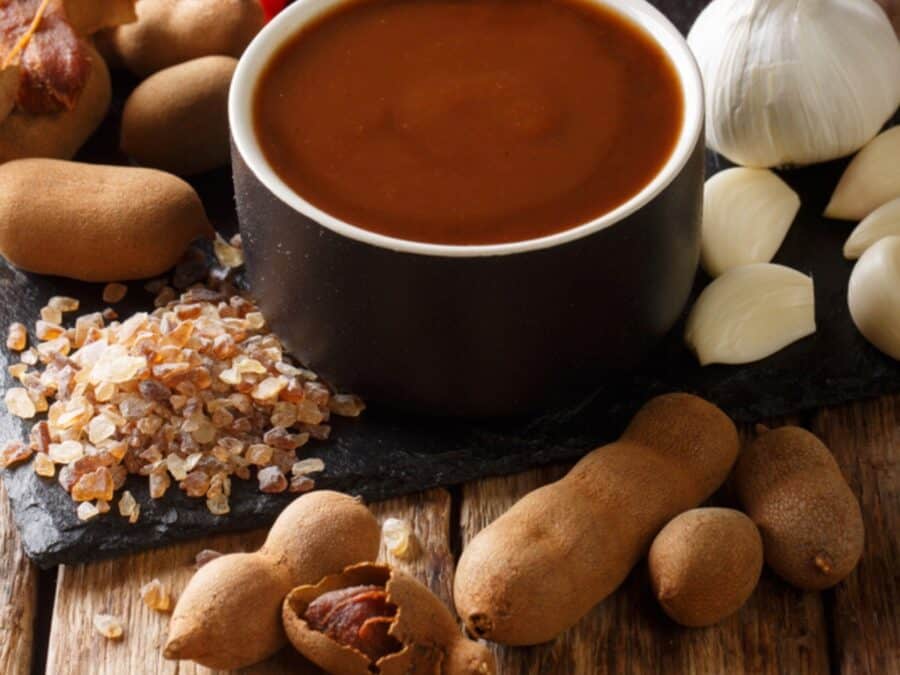
Tamarind sauce glaze is a sweet-and-sour chutney-style sauce made with tamarind paste, hot water, salt, cayenne, and warm spices like cumin and coriander. It’s quick and works well for a weeknight dip or glaze for everything from samosas and pakoras to chicken wings and grilled meats. Unlike store-bought tamarind chutney that can taste one-note and overly sweet, this version is a 5-minute microwave tamarind sauce recipe you can tweak for sweet, spicy, or extra tangy balance.
What Is A Tamarind?
Tamarind is a tree that produces edible tropical fruit. The tamarind tree grows pods that have an edible pulp inside.
Tamarind concentrate is what I used for this tamarind chutney sauce . It can be difficult for some to find in stores. If you have trouble finding it, you can purchase tamarind concentrate here .

What Does Tamarind Sauce Taste Like?
The flavor of tamarind chutney can vary depending on how you adjust the recipe. It can be anything from a sweet sauce or chutney to a tart sauce. Here’s how to modify it to your liking:
- Sweet . Add more sweetener of your choice for a sweet tamarind chutney .
- Spicy . Add more cayenne to kick up the spice on this tamarind chutney sauce .
- Tangy . Make the recipe as is. Add more tamarind paste to taste.
What Is Tamarind Sauce Made Of?
This sauce is made mostly of concentrates and spices. Here are the ones I used:
- 1 TBSP Tamarind Paste - The star ingredient and flavor base. It brings the signature tangy, slightly sour, and fruity taste that defines tamarind sauce or chutney.
- 1/2 Cup Water - Helps dissolve the paste and spices, adjusting consistency depending on whether you want a thicker chutney or a thinner sauce/glaze.
- 1/2 tsp Kosher Salt - Enhances all the flavors, balancing the sweet, spicy, and tangy notes so the sauce isn’t flat.
- 1/2 tsp Cayenne Pepper - Adds heat and a subtle smokiness, giving the sauce its spicy kick.
- 1 TBSP Agave Nectar - Provides natural sweetness to balance the tartness of tamarind. It also gives the sauce a smoother, more rounded flavor.
- 1/2 tsp Ground Cumin - Infuses earthy, warm undertones that complement tamarind’s brightness and add depth to the overall flavor.
- 1/2 tsp Ground Coriander - Brings a citrusy, slightly floral note that pairs beautifully with tamarind, making the sauce taste more vibrant.
- 1/2 tsp Splenda - A sugar substitute that lightens the sweetness without adding calories. It balances the tart tamarind while keeping the sauce diabetic-friendly or lower in sugar.
Traditional Indian tamarind chutney uses jaggery (a coarse dark brown sugar made in India by evaporation of the sap of palm trees) and ground ginger, and is cooked for a long time. But not everyone has those things in their kitchen, so I made it with ingredients that are more easily accessible.
If you have ground ginger, you can add 1/4 teaspoon and try it. Add more to taste, as it can be a little spicy.
Can I Make Tamarind Chutney With Dried Tamarind?
Yes, you can. If you can get dried tamarind pods, soak the pods in hot water for 15-20 minutes. Then use your fingers to squeeze out the tamarind pulp.
This will be less concentrated than the tamarind paste that you can buy so you may need to use a ball of tamarind about the size of your fist. Soak and squeeze twice.
How To Make Tamarind Sauce
Have you been wondering how to make tamarind chutney ? It’s as easy as these simple steps:
- Mix. Combine water and tamarind paste until all lumps have dissolved.
- Add. All other ingredients.
- Microwave. 5 minutes, stirring halfway through.
- Taste and adjust. You want a good mix of hot (cayenne), sweet (agave & Splenda), spiced (cumin & coriander), and tart (tamarind).
- Serve.
Tamarind Chutney is basically just a thicker version of this and is generally used for dipping Indian fried foods like samosas or pakoras.
For a thicker tamarind chutney recipe , use less water. For thinner tamarind sauce or glaze, add more water. Otherwise, it’s the same exact recipe.
Tips And Tricks
Making homemade tamarind sauce at home is quick and easy, but a few simple tricks can help you perfect the balance of flavors every time.
- Adjust the consistency. Use less water for a thick chutney-style dip, or more water if you want a pourable glaze.
- Balance the flavors. Taste as you go. Try to add extra sweetener if it’s too tart, more cayenne if you like heat, or a pinch more salt to round things out.
- Use fresh spices. Ground cumin and coriander lose potency over time, so using fresh spices makes the sauce more aromatic and flavorful.
Variations
One of the best things about tamarind sauce is how easy it is to customize. Whether you love it sweet, spicy, or extra tangy, here are a few ways to make it your own:
- Sweet - Add more agave nectar, honey, or even jaggery for a rich sweetness that balances the tartness. This version pairs beautifully with fried snacks like samosas or pakoras.
- Spicy - Kick up the cayenne or stir in a little chili powder, red chili flakes, or hot sauce for a bold, fiery bite. This is great with grilled meats, kababs, or wings.
- Tangy - Increase the amount of tamarind paste for a sharper, more tart flavor. Perfect as a glaze for roasted vegetables or as a dipping sauce when you want that extra punch.
What Do You Use Tamarind Sauce For?
When people go into Indian restaurants in the US, they often get served mint chutney and tamarind chutney together with roasted or fried papads.
Though delicious, this is not how it’s traditionally consumed.
- Samosas
- Bhel
- Kachoris
- Kababs
- Dahi Wada
- Savory Potato Patties
- French Fries
- Veggies
Basically, it’s good for everything. Especially my favorite Indian Street Foods.
How Long Does It Last?
Tamarind sauce typically lasts up to 1 week in the refrigerator when stored in an airtight container. The flavors actually deepen as it sits, making it taste even better after a day or two.
Can You Freeze Tamarind Chutney?
For longer storage, you can freeze tamarind sauce in small portions, such as ice cube trays or freezer-safe jars, for up to 3 months.
Just thaw what you need in the fridge overnight or reheat gently in the microwave or on the stovetop before serving.
The difference between tamarind paste vs tamarind concentrate vs tamarind sauce mostly comes down to strength and added ingredients. Tamarind paste is usually pure (or near-pure) tamarind pulp with a thick texture and tangy flavor, making it the most common base for a homemade tamarind sauce. Tamarind concentrate is a more reduced, stronger form (often thicker and more intense), so you typically use less and dilute it when following a tamarind sauce recipe. Tamarind sauce is a ready-to-use, seasoned product that is often sweetened and sometimes salted/spiced, and is meant for quick use as a tamarind dipping sauce or shortcut for dishes like tamarind sauce for pad thai. It can be less tart and sweeter than a sauce made from paste or concentrate.
To thin the tamarind sauce, whisk in warm water or broth a tablespoon at a time until it reaches the consistency you want. This works best for a tamarind dipping sauce or tamarind sauce for pad thai when it’s too thick to coat noodles evenly. If you’re starting from tamarind paste, dilute it with warm liquid first, then adjust the seasoning so it doesn’t taste washed out. If you used tamarind concentrate, add a bit more water and stir well since it’s extra strong. Warm the sauce gently and whisk to smooth out any lumps, then taste and rebalance the sweet-tart flavor if needed.
If your homemade tamarind sauce is too sour, balance the acidity by adding a sweetener in small increments (½–1 tsp at a time), which is the quickest fix for a sweet-and-sour tamarind sauce or tamarind sauce for pad thai. Next, add a tiny pinch of salt to round out the flavor and reduce the sharp “pucker” effect, then simmer for a minute so the taste smooths out. If it’s still aggressively tart, dilute slightly with a splash of warm water to soften the intensity. This is especially helpful if you started with tamarind concentrate, which is stronger than tamarind paste. Taste after each adjustment until it lands in that sweet-tangy balance.
If you don’t have tamarind, the best tamarind sauce substitute is a quick sweet-tart combo. Use lime or lemon juice plus a little brown sugar (or another sweetener) to mimic tamarind’s tangy, fruity acidity. It’s great in an easy tamarind sauce recipe or when you need a shortcut tamarind sauce for pad thai. For extra depth, add a small splash of vinegar (rice or apple cider) and a pinch of salt to round it out, then taste and adjust until it hits that sweet-and-sour balance. It won’t be identical, but it’ll get you very close in marinades, stir-fries, and dipping sauces.
The difference between tamarind sauce and pad thai sauce is that tamarind sauce is usually a more general sweet-tart condiment used as a tamarind dipping sauce, glaze, or stir-fry booster. Pad Thai sauce is a specific, balanced blend built for noodles. It’s typically made from combining tamarind (paste or concentrate) with sweet and salty elements to create that signature sweet-sour-savory flavor that coats pasta evenly. In other words, tamarind sauce for pad thai can be a component, but true pad thai sauce is a more complete, ready-to-cook seasoning mix designed specifically for pad thai’s taste and texture.
If you’re wondering why your tamarind sauce is bitter, it’s usually because the tamarind base is too concentrated, or the sauce was simmered too long, which can make the tart notes taste harsh. Bitterness can also come from scorched garlic/onion if you sautéed aromatics too hot before building a homemade tamarind sauce. To fix it, thin the tamarind sauce with a little warm water, then rebalance with a small amount of sweetener and a pinch of salt. Gently warm (don’t aggressively boil) and taste as you go until it returns to a smooth, sweet-tangy profile.
Want More Indian Recipes?
- Butter Chicken
- Chicken Korma
- Chicken Vindaloo
- Ghee
- Rice and Dal
It can be hard to find in stores, so it’s best to know how to make it whenever you want it, especially since it’s so simple! I also make this Indian Green Chutney that’s amazing too!

Tamarind Sauce | Tamarind Chutney
Ingredients
- ▢ 1 tablespoon ( 1 tablespoon ) concentrated tamarind paste
- ▢ 1/2 cup ( 1 tablespoon ) hot water
- ▢ ½ teaspoon ( 0.5 teaspoon ) Kosher Salt
- ▢ ½ teaspoon ( 0.5 teaspoon ) Cayenne Pepper
- ▢ 1 tablespoon ( 1 tablespoon ) agave nectar
- ▢ ½ teaspoon ( 0.5 teaspoon ) Ground Cumin
- ▢ ½ teaspoons ( 0.5 teaspoons ) Ground Coriander
- ▢ ½ teaspoon ( 0.5 teaspoon ) Splenda
Instructions
Mix water and tamarind paste together until all lumps have been dissolved.
Add all other ingredients.
Microwave for 5 minutes, stirring halfway through.
Taste and adjust. You want a good mix of hot (cayenne), sweet (agave & Splenda), spiced (cumin & coriander) and tart (tamarind).
Serve with fritters, latkes, tater tots, french fries, or use as a glaze for grilled meats and cooked chicken wings.
If you’re making this with tamarind pods, soak the peeled tamarind for 30 minutes and then using your fingers or a strainer, remove the tamarind pulp and discard the pith. Then proceed as recommended.
You can sub honey and sugar for the Agave and Truvia if you don’t need to stay low carb.
Get support & connect with our community on Facebook!
Nutrition
Don’t forget to check out my other Ketocookbooks.
Keto Instant Pot, Keto Fat Bombs, Sweets, & Treats , and Easy keto in 30 minutes.

