
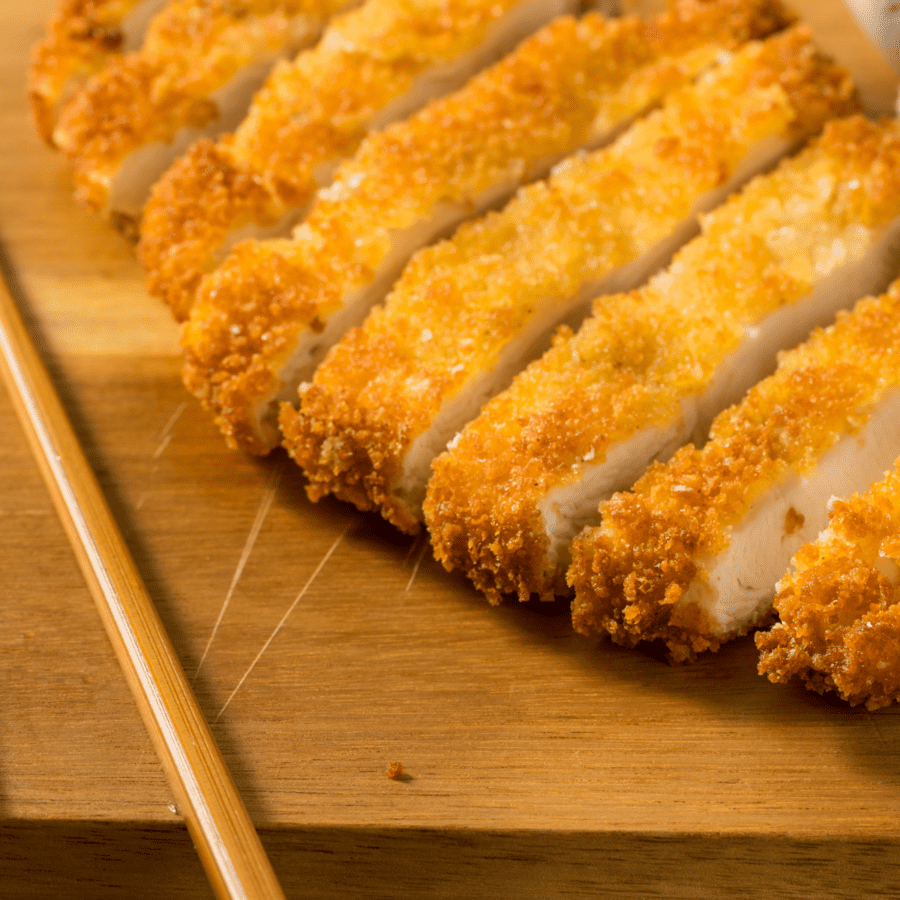
Pork katsu is a delicious Japanese dish that consists of breaded and fried pork cutlets. Traditionally, it is deep-fried in oil, but with the help of your air fryer you can make this crispy and flavorful dish with less oil and less mess and calories.

Why You’ll Love Making It In Your Air Fryer
- Fast. ready in under 30 minutes with the help of your air fryer .
- Easy. Bread the pork , spray it with oil, and let the air fryer do the rest.
- High Protein . Tonkatsu has an impressive 30 grams of protein per serving.
- Few Ingredients. Not including salt and pepper to season it, you’ll need under 5 ingredients to make this recipe.
Making pork katsu in the air fryer is a quick and easy way to enjoy this classic Japanese dish without the hassle of deep-frying. With a few simple ingredients and some basic cooking techniques, you can create a delicious and crispy meal that will impress your friends and family.
What Is The Difference Between Katsu And Tonkatsu?
Katsu and tonkatsu are both Japanese dishes that consist of breaded and fried meat cutlets. The main difference between the two is the type of meat that is used and the sauce that is served with them.
Katsu refers to any breaded and fried meat cutlet and can be made with chicken, beef, or pork.
Tonkatsu, on the other hand, specifically refers to a pork cutlet that is breaded and fried.
What Is The Difference Between Katsu And Katsudon?
Katsu and katsudon are both Japanese dishes that feature a breaded and fried cutlet of meat, typically pork, served in different ways. The main difference between the two lies in how they are served and what other ingredients they are served with.
While both katsu and katsudon feature a breaded and fried cutlet of meat, katsudon is a more complete meal that includes rice and a variety of toppings. Katsu is often served on its own or as a simple dish with rice and cabbage.
Ingredients You’ll Need
- Boneless pork chops- Pound out boneless pork chops until they are 1/2" thick, or use pork cutlets that are already sliced extremely thin.
- All-purpose flour - Creates the base of the breading.
- Eggs - Helps the flour and breadcrumbs stick to the pork cutlet.
- Panko breadcrumbs - Creates a crispy and crunchy breading that mimics the katsu texture you know and love.
- Cooking Spray - A quick spray on the breaded pork will help the panko crisp up beautifully.
- Salt - Accentuates the natural flavors of the pork.
- Pepper - Adds just a hint of heat to the breading.
How To Make Pork Katsu
- First, preheat your air fryer to 400°F.
- Season the pork chops with salt and pepper on both sides.
- Set up your breading station with flour, beaten eggs, and panko breadcrumbs in three separate shallow dishes.
- Dip each pork chop in the flour, shaking off any excess, then dip it in the beaten egg, and finally coat it in the panko breadcrumbs. Press the breadcrumbs firmly onto the pork chop to ensure a good coating.
- Place the breaded pork chops on a plate or tray.
- Spray both sides of the pork chops with cooking spray. This will help them brown and become crispy in the air fryer.
- Place the pork chops in the air fryer basket, leaving some space between each piece. If necessary, you can cook them in batches.
- Cook the pork chops in the air fryer for 10-12 minutes or until they are golden brown and cooked through. You can flip them halfway through cooking for even browning.
- Once the pork chops are cooked, remove them from the air fryer and let them rest for a few minutes before serving. This will allow the juices to redistribute and ensure that they are juicy and tender.
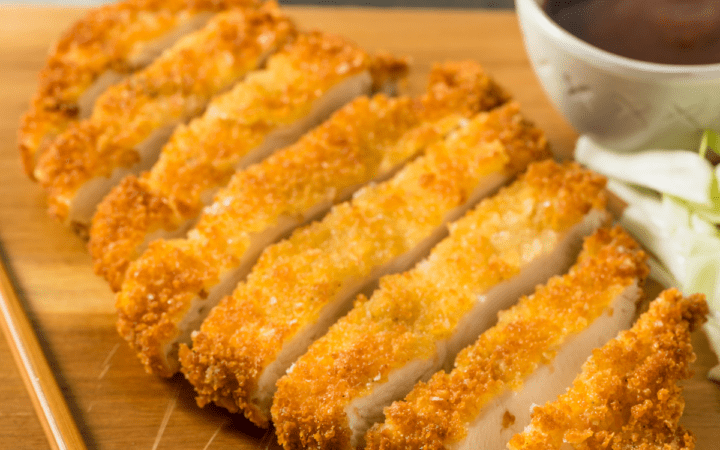
- Finally, serve the pork katsu with a side of rice, steamed vegetables, and tonkatsu sauce.
Cooking Tips And Variations
This Tonkatsu recipe is incredibly simple to make, but for the best results or to switch up the flavor, check out some of my tips and recommendations:
- Make sure to use panko breadcrumbs for this recipe, as they are larger and crispier than regular breadcrumbs, and will give the pork katsu its signature crunchy texture.
- If your air fryer doesn’t have a preheat function, you can preheat it by running it at the desired temperature for a few minutes before adding the pork chops.
- Don’t overcrowd the air fryer basket, as this can affect the cooking time and temperature.
- You can also use this recipe to make chicken katsu by substituting boneless chicken breasts for pork chops.
What To Serve With It
When serving pork katsu, there are several side dishes that can complement the dish and make it a complete meal. Here are some of my favorite things to serve with it:
- Rice - Pork katsu is traditionally served with steamed white rice. The fluffy texture of the rice goes well with the crispy texture of the pork katsu.
- Miso soup - Miso soup is a common side dish in Japanese cuisine that pairs well with it. It is a light and savory soup made with miso paste, tofu, and seaweed.
- Pickled vegetables - Pickled vegetables such as cucumbers, carrots, and daikon radish are often served as a side dish in Japanese cuisine. They add a tangy and refreshing flavor that can balance the richness of the dish.
- Shredded cabbage - Shredded cabbage is a classic side dish that is often served with pork katsu. It provides a crunchy and refreshing contrast to the crispy texture of the pork.
- Tonkatsu sauce - Tonkatsu sauce is a thick and savory sauce made with ingredients such as soy sauce, sugar, and fruit puree. It is commonly served with pork katsu and can be used as a dipping sauce for the pork or poured over the rice.
- Japanese BBQ Sauce - Similar in flavor to Tonkatsu sauce, this homemade Asian-inspired BBQ sauce is slightly thicker in texture and perfect for dipping.
How Long Does It Last?
This air fried pork cutlet can be saved for later if you can’t finish it all in one meal. If the pork katsu has been cooked and then stored properly in an airtight container in the refrigerator, it can last for up to 3-4 days.
Can You Freeze It?
Yes, you can freeze your Pork Katsu for later. If you don’t think you’ll be able to finish your leftovers before they spoil, here are the steps you need to take to safely freeze it:
- Let the pork katsu cool down to room temperature.
- Wrap each piece of pork katsu individually in plastic wrap or aluminum foil to prevent freezer burn and air exposure.
- Place the wrapped pork katsu in a freezer-safe container or airtight freezer bag.
- Label the container or bag with the date of freezing and the contents.
- Place the container or bag in the freezer.
Frozen pork katsu can last for up to 2-3 months in the freezer.
To thaw it, remove it from the freezer and let it thaw in the refrigerator overnight. Reheating frozen pork katsu is best done in the air fryer at 350F for 4-5 minutes or until it is heated through.
More Tasty Pork Recipes
- Pork Wontons
- Keto Stir Fry
- Air Fryer Pork Chops
- Pork Bulgogi
- Instant Pot Pork Tenderloin

Pork Katsu | Air Fryer Katsu Pork
Ingredients
- ▢ 1 pound pork cutlets
- ▢ 3/4 cup All-Purpose Flour
- ▢ 1 Eggs
- ▢ 1/2 cup Panko
- ▢ 1 tsp Kosher Salt
- ▢ 1/2 tsp Ground Black Pepper
- ▢ Cooking Spray
Instructions
- First, preheat your air fryer to 400°F.
- Season the pork chops with salt and pepper on both sides.
- Set up your breading station with flour, beaten eggs, and panko breadcrumbs in three separate shallow dishes.
- Dip each pork chop in the flour, shaking off any excess, then dip it in the beaten egg, and finally coat it in the panko breadcrumbs. Press the breadcrumbs firmly onto the pork chop to ensure a good coating.
- Place the breaded pork chops on a plate or tray.
- Spray both sides of the pork chops with cooking spray. This will help them brown and become crispy in the air fryer.
- Place the pork chops in the air fryer basket, leaving some space between each piece. If necessary, you can cook them in batches.
- Cook the pork chops in the air fryer for 10-12 minutes or until they are golden brown and cooked through. You can flip them halfway through cooking for even browning.
- Once the pork chops are cooked, remove them from the air fryer and let them rest for a few minutes before serving. This will allow the juices to redistribute and ensure that they are juicy and tender.
Get support & connect with our community on Facebook!
Nutrition
And don’t forget to check out my air fryer cookbooks! Every day easy air fryer , and Air Fryer Revolution .


If you already signed up, you should have received an email with a password to give you unlimited access to our FREE Printable Library. The password is case sensitive. Enter it below and get printing!
Password:

Pork Katsu | Air Fryer Katsu Pork
Ingredients
- 1 pound pork cutlets
- 3/4 cup All-Purpose Flour
- 1 Eggs
- 1/2 cup Panko
- 1 tsp Kosher Salt
- 1/2 tsp Ground Black Pepper
- Cooking Spray
Instructions
- First, preheat your air fryer to 400°F.
- Season the pork chops with salt and pepper on both sides.
- Set up your breading station with flour, beaten eggs, and panko breadcrumbs in three separate shallow dishes.
- Dip each pork chop in the flour, shaking off any excess, then dip it in the beaten egg, and finally coat it in the panko breadcrumbs. Press the breadcrumbs firmly onto the pork chop to ensure a good coating.
- Place the breaded pork chops on a plate or tray.
- Spray both sides of the pork chops with cooking spray. This will help them brown and become crispy in the air fryer.
- Place the pork chops in the air fryer basket, leaving some space between each piece. If necessary, you can cook them in batches.
- Cook the pork chops in the air fryer for 10-12 minutes or until they are golden brown and cooked through. You can flip them halfway through cooking for even browning.
- Once the pork chops are cooked, remove them from the air fryer and let them rest for a few minutes before serving. This will allow the juices to redistribute and ensure that they are juicy and tender.
Pork Katsu | Air Fryer Katsu Pork https://twosleevers.com/pork-katsu/
Every family has their own Goda Masala Recipe. This recipe gets used in most dishes daily. Whether it’s lentils (Amti), sprouts, salads (ussal), or Masalé bhat, this Goda Masala (sweet masala) or Kala Masala (black masala) as it’s sometimes referred to, gets added in pinches and spoons.
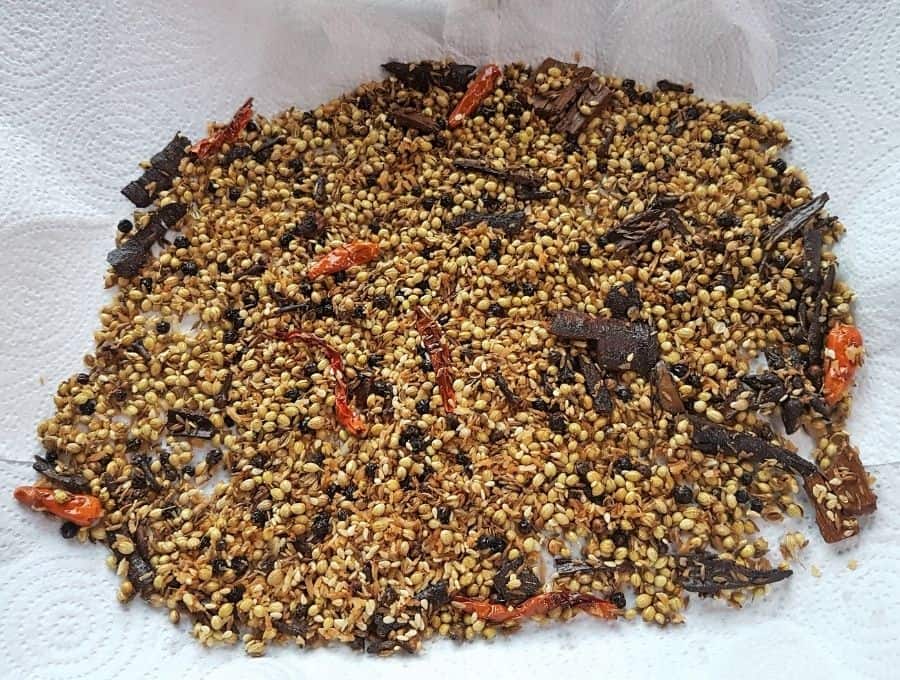
Photo Credit: Manuela Munson
Maharashtrian Goda Masala | Indian Spice Blend
Okay, let’s be honest. I just wanted the masalé bhat and you can’t make it without this spice mix. So I decided to either make it or stop moaning on about the rice.
So I made it, and it turned out well. The recipe below makes enough for one batch of masalé bhat and can be doubled, but since it’s cooked in oil, you want to use it within a month or so.
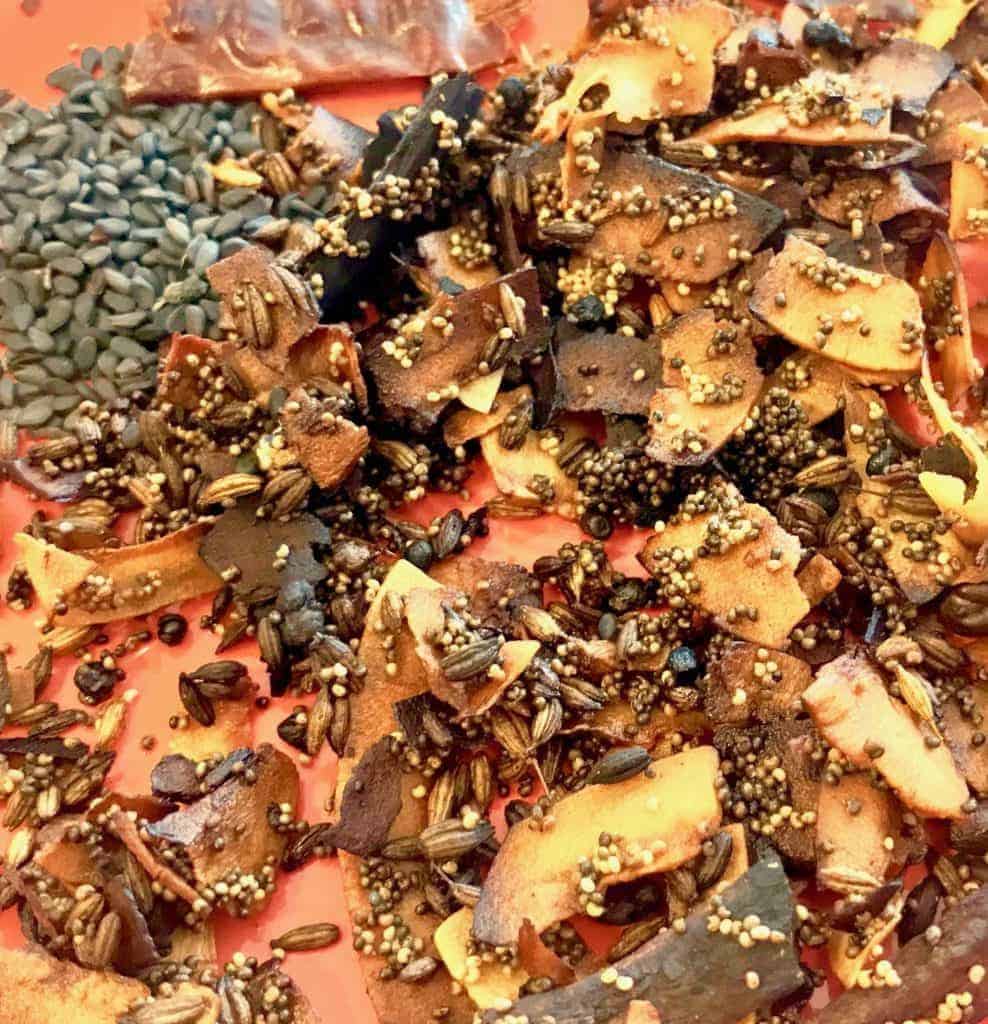
What Do You Need To Make Goda Masala?
- Oil
- Unsweetened Shredded Coconut
- cumin seeds
- Sesame Seeds
- Poppy Seeds (omit if you can’t find)
- Whole Cloves
- Cinnamon
- Dried Red Chilis
- Cardamom Seeds
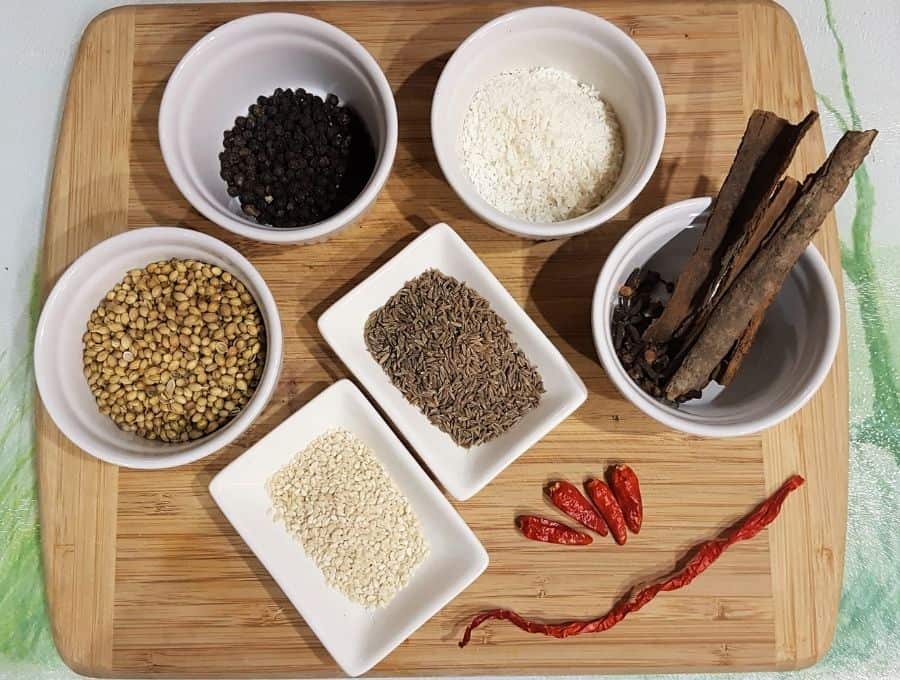
Photo Credit: Manuela Munson
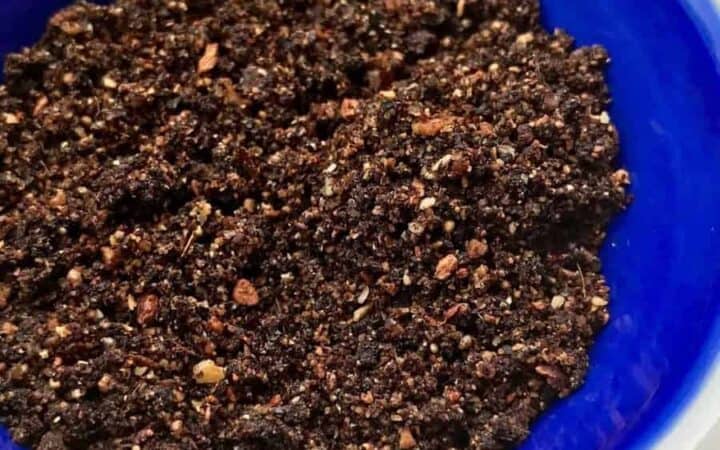
How To Make Goda Masala
- Gather all your ingredients
- Heat a small pan on medium-high heat and when hot, add oil
- Sauté spices and when toasty, lay them on a paper towel to cool
- Grind with a coffee grinder
The picture below shows how browned you want your coconut and other spices. If in doubt under-cook – but do not burn.
LOOKING FOR A GOOD PLACE TO USE THIS SPICE MIX? TRY OUT MYMAHARASHTRIAN MASALÉ BHAT RECIPE!
WANT TO MAKE MORE HOMEMADE SPICE BLENDS?
- Egyptian Dukkah
- Lebanese 7 Spice
- Cajun Spice Mix
- Sambhar Masala
- Kafta Kabab Spice Mix
- Ras Al Hanout Spice
- Shawarma Spice Mix
- Dry Sesame Garlic Chutney
- Ethiopian Berbere
- Maharash Trian Goda Masala
- Garama Masala
- Punjabi Garam Masala
- Apple Pie Spice
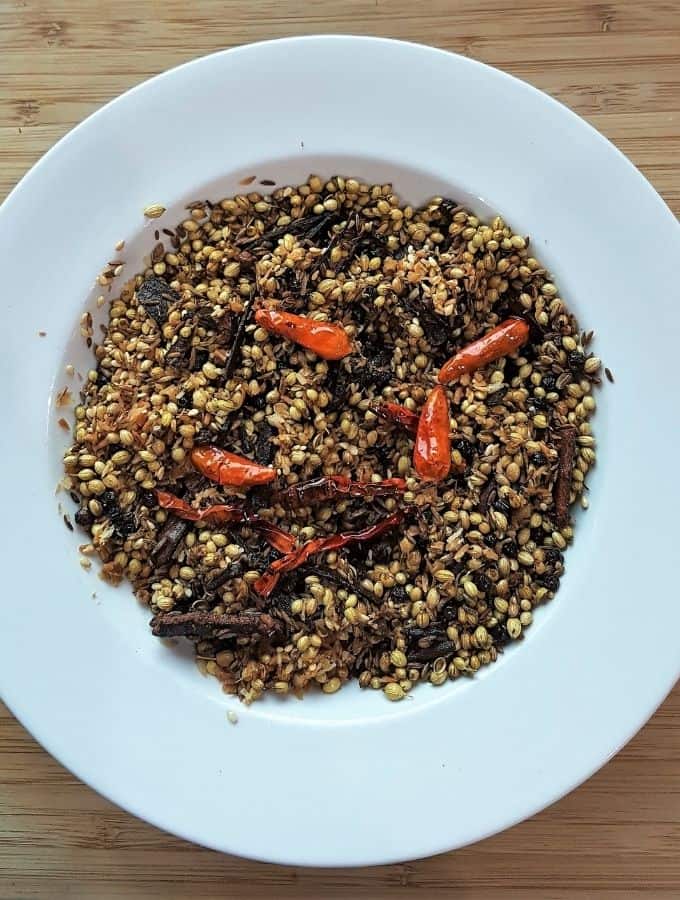
Photo Credit: Manuela Munson
If you love the way this Goda Masala recipe turned out, make sure you share it with your friends on Facebook and Pinterest so they can make it too.
Maharashtrian Goda Masala
Ingredients
- ▢ 2 teaspoons ( 2 teaspoons ) Oil
- ▢ 1 tablespoon ( 1 tablespoon ) Unsweetened Shredded Coconut
- ▢ 1 tablespoon ( 1 tablespoon ) cumin seeds
- ▢ 1 teaspoon ( 1 teaspoon ) Sesame Seeds
- ▢ 1 teaspoon ( 1 teaspoon ) Poppy Seeds , (omit if you can’t find)
- ▢ 3 ( 3 ) Whole Cloves
- ▢ 1 stick ( 1 stick ) Cinnamon
- ▢ 1 ( 1 ) Dried Red Chilis
- ▢ 1/4 teaspoon ( 0.25 teaspoon ) Cardamom Seeds
Instructions
- Heat oil in a pan and when hot, add in all your spices. The pesky poppy seeds will want to pop out of your pan so work fast to stir the mixture.
- Stir until all spices are aromatic and well browned. Be careful not to burn. If in doubt, remove early as under-toasted is better than burned and bitter.
- Remove quickly from the pan, spread on a plate or paper towel and let everything cool. Grinding when hot will result in a paste.
- Once cool, use a coffee grinder to grind into a homogenous mixture.
Get support & connect with our community on Facebook!
Nutrition
Don’t forget to check out my otherBest-selling Instant Pot Cookbooks!
Indian Instant Pot , Keto Instant Pot, Instant Pot Fast and Easy , Healthy Instant Pot & Vegetarian Instant Pot .

