Quench your thirst with this delightful Peach Lemonade! A perfect blend of juicy peaches and zesty lemons, this refreshing drink is ideal for summer gatherings or a cozy day at home. Simple, sweet, and slightly tangy, this homemade lemonade will become your go-to beverage.

Why You’ll Love This Perfect Peach Drink
- Refreshing . A perfect balance of sweet peaches and tart lemons.
- Easy to Make . Simple ingredients and minimal preparation.
- Versatile . Enjoy it as a non-alcoholic beverage or as a base for a summery cocktail.
Whether you’re looking to cool off on a hot day or just craving something sweet and tangy, this Peach Lemonade is the answer. With fresh peaches and lemons, you’ll get a naturally sweetened drink that’s both delicious and satisfying.
What Does Peach Lemonade Taste Like?
Peach Lemonade has a delightful blend of flavors that create a refreshing and satisfying drink. The taste can be described as:
- Sweet . The natural sweetness of ripe peaches shines through, providing a fruity and luscious flavor.
- Tangy . The addition of fresh lemon juice adds a bright and tangy twist, balancing the sweetness of the peaches.
- Fruity . The combination of peaches and lemons offers a vibrant, fruity taste that is both refreshing and invigorating.
Overall, Peach Lemonade is a harmonious blend of sweet and tangy flavors, making it a perfect summer beverage.
What Is Peach Lemonade Made Of?
- Fresh Peaches - The star ingredient, providing natural sweetness and vibrant color.
- Lemons - For a tangy twist that balances the sweetness of the peaches.
- Sugar - Adjust to taste; enhances the natural flavors of the fruit.
- Water - To create the perfect lemonade consistency.
- Ice - To chill the lemonade, making it extra refreshing.
How To Make Peach Lemonade
- Prepare the Peaches. Start by washing and slicing the peaches. You can peel them if you prefer a smoother texture, but leaving the skin on adds a bit of extra flavor and color.
- Make the Peach Puree. Blend the peach slices in a blender until smooth. If you prefer a smoother drink, strain the puree through a fine mesh sieve to remove any pulp.
- Juice the Lemons. Squeeze the lemons to extract fresh lemon juice. For best results, use a citrus juicer to ensure you get every drop.
- Combine Ingredients. In a large pitcher, combine the peach puree, lemon juice, sugar, and water. Stir well until the sugar is fully dissolved. Taste and adjust the sweetness or tartness by adding more sugar or lemon juice as needed.
- Chill and Serve. Fill glasses with ice and pour the peach lemonade over. Garnish with peach slices, lemon wedges, or fresh mint leaves for an extra touch.

Tips And Tricks
Making the perfect Peach Lemonade involves a few key steps to enhance its flavor and presentation:
- Choose Ripe Peaches . For the best flavor, use ripe, juicy peaches. They will provide the sweetest taste and the most vibrant color.
- Adjust Sweetness . Taste your lemonade as you go. If it’s too tart, add a bit more sugar. If too sweet, a splash of lemon juice will balance it out.
- Serve Cold . This lemonade is best served chilled. Add ice right before serving to keep it refreshing without diluting the flavor.
Variations
Peach Lemonade is a versatile drink that can be easily customized:
- Sparkling- Add a splash of sparkling water or club soda for a fizzy twist.
- Peach Mint- Muddle fresh mint leaves with the peach puree for a refreshing herbal note.
- Cocktail - For a boozy version, add a shot of vodka or rum to each glass.
What To Enjoy With Peach Lemonade
Pair this refreshing drink with a variety of summer dishes:
- Grilled Chicken - The tangy lemonade complements the smoky flavors of grilled meats.
- Fresh Salads - A light, crisp salad with vinaigrette dressing goes well with the sweetness of the lemonade.
- Summer Desserts - Enjoy with fruit tarts or a light sorbet for a complete summer treat.
How Long Does It Last?
Peach Lemonade can be stored in an airtight container in the refrigerator for up to 3 days. Stir well before serving, as the ingredients may settle over time.
Can You Freeze It?
Yes, you can freeze Peach Lemonade! Pour the lemonade into ice cube trays and freeze. You can use these cubes to chill future drinks without watering them down, or blend them into a frozen slushy treat.
More Delicious Drinks
- Pink Drink
- Iced Caramel Macchiato
- Instant Pot Iced Tea
- Strawberry Lemonade
- White Hot Chocolate


Peach Lemonade Recipe | Homemade Peach Lemonade
Ingredients
- ▢ 4 Peaches , peeled and pitted and chopped
- ▢ 6 Lemons
- ▢ 1/2 cup Sugar
- ▢ 6 cups Water
- ▢ Ice , to chill
Instructions
- Prepare the Peaches. Start by washing and slicing the peaches. You can peel them if you prefer a smoother texture, but leaving the skin on adds a bit of extra flavor and color.
- Make the Peach Puree. Blend the peach slices in a blender until smooth. If you prefer a smoother drink, strain the puree through a fine mesh sieve to remove any pulp.
- Juice the Lemons. Squeeze the lemons to extract fresh lemon juice. For best results, use a citrus juicer to ensure you get every drop.
- Combine Ingredients. In a large pitcher, combine the peach puree, lemon juice, sugar, and water. Stir well until the sugar is fully dissolved. Taste and adjust the sweetness or tartness by adding more sugar or lemon juice as needed.
- Chill and Serve. Fill glasses with ice and pour the peach lemonade over. Garnish with peach slices, lemon wedges, or fresh mint leaves for an extra touch.
Get support & connect with our community on Facebook!
Nutrition

If you already signed up, you should have received an email with a password to give you unlimited access to our FREE Printable Library. The password is case sensitive. Enter it below and get printing!
Password:

Peach Lemonade Recipe | Homemade Peach Lemonade
Ingredients
- 4 Peaches peeled and pitted and chopped
- 6 Lemons
- 1/2 cup Sugar
- 6 cups Water
- Ice to chill
Instructions
- Prepare the Peaches. Start by washing and slicing the peaches. You can peel them if you prefer a smoother texture, but leaving the skin on adds a bit of extra flavor and color.
- Make the Peach Puree. Blend the peach slices in a blender until smooth. If you prefer a smoother drink, strain the puree through a fine mesh sieve to remove any pulp.
- Juice the Lemons. Squeeze the lemons to extract fresh lemon juice. For best results, use a citrus juicer to ensure you get every drop.
- Combine Ingredients. In a large pitcher, combine the peach puree, lemon juice, sugar, and water. Stir well until the sugar is fully dissolved. Taste and adjust the sweetness or tartness by adding more sugar or lemon juice as needed.
- Chill and Serve. Fill glasses with ice and pour the peach lemonade over. Garnish with peach slices, lemon wedges, or fresh mint leaves for an extra touch.
Peach Lemonade Recipe | Homemade Peach Lemonade https://twosleevers.com/peach-lemonade-recipe/

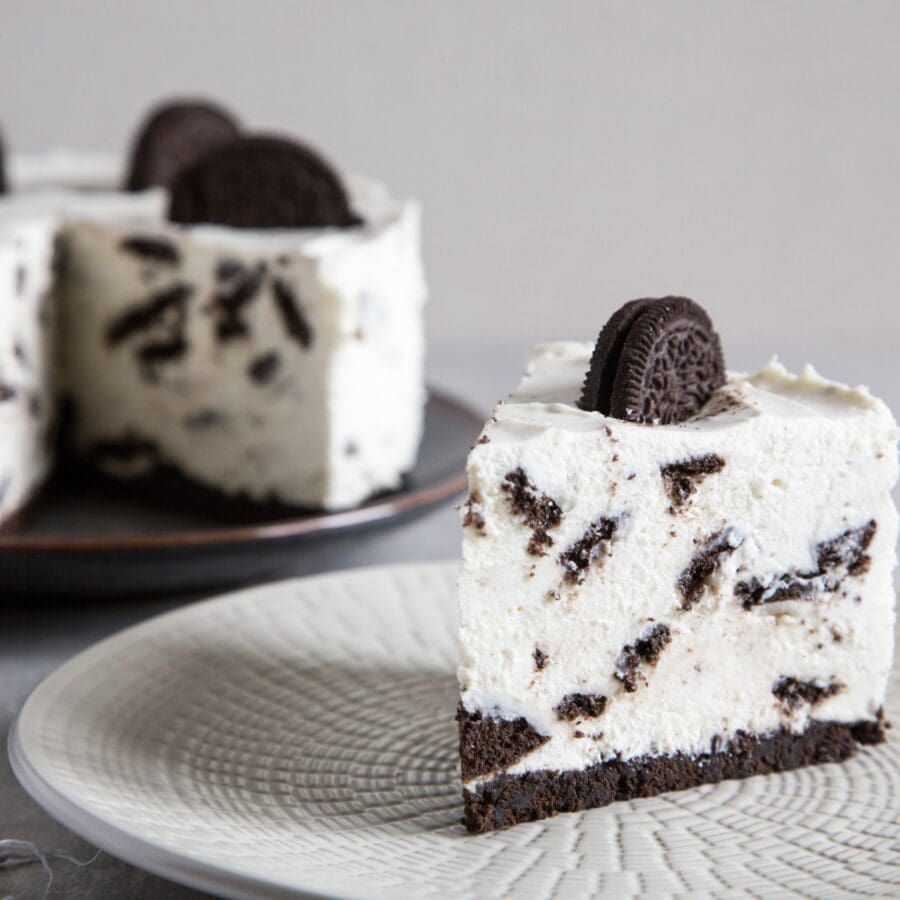
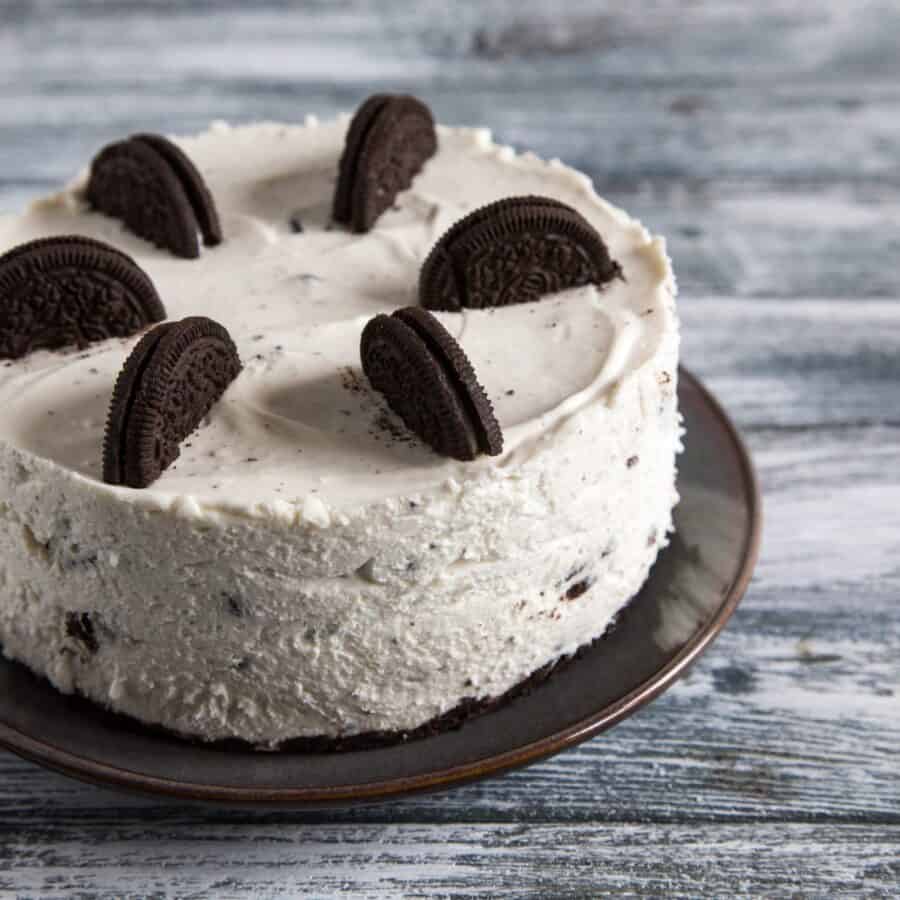
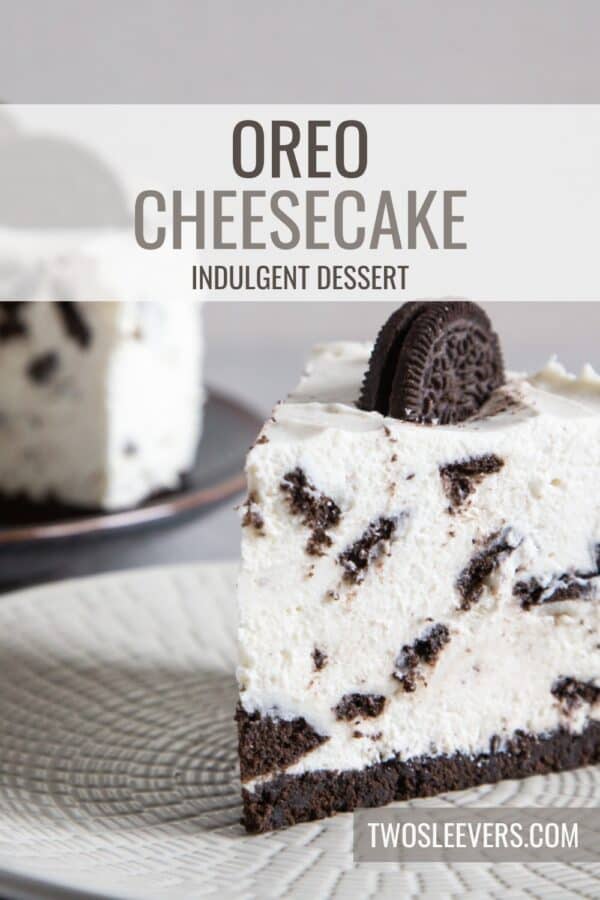
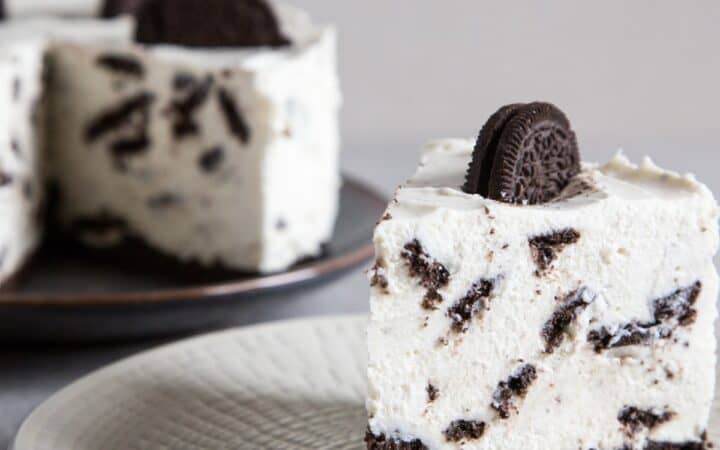
Indulge in the ultimate dessert experience with this Oreo Cheesecake! A rich and creamy cheesecake with a classic Oreo crust, this recipe is a must-try for all Oreo lovers. The velvety cheesecake filling, studded with Oreo pieces, sits atop a crunchy Oreo cookie base, making every bite a delightful mix of textures and flavors.
Why You’ll Love This Delicious Dessert
- Creamy and Rich. The cheesecake filling is smooth and luscious, with a perfect balance of sweetness.
- Crunchy and Chocolaty . The Oreo crust adds a delightful crunch and rich chocolate flavor.
- Impressive Yet Easy . Looks and tastes like it came from a fancy bakery, but is simple enough to make at home.
Whether you’re making it for a special occasion or just because, this Oreo Cheesecake is sure to impress and satisfy your sweet tooth.
What Does Oreo Cheesecake Taste Like?
Oreo Cheesecake is rich and indulgent, making it a perfect dessert for special occasions or for satisfying a sweet tooth craving. The combination of creamy cheesecake and chocolaty Oreo flavors makes it a favorite among cheesecake and chocolate lovers alike.
How To Tell When Oreo Cheesecake Is Done
To determine if an Oreo Cheesecake is done baking, you can use several methods:
- Toothpick Test Insert a toothpick or a cake tester into the center of the cheesecake. It should come out with a few moist crumbs but not wet batter. Keep in mind that this test is less reliable for cheesecakes than for cakes, as cheesecakes can still appear moist even when fully cooked.
- Jiggle Test Gently shake the cheesecake while it’s still in the oven or give the pan a slight tap. The cheesecake should be mostly set but still have a slight jiggle in the center. The center should wobble slightly but not slosh around. The edges should be set and firm.
- Temperature Test For a more precise check, use an instant-read thermometer. Insert it into the center of the cheesecake. The cheesecake is done when the internal temperature reaches about 150°F. This method ensures the cheesecake is fully cooked without overbaking.
Using a combination of these methods can help you accurately judge when your Oreo Cheesecake is perfectly baked. Remember, it’s better to have a slightly underbaked center as it will firm up during cooling.
Ingredients You’ll Need
The Crust
- Oreo Cookies - The finely crushed Oreo cookies serve as the base of the crust for the cheesecake. The chocolate cookies provide a rich, chocolaty flavor and a slight crunch, which contrasts beautifully with the creamy cheesecake filling.
- Butter - The melted butter binds the crushed Oreo cookies together, helping to form a solid and cohesive crust that holds up well when sliced. The butter also adds a slight richness to the crust.
Cheesecake Filling
- Cream Cheese - The primary ingredient in the cheesecake filling, cream cheese provides the smooth and creamy texture that is characteristic of cheesecakes. It also contributes to the rich and slightly tangy flavor of the dessert.
- Sugar - Granulated sugar sweetens the cheesecake filling, balancing the tanginess of the cream cheese and other ingredients.
- Sour Cream - Sour cream adds a tangy richness to the cheesecake filling, enhancing the overall flavor and helping to create a smooth and creamy consistency.
- Vanilla Extract - Vanilla extract adds a subtle sweetness and depth of flavor to the cheesecake filling, complementing the other ingredients and adding warmth to the taste.
- Eggs - Eggs help set the cheesecake, providing structure and firmness to the filling once baked. They also contribute to the creamy texture of the cheesecake.
- Oreo Cookies - Additional roughly chopped Oreo cookies are folded into the filling, adding texture and bursts of chocolaty flavor throughout the cheesecake.
Toppings
- Whipped Cream - Whipped cream is used as a garnish, adding a light and airy contrast to the dense and creamy cheesecake. It also adds an extra layer of sweetness and a decorative element.
- Oreo Crumbs - Sprinkled on top of the cheesecake, Oreo crumbs provide additional texture and a visually appealing finish. They reinforce the Oreo flavor and add a bit of crunch to each bite.
How To Make Oreo Cheesecake
- Prepare the Crust. Preheat your oven to 325°F. In a mixing bowl, combine the finely crushed Oreo cookies and melted butter. Press the mixture firmly into the bottom of a 9-inch springform pan to form an even layer. Bake the crust for 10 minutes, then remove it from the oven and let it cool.
- Make the Cheesecake Filling. In a large mixing bowl, beat the softened cream cheese and sugar together until smooth and creamy. Add the sour cream and vanilla extract, mixing until fully combined. Add the eggs one at a time, beating on low speed after each addition until just blended. Gently fold in the chopped Oreo cookies.
- Bake the Cheesecake. Pour the cheesecake filling over the cooled crust, spreading it evenly. Place the springform pan on a baking sheet and bake in the preheated oven for 50-60 minutes, or until the center is almost set but still slightly jiggly. Turn off the oven and let the cheesecake cool in the oven with the door slightly open for about 1 hour.
- Chill the Cheesecake. Remove the cheesecake from the oven and run a knife around the edge of the pan to loosen it. Let it cool completely at room temperature, then refrigerate for at least 4 hours, preferably overnight.
- Serve. Before serving, garnish with whipped cream and additional Oreo crumbs if desired. Carefully remove the sides of the springform pan and slice the cheesecake. Enjoy!
Tips And Tricks
To make the best Oreo Cheesecake, keep these tips in mind:
- Room Temperature Ingredients . Make sure your cream cheese and eggs are at room temperature to ensure a smooth filling.
- Avoid Overmixing . Overmixing the batter can incorporate too much air, leading to cracks in the cheesecake.
- Water Bath . For an extra creamy texture, consider baking the cheesecake in a water bath. Wrap the springform pan in foil and place it in a larger pan filled with an inch of hot water.
Variations
Customize your Oreo Cheesecake with these fun variations:
- Chocolate Ganache Topping - Pour a layer of chocolate ganache over the cheesecake for an extra indulgent treat.
- Mint - Use Mint Oreo cookies in both the crust and the filling for a refreshing twist.
- Peanut Butter- Add a swirl of peanut butter into the filling for a delicious flavor combination.
What To Enjoy With Oreo Cheesecake
This rich and creamy dessert pairs well with:
- Fresh Berries - Add a burst of freshness and color to each slice.
- Coffee or Espresso - The bitterness of coffee complements the sweetness of the cheesecake.
- Vanilla Ice Cream - For an extra indulgent dessert experience.
How Long Does It Last?
Oreo Cheesecake can be stored in the refrigerator for up to 5 days. Make sure it’s covered or stored in an airtight container to prevent it from drying out or absorbing fridge odors.
Can You Freeze It?
Yes! You can freeze Oreo Cheesecake. Once fully set and cooled, wrap it tightly in plastic wrap and then in aluminum foil. It can be frozen for up to 3 months. Thaw in the refrigerator overnight before serving.
More Craveworthy Cheesecakes
- Mango Cheesecake
- Cheesecake Brownies
- Mini Cheesecake Bites
- Low Carb Cheesecake
- Gluten Free Cheesecake
- Cheesecake Bars
Oreo Cheesecake Recipe | Cookies And Cream Cheesecake
Ingredients
For The Crust
- ▢ 2 cups Oreos , crushed
- ▢ 1/2 cup Unsalted Butter , melted
For The Filling
- ▢ 24 oz Cream Cheese , softened
- ▢ 1 cup Granulated Sugar
- ▢ 1 cup Sour Cream
- ▢ 1 tsp Vanilla Extract
- ▢ 3 Eggs
- ▢ 1 1/2 cups Oreos , chopped
Garnish
- ▢ Whipped Cream , to garnish
- ▢ 6 Oreos , to garnish
Instructions
- Prepare the Crust. Preheat your oven to 325°F. In a mixing bowl, combine the finely crushed Oreo cookies and melted butter. Press the mixture firmly into the bottom of a 9-inch springform pan to form an even layer. Bake the crust for 10 minutes, then remove it from the oven and let it cool.
- Make the Cheesecake Filling. In a large mixing bowl, beat the softened cream cheese and sugar together until smooth and creamy. Add the sour cream and vanilla extract, mixing until fully combined. Add the eggs one at a time, beating on low speed after each addition until just blended. Gently fold in the chopped Oreo cookies.
- Bake the Cheesecake. Pour the cheesecake filling over the cooled crust, spreading it evenly. Place the springform pan on a baking sheet and bake in the preheated oven for 50-60 minutes, or until the center is almost set but still slightly jiggly. Turn off the oven and let the cheesecake cool in the oven with the door slightly open for about 1 hour.
- Chill the Cheesecake. Remove the cheesecake from the oven and run a knife around the edge of the pan to loosen it. Let it cool completely at room temperature, then refrigerate for at least 4 hours, preferably overnight.
- Serve. Before serving, garnish with whipped cream and additional Oreo crumbs if desired. Carefully remove the sides of the springform pan and slice the cheesecake. Enjoy!
