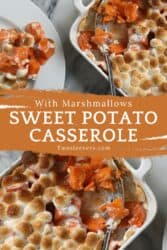
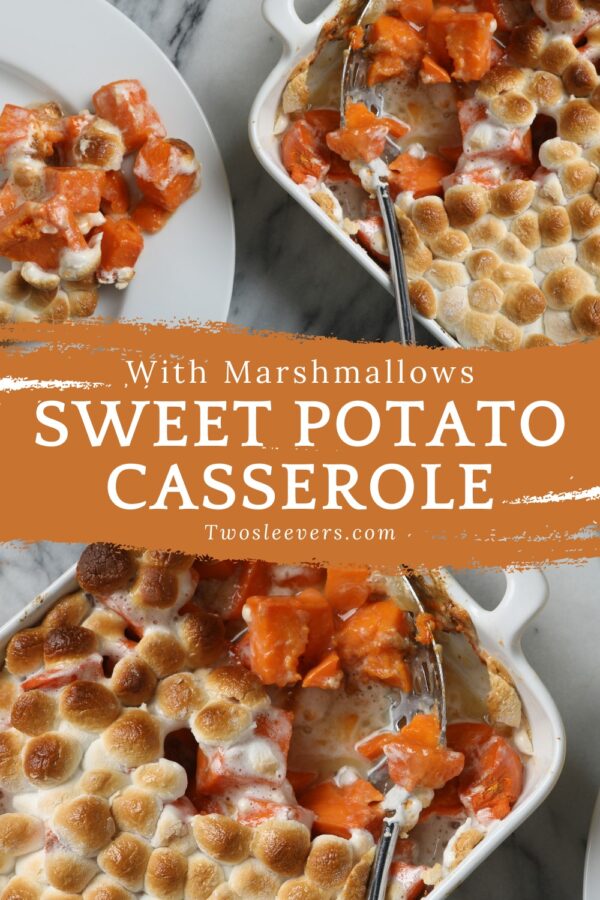
If you’re a fan of classic holiday comfort food, you’re in for a treat! Learn how to make the easiest Old Fashioned Sweet Potato Casserole with Marshmallows. It’s a nostalgic, crowd-pleasing recipe filled with tender sweet potatoes, warm spices, and that irresistible toasted marshmallow topping.

Why You’ll Love This Comforting Casserole
- Fast. Use cooked or canned sweet potatoes to save time. It’s perfect for holiday prep. Easy. Boil, top with marshmallows, and bake. Foolproof and beginner-friendly. Classic. This recipe captures that traditional holiday flavor everyone knows and loves. Comforting. Comforting sweet potatoes topped with gooey, golden marshmallows? Pure holiday magic.
This timeless side dish brings cozy holiday flavors to your table with minimal effort and maximum wow factor.
Why Put Marshmallows On Sweet Potato Casserole?
Marshmallows are placed on sweet potato casserole because they create the perfect blend of texture, flavor, nostalgia, and visual appeal, turning a simple side dish into a comforting holiday staple.
The tradition dates back more than a century, and over time it became one of the most iconic elements of Thanksgiving and Christmas dinners.
What Does It Taste Like?
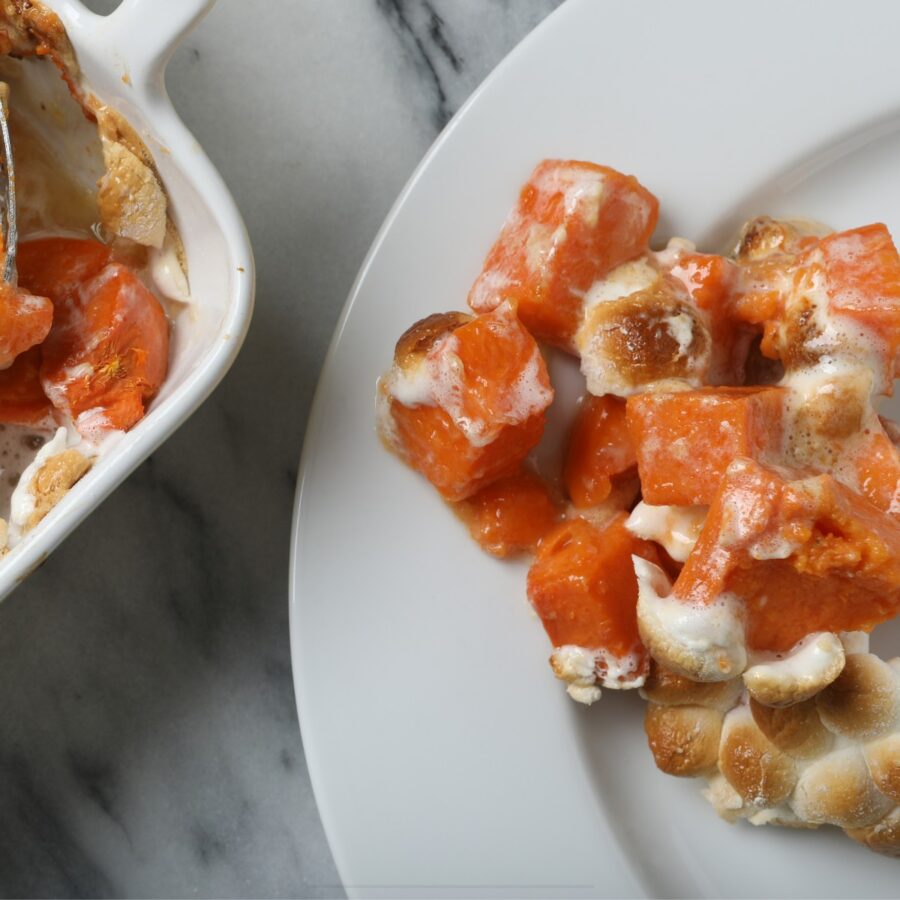
Sweet potato casserole strikes the perfect balance between sweet and savory. You get the natural richness of sweet potatoes, the warmth of cinnamon and nutmeg, and that iconic layer of toasted marshmallows that melts into a gooey, golden crust. The result is creamy, nostalgic, and comforting in every bite.
Even people who don’t usually like sweet potatoes end up loving this dish!
Ingredients You’ll Need
- 4 large sweet potatoes - These form the base of the casserole. The sweet potatoes bake into tender, flavorful layers that soak up the buttery, spiced sauce. Cubing helps them cook evenly and allows the sauce to cling to every piece.
- ½ cup butter - Adds richness and moisture to the casserole. The butter blends with the sugar and spices to create a velvety sauce.
- ½ cup brown sugar - Sweetens the dish while adding warm caramel and molasses depth. It helps the sauce thicken and glaze the potatoes as they bake.
- 1 teaspoon vanilla extract - Adds warmth and enhances the sweetness, giving the casserole a cozy, classic holiday aroma.
- 1 teaspoon cinnamon - Provides the signature warm, spiced flavor that pairs perfectly with sweet potatoes.
- ¼ teaspoon nutmeg - Adds subtle warmth and nutty notes. Nutmeg deepens the holiday flavor profile and complements the cinnamon beautifully.
- ½ teaspoon salt - Balances the sweetness and enhances all the other flavors.
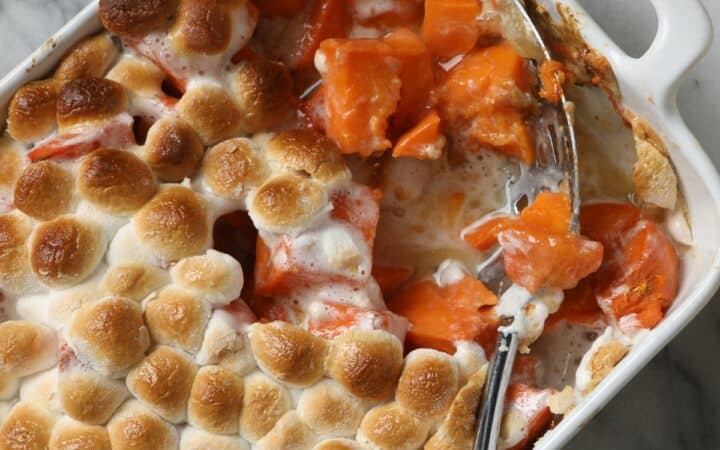
- 3–4 cups mini marshmallows - The iconic finishing touch. Mini marshmallows melt into a gooey, golden layer that caramelizes on top of the casserole.
How To Make Sweet Potato Casserole With Marshmallows
- Prepare the Sweet Potatoes . Peel the sweet potatoes and cut them into small chunks. Keeping the pieces even helps them cook uniformly.
- Par-Cook the Potatoes . Bring a large pot of water to a boil. Add cubed sweet potatoes and cook for 8–10 minutes, or until just fork-tender but not falling apart. Drain gently to keep chunks intact.
- Make the Brown Sugar Glaze . In a bowl, whisk together melted butter, brown sugar, granulated sugar, cinnamon, nutmeg, and vanilla. This creates a glossy, syrupy glaze that clings to the sweet potatoes.
- Layer the Casserole . Grease a 9×13-inch baking dish. Add the sweet potatoes to the dish. Pour the brown sugar glaze evenly over the top, tilting the dish slightly so the glaze coats everything.
- Bake the Base . Bake at 350°F for 20 minutes, uncovered. This allows the glaze to thicken and coat the potatoes in a sticky, caramel-like layer.
- Add Marshmallows . Remove the dish from the oven and sprinkle mini marshmallows across the entire surface. Bake for an additional 10–15 minutes until the marshmallows are melted and the tops are caramelized and golden brown.
- Cool and Serve . Let the casserole rest for 10 minutes before serving so the glaze thickens and the marshmallows become gooey but stable.
Tips And Tricks
Making this sweet potato casserole is easy, but these helpful tips will ensure perfect results:
- Don’t skip the eggs. They help the casserole hold together and stay fluffy.
- Use mini marshmallows. Large ones brown too quickly and melt unevenly.
- Bake uncovered. This lets the marshmallows toast instead of steaming.
Variations
If you love the classic version but want to switch things up, there are plenty of easy variations that add new flavors, textures, or dietary twists while keeping that nostalgic holiday charm:
- Pecan Crumble + Marshmallows (Half-and-Half) - Can’t decide between marshmallows or a pecan topping? Do both! Sprinkle a pecan streusel (pecans + brown sugar + butter + flour or oats) over half the casserole. Add marshmallows over the other half. Perfect for pleasing everyone at the table.
- Fully Streuseled (No Marshmallows) - If you prefer a crunchier topping, mix 1 cup chopped pecans, ½ cup brown sugar, ½ cup flour, and ¼ cup melted butter. Bake until golden and nutty. It turns the casserole into more of a dessert-style crisp.
- Orange-Spiced Sweet Potato Casserole - Add 1 tablespoon orange zest and 2–3 tablespoons orange juice. The citrus brightens the dish and balances the sweetness. It’s fantastic for holiday meals with rich mains.
What To Eat With Sweet Potato Casserole
This sweet, buttery, and nostalgic side dish pairs beautifully with a variety of mains and sides that balance its richness and highlight its cozy flavors.
- Spatchcock Turkey - The ultimate Thanksgiving pairing, where the savory turkey and sweet potatoes balance each other perfectly.
- Crock Pot Ham - Sweet maple- or brown-sugar–glazed ham enhances the casserole’s warm flavors.
- Roasted Chicken - A simple, comforting protein that doesn’t overpower the dish.
- Beef Tenderloin - Hearty beef dishes offer a luxurious contrast to the sweetness.
How Long Does It Last?
Sweet potato casserole with marshmallows will typically last 3 to 4 days in the refrigerator when stored properly. The marshmallows may soften as it sits, but the flavor remains delicious.
When you’re ready to reheat it, warm the casserole in the oven so the topping can re-toast and regain some of its gooey, golden texture.
Can You Freeze It?
Yes, you can freeze sweet potato casserole, but there’s one important guideline: freeze it without the marshmallows. The sweet potato base freezes beautifully. It stays creamy, smooth, and flavorful once thawed and reheated. However, marshmallows don’t freeze well; they become sticky, watery, and lose their texture.
To freeze, prepare the casserole as usual, but stop before adding the marshmallow topping. Let it cool completely, wrap tightly in plastic wrap and foil, or store it in an airtight freezer-safe container. It will keep well in the freezer for up to 2–3 months.
More Simple Sweet Potato Recipes
- Sweet Potato Soup
- Grilled Sweet Potatoes
- Air Fryer Sweet Potato Fries
- Hasselback Sweet Potatoes
- Instant Pot Sweet Potatoes
Old Fashioned Sweet Potato Casserole With Marshmallows
Ingredients
- ▢ 4 Sweet Potatoes , cubed
- ▢ 1/2 cup Unsalted Butter
- ▢ 1/2 cup Brown Sugar
- ▢ 1 tsp Vanilla Extract
- ▢ 1 tsp Ground Cinnamon
- ▢ 1/4 tsp Nutmeg
- ▢ 1/2 tsp Kosher Salt
- ▢ 3 cups Mini Marshmallows
Instructions
- Prepare the Sweet Potatoes . Peel the sweet potatoes and cut them into small chunks. Keeping the pieces even helps them cook uniformly.
- Par-Cook the Potatoes . Bring a large pot of water to a boil. Add cubed sweet potatoes and cook for 8–10 minutes, or until just fork-tender but not falling apart. Drain gently to keep potatoes intact.
- Make the Brown Sugar Glaze . In a bowl, whisk together melted butter, brown sugar, cinnamon, nutmeg, and vanilla. This creates a glossy, syrupy glaze that clings to the sweet potatoes.
- Layer the Casserole . Grease a 9×13-inch baking dish. Add the sweet potatoes inside the dish. Pour the brown sugar glaze evenly over the top, tilting the dish slightly so the glaze coats everything.
- Bake the Base . Bake at 350°F for 20 minutes, uncovered. This allows the glaze to thicken and coat the potato slices in a sticky, caramel-like layer.
- Add Marshmallows . Remove the dish from the oven and sprinkle mini marshmallows across the entire surface. Bake for an additional 10–15 minutes until the marshmallows are melted and the tops are caramelized and golden brown.
- Cool and Serve . Let the casserole rest for 10 minutes before serving so the glaze thickens and the marshmallows become gooey but stable.
Get support & connect with our community on Facebook!

If you already signed up, you should have received an email with a password to give you unlimited access to our FREE Printable Library. The password is case sensitive. Enter it below and get printing!
Password:

Old Fashioned Sweet Potato Casserole With Marshmallows
Ingredients
- 4 Sweet Potatoes cubed
- 1/2 cup Unsalted Butter
- 1/2 cup Brown Sugar
- 1 tsp Vanilla Extract
- 1 tsp Ground Cinnamon
- 1/4 tsp Nutmeg
- 1/2 tsp Kosher Salt
- 3 cups Mini Marshmallows
Instructions
- Prepare the Sweet Potatoes . Peel the sweet potatoes and cut them into small chunks. Keeping the pieces even helps them cook uniformly.
- Par-Cook the Potatoes . Bring a large pot of water to a boil. Add cubed sweet potatoes and cook for 8–10 minutes, or until just fork-tender but not falling apart. Drain gently to keep potatoes intact.
- Make the Brown Sugar Glaze . In a bowl, whisk together melted butter, brown sugar, cinnamon, nutmeg, and vanilla. This creates a glossy, syrupy glaze that clings to the sweet potatoes.
- Layer the Casserole . Grease a 9×13-inch baking dish. Add the sweet potatoes inside the dish. Pour the brown sugar glaze evenly over the top, tilting the dish slightly so the glaze coats everything.
- Bake the Base . Bake at 350°F for 20 minutes, uncovered. This allows the glaze to thicken and coat the potato slices in a sticky, caramel-like layer.
- Add Marshmallows . Remove the dish from the oven and sprinkle mini marshmallows across the entire surface. Bake for an additional 10–15 minutes until the marshmallows are melted and the tops are caramelized and golden brown.
- Cool and Serve . Let the casserole rest for 10 minutes before serving so the glaze thickens and the marshmallows become gooey but stable.
Old Fashioned Sweet Potato Casserole With Marshmallows https://twosleevers.com/old-fashioned-sweet-potato-casserole/
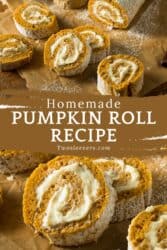
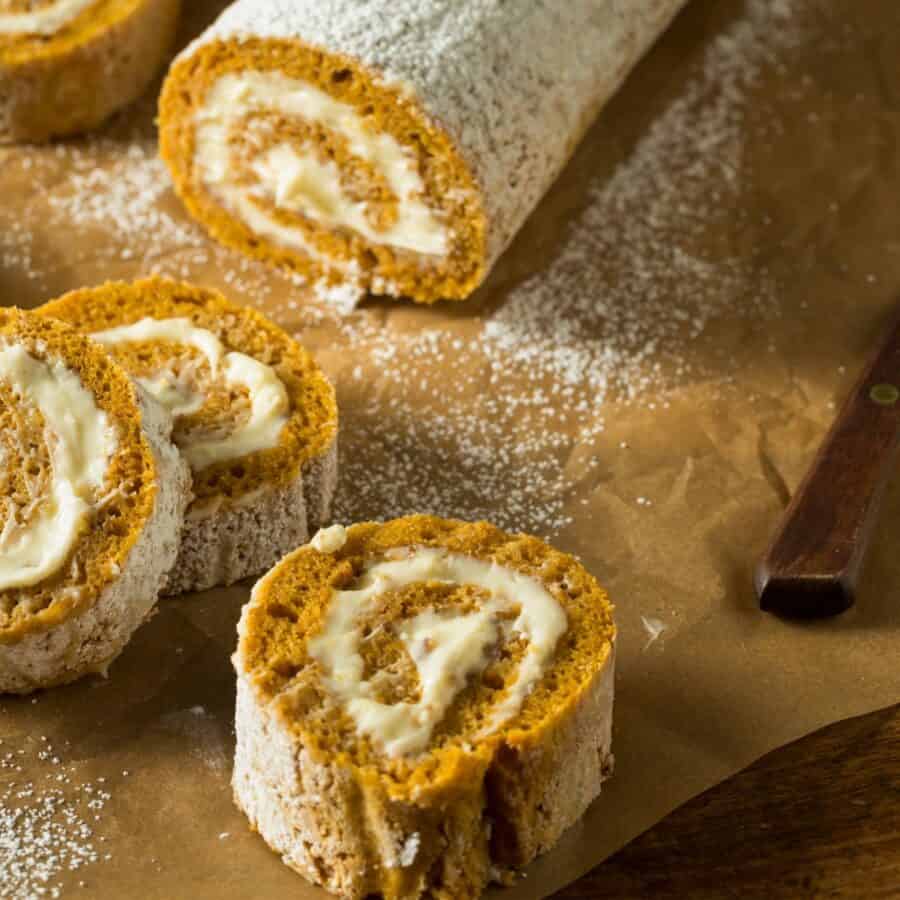
If you love the warm flavors of pumpkin and spice wrapped up with a creamy, luscious filling, you’re going to adore this Pumpkin Roll Recipe. This classic dessert features a soft and fluffy pumpkin sponge cake rolled around a smooth cream cheese filling. It’s the perfect treat for the fall season, holidays, or any special occasion.
Why You’ll Love This Perfect Pumpkin Recipe
- Simple and Stunning . While it looks fancy, this pumpkin roll is surprisingly easy to make. Impress your family and guests with minimal effort.
- Perfect Texture . The sponge cake is moist and tender, while the cream cheese filling adds a silky, rich contrast.
- Make-Ahead Friendly . This dessert can be prepared a day or two in advance, making it ideal for entertaining or meal prepping.
- Flavorful . Packed with pumpkin, warm spices, and sweet cream cheese, every bite is a taste of autumn bliss.
- Crowd-Pleaser . Whether you’re serving it for Thanksgiving, a potluck, or a cozy family dinner, it’s guaranteed to be a hit!
From its moist, tender cake to the swirls of luscious filling, this Pumpkin Roll is a showstopper for holiday gatherings, potlucks, or any fall celebration.
What Does A Pumpkin Roll Taste Like?
A pumpkin roll is the ultimate combination of soft, spiced cake and rich, creamy filling. It’s like eating a pumpkin-spice latte in dessert form!
The cake has notes of cinnamon, nutmeg, and ginger, which pair beautifully with the tangy cream cheese filling. The result is a balanced, melt-in-your-mouth treat that isn’t overly sweet.
Ingredients You’ll Need
For The Pumpkin Cake
- All-Purpose Flour - Gives structure to the cake.
- Pumpkin Puree - Not pumpkin pie filling – pure pumpkin for flavor and moisture.
- Granulated Sugar - Adds sweetness to balance the spices.
- Large Eggs - Creates the fluffy, sponge-like texture.
- Baking Soda and Baking Powder - Leavening agents for lightness.
- Pumpkin Pie Spice - Warm, classic fall spices.
- Vanilla Extract - Enhances flavor.
For The Filling
- Cream Cheese - Creates a rich and creamy base.
- Unsalted Butter - Adds smoothness.
- Powdered Sugar - Sweetens the filling and keeps it light.
- Vanilla Extract - Enhances the cream cheese flavor.
Powdered Sugar - For a final dusting (optional, but adds a beautiful finishing touch).
How To Make A Pumpkin Roll
- Prepare the Baking Pan . Preheat your oven to 350°F . Line a 10x15-inch jelly roll pan with parchment paper, ensuring it covers the bottom and sides. Grease the parchment lightly with non-stick spray.
- Make the Pumpkin Cake . In a bowl, whisk together the flour, baking powder, baking soda, pumpkin pie spice, and salt. Set aside. In a large bowl, beat the eggs and granulated sugar with an electric mixer on medium speed for about 2-3 minutes, until light and fluffy. Add the pumpkin puree and vanilla extract, mixing until smooth. Gradually add the dry ingredients to the wet mixture, folding gently with a spatula. Mix until just combined. Spread the batter evenly into the prepared jelly roll pan.
- Bake the Cake . Bake for 12-14 minutes, or until the cake springs back when lightly touched. Remove the cake from the oven.
- Roll the Cake . Lay a clean kitchen towel on a flat surface and generously dust it with powdered sugar. While the cake is still warm, carefully invert it onto the prepared towel. Gently peel away the parchment paper from the cake. Starting at one short end, roll the cake and towel together into a tight spiral. Let the rolled cake cool completely on a wire rack.
- Make the Cream Cheese Filling . In a bowl, beat the cream cheese, butter, and vanilla extract until smooth and creamy. Gradually add the powdered sugar, beating until light and fluffy.
- Assemble the Pumpkin Roll . Once the cake is completely cooled, carefully unroll it. Spread the cream cheese filling evenly over the surface of the cake, leaving a small border around the edges. Gently roll the cake back up (without the towel) into a spiral. Wrap the rolled cake in plastic wrap and refrigerate for at least 1 hour.
- Serve and Enjoy . Before serving, dust the pumpkin roll with powdered sugar. Slice into 1-inch pieces.

Tips And Tricks
Here are the top tips and tricks for making the perfect Pumpkin Roll. Follow these to avoid common pitfalls and ensure your roll is beautifully swirled, moist, and crack-free every time:
- Roll While Warm . Always roll the cake while it’s warm to prevent cracking. The towel keeps it flexible and helps it retain its shape.
- Generous Dusting. Use plenty of powdered sugar on the towel to prevent sticking. This ensures a smooth, easy roll.
- Don’t Overbake . A soft, moist cake is key. Overbaking will make it dry and prone to cracking.
- Room-Temperature Filling . Ensure the cream cheese and butter are softened to room temperature for a smooth, lump-free filling.
Variations
Here are some delicious variations for a Pumpkin Roll to suit every flavor preference or special occasion:
- Add Nuts - Sprinkle finely chopped pecans or walnuts onto the cream cheese filling before rolling for added crunch.
- Chocolate Twist - Add 2 tablespoons of cocoa powder to the filling for a chocolate cream cheese filling.
- Maple Flavor - Replace the vanilla extract in the filling with maple extract for a cozy maple twist.
- Caramel Drizzle - Drizzle caramel sauce over each slice before serving for a decadent finish.
What To Enjoy With A Pumpkin Roll
A Pumpkin Roll is already a showstopper on its own, but pairing it with complementary flavors can elevate the experience. Here are some delicious ideas for what to enjoy with it:
- Coffee or Espresso - The bitterness of coffee balances the sweet cream cheese filling.
- Hot Chocolate - A cozy drink perfect for a holiday dessert table.
- Whipped Cream - Add a dollop of whipped cream for an extra creamy touch.
- Fresh Berries - Serve with fresh raspberries or strawberries for a burst of color and tangy flavor.
How Long Does It Last?
A Pumpkin Roll is a versatile dessert that stores exceptionally well, making it perfect for holiday preparations or casual gatherings.
When properly stored in the refrigerator, a pumpkin roll can last for up to 4 days. To keep it fresh, wrap the roll tightly in plastic wrap or aluminum foil to prevent it from drying out and absorbing any odors from the fridge.
Can You Freeze It?
For longer storage, you can freeze a pumpkin roll for up to 2 months. Simply wrap the roll in plastic wrap, followed by a layer of foil, and place it in a freezer-safe bag or airtight container to maintain its flavor and texture.
When you’re ready to serve, allow the pumpkin roll to thaw in the refrigerator overnight to prevent the filling from becoming runny.
More Pumpkin Dishes
- Pumpkin Scones
- Low Carb Pumpkin Pie
- Pumpkin Bundt Cake
- Low Carb Pumpkin Bars
- Pumpkin Cinnamon Rolls


Pumpkin Roll Recipe | Easy Homemade Pumpkin Roll
Ingredients
- ▢ 3 Eggs
- ▢ 2/3 cup Granulated Sugar
- ▢ 1 tsp Vanilla Extract
- ▢ 3/4 cup Pumpkin Puree
- ▢ 3/4 cup All Purpose Flour
- ▢ 1/2 tsp Baking Powder
- ▢ 1/2 tsp Baking Soda
- ▢ 1/2 tsp Kosher Salt
- ▢ 2 tsp Pumpkin Pie Spice
- ▢ 1/2 cup Powdered Sugar , for dusting
For The Filling
- ▢ 8 ounces Cream Cheese , softened
- ▢ 4 tbsp Unsalted Butter , softened
- ▢ 1 cup Powdered Sugar
- ▢ 1 tsp Vanilla Extract
Instructions
- Prepare the Baking Pan . Preheat your oven to 350°F . Line a 10x15-inch jelly roll pan with parchment paper, ensuring it covers the bottom and sides. Grease the parchment lightly with non-stick spray.
- Make the Pumpkin Cake . In a bowl, whisk together the flour, baking powder, baking soda, pumpkin pie spice, and salt. Set aside. In a large bowl, beat the eggs and granulated sugar with an electric mixer on medium speed for about 2-3 minutes, until light and fluffy. Add the pumpkin puree and vanilla extract, mixing until smooth. Gradually add the dry ingredients to the wet mixture, folding gently with a spatula. Mix until just combined. Spread the batter evenly into the prepared jelly roll pan.
- Bake the Cake . Bake for 12-14 minutes, or until the cake springs back when lightly touched. Remove the cake from the oven.
- Roll the Cake . Lay a clean kitchen towel on a flat surface and generously dust it with powdered sugar. While the cake is still warm, carefully invert it onto the prepared towel. Gently peel away the parchment paper from the cake. Starting at one short end, roll the cake and towel together into a tight spiral. Let the rolled cake cool completely on a wire rack.
- Make the Cream Cheese Filling . In a bowl, beat the cream cheese, butter, and vanilla extract until smooth and creamy. Gradually add the powdered sugar, beating until light and fluffy.
- Assemble the Pumpkin Roll . Once the cake is completely cooled, carefully unroll it. Spread the cream cheese filling evenly over the surface of the cake, leaving a small border around the edges. Gently roll the cake back up (without the towel) into a spiral. Wrap the rolled cake in plastic wrap and refrigerate for at least 1 hour.
- Serve and Enjoy . Before serving, dust the pumpkin roll with powdered sugar. Slice into 1-inch pieces.
