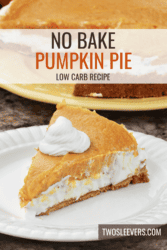
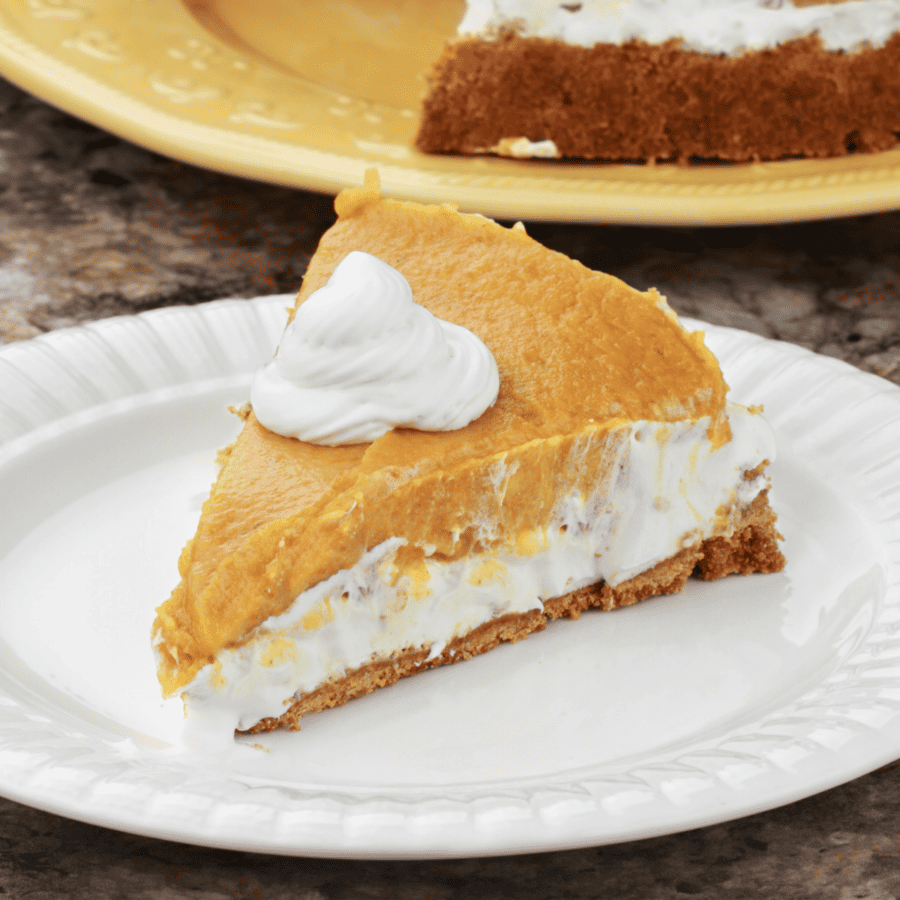
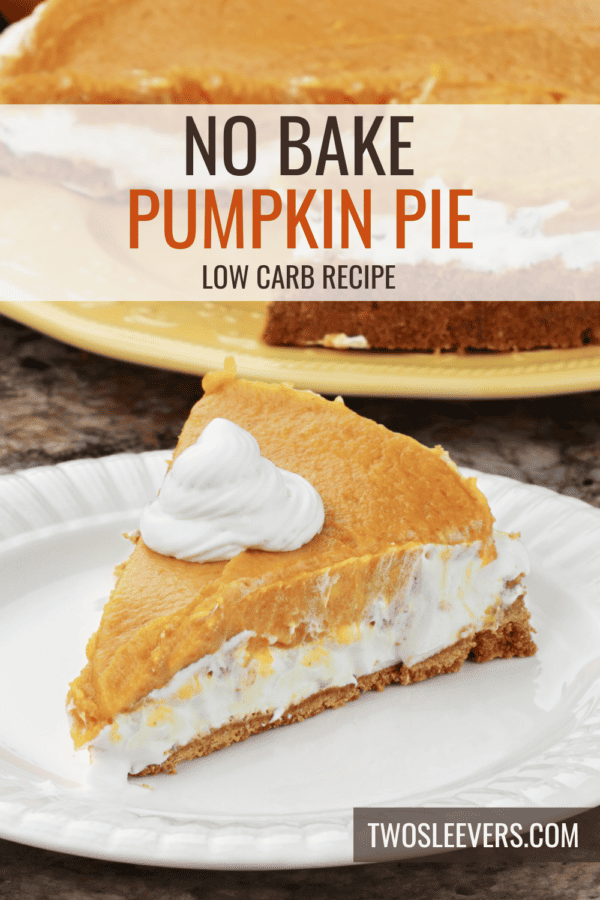
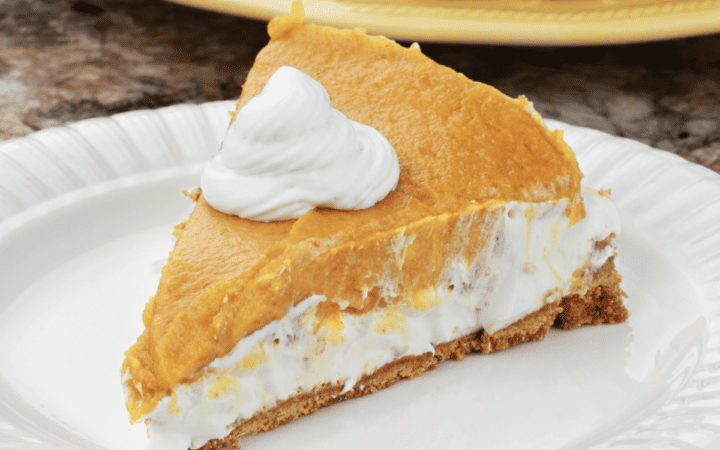
If you’re in search of a delightful, keto-friendly dessert that embodies the essence of fall, you’re in for a treat. Our No Bake Pumpkin Pie is a game-changer, offering all the pumpkin spice goodness you crave without the excess carbs. Whether you’re following a keto diet or simply looking for a lower-carb dessert option, it is a must-try.
Why You’ll Love This Simple Pie Recipe
- Keto-Friendly Delight . If you’re on a keto journey or just want to reduce your carb intake, this pumpkin pie is your perfect sweet companion. It’s lower in carbs, high in flavor, and delivers that classic pumpkin pie experience.
- Effortless Preparation . No need to stress in the kitchen. This no-bake pie is incredibly easy to make. Simply mix, pour, and refrigerate. It’s a hassle-free dessert that impresses.
- Fall in Every Bite . When autumn arrives, so does the craving for pumpkin-spiced everything. This pie encapsulates the warm and comforting flavors of fall in each creamy forkful.
Our No Bake Pumpkin Pie is the perfect keto dessert to celebrate the flavors of fall without breaking your low-carb diet. It’s easy to make, customizable, and incredibly delicious. Whether you’re following a ketogenic lifestyle or simply want a healthier dessert option, this pie is a must-try for any occasion.
Is No Bake Pumpkin Pie Truly Keto?
Absolutely! Traditional pumpkin pies are loaded with sugar and high-carb crusts, making them a no-go for keto dieters. However, our recipe transforms this classic dessert into a keto-compliant treat.
We use a low-carb almond flour crust that provides the perfect base for the velvety pumpkin filling. The filling itself is sweetened with a keto-friendly sugar substitute like Swerve Confectioner’s Sugar. With these adjustments, you can relish your pumpkin pie while staying in ketosis.
Ingredients You’ll Need
For the Almond Flour Crust
- Almond Flour
- Swerve Confectioner’s Sugar
- Melted Butter
- Cinnamon
- Salt
Cream Cheese Layer
- Cream Cheese
- Swerve Confectioner’s Sugar
For the Pumpkin Pie Filling
- Pumpkin Puree
- Almond Milk
- Instant Sugar Free Vanilla Pudding
- Pumpkin Pie Spice
- Salt
How To Make No Bake Pumpkin Pie
- Prepare the Almond Flour Crust. In a bowl, combine the almond flour, Swerve Confectioner’s Sugar, cinnamon, and salt. Pour in the melted butter and mix until the mixture resembles coarse crumbs. Press the mixture into a pie dish, forming an even crust along the bottom and sides. Refrigerate the crust while you prepare the filling.
- Create the Pumpkin Pie Filling. In a separate bowl, combine the pumpkin puree, Almond Milk, Sugar Free Vanilla Pudding, pumpkin pie spice, and salt. Mix until smooth and well combined. Pour the filling into the prepared almond flour crust.
- Whip Together the Cream Cheese Filling. In a separate bowl, whip together softened cream cheese and confectioner’s sugar.
- Chill and Serve. Refrigerate the pie for at least 2-3 hours or until it’s set. When ready to serve, you can optionally top it with whipped cream and a sprinkle of extra pumpkin pie spice for that finishing touch. Slice and enjoy your keto-friendly pumpkin pie!

Tips And Tricks
Creating the perfect No Bake Pumpkin Pie requires some tips and tricks to ensure your pie is delicious and hassle-free. Here are some valuable tips for making it:
- Use Pure Pumpkin Puree . Opt for 100% pure pumpkin puree without any added sugar or spices. This will allow you to control the sweetness and spices in your pie.
- Chill Your Mixing Bowl and Whisk . Before making the filling, place your mixing bowl and whisk in the refrigerator for a few minutes. This will help it whip up better and faster.
- Add Sweetener Gradually . When sweetening the filling, add your keto-friendly sweetener slowly and taste as you go. Different brands and types of sweeteners may have varying sweetness levels, so it’s essential to adjust to your liking.
Variations
No-bake pumpkin pie is a versatile dessert that you can customize in various ways to suit your taste or dietary preferences. Here are some delightful variations to consider:
- Pumpkin Spice Whipped Cream - Top your pie with pumpkin spice whipped cream. Add a dash of pumpkin spice mix to your whipped cream for extra flavor.
- Caramel Drizzle - Drizzle your pie with sugar-free caramel sauce or a keto-friendly butterscotch syrup for added sweetness and richness.
- Pecan Topping - For a nod to classic pecan pie, sprinkle chopped roasted pecans over the top of your no-bake pumpkin pie.
- Mini No-Bake Pumpkin Pies - Make individual servings in muffin tins or mini pie tins for easy portion control and a charming presentation.
What To Serve With No Bake Pumpkin Pie
No-bake pumpkin pie is a delightful dessert on its own, but you can enhance your dessert experience by serving it with complementary side items or garnishes. Here are some ideas for what to serve with it:
- Keto Whipped Cream - A dollop of whipped cream is a classic and delicious pairing. You can make keto whipped cream using heavy whipping cream and keto-friendly sweeteners for a low-carb option.
- Keto Granola - Serve with a spoonful of keto granola for some added texture and a touch of sweetness.
- Caramel or Butterscotch Drizzle - Drizzle a keto-friendly caramel or butterscotch sauce on top for a sweet and rich touch.
How Many Days Before Thanksgiving Can I Make Pies?
Properly stored in the refrigerator, your No Bake Pumpkin Pie will stay fresh for about 3-4 days. Be sure to cover it or place it in an airtight container to maintain its texture and flavor.
More Perfect Pumpkin Recipes
- Low Carb Pumpkin Mousse
- Pumpkin Bread Pudding
- Keto Pumpkin Cheesecake
- Low Carb Pumpkin Pie
- Instant Pot Pumpkin Pie
- Pumpkin Banana Bread
No Bake Pumpkin Pie | Simple Pumpkin Pie Recipe
Ingredients
For The Crust
- ▢ 2 cups Almond Flour , toasted
- ▢ 1/2 cup Powdered Swerve
- ▢ 1 tsp Ground Cinnamon
- ▢ 1/4 tsp Kosher Salt
- ▢ 1/2 cup Melted Butter
For The Pumpkin Filling
- ▢ 8 oz Canned Pumpkin
- ▢ 1 cup Almond Milk
- ▢ 3.4 oz Sugar Free Vanilla Pudding
- ▢ 1 tsp Pumpkin Pie Spice
- ▢ 1/2 tsp Vanilla Extract
For The Cream Cheese Layer
- ▢ 8 oz Cream Cheese , softened
- ▢ 1/3 cup Powdered Swerve
- ▢ 2 tbsp Almond Milk
Instructions
- Prepare the Almond Flour Crust. In a bowl, combine the toasted almond flour, Swerve Confectioner’s Sugar, cinnamon, and salt. Pour in the melted butter and mix until the mixture resembles coarse crumbs. Press the mixture into a pie dish, forming an even crust along the bottom and sides. Refrigerate the crust while you prepare the filling.
- Create the Pumpkin Pie Filling. In a separate bowl, combine the pumpkin puree, Almond Milk, Sugar Free Vanilla Pudding, pumpkin pie spice, and salt. Mix until smooth and well combined. Pour the filling into the prepared almond flour crust.
- Whip Together the Cream Cheese Filling. In a separate bowl, whip together softened cream cheese and confectioner’s sugar.
- Chill and Serve. Refrigerate the pie for at least 2-3 hours or until it’s set. When ready to serve, you can optionally top it with whipped cream and a sprinkle of extra pumpkin pie spice for that finishing touch. Slice and enjoy your keto-friendly pumpkin pie!
Get support & connect with our community on Facebook!
Don’t forget to check out my other Ketocookbooks.
Keto Instant Pot, Keto Fat Bombs, Sweets, & Treats , and Easy keto in 30 minutes.


If you already signed up, you should have received an email with a password to give you unlimited access to our FREE Printable Library. The password is case sensitive. Enter it below and get printing!
Password:

No Bake Pumpkin Pie | Simple Pumpkin Pie Recipe
Ingredients
For The Crust
- 2 cups Almond Flour toasted
- 1/2 cup Powdered Swerve
- 1 tsp Ground Cinnamon
- 1/4 tsp Kosher Salt
- 1/2 cup Melted Butter
For The Pumpkin Filling
- 8 oz Canned Pumpkin
- 1 cup Almond Milk
- 3.4 oz Sugar Free Vanilla Pudding
- 1 tsp Pumpkin Pie Spice
- 1/2 tsp Vanilla Extract
For The Cream Cheese Layer
- 8 oz Cream Cheese softened
- 1/3 cup Powdered Swerve
- 2 tbsp Almond Milk
Instructions
- Prepare the Almond Flour Crust. In a bowl, combine the toasted almond flour, Swerve Confectioner’s Sugar, cinnamon, and salt. Pour in the melted butter and mix until the mixture resembles coarse crumbs. Press the mixture into a pie dish, forming an even crust along the bottom and sides. Refrigerate the crust while you prepare the filling.
- Create the Pumpkin Pie Filling. In a separate bowl, combine the pumpkin puree, Almond Milk, Sugar Free Vanilla Pudding, pumpkin pie spice, and salt. Mix until smooth and well combined. Pour the filling into the prepared almond flour crust.
- Whip Together the Cream Cheese Filling. In a separate bowl, whip together softened cream cheese and confectioner’s sugar.
- Chill and Serve. Refrigerate the pie for at least 2-3 hours or until it’s set. When ready to serve, you can optionally top it with whipped cream and a sprinkle of extra pumpkin pie spice for that finishing touch. Slice and enjoy your keto-friendly pumpkin pie!
No Bake Pumpkin Pie | Simple Pumpkin Pie Recipe https://twosleevers.com/no-bake-pumpkin-pie/

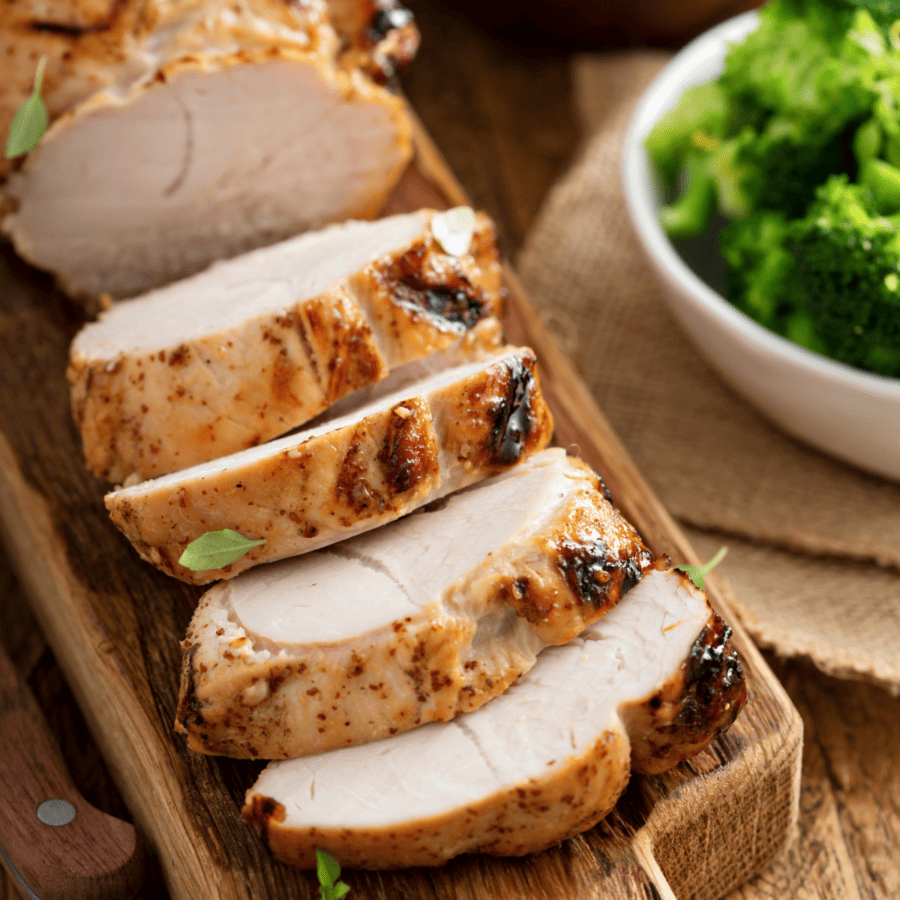
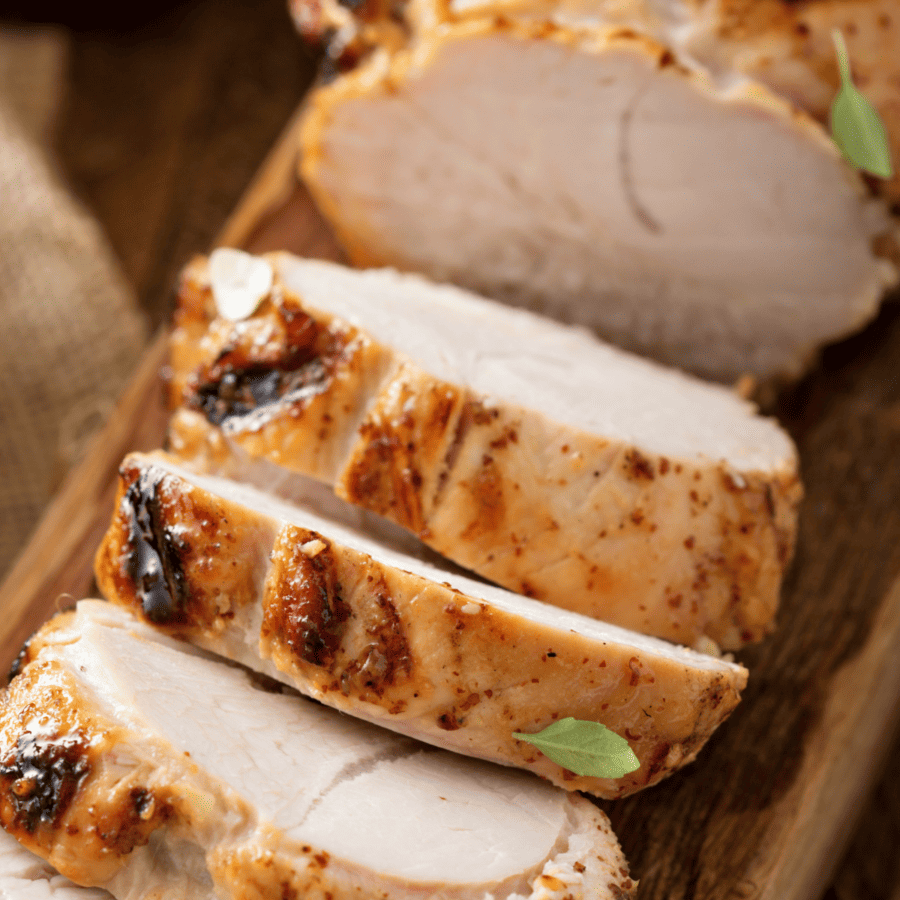
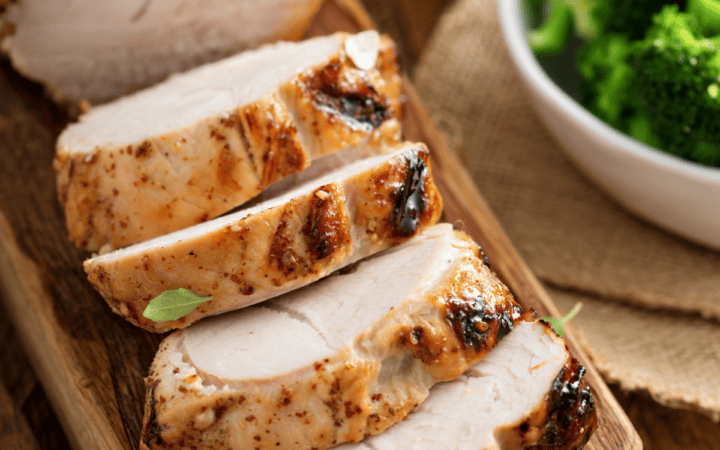
Roasting a turkey breast can be a game-changer, especially when you’re short on time or cooking for a smaller group. This recipe for Roasted Turkey Breast is your ticket to a succulent and flavorful turkey dinner in a fraction of the time it takes to roast a whole bird.
Why This Is The Perfect Turkey Breast Recipe
- Saves Time . Forget about spending hours in the kitchen. With this recipe, you can have a delicious turkey breast ready in much less time.
- Easy Preparation . Roasting a turkey breast is simpler than dealing with a whole turkey. It’s perfect for both beginners and seasoned home cooks.
- Juicy and Tender . The turkey breast turns out incredibly juicy and tender, with crispy skin on the outside and flavorful meat on the inside.
- Versatile Flavors . This recipe allows you to infuse your turkey breast with a medley of aromatic herbs, making it a versatile centerpiece for any meal.
How Do You Keep Turkey Breast Moist When Roasting?
Keeping a turkey breast moist while roasting is essential for a delicious and tender result. Here are some tips to help you achieve a moist roasted turkey breast:
- Brine the Turkey . Brining involves soaking the turkey in a solution of salt and water, sometimes with sugar and aromatics, for several hours or overnight before roasting. This helps the turkey absorb moisture and flavor, making it juicier. Rinse and pat dry before roasting.
- Use a Meat Thermometer . Invest in a good meat thermometer to monitor the turkey’s internal temperature. Overcooking can lead to dry meat. Roast the turkey until the thickest part of the breast registers 165°F).
- Butter or Oil Under the Skin . Gently loosen the skin from the breast meat and rub softened butter or olive oil underneath. This helps to baste the meat from the inside as it melts during roasting.
- Baste During Cooking . Basting the turkey with its own juices or a flavorful liquid (such as broth or white wine) every 30 minutes can help keep it moist. However, opening the oven frequently can also extend the cooking time, so baste sparingly.
- Use a Roasting Rack . Elevating the turkey on a roasting rack allows hot air to circulate evenly around it, helping it cook more evenly and preventing it from sitting in its juices, which can lead to steaming and uneven cooking.
- Cover with Foil . If you notice that the turkey breast is browning too quickly, you can tent it with aluminum foil to prevent excessive browning while the meat continues to cook.
- Rest the Turkey . After removing the turkey from the oven, let it rest for at least 15-30 minutes before carving. During this time, the juices redistribute, and the meat continues to cook slightly, resulting in juicier slices.
Should I Cover Turkey Breast When Roasting?
Covering the turkey breast with foil is an option if you want to retain moisture, prevent excessive browning, or promote even cooking. However, if you prefer crispy skin and a faster cooking time, leaving it uncovered is a better choice.
How Many Minutes Per Pound Should You Cook A Turkey Breast?
When roasting a turkey breast, the general rule of thumb for cooking time is approximately 20 minutes per pound at a temperature of 325°F.
Ingredients You’ll Need
- Bone-in Turkey Breast- The turkey breast is the star of the dish. It provides the main protein and flavor. Roasting it with the bone-in helps keep the meat moist and adds extra flavor.
- Butter- The butter is used to coat the turkey breast. This coating helps crisp up the skin, adds richness, and contributes to browning during roasting.
- Salt and Pepper- Salt and pepper are essential for seasoning the turkey breast. They enhance the natural flavors of the meat and create a balanced taste.
- Paprika- Paprika is an optional seasoning that adds a subtle smokiness and a reddish color to the turkey’s skin.
- Dried Sage- Dried sage is an optional herb that imparts a warm, earthy, and slightly peppery flavor.
- Dried Rosemary- Dried rosemary contributes a piney and herbal flavor to the turkey.
- Dried Thyme- Dried thyme, like rosemary, is an optional herb that adds an earthy, slightly floral flavor to the turkey.
- Garlic- Minced garlic adds a rich, pungent, and aromatic quality to the dish.
- Lemon- Lemon quarters are used to provide a citrusy brightness and aroma.
These ingredients work together to create a well-seasoned, flavorful, and aromatic roasted turkey breast. The optional herbs and spices allow you to customize the flavor profile to your liking, while the aromatics and liquids contribute to a moist and delicious final result.
How To Make Roasted Turkey Breast
- Preheat the Oven . Preheat your oven to 325°F.
- Prepare the Turkey Breast. Remove the turkey breast from its packaging and pat it dry with paper towels. Place the turkey breast on a roasting rack in a roasting pan. This helps the turkey cook more evenly by allowing air to circulate around it.
- Season the Turkey. Rub the turkey breast with softened butter. This will help the skin brown and keep the meat moist. Season the turkey generously with salt and pepper. You can also add optional seasonings like paprika, dried sage, dried rosemary, and dried thyme for extra flavor.
- Add Aromatic Ingredients. Place minced garlic, lemon quarters, fresh thyme sprigs, and fresh rosemary sprigs around the turkey in the roasting pan. These aromatics will infuse the turkey with wonderful flavors as it roasts.
- Roasting . Place the roasting pan with the turkey breast in the preheated oven. Roast the turkey breast for about 20 minutes per pound. A 4-6 pound turkey breast will take approximately 80-120 minutes to cook. Use a meat thermometer to check for doneness.
- Check Internal Temperature. Begin checking the turkey’s internal temperature after about 1 hour of roasting. The turkey breast is done when it reaches an internal temperature of 165°F in the thickest part of the meat.
- Resting. Once the turkey reaches the desired temperature, remove it from the oven. Tent the turkey loosely with aluminum foil and let it rest for about 15-20 minutes. This allows the juices to redistribute and ensures a juicy, tender result when you carve the turkey.
- Carve and Serve. After resting, carve the roasted turkey breast into slices and serve with your favorite side dishes and gravy if desired.
Tips And Tricks
Roasting a turkey breast can be a flavorful and satisfying meal, whether you’re preparing it for a holiday feast or a regular family dinner. Here are some tips and tricks to ensure your turkey breast turns out perfect:
- Choose the Right Size . Select a turkey breast that suits the number of servings you need. Estimate about 1/2 to 3/4 pounds of turkey breast per person.
- Seasoning . Rub the turkey breast with olive oil or melted butter to promote a crispy, golden skin. Season generously with salt, pepper, and any desired herbs or spices. You can also insert garlic cloves, fresh herbs, and lemon slices under the skin for added flavor.
Variations
Roasted turkey breast is a versatile dish that can be customized with various seasonings, marinades, and accompaniments to suit your taste preferences. Here are some delicious variations:
- Citrus-Herb Roasted Turkey Breast- Season the turkey breast with a mixture of lemon or orange zest, fresh herbs like rosemary, thyme, and sage, along with minced garlic. Add citrus slices (lemon, orange, or lime) to the roasting pan for extra flavor.
- Garlic-Herb Roasted Turkey Breast- Create a garlic herb paste using minced garlic, fresh herbs (rosemary, thyme, sage, and parsley), olive oil, salt, and pepper. Rub this mixture all over the turkey breast before roasting.
- Cajun-Spiced Roasted Turkey Breast- Season the turkey breast with a Cajun spice blend for a bold and spicy flavor. You can make your own blend with paprika, cayenne pepper, garlic powder, onion powder, oregano, and thyme.
What To Serve With This Roasted Turkey Breast Recipe
When serving roasted turkey breast, you have a variety of side dishes and accompaniments to choose from to create a well-rounded and delicious meal. Here are some popular options to consider:
- Gravy - Homemade turkey gravy made from the pan drippings is a classic and essential choice to drizzle over the turkey and side dishes.
- Mashed Potatoes - Creamy mashed potatoes are a comforting and traditional side that pairs perfectly with roasted turkey. You can add garlic, butter, or herbs to customize the flavor.
- Stuffing - A savory stuffing or dressing made with bread, herbs, vegetables, and sometimes sausage complements the turkey’s flavor and adds texture to the meal.
- Cranberry Sauce- Homemade or canned cranberry sauce provides a sweet and tangy contrast to the savory turkey. It’s a classic Thanksgiving pairing.
- Green Beans - Roasted or steamed green beans seasoned with garlic, butter, or almonds make for a vibrant and nutritious side dish.
- Roasted Root Vegetables - A medley of roasted root vegetables like carrots, parsnips, and sweet potatoes adds color and earthy flavors to the meal.
- Brussels Sprouts - Roasted Brussels sprouts with bacon or balsamic glaze offer a delightful balance of flavors and textures.
How Long Does It Last?
A roasted turkey breast can be stored in the refrigerator for up to 3 to 4 days. To maximize its freshness and safety, follow these guidelines:
- Cooling - Allow the roasted turkey breast to cool down at room temperature for no more than 2 hours after cooking. This helps prevent the growth of harmful bacteria.
- Storage - Once cooled, transfer the turkey breast to an airtight container or wrap it tightly in aluminum foil or plastic wrap. You can also place it in a resealable plastic bag.
- Refrigeration - Store the wrapped or containerized turkey breast in the refrigerator at or below 40°F.
- Labeling - It’s a good practice to label the container or wrapping with the date when the turkey breast was cooked so you can easily keep track of its freshness.
Can You Freeze It?
After the 3 to 4-day mark, the turkey breast may still be safe to eat, but its quality and flavor can deteriorate, and it may become dry. If you have leftovers that you don’t plan to consume within this timeframe, consider freezing them for longer storage.
Properly wrapped and frozen, roasted turkey breast can last for 2 to 6 months in the freezer without significant loss of quality.
More Tasty Turkey Recipes
- Air Fryer Turkey Burgers
- Air Fryer Turkey Breast
- Instant Pot Turkey Chili
- Instant Pot Turkey Breast
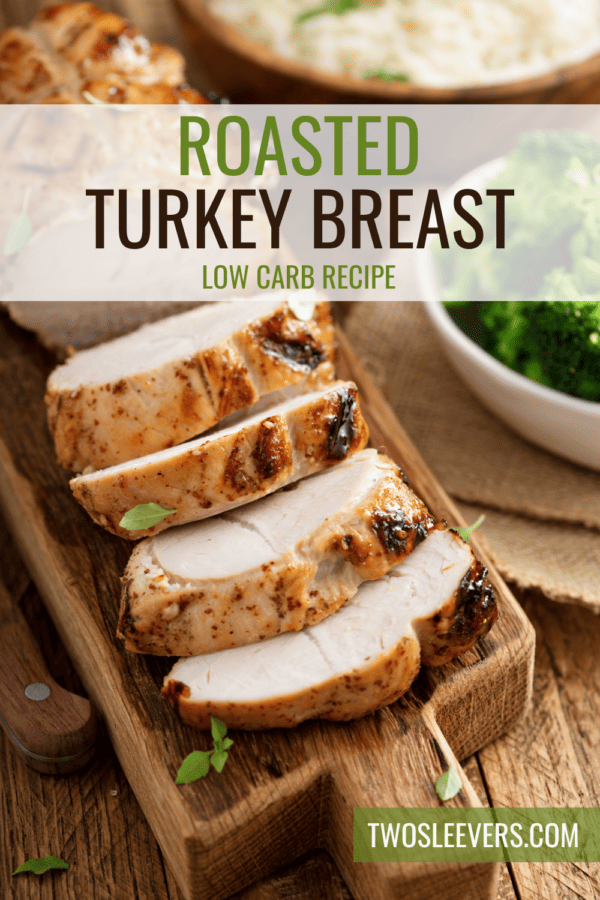
Roasted Turkey Breast Recipe | Easy Baked Turkey Breast
Ingredients
- ▢ 1 4 pound Turkey Breast
- ▢ 6 tbsp Unsalted Butter
- ▢ 1 tbsp Minced Garlic
- ▢ 1 tbsp Sage
- ▢ 1 tbsp Thyme
- ▢ 2 tsp Salt
- ▢ 1/2 tsp Black Pepper
- ▢ 1 tbsp Rosemary
- ▢ 1 tsp Paprika
Instructions
- Preheat the Oven . Preheat your oven to 325°F.
- Prepare the Turkey Breast. Remove the turkey breast from its packaging and pat it dry with paper towels. Place the turkey breast on a roasting rack in a roasting pan. This helps the turkey cook more evenly by allowing air to circulate around it.
- Season the Turkey. Rub the turkey breast with softened butter. This will help the skin brown and keep the meat moist. Season the turkey generously with salt and pepper. You can also add optional seasonings like paprika, dried sage, dried rosemary, and dried thyme for extra flavor.
- Add Aromatic Ingredients. Place minced garlic, lemon quarters, fresh thyme sprigs, and fresh rosemary sprigs around the turkey in the roasting pan. These aromatics will infuse the turkey with wonderful flavors as it roasts.
- Roasting . Place the roasting pan with the turkey breast in the preheated oven. Roast the turkey breast for about 20 minutes per pound. A 4-6 pound turkey breast will take approximately 80-120 minutes to cook. Use a meat thermometer to check for doneness.
- Check Internal Temperature. Begin checking the turkey’s internal temperature after about 1 hour of roasting. The turkey breast is done when it reaches an internal temperature of 165°F in the thickest part of the meat.
- Resting. Once the turkey reaches the desired temperature, remove it from the oven. Tent the turkey loosely with aluminum foil and let it rest for about 15-20 minutes. This allows the juices to redistribute and ensures a juicy, tender result when you carve the turkey.
- Carve and Serve. After resting, carve the roasted turkey breast into slices and serve with your favorite side dishes and gravy if desired.
Get support & connect with our community on Facebook!
Don’t forget to check out my other Ketocookbooks.
Keto Instant Pot, Keto Fat Bombs, Sweets, & Treats , and Easy keto in 30 minutes.
