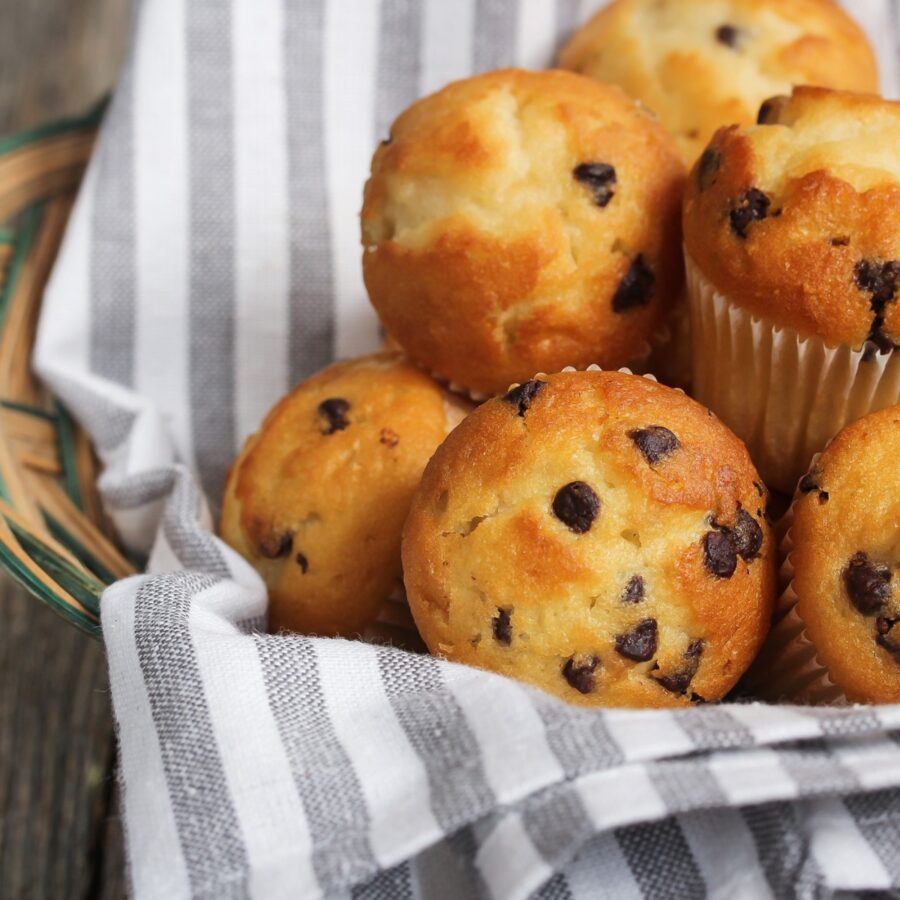
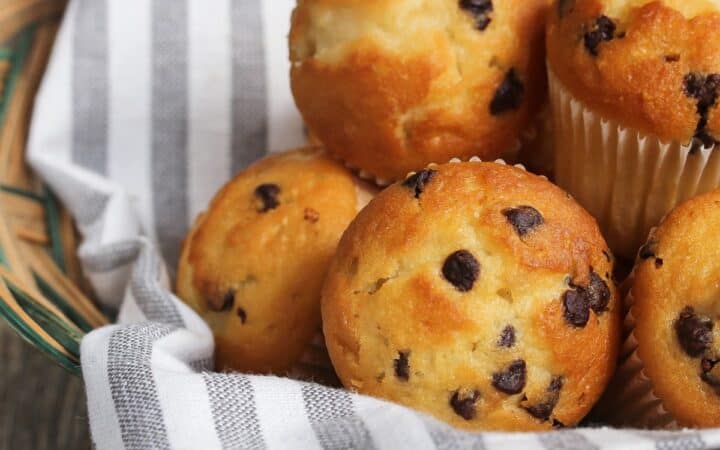
If you’re craving the delightful goodness of bite-sized baked treats, then you’ve come to the right place. Mini muffins are the perfect solution for a quick snack, a fun breakfast treat, or even a party dessert! Learn how to make the easiest, fluffiest Mini Muffins that are sure to be a hit with everyone. You’ll love the balance of tender, soft texture paired with incredible flavor in every bite.
Why You’ll Love These Magnificent Muffins
- Quick and Easy . Ready in under 25 minutes from start to finish!
- Perfect for Any Occasion . Great for lunch boxes, snacks, or breakfast on the go.
- Customizable . You can easily switch up the add-ins, like chocolate chips, blueberries, or nuts.
- Kid-Friendly . Mini muffins are the perfect size for little hands, making them a favorite among kids.
With just a few ingredients and minimal prep time, you can whip up a batch of mini muffins that will fill your home with the warm, inviting smell of freshly baked goodness. These muffins are so versatile—you can enjoy them plain or jazz them up with your favorite mix-ins.
What Do Mini Muffins Taste Like?
Mini muffins are more than just a smaller version of regular muffins—they’re packed with the same flavors and textures you love but in a perfectly portioned bite-sized form! They are great for portion control, and because they bake faster, you get to enjoy them quicker than traditional muffins.
Whether you prefer a simple vanilla base, rich chocolate, or fresh fruit fillings, mini muffins offer a world of possibilities.
Why Are My Mini Muffins Dry?
If your mini muffins are turning out dry, there are several common reasons that could be causing this issue. Here’s a breakdown of why it might be happening and what you can do to prevent dry muffins in the future:
- Overmixing the Batter . Overmixing is a common mistake that can lead to dense, dry muffins. When you stir the batter too much, you activate the gluten in the flour, which results in tougher muffins. Solution? Mix the batter just until the dry ingredients are incorporated. It’s okay if there are a few lumps in the mixture.
- Baking Too Long . Baking mini muffins even a few minutes longer than needed can dry them out. Mini muffins bake faster than regular-sized muffins, so keep a close eye on them and check for doneness around the 10-12 minute mark. Use the toothpick test — if it comes out clean, they’re ready to come out of the oven.
- Letting Muffins Cool in the Tin . Leaving your muffins to cool in the muffin tin for too long can cause them to steam and dry out. Once they’ve had a few minutes to cool, transfer them to a wire rack to finish cooling. This will help maintain their moisture and keep them soft.
By following these tips, you can avoid dry mini muffins and enjoy perfectly moist, tender results every time!
Ingredients You’ll Need
- All-Purpose Flour – This gives the muffins structure and a light, airy crumb.
- Baking Powder – Helps the muffins rise and gives them that perfect fluffy texture.
- Baking Soda - Acts as a leavening agent and creates a tender crumb.
- Greek Yogurt – Adds moisture and richness to the batter.
- Egg – Binds the ingredients together and contributes to the overall texture.
- Unsalted Butter – Adds richness and depth of flavor.
- Sugar – Sweetens the muffins without overpowering the other ingredients.
- Vanilla Extract – Adds a beautiful layer of flavor that complements any add-ins you choose.
- Optional Mix-ins - Chocolate chips, blueberries, nuts, or cinnamon for a delicious twist.
How To Make Mini Muffins
- Prep the Ingredients . Start by preheating your oven to 350°F and greasing a mini muffin tin or lining it with mini muffin liners.
- Make the Batter . In a medium-sized bowl, whisk together the flour, baking powder, baking soda, and a pinch of salt. In another bowl, combine the melted butter, sugar, egg, yogurt, and vanilla extract. Gradually fold the dry ingredients into the wet mixture, stirring just until combined. Be careful not to overmix, as this can lead to dense muffins.
- Add Your Favorite Mix-ins . Now’s the fun part! Fold in your favorite add-ins like chocolate chips, fresh berries, or nuts. This step allows you to personalize the muffins based on your preference or the occasion.
- Fill the Muffin Tin . Using a spoon or small scoop, fill the mini muffin tin, making sure each cavity is about 3/4 full. This gives the muffins enough room to rise while baking without overflowing.
- Bake to Perfection . Place the muffin tin in the preheated oven and bake for about 12-15 minutes, or until a toothpick inserted in the center comes out clean. The tops should be slightly golden and spring back when touched.
- Cool and Enjoy . Once baked, allow the muffins to cool in the tin for a few minutes before transferring them to a wire rack to cool completely. Enjoy them warm with a bit of butter, or store them for later snacking!

Tips And Tricks
Making mini muffins is easy, but a few tricks can take your muffins from good to great. Here are some helpful tips to ensure your muffins turn out light, fluffy, and full of flavor:
- Don’t Overmix . Overmixing the batter can cause the muffins to become dense. Stir the ingredients just until combined for the best results.
- Room Temperature Ingredients . Using room temperature butter, eggs, and milk will help the ingredients combine more smoothly, resulting in a better texture.
- Use a Cookie Scoop . For evenly sized muffins, use a cookie or ice cream scoop to fill the muffin tins. This ensures that all the muffins bake at the same rate.
- Cool Completely Before Storing . If you plan to store your muffins, let them cool completely before placing them in an airtight container to prevent them from becoming soggy.
Variations
The beauty of mini muffins is that they are incredibly versatile. You can experiment with different flavors and mix-ins to create a variety of muffins to suit your taste. Here are a few ideas to get you started:
- Chocolate Chip - Add chocolate chips to the batter for a sweet, indulgent treat.
- Blueberry - Fresh or frozen blueberries give these muffins a burst of fruity flavor.
- Banana Nut - Mash a ripe banana and fold it into the batter along with chopped walnuts for a tasty twist.
- Cinnamon Sugar Muffins : Mix cinnamon and sugar into the batter and sprinkle some on top before baking for a spiced-up version.
What To Enjoy With Mini Muffins
Mini muffins are perfect on their own, but you can serve them with various accompaniments to elevate your snacking experience:
- Fruit Salad - Fresh fruit adds a burst of refreshing flavor that complements the sweetness of the muffins.
- Yogurt - A dollop of Greek yogurt on the side makes for a light and healthy breakfast.
- Butter or Jam - Spread a bit of butter or your favorite fruit preserves on a warm muffin for extra richness.
How Long Do They Last?
Mini muffins can last for up to 3-4 days when stored in an airtight container at room temperature.
Can You Freeze Them?
Yes, mini muffins freeze beautifully. To freeze, allow them to cool completely after baking. Place them in a single layer on a baking sheet and freeze for about an hour. Then, transfer the muffins to a freezer-safe bag or container. You can store them in the freezer for up to 3 months .
When you’re ready to eat them, let them thaw at room temperature or warm them up in the microwave for a quick snack.
More Marvelous Muffin Recipes
- Apple Cinnamon Muffins
- Keto Blueberry Muffins
- Coffee Cake Muffins
- Egg Muffins
- Banana Oatmeal Muffins
- Lemon Muffins
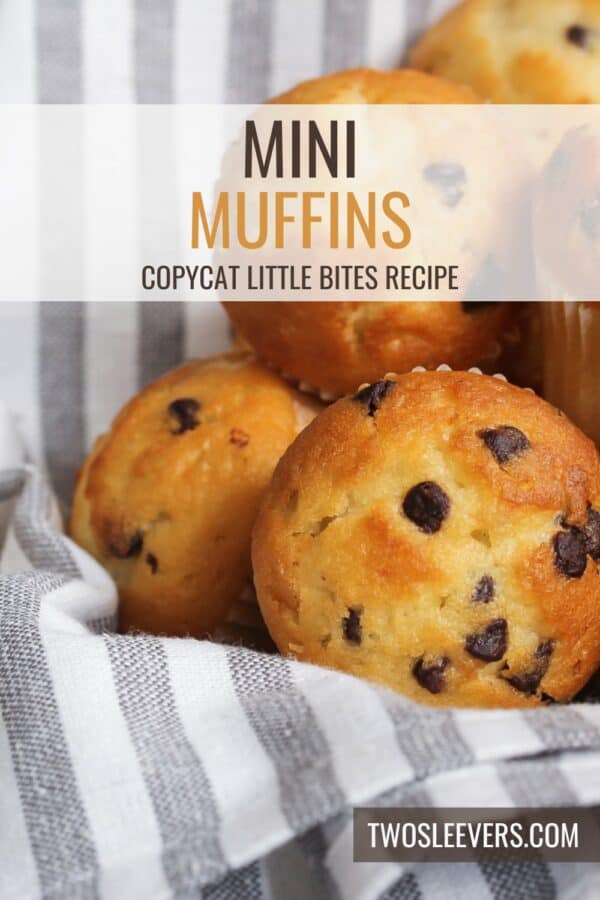
Mini Muffins | Copycat Little Bites Recipe
Ingredients
- ▢ 1 3/4 cups All Purpose Flour
- ▢ 1 1/2 tsp Baking Powder
- ▢ 1/2 tsp Baking Soda
- ▢ 1/2 cup Greek Yogurt
- ▢ 2 Eggs
- ▢ 1/4 cup Unsalted Butter
- ▢ 1/2 cup Granulated Sugar
- ▢ 1 tsp Vanilla Extract
- ▢ 1/2 cup Chocolate Chips
Instructions
- Prep the Ingredients . Start by preheating your oven to 350°F and greasing a mini muffin tin or lining it with mini muffin liners.
- Make the Batter . In a medium-sized bowl, whisk together the flour, baking powder, baking soda, and a pinch of salt. In another bowl, combine the melted butter, sugar, egg, Greek Yogurt, and vanilla extract. Gradually fold the dry ingredients into the wet mixture, stirring just until combined. Be careful not to overmix, as this can lead to dense muffins.
- Add Your Favorite Mix-ins . Now’s the fun part! Fold in your favorite add-ins like chocolate chips, fresh berries, or nuts. This step allows you to personalize the muffins based on your preference or the occasion.
- Fill the Muffin Tin . Using a spoon or small scoop, fill the mini muffin tin, making sure each cavity is about 3/4 full. This gives the muffins enough room to rise while baking without overflowing.
- Bake to Perfection . Place the muffin tin in the preheated oven and bake for about 12-15 minutes, or until a toothpick inserted in the center comes out clean. The tops should be slightly golden and spring back when touched.
- Cool and Enjoy . Once baked, allow the muffins to cool in the tin for a few minutes before transferring them to a wire rack to cool completely. Enjoy them warm with a bit of butter, or store them for later snacking!
Get support & connect with our community on Facebook!
Nutrition

If you already signed up, you should have received an email with a password to give you unlimited access to our FREE Printable Library. The password is case sensitive. Enter it below and get printing!
Password:

Mini Muffins | Copycat Little Bites Recipe
Ingredients
- 1 3/4 cups All Purpose Flour
- 1 1/2 tsp Baking Powder
- 1/2 tsp Baking Soda
- 1/2 cup Greek Yogurt
- 2 Eggs
- 1/4 cup Unsalted Butter
- 1/2 cup Granulated Sugar
- 1 tsp Vanilla Extract
- 1/2 cup Chocolate Chips
Instructions
- Prep the Ingredients . Start by preheating your oven to 350°F and greasing a mini muffin tin or lining it with mini muffin liners.
- Make the Batter . In a medium-sized bowl, whisk together the flour, baking powder, baking soda, and a pinch of salt. In another bowl, combine the melted butter, sugar, egg, Greek Yogurt, and vanilla extract. Gradually fold the dry ingredients into the wet mixture, stirring just until combined. Be careful not to overmix, as this can lead to dense muffins.
- Add Your Favorite Mix-ins . Now’s the fun part! Fold in your favorite add-ins like chocolate chips, fresh berries, or nuts. This step allows you to personalize the muffins based on your preference or the occasion.
- Fill the Muffin Tin . Using a spoon or small scoop, fill the mini muffin tin, making sure each cavity is about 3/4 full. This gives the muffins enough room to rise while baking without overflowing.
- Bake to Perfection . Place the muffin tin in the preheated oven and bake for about 12-15 minutes, or until a toothpick inserted in the center comes out clean. The tops should be slightly golden and spring back when touched.
- Cool and Enjoy . Once baked, allow the muffins to cool in the tin for a few minutes before transferring them to a wire rack to cool completely. Enjoy them warm with a bit of butter, or store them for later snacking!
Mini Muffins | Copycat Little Bites Recipe https://twosleevers.com/mini-muffins/

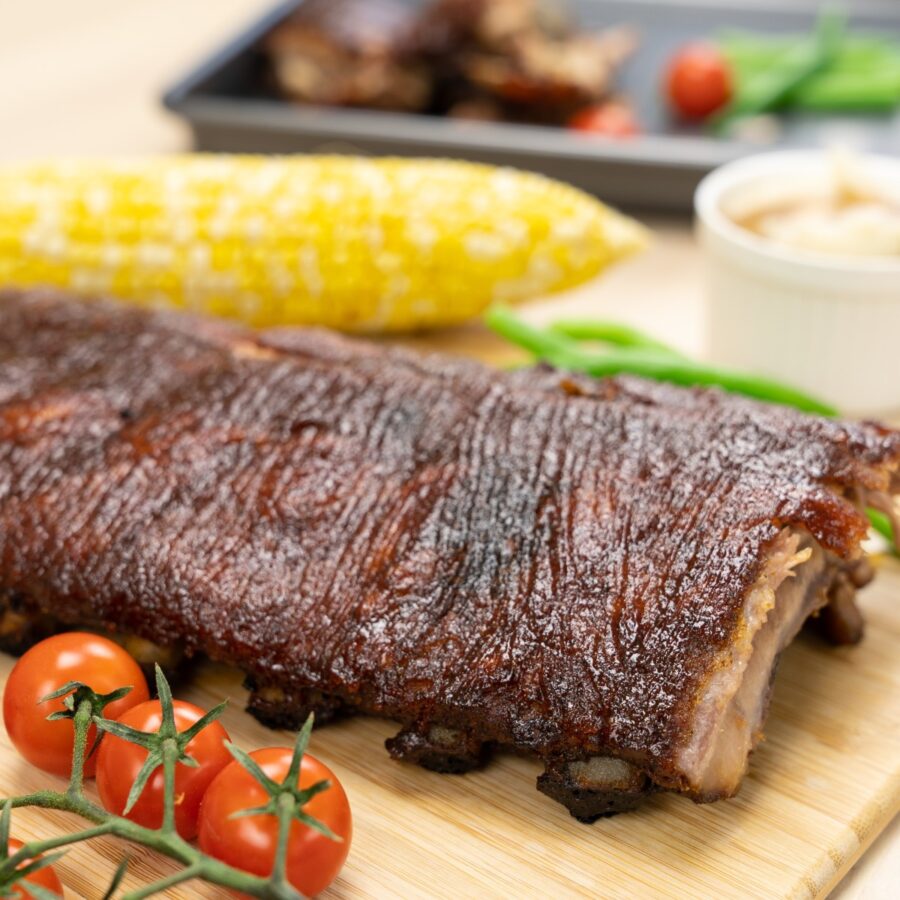
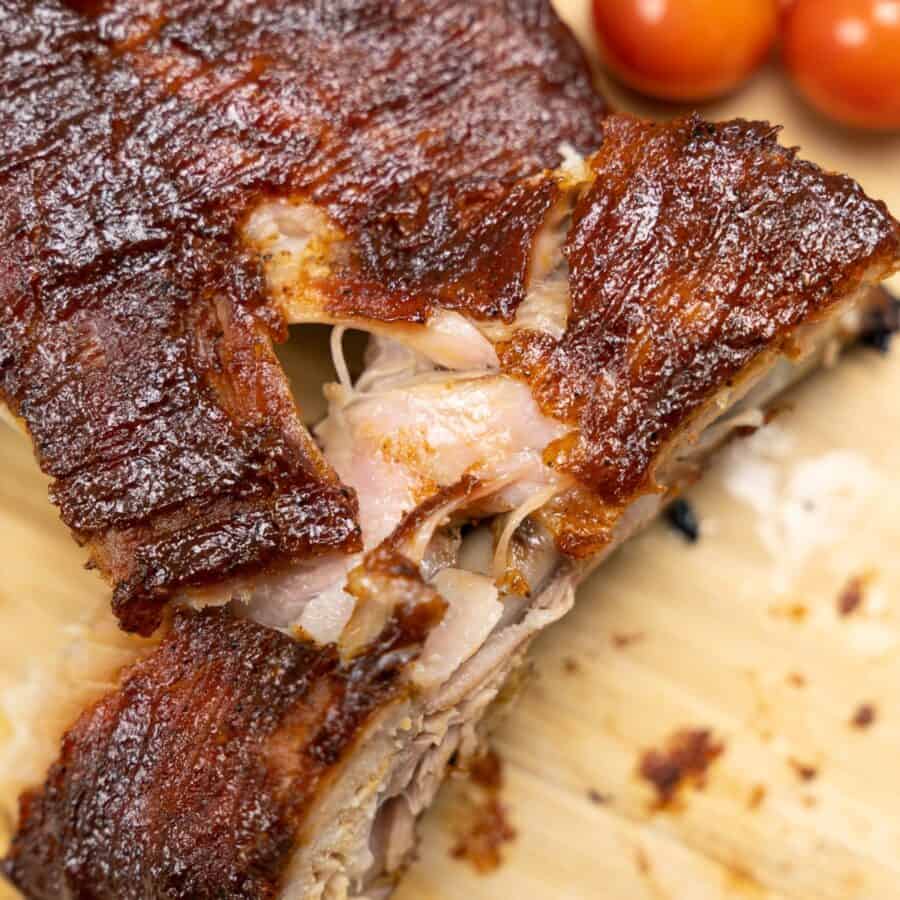
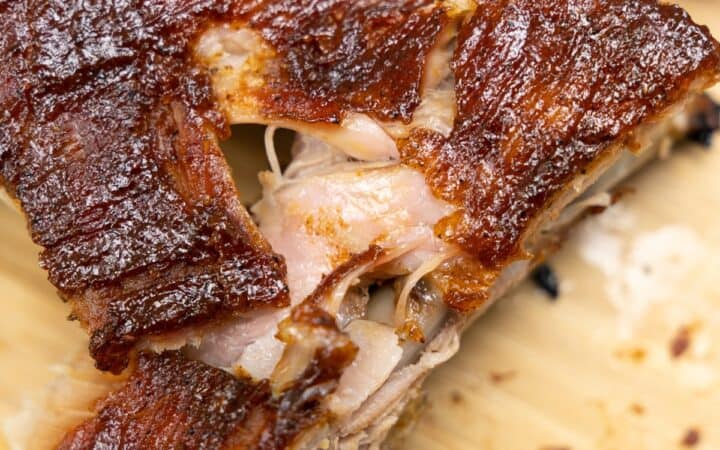
If you love tender, flavorful ribs without needing a grill, you’re in the right place! Learn how to make the most irresistible Oven Baked Ribs that are perfect for any occasion. Achieve that melt-in-your-mouth texture with a sweet, smoky glaze that will have everyone coming back for more.
Why You’ll Love This Perfect Pork Recipe
- Tender and Juicy . These ribs practically fall off the bone after a slow roast in the oven.
- Easy Preparation . No need for a grill or smoker—everything happens in your oven!
- Flavorful . With a simple homemade rub and BBQ glaze, these ribs pack an irresistible punch.
- Perfect for Any Occasion . Whether it’s a casual weeknight meal or a summer BBQ, these oven-baked ribs are always a hit.
With a low and slow bake in the oven, you’ll achieve perfectly tender ribs without the fuss of outdoor grilling. Whether you’re serving them for a special dinner or bringing them to a potluck, these ribs will impress every guest.
Are Oven Baked Ribs Good?
Absolutely! Oven baked ribs are known for their tenderness. The slow cooking process allows the ribs to become juicy and flavorful. While grilling adds a smoky char, baking lets you control the flavors and tenderness perfectly. Plus, you can enjoy ribs year-round, rain or shine!
Do You Bake Ribs With Or Without Foil?
When baking ribs, it’s generally recommended to bake them with foil. Wrapping the ribs in foil helps trap moisture and heat, ensuring that the ribs become tender and juicy as they cook slowly.
Ingredients You’ll Need
- Pork Ribs – Choose baby back ribs or spare ribs, depending on your preference.
- Brown Sugar – Adds sweetness and helps form a caramelized crust.
- Paprika – For a smoky undertone.
- Garlic Powder – Enhances the savory flavor.
- Onion Powder – Adds depth to the rub.
- Salt & Pepper – Essential for seasoning.
- BBQ Sauce – Use your favorite brand or make a homemade BBQ glaze.
- Apple Cider Vinegar – Helps tenderize the ribs while adding tangy flavor.
How To Make Oven Baked Ribs
- Prep the Ribs. Start by preheating your oven to 275°F. Remove the membrane from the back of the ribs for maximum tenderness. This ensures the rub penetrates the meat fully.
- Season the Ribs. In a small bowl, mix together the brown sugar, paprika, garlic powder, onion powder, salt, and pepper. Rub this mixture generously over both sides of the ribs.
- Wrap and Bake. Place the seasoned ribs on a large sheet of foil, meat-side up, and fold the foil over to create a sealed packet. Place the wrapped ribs on a baking sheet and bake for 2.5 to 3 hours. The low temperature ensures the meat becomes tender and juicy.
- Glaze with BBQ Sauce. After baking, carefully unwrap the ribs and discard any excess juices. Brush your favorite BBQ sauce generously over the ribs.
- Broil for a Crispy Finish. Set your oven to broil and place the ribs under the broiler for 5-7 minutes. This step helps the BBQ sauce caramelize, creating that perfect sticky finish.
Tips And Tricks
Here are some tips and tricks to help you achieve perfectly tender and flavorful oven baked ribs:
- Remove the Membrane . Taking off the tough membrane from the back of the ribs helps the seasonings penetrate and results in more tender meat.
- Low and Slow . Don’t rush the process! Cooking the ribs at a low temperature for a long time ensures they are perfectly tender.
- Foil-Wrapped Ribs . Wrapping the ribs in foil traps the moisture and steam, which makes the ribs juicy and flavorful.
- Rest the Ribs . After removing the ribs from the oven, allow them to rest for 5-10 minutes before cutting. This helps lock in the juices.
Variations
Here are some delicious variations to spice up your oven baked ribs:
- Spicy - Add a teaspoon of cayenne pepper to the rub for a spicy kick.
- Honey Glazed - Mix some honey into the BBQ sauce for a sweet, sticky glaze.
- Garlic Herb - Skip the BBQ sauce and finish the ribs with a garlic herb butter for a savory alternative.
What To Eat With Oven Baked Ribs
These ribs pair well with a variety of side dishes for a complete meal:
- Coleslaw - The tangy crunch of coleslaw complements the rich, savory flavor of the ribs.
- Potato Salad - A creamy side like potato salad balances the BBQ flavors.
- Cornbread - Sweet and buttery cornbread is a classic pairing for ribs.
How Long Do They Last?
If you have any leftovers (though that’s unlikely!), you can store the ribs in an airtight container in the refrigerator for up to 3 days. To reheat, place the ribs in a 300°F oven until warmed through.
Can You Freeze Them?
Yes! To freeze leftover ribs, wrap them tightly in foil or plastic wrap, then place them in a resealable freezer bag. Frozen ribs will last up to 3 months.
When you’re ready to eat your leftover baked ribs, thaw them in the refrigerator overnight and reheat them in the oven.
More Brilliant BBQ Bites
- Smoked Ribs
- BBQ Pork Chops
- Japanese BBQ Sauce
- Grilled Sweet Potatoes
- Pork Belly Burnt Ends
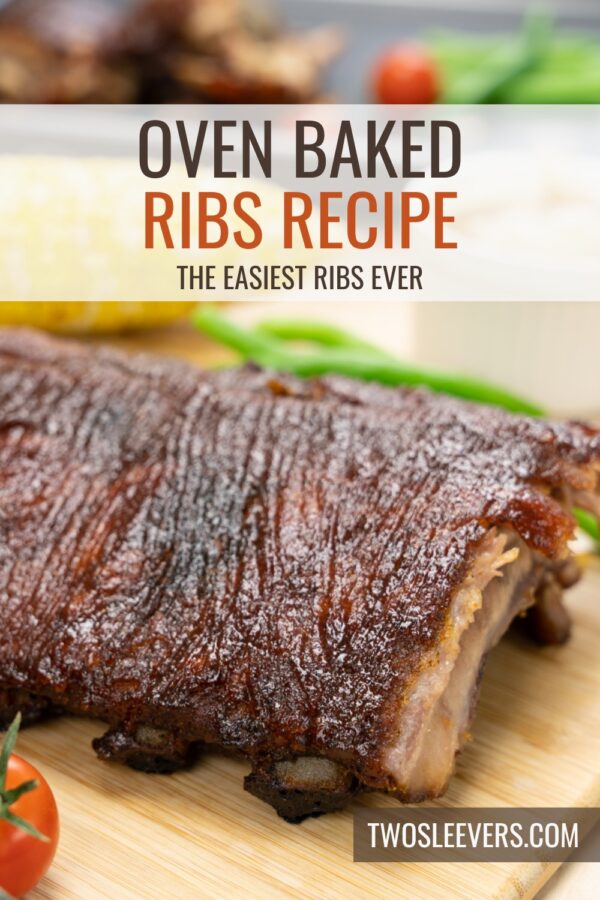
Oven Baked Ribs | Tender Oven Baked Rib Recipe
Ingredients
- ▢ 2 Racks Pork Ribs
- ▢ 3 tbsp Brown Sugar
- ▢ 2 tsp Paprika
- ▢ 2 tsp Garlic Powder
- ▢ 1 tsp Onion Powder
- ▢ 1 tsp Kosher Salt
- ▢ 1 tsp Ground Black Pepper
- ▢ 1/2 cup Apple Cider Vinegar
- ▢ 1 cup BBQ Sauce
Instructions
- Prep the Ribs. Start by preheating your oven to 275°F. Remove the membrane from the back of the ribs for maximum tenderness. This ensures the rub penetrates the meat fully.
- Season the Ribs. In a small bowl, mix together the brown sugar, paprika, garlic powder, onion powder, salt, and pepper. Rub this mixture generously over both sides of the ribs.
- Wrap and Bake. Place the seasoned ribs on a large sheet of foil, meat-side up, and fold the foil over to create a sealed packet. Place the wrapped ribs on a baking sheet and bake for 2.5 to 3 hours. The low temperature ensures the meat becomes tender and juicy.
- Glaze with BBQ Sauce. After baking, carefully unwrap the ribs and discard any excess juices. Brush your favorite BBQ sauce generously over the ribs.
- Broil for a Crispy Finish. Set your oven to broil and place the ribs under the broiler for 5-7 minutes. This step helps the BBQ sauce caramelize, creating that perfect sticky finish.
