


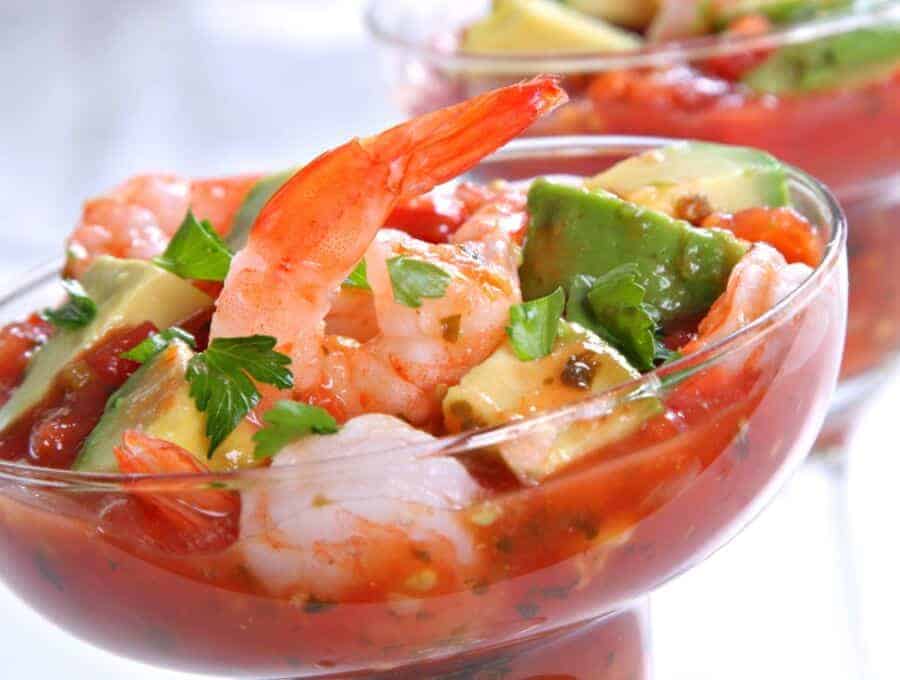
This Mexican Shrimp Cocktail is a deliciously simple and low carb dish you’re sure to love! It can be served as an appetizer, snack, or even as a main dish.
What Makes This Mexican Shrimp Cocktail So Great
- Simple. Need an appetizer quick and in a hurry? This shrimp cocktail is the perfect recipe for you. Simply dice the veggies , make the sauce and then toss them all together with the shrimp.
- Versatile. Really, this Mexican Shrimp Cocktail can be whatever you want it to be! I’ve served these as appetizers before with my Instant Pot Pulled Pork Carnitas recipe and even as sides . I’ve personally eaten these as my main dish many times in the summer along with this Texas Caviar recipe - they’re both perfect for hot days.
- Low carb. Shrimp cocktail sauce isn’t particularly known for being low in carbs. However, this recipe uses a keto cocktail sauce I put together, making it far more keto-friendly than traditional shrimp cocktail recipes.
How To Make Shrimp Cocktail
- Chop. Chop all pico de gallo ingredients (except avocado) into small cubes of uniform shape and size. I totally cheat and use a chopper to chop everything including the tomatoes. Just be sure to put the tomatoes skin side down and it will go through your onions, tomatoes, cucumber, jalapeno and yes, even the cilantro. I use this pull chopper or this push chopper and love them both!
- Sauce. Mix all ingredients for the sauce.
- Mix. Mix sauce with chopped vegetables and shrimp and let it sit on the counter to let the flavors marry. If longer than 30 minutes, let it sit in the refrigerator.
- Serve. Serve and enjoy!
How is Mexican Shrimp Cocktail Keto?
When I made this, I wanted something fresh-tasting but high protein . As you know, with Keto it’s important to get a lot of protein in a day. This Mexican Shrimp Cocktail fits the bill! Shrimp are an excellent source of protein, and avocados are great for fat content , both in which are beneficial to those living a keto lifestyle.
Does This Need To Be Made In Advance?
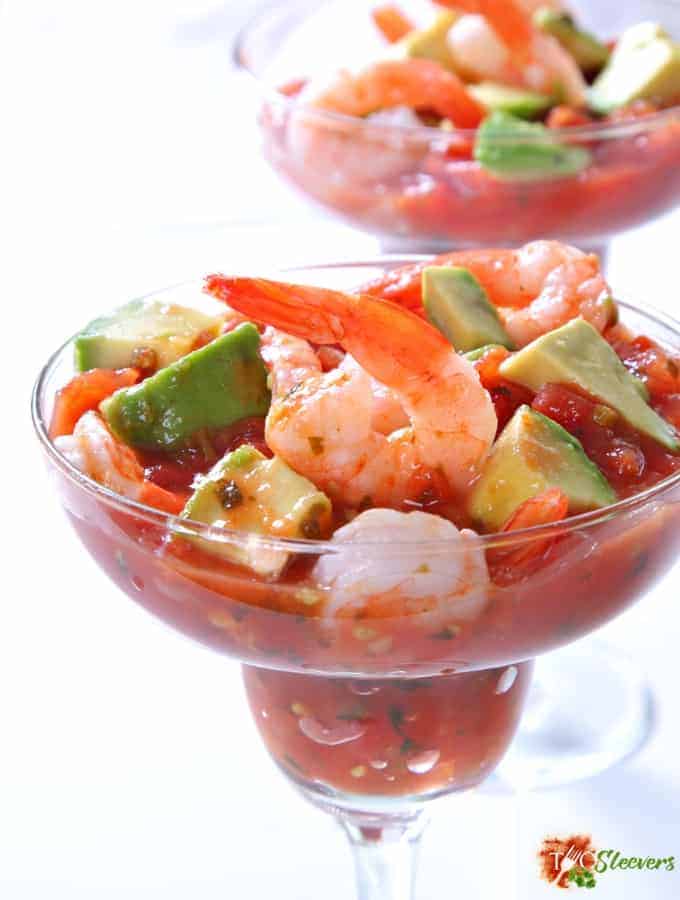
The beauty of this is you can make it all from scratch, or if you’re in a hurry, buy some pico de gallo and get boiled shrimp and make this in a jiffy. I suppose I should have let them mix and mingle for a while but I was hungry so we ate it right away. Felt like summer in my mouth!
If you want to let the flavors meld, you can certainly make this in advance and store in the fridge. It’s great chilled and is perfect for a warm summer day (like this Avocado Grapefruit Salad I eat a ton of in the summer too)! The tomato blends well with the herbs and the shrimp soak all that flavor up when they’re allowed some time to marinate.
What Are These Called In Spanish?
If you want to order these in Spanish, or from a Mexican restaurant , you will likely see them on the menu as Coctel de Camarones, which literally translates to Cocktail of Shrimp .
A Mexican Shrimp Cocktail is sometimes served with chips at a restaurant, so keep that in mind if you’re living a Keto lifestyle and want to avoid those carbs. Additionally, if you’re serving these to non-keto guests, you may want to serve it with some chips in case they want to eat them that way as well.
Shrimp Cocktail Tips And Tricks
- This is best if served chilled. The flavors will blend best if it’s allowed to sit in the fridge for 30 minutes or longer before eating.
- Save time by using store-bought pico de gallo and boiled shrimp.
- Use parsley instead of cilantro if you don’t like it.
- Omit the hot sauce to keep it from being spicy, or add more to kick it up a notch!
- The traditional way to eat this is with an oyster fork, but you can just dig in like I did with any old utensil you have laying around. Unless, of course, you’re serving this to guests, then maybe the oyster fork is the way to go.
- Sometimes people will even use the cocktail as a sort of dip to scoop up with chips. If you’re making it at home, you can eat it however sounds most delicious to you!
What Do I Serve With Shrimp Cocktail?
Here are some delicious Mexican recipes, sides, main courses and desserts, that you can enjoy along with this recipe:
- Air Fryer Southwestern Roasted Corn - Perfectly sweet, tangy and spicy.
- Arroz Pina Colada - A simple, one step dessert recipe.
- Low Carb Stuffed Poblano Peppers - Delicious, low carb, and take under 30 minutes to make.
- Instant Pot Beef Barbacoa - Make this deliciously tender barbacoa recipe quickly in your Instant Pot.
- Instant Pot Tamale Pie - All of the taste of tamales but done in under an hour.
- Instant Pot Chicken Tacos - Delicious shredded chicken tacos in just 30 minutes.
- Grapefruit Salad - a Creamy and Citrus summer salad recipe.

Mexican Shrimp Cocktail
Equipment
- Pull Chopper
- Push Chopper
Ingredients
For the Pico de Gallo:
- ▢ 1/2 Red Onion. chopped
- ▢ 2 Tomatoes
- ▢ 1/2 cucumber
- ▢ 1 Jalapeño Peppers
- ▢ 3-4 tablespoons Cilantro
- ▢ 1 Avocado
For the Sauce:
- ▢ 1/8 cup Ketchup
- ▢ 1 teaspoon Cholula hot sauce
- ▢ 1 lime , juiced
- ▢ 1/4 teaspoon Ground Cumin
- ▢ 1/4 teaspoon Ground Coriander
- ▢ 1 teaspoon Kosher Salt , or to taste
For the Shrimp
- ▢ 1/2 pound Shrimp , cooked, peeled, de-veined, and tails taken off
- ▢ 1 teaspoon Kosher Salt
Instructions
- Chop all pico de gallo ingredients (except avocado) into small cubes of uniform shape and size. I totally cheat and use a chopper to chop everything including the tomatoes. Just be sure to put the tomatoes skin side down and it will go through your onions, tomatoes, cucumber, jalapeno and yes, even the cilantro. I use this pull chopper or this push chopper and love them both!
- Mix all ingredients for the sauce.
- Mix sauce with chopped vegetables and shrimp and let it sit on the counter to let the flavors marry. If longer than 30 minutes, let it sit in the refrigerator.
- Serve and enjoy!
Shrimp Cocktail Tips And Tricks
- This is best if served chilled. The flavors will blend best if it’s allowed to sit in the fridge for 30 minutes or longer before eating.
- Save time by using store-bought pico de gallo and boiled shrimp.
- Use parsley instead of cilantro if you don’t like it.
- Omit the hot sauce to keep it from being spicy, or add more to kick it up a notch!
- The traditional way to eat this is with an oyster fork, but you can just dig in like I did with any old utensil you have laying around. Unless, of course, you’re serving this to guests, then maybe the oyster fork is the way to go.
- Sometimes people will even use the cocktail as a sort of dip to scoop up with chips. If you’re making it at home, you can eat it however sounds most delicious to you!
Get support & connect with our community on Facebook!
Nutrition
Don’t forget to check out my other Ketocookbooks.
Keto Instant Pot, Keto Fat Bombs, Sweets, & Treats , and Easy keto in 30 minutes.


If you already signed up, you should have received an email with a password to give you unlimited access to our FREE Printable Library. The password is case sensitive. Enter it below and get printing!
Password:

Mexican Shrimp Cocktail
Ingredients
For the Pico de Gallo:
- 1/2 Red Onion. chopped
- 2 Tomatoes
- 1/2 cucumber
- 1 Jalapeño Peppers
- 3-4 tablespoons Cilantro
- 1 Avocado
For the Sauce:
- 1/8 cup Ketchup
- 1 teaspoon Cholula hot sauce
- 1 lime juiced
- 1/4 teaspoon Ground Cumin
- 1/4 teaspoon Ground Coriander
- 1 teaspoon Kosher Salt or to taste
For the Shrimp
- 1/2 pound Shrimp cooked, peeled, de-veined, and tails taken off
- 1 teaspoon Kosher Salt
Instructions
- Chop all pico de gallo ingredients (except avocado) into small cubes of uniform shape and size. I totally cheat and use a chopper to chop everything including the tomatoes. Just be sure to put the tomatoes skin side down and it will go through your onions, tomatoes, cucumber, jalapeno and yes, even the cilantro. I use this pull chopper or this push chopper and love them both!
- Mix all ingredients for the sauce.
- Mix sauce with chopped vegetables and shrimp and let it sit on the counter to let the flavors marry. If longer than 30 minutes, let it sit in the refrigerator.
- Serve and enjoy!
Shrimp Cocktail Tips And Tricks
- This is best if served chilled. The flavors will blend best if it’s allowed to sit in the fridge for 30 minutes or longer before eating.
- Save time by using store-bought pico de gallo and boiled shrimp.
- Use parsley instead of cilantro if you don’t like it.
- Omit the hot sauce to keep it from being spicy, or add more to kick it up a notch!
- The traditional way to eat this is with an oyster fork, but you can just dig in like I did with any old utensil you have laying around. Unless, of course, you’re serving this to guests, then maybe the oyster fork is the way to go.
- Sometimes people will even use the cocktail as a sort of dip to scoop up with chips. If you’re making it at home, you can eat it however sounds most delicious to you!
Mexican Shrimp Cocktail https://twosleevers.com/mexican-shrimp-cocktail/


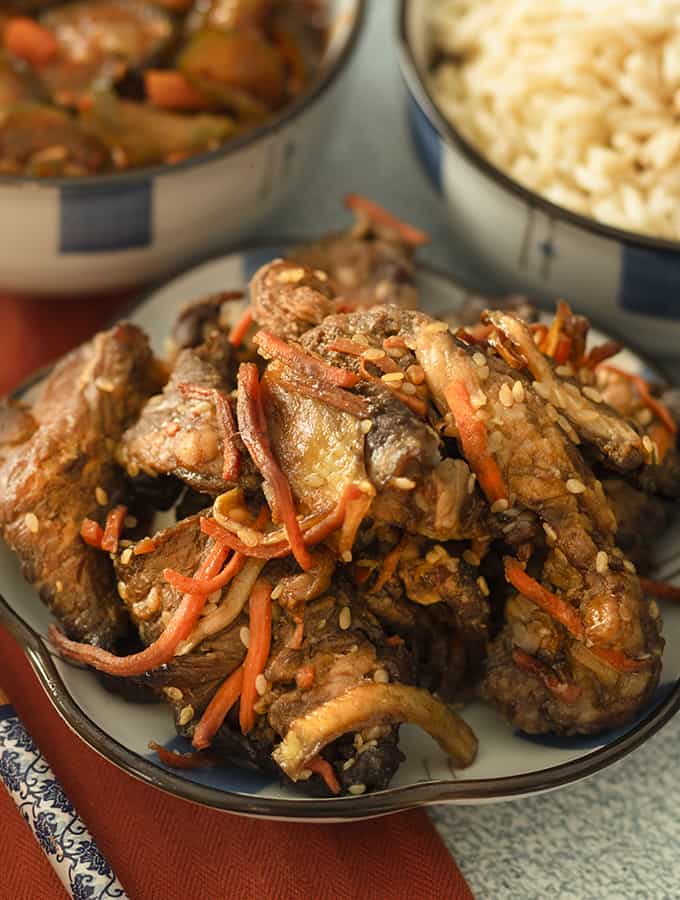
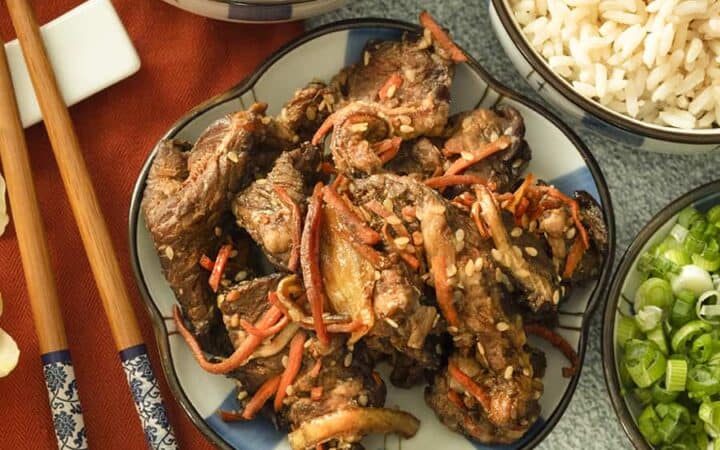
Air Fryer Beef Bulgogi is a Korean marinated beef dish made with thin-sliced sirloin (or chuck), soy sauce, brown sugar, sesame oil, garlic, sesame seeds, green onions, and shredded carrots. It’s quick and weeknight-friendly and works well for an easy dinner or meal prep (with a low-carb option if you swap the sugar for a keto sweetener and serve it over cauliflower rice). Unlike traditional bulgogi recipes cooked on a grill or stovetop, this version uses the air fryer to create caramelized edges fast with minimal mess and effort.

What Makes This Beef Bulgogi So Delicious
- Fast. Made in under 30 minutes , not including the time it takes to marinate the beef.
- Easy. A simple marinade, pour and cook recipe .
- High Protein . Packs an impressive 27 grams of protein per serving.
- Low Carb . Only 8 carbs per serving.
- Delicious. Loaded with authentic Korean flavors .
If you know anything about me, you probably know that I’m a huge fan of simple recipes. This Beef Bulgogi is the simplest of recipes with just the essential ingredients—but with a lot of flavor.
And who says a dish has to be complicated in order to be delicious? Not me, that’s for sure.
This Beef Bulgogi comes out perfectly tender every time. Do you want to know my secret? One reason is that I take the time to let it marinate. The other is that I cook this in my air fryer .
I’m a huge fan of air fryer recipes , and this Bulgogi seemed like the perfect candidate for being cooked in the air fryer. The air fryer does a great job of cooking the beef to perfection while not having to heat up the whole kitchen. It also cooks it quickly, and the faster it’s done the sooner you get to enjoy it.
This Beef Bulgogi is a great main course to serve the whole family for dinner, and because it’s high in protein you know your little ones won’t be begging for a snack after.
How Do You Pronounce Beef Bulgogi?
The correct pronunciation for this traditional Korean dish is:
Pool-Goh-Gee .
What Is Bulgogi?
Bulgogi is loosely translated as “fire meat”. It is thinly sliced meat that is cooked over high heat and is commonly served in many Korean households.
What Does It Taste Like?
This Beef Bulgogi is the perfect balance of savory, salty and lightly sweet wrapped up in one delicious and simple dish. It’s a staple of Korean cuisine and if you’ve never had it before your in for quite the treat!
What Cut Of Beef Is It Made Out Of?
Beef Bulgogi is usually made with thin slices of tender beef. Ribeye is a very popular option, as well as sirloin. I chose to use sirloin for this Beef Bulgogi recipe, but you can also use chuck steak if you’d like.
What Is Bulgogi Beef Made Of?
If you’re a fan of any Asian dishes, you’ll likely have all of the ingredients to make this Bulgogi Beef in your kitchen already.
Here’s what you’ll need to make it:
- 1.5 pounds sirloin steak or chuck steak - The main protein and centerpiece of the dish. Thinly sliced beef ensures tenderness and allows the marinade to absorb deeply, creating the signature sweet-savory flavor of bulgogi. Cutting against the grain keeps the meat soft and easy to chew.
- 3 chopped green scallions - Add mild onion flavor and freshness to balance the richness of the beef. They also caramelize slightly in the air fryer, adding extra aroma and depth.
- 1 cup shredded carrots - Provide a touch of sweetness, color, and texture. The carrots complement the savory flavors and add a bit of crunch to the finished dish.
- 3 tablespoons soy sauce – The salty, umami base of the marinade. It seasons the beef and helps tenderize it while enhancing the meaty flavor.
- 2 tablespoons brown sugar - Adds sweetness to balance the soy sauce’s saltiness and helps create the slightly caramelized glaze that makes bulgogi so delicious. The sugar also aids in browning the meat.
- 2 tablespoons sesame oil - Brings nutty aroma and richness to the marinade. It helps coat the beef evenly and adds the distinctive Korean flavor that makes bulgogi so fragrant.
- 2 tablespoons sesame seeds - Add texture, nuttiness, and visual appeal. They’re often sprinkled on top just before serving to enhance flavor and presentation.
- 2 teaspoons minced garlic - Contributes bold, savory depth and enhances the overall umami profile of the marinade. Garlic is essential to traditional Korean bulgogi flavor.
- 1/2 teaspoon ground black pepper - Adds gentle spice and warmth, balancing the sweetness and highlighting the savory notes of the soy and sesame.
How To Make Beef Bulgogi
- Create marinade. Place sliced beef, carrots, and green onions into a plastic zip-top bag . Add, soy sauce, brown sugar, sesame oil, sesame seeds, garlic, and ground pepper. Squish the bag well to get the meat and sauce to incorporate well.
- Marinate. Allow the beef to marinate for 30 minutes or up to 24 hours in the refrigerator.
- Cook. Place the meat and veggies into the air fryer basket, leaving behind as much of the marinade as you can. Set air fryer to 400°F for 12 minutes, shaking halfway through.
- Serve. Serve with steamed rice, riced cauliflower, or over a mixed salad.
Tips And Tricks
Making Air Fryer Beef Bulgogi is a quick and flavorful way to enjoy this Korean classic without firing up the grill. The air fryer helps achieve beautifully caramelized edges while keeping th.beef tender and juicy. Here are some helpful tips and tricks to make your bulgogi turn out perfectly every time:
- Slice the Beef Thinly . Thin slices (about 1/8 inch) allow the marinade to penetrate deeply and help the meat cook quickly and evenly.
- Marinate for Maximum Flavor . Let the beef marinate for at least 30 minutes, or up to 4 hours if you have time. The longer it sits, the more flavorful and tender it becomes.
- Don’t Overcrowd the Basket . Cook in batches if necessary. Giving the beef space allows air to circulate, ensuring caramelized, crisp edges instead of steaming.
- Preheat the Air Fryer . Starting with a hot basket helps sear the beef immediately, locking in moisture and flavor.
Variations
From spicy to light and low-carb, here are some delicious ideas to try:
- Spicy Gochujang- Add 1–2 tablespoons of gochujang (Korean chili paste) to the marinade for a rich, spicy kick. You can also sprinkle in extra gochugaru (Korean chili flakes) if you like more heat.
- Low-Carb Lettuce Wrap- Skip the rice and serve the cooked bulgogi in romaine or butter lettuce leaves. Add toppings like sliced cucumbers, shredded carrots, or kimchi for crunch and freshness.
- Veggie-Loaded- Mix in vegetables such as bell peppers, onions, mushrooms, or zucchini before air frying. The veggies soak up the flavorful marinade and make the dish even more colorful and nutrient-packed.
What Do You Serve With This Korean Bulgogi Recipe?
Beef Bulgogi is often served over a bed of rice. If you own an Instant Pot I highly recommend using my Perfect Pressure Cooker Rice recipe to make the best rice easily.
If you’re wanting to keep the carb count down you could also serve this over a bed of cauliflower rice or serve it with a side of lettuce and use the lettuce to wrap a slice of the beef.
How Long Does It Last?
Air fryer beef bulgogi can be stored in an airtight container in the refrigerator for up to 4 days. Make sure it cools completely before sealing it to prevent excess moisture buildup, which can affect texture and flavor.
To reheat, simply warm it in the air fryer at 350°F for a few minutes or heat it in a skillet over medium heat until hot.
Can You Freeze It?
If you want to store it longer, you can freeze the cooked bulgogi for up to 2 months. When ready to enjoy, thaw it overnight in the fridge and reheat as usual to maintain its juicy, caramelized texture.
For air fryer beef bulgogi, a good marinating sweet spot is 30 minutes to 4 hours. Long enough for the bulgogi marinade (soy sauce, garlic, sesame oil, and a little sweetener) to soak in, but not so long that the beef gets overly soft. If you’re using slightly thicker slices, you can go up to overnight for deeper flavor, but keep super-thin beef on the shorter end. For best caramelized edges in the air fryer (and less sticking/burning), drain off excess marinade before cooking and cook in batches so the beef browns instead of steaming.
Your air fryer beef bulgogi is probably burning because the bulgogi marinade contains sweetener and soy sauce, which caramelize fast at high heat. Excess marinade can drip, smoke, and scorch on the basket or heating element. It’s more likely if the beef is very thin-sliced/shaved, you overcrowded the basket (steam + uneven hot spots), or you cooked it too hot for too long. To prevent burning, shake off extra marinade, cook in a single layer in batches, lower the temp slightly and shorten the time, or line the basket with perforated parchment. You’ll still get caramelized edges without charred bits.
To stop air fryer beef bulgogi from sticking, the goal is less sticky glaze on the metal and better airflow. Lightly oil the basket (or use perforated parchment), and shake off excess bulgogi marinade before cooking so it doesn’t puddle and glue the beef down. Cook the beef in a single layer (batches matter), then flip or shake halfway through once the surface has started to caramelize. Trying to move it too early can tear it.
Looking For More Great Korean Recipes? Check These Out!
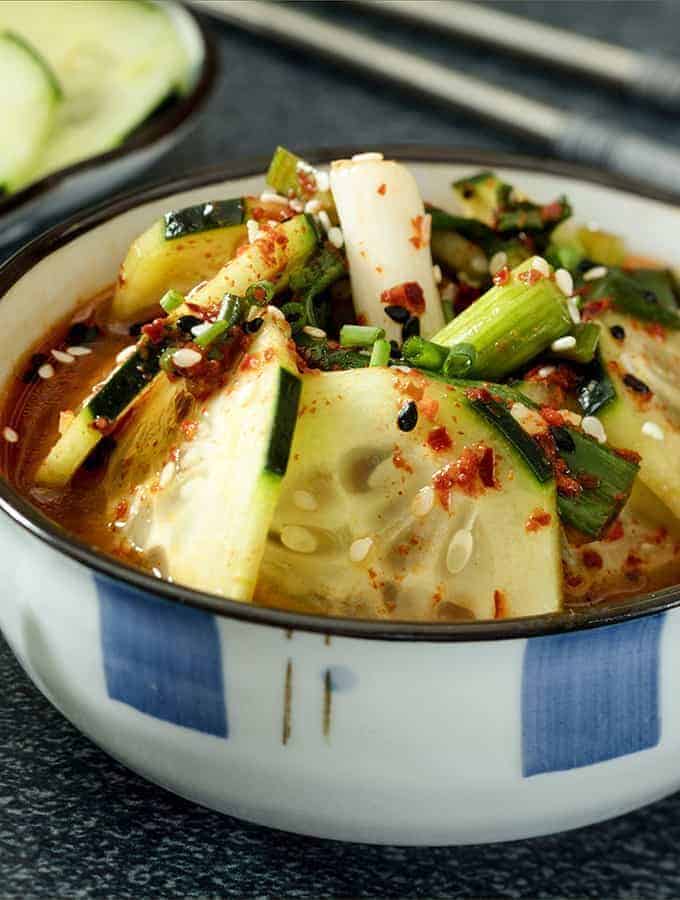
- Korean Cucumber Salad - A wonderful vegan, keto Korean cucumber side dish
- Yukgaejang - This is a keto version of the popular Korean beef stew
- Air Fryer Korean Dae Ji Bulgogi - A wonderful way to get a savory, umami, spicy Korean grilled pork dish for an easy weeknight dinner
- Beef Bulgogi Burgers - If you love this Beef Bulgogi recipe you’ll love these burgers
- Korean Chicken Wings - Mix things up with these delicious wings with Gochujang sauce
- Kimchi Beef Stew - An easy Korean-style dump and cook keto recipe that’s full of spicy, umami flavor
- Instant Pot Dae Ji Bulgogi - This spicy Korean pork recipe cooks up flavorful and tender from your Instant Pot
- Bo-Ssäm Pork & Noodles - Make a dish in under 30 minutes that the whole family will enjoy
- Korean Dak Galbi - A non-traditional take on Dak Galbi you can easily make at home.
- Gochujang Chicken - A deliciously simple slow carb recipe.
Beef Bulgogi | Air Fryer Beef Bulgogi Recipe
Equipment
- PHILLIPS AIR FRYER
Ingredients
- ▢ 1.5 pounds Sirloin Steak , or chuck steak, sliced thinly against the grain
- ▢ 3 Chopped Green Scallions , cut into 2-3 pieces each
- ▢ 1 cup shredded carrots
- ▢ 3 tablespoons Soy Sauce
- ▢ 2 tablespoons Brown Sugar , or 2 teaspoons Splenda for low carb
- ▢ 2 tablespoons Sesame Oil
- ▢ 2 tablespoons Sesame Seeds
- ▢ 2 teaspoons Minced Garlic
- ▢ 1/2 teaspoon Ground Black Pepper
Instructions
- Place sliced beef, carrots, and green onions into a plastic zip-top bag . Add, soy sauce, brown sugar, sesame oil, sesame seeds, garlic, and ground pepper. Squish the bag well to get the meat and sauce to incorporate well.
- Allow the beef to marinate for 30 minutes or up to 24 hours in the refrigerator.
- Place the meat and veggies into the air fryer basket, leaving behind as much of the marinade as you can. Set air fryer to 400°F for 12 minutes, shaking halfway through.
- Serve with steamed rice, riced cauliflower, or over a mixed salad.
Get support & connect with our community on Facebook!
Nutrition
And don’t forget to check out my air fryer cookbooks! Every day easy air fryer , and Air Fryer Revolution .

