Instant Pot Keto Cheesecake is a delicious low carb cheesecake made with ricotta and lemon zest for a little zing. Cook this in your pressure cooker to get a smooth and creamy cheesecake. Perfect for the summer when you don’t want to turn on your oven!

Why Should You Make This Instant Pot Keto Cheesecake?
This Instant Pot Keto Cheesecake has no crust, mainly because I’m lazy and I don’t like recipes with multiple steps.
- Low Carb - this recipe only has 2 net carbs per serving.
- Fast - less than an hour from start to finish.
- Easy - use your Instant Pot to make this keto cheesecake.
- Refreshing - doesn’t have a heavy crust and packed with light citrus flavor.
- Fat Bomb - great for hitting your fat macros if you’re trying to hold off the hunger.
How Does This Compare To The Best Keto Cheesecake Recipes?
Comparison is the killer of joy, or so I’ve heard. And no one has ever been sad eating cheesecake. If you’re living a low carb lifestyle and someone offers you cheesecake, you’re going to say yes. Every. Single. Time.
That being said, since this recipe skips the crust, it is super low carb. Which allows me to be a little more liberal with how I eat throughout the day. It also has amazing citrus flavor from the lemon.
Low carb and packed with flavor? It sure sounds like this keto cheesecake Instant Pot recipe can rival even the best recipe out there.
Accessories To Make This Lemon Ricotta Cheesecake Recipe:
- Cheesecake Pan
- Steamer Rack to elevate the cheesecake off the water
- Silicone Lids to cover the cheesecake (or use foil)
- Silicone Mitts to take the cheesecake out when it’s done cooking
- Microplane Zester for the Lemon
But of course, you don’t need any of this stuff if you don’t want to use it, just use whatever you have that’s close enough. The cheesecake will still be yummy.
The only thing you must do is plan to let it cool quite completely in the fridge so it is creamy and holds together well.
Trying To Make Keto Cheesecake Bites?
Make this recipe as the instructions state in an Instant Pot safe square pan and chill until VERY firm. Use a sharp knife to cut into 1-inch squares and serve as bite-size treats.
These can also be used as Keto cheesecake fat bombs if you’re trying to meet your fat macros or just put those sweet cravings on the back burner.
Wait, Where’s the Keto Cheesecake Crust?
I’m a fan of #ruthlessefficiency. And every recipe for Instant Pot Cheesecake I’ve come across involves multiple steps. Most of the work is in making the crust.
I wanted an easy Keto cheesecake recipe, so I couldn’t be bothered with it in this recipe. I wanted cheesecake…and fast. SO this Instant Pot Keto Cheesecake doesn’t have a crust. Which saves you time, carbs, and calories.
Want To Bake This Low Carb Cheesecake?
Prepare the cheesecake ingredients as listed for the Instant Pot directions. Create a water bath and place the pan with the cheesecake ingredients inside. Bake at 375F for 35 minutes.
How To Make Ricotta Cheesecake
- Using a stand mixer, all ingredients except the eggs until you get a smooth mixture with no lumps.
- Taste to ensure the sweetness is to your liking.
- Add the two eggs, reduce the speed, and gently blend until the eggs are incorporated. Over-beating at this stage will result in a cracked crust.
- Pour into a 6 inch greased spring-form pan and cover with foil or a silicone lid.
- In the inner liner of your Instant Pot, place two cups of water, and a trivet. Place the foil-covered pot on the trivet.
- Cook on High Pressure for 30 minutes, and allow it to release pressure naturally.
- Mix the sour cream and Truvia and spread on the warm cake.
- Refrigerate the cheesecake for 6-8 hours.
Tips and Tricks for Easy Keto Cheesecake
- Use a mixer to blend the ingredients well. Trying to hand mix these ingredients could result in a lumpy cheesecake.
- Do not over mix. This will cause your cheesecake to crack when baking.
- Grease your springform pan well so that it doesn’t stick.
- If you’re choosing to bake this keto cheesecake, check to see if your springform pan is completely waterproof before adding to the water bath.
Love Cheesecake?
Here are a few more cheesecake recipes to try:
- Instant Pot Mango Cheesecake
- Low Carb Cheesecake
- Keto Cheesecake Brownies
- Two Ingredient Cheesecake
- Pumpkin Cheesecake Mousse
- Key Lime Cheesecake


Pressure Cooker Keto Ricotta Lemon Cheesecake
Equipment
- INSTANT POT DUO 6 QUART
- KITCHENAID STAND MIXER
- 7 Inch Springform Pan
- STEAMER RACK / TRIVET
- Measuring Cups
- OVAL MEASURING SPOONS
Ingredients
- ▢ 8 oz ( 226.8 g ) Cream Cheese
- ▢ 1/4 cup ( 0.25 g ) Truvia
- ▢ 1/3 cup ( 82 g ) Ricotta cheese
- ▢ Zest of one lemon
- ▢ 1/4 cup Lemon Juice
- ▢ 1/2 teaspoon ( 0.5 teaspoon ) Lemon Extract
- ▢ 2 ( 2 ) Eggs
FOR TOPPING
- ▢ 2 tablespoons ( 2 tablespoons ) sour cream
- ▢ 1 tsp ( 1 tsp ) Truvia
Instructions
- Using a stand mixer, mix all ingredients except the eggs until you get a smooth mixture with no lumps.
- Taste to ensure the sweetness is to your liking.
- Add the two eggs, reduce the speed and gently blend until the eggs are incorporated. Over-beating at this stage will result in a cracked crust.
- Pour into a 6 inch greased spring-form pan and cover with foil or a silicone lid.
- In the inner liner of your Instant Pot, place two cups of water, and a trivet. Place the foil-covered pot on the trivet.
- Cook on High Pressure for 30 minutes, and allow it to release pressure naturally.
- Mix the sour cream and Truvia and spread on the warm cake.
- Refrigerate the cheesecake for 6-8 hours.
Oven Instructions
- Prepare the cheesecake ingredients as listed for the Instant Pot directions.
- Create a water bath and place the pan with the cheesecake ingredients inside.
- Bake at 375F for 35 minutes.
Get support & connect with our community on Facebook!
Nutrition
Originally Published July 2017
Want MoreInstant Pot Recipes?
- Instant Pot Butter Chicken is an easy 30-minute dinner and you can make rice on top of it, as the video shows.
- Pressure Cooker Rice and Dal is a great vegetarian rice dinner.
- This Lebanese Lentil and Rice dish is another great Vegetarian Instant Pot recipe .
- Instant Pot Indian Khichadi is comfort food in a bowl!
- Instant Pot Risotto with Shrimp is another one-pot comfort meal.
- Buffalo chicken casserole for the days you want low carb recipes
- You might also like low carb Chicken Biryani that uses riced cauliflower.
- Chicken and Mushrooms are a great combo.
- My kids love Instant Pot Pork Chops with Rice and Vegetables
- Zucchini Lasagna - You won’t even miss the pasta.
- Haluski Recipe - A wonderful cabbage and noodles recipe.
Don’t forget to check out my otherBest-selling Instant Pot Cookbooks!
Indian Instant Pot , Keto Instant Pot, Instant Pot Fast and Easy , Healthy Instant Pot & Vegetarian Instant Pot .

Instant Pot Keto Cheesecake is a delicious low carb cheesecake made with ricotta and lemon zest for a little zing. Cook this in your pressure cooker to get a smooth and creamy cheesecake. Perfect for the summer when you don’t want to turn on your oven!
Why Should You Make This Instant Pot Keto Cheesecake?
This Instant Pot Keto Cheesecake has no crust, mainly because I’m lazy and I don’t like recipes with multiple steps.
- Low Carb - this recipe only has 2 net carbs per serving.
- Fast - less than an hour from start to finish.
- Easy - use your Instant Pot to make this keto cheesecake.
- Refreshing - doesn’t have a heavy crust and packed with light citrus flavor.
- Fat Bomb - great for hitting your fat macros if you’re trying to hold off the hunger.
How Does This Compare To The Best Keto Cheesecake Recipes?
Comparison is the killer of joy, or so I’ve heard. And no one has ever been sad eating cheesecake. If you’re living a low carb lifestyle and someone offers you cheesecake, you’re going to say yes. Every. Single. Time.
That being said, since this recipe skips the crust, it is super low carb. Which allows me to be a little more liberal with how I eat throughout the day. It also has amazing citrus flavor from the lemon.
Low carb and packed with flavor? It sure sounds like this keto cheesecake Instant Pot recipe can rival even the best recipe out there.
Accessories To Make This Lemon Ricotta Cheesecake Recipe:
- Cheesecake Pan
- Steamer Rack to elevate the cheesecake off the water
- Silicone Lids to cover the cheesecake (or use foil)
- Silicone Mitts to take the cheesecake out when it’s done cooking
- Microplane Zester for the Lemon
But of course, you don’t need any of this stuff if you don’t want to use it, just use whatever you have that’s close enough. The cheesecake will still be yummy.
The only thing you must do is plan to let it cool quite completely in the fridge so it is creamy and holds together well.
Trying To Make Keto Cheesecake Bites?
Make this recipe as the instructions state in an Instant Pot safe square pan and chill until VERY firm. Use a sharp knife to cut into 1-inch squares and serve as bite-size treats.
These can also be used as Keto cheesecake fat bombs if you’re trying to meet your fat macros or just put those sweet cravings on the back burner.
Wait, Where’s the Keto Cheesecake Crust?
I’m a fan of #ruthlessefficiency. And every recipe for Instant Pot Cheesecake I’ve come across involves multiple steps. Most of the work is in making the crust.
I wanted an easy Keto cheesecake recipe, so I couldn’t be bothered with it in this recipe. I wanted cheesecake…and fast. SO this Instant Pot Keto Cheesecake doesn’t have a crust. Which saves you time, carbs, and calories.
Want To Bake This Low Carb Cheesecake?
Prepare the cheesecake ingredients as listed for the Instant Pot directions. Create a water bath and place the pan with the cheesecake ingredients inside. Bake at 375F for 35 minutes.
How To Make Ricotta Cheesecake
- Using a stand mixer, all ingredients except the eggs until you get a smooth mixture with no lumps.
- Taste to ensure the sweetness is to your liking.
- Add the two eggs, reduce the speed, and gently blend until the eggs are incorporated. Over-beating at this stage will result in a cracked crust.
- Pour into a 6 inch greased spring-form pan and cover with foil or a silicone lid.
- In the inner liner of your Instant Pot, place two cups of water, and a trivet. Place the foil-covered pot on the trivet.
- Cook on High Pressure for 30 minutes, and allow it to release pressure naturally.
- Mix the sour cream and Truvia and spread on the warm cake.
- Refrigerate the cheesecake for 6-8 hours.
Tips and Tricks for Easy Keto Cheesecake
- Use a mixer to blend the ingredients well. Trying to hand mix these ingredients could result in a lumpy cheesecake.
- Do not over mix. This will cause your cheesecake to crack when baking.
- Grease your springform pan well so that it doesn’t stick.
- If you’re choosing to bake this keto cheesecake, check to see if your springform pan is completely waterproof before adding to the water bath.
Love Cheesecake?
Here are a few more cheesecake recipes to try:
- Instant Pot Mango Cheesecake
- Low Carb Cheesecake
- Keto Cheesecake Brownies
- Two Ingredient Cheesecake
- Pumpkin Cheesecake Mousse
- Key Lime Cheesecake
Pressure Cooker Keto Ricotta Lemon Cheesecake
Equipment
- INSTANT POT DUO 6 QUART
- KITCHENAID STAND MIXER
- 7 Inch Springform Pan
- STEAMER RACK / TRIVET
- Measuring Cups
- OVAL MEASURING SPOONS
Ingredients
- ▢ 8 oz ( 226.8 g ) Cream Cheese
- ▢ 1/4 cup ( 0.25 g ) Truvia
- ▢ 1/3 cup ( 82 g ) Ricotta cheese
- ▢ Zest of one lemon
- ▢ 1/4 cup Lemon Juice
- ▢ 1/2 teaspoon ( 0.5 teaspoon ) Lemon Extract
- ▢ 2 ( 2 ) Eggs
FOR TOPPING
- ▢ 2 tablespoons ( 2 tablespoons ) sour cream
- ▢ 1 tsp ( 1 tsp ) Truvia
Instructions
- Using a stand mixer, mix all ingredients except the eggs until you get a smooth mixture with no lumps.
- Taste to ensure the sweetness is to your liking.
- Add the two eggs, reduce the speed and gently blend until the eggs are incorporated. Over-beating at this stage will result in a cracked crust.
- Pour into a 6 inch greased spring-form pan and cover with foil or a silicone lid.
- In the inner liner of your Instant Pot, place two cups of water, and a trivet. Place the foil-covered pot on the trivet.
- Cook on High Pressure for 30 minutes, and allow it to release pressure naturally.
- Mix the sour cream and Truvia and spread on the warm cake.
- Refrigerate the cheesecake for 6-8 hours.
Oven Instructions
- Prepare the cheesecake ingredients as listed for the Instant Pot directions.
- Create a water bath and place the pan with the cheesecake ingredients inside.
- Bake at 375F for 35 minutes.
Get support & connect with our community on Facebook!
Nutrition
Originally Published July 2017
Want MoreInstant Pot Recipes?
- Instant Pot Butter Chicken is an easy 30-minute dinner and you can make rice on top of it, as the video shows.
- Pressure Cooker Rice and Dal is a great vegetarian rice dinner.
- This Lebanese Lentil and Rice dish is another great Vegetarian Instant Pot recipe .
- Instant Pot Indian Khichadi is comfort food in a bowl!
- Instant Pot Risotto with Shrimp is another one-pot comfort meal.
- Buffalo chicken casserole for the days you want low carb recipes
- You might also like low carb Chicken Biryani that uses riced cauliflower.
- Chicken and Mushrooms are a great combo.
- My kids love Instant Pot Pork Chops with Rice and Vegetables
- Zucchini Lasagna - You won’t even miss the pasta.
- Haluski Recipe - A wonderful cabbage and noodles recipe.
Don’t forget to check out my otherBest-selling Instant Pot Cookbooks!
Indian Instant Pot , Keto Instant Pot, Instant Pot Fast and Easy , Healthy Instant Pot & Vegetarian Instant Pot .

If you already signed up, you should have received an email with a password to give you unlimited access to our FREE Printable Library. The password is case sensitive. Enter it below and get printing!
Password:

Pressure Cooker Keto Ricotta Lemon Cheesecake
Ingredients
- 8 oz Cream Cheese
- 1/4 cup Truvia
- 1/3 cup Ricotta cheese
- Zest of one lemon
- 1/4 cup Lemon Juice
- 1/2 teaspoon Lemon Extract
- 2 Eggs
FOR TOPPING
- 2 tablespoons sour cream
- 1 tsp Truvia
Instructions
- Using a stand mixer, mix all ingredients except the eggs until you get a smooth mixture with no lumps.
- Taste to ensure the sweetness is to your liking.
- Add the two eggs, reduce the speed and gently blend until the eggs are incorporated. Over-beating at this stage will result in a cracked crust.
- Pour into a 6 inch greased spring-form pan and cover with foil or a silicone lid.
- In the inner liner of your Instant Pot, place two cups of water, and a trivet. Place the foil-covered pot on the trivet.
- Cook on High Pressure for 30 minutes, and allow it to release pressure naturally.
- Mix the sour cream and Truvia and spread on the warm cake.
- Refrigerate the cheesecake for 6-8 hours.
Oven Instructions
- Prepare the cheesecake ingredients as listed for the Instant Pot directions.
- Create a water bath and place the pan with the cheesecake ingredients inside.
- Bake at 375F for 35 minutes.
Pressure Cooker Keto Ricotta Lemon Cheesecake https://twosleevers.com/instant-pot-keto-ricotta-lemon-cheesecake/
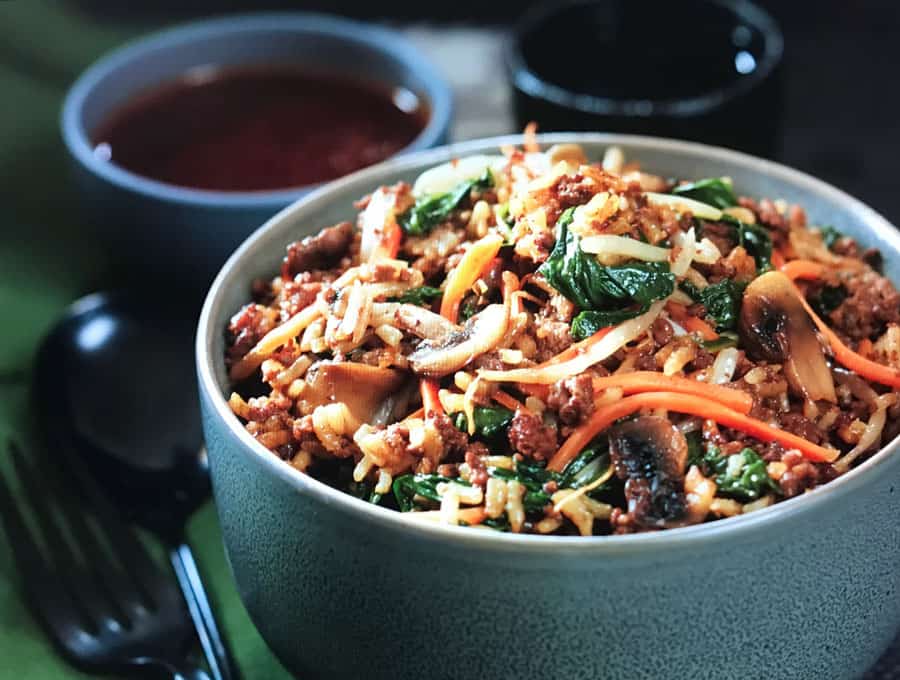
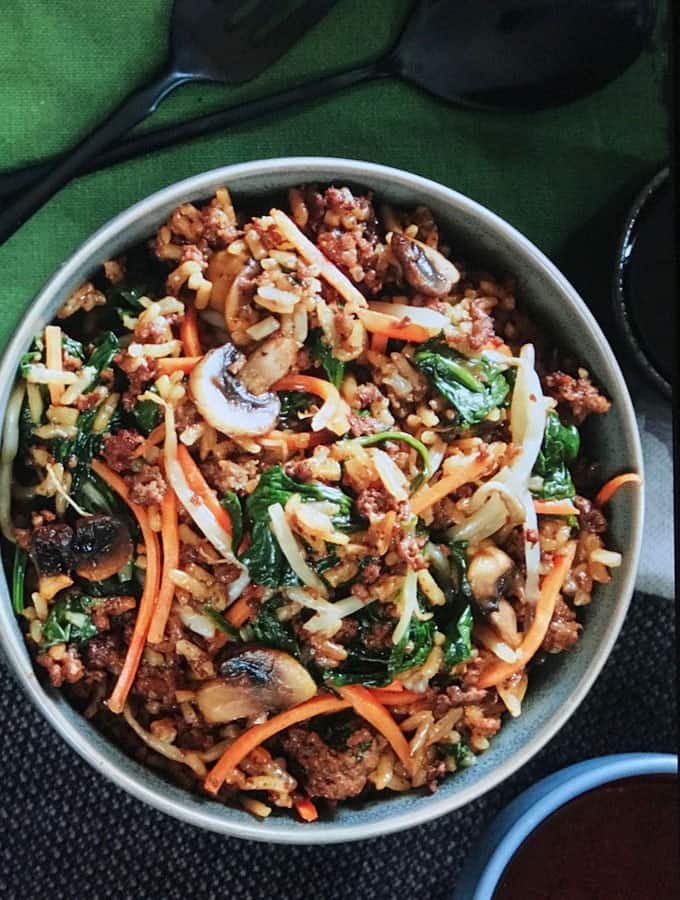
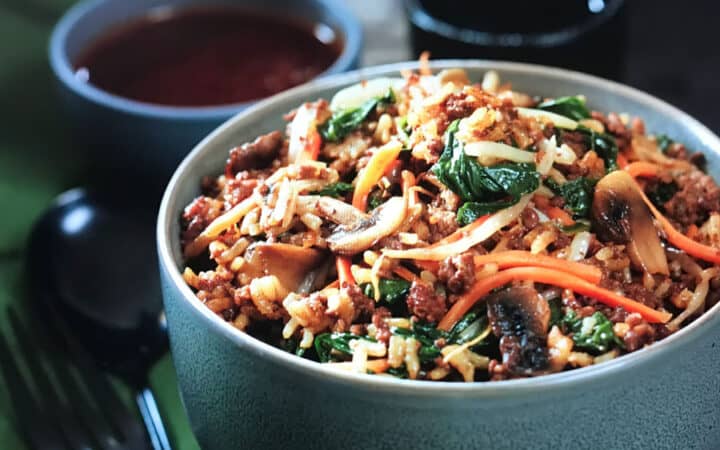
Korean Beef Bowl is a bibimbap-style Instant Pot rice bowl made with jasmine rice, lean ground beef, mushrooms, spinach, bean sprouts, shredded carrots, and a gochujang soy sesame sauce. It’s quick and works well for a busy weeknight dinner when you want bold Korean flavors in a single bowl. Unlike traditional bibimbap recipes that cook each component separately, this version uses the Instant Pot to cook the rice and beef while steaming the vegetables in a foil packet at the same time.
What Makes This One Of Our Best Beef Recipes
- Yummy. This comforting Korean beef bowl encompasses so much deliciousness in a single bite. Perfectly cooked jasmine rice , tasty ground beef , wonderfully steamed and marinated veggies and delicious gochujang sauce all in one bowl.
- One-pot. No need to worry about having to wash a sink full of dishes after making this Bibimbap recipe. This Instant Pot recipe uses some aluminum foil and a steamer rack , you can cook all of the ingredients at once .
- Customizable. Don’t want as much meat? Simply reduce the ground beef to half a pound. Want to add a fried egg into the mix? Have at it! Prefer vegetarian ? Check out the notes in the recipe card for how to make this Korean Beef Bowl with veggies like mushrooms instead.
- Efficient. This is NOT how you would traditionally make a proper Bibimbap bowl. You’d make almost every item independently, and then mix it. But as you know, I’m all about #ruthlessefficiency. So I had to make this a one-pot ground beef and rice dinner
Ingredients You’ll Need
For The Sauce
- 2 tablespoons Gochujang - A Korean fermented chili paste that brings heat, depth, and umami to the sauce.
- 1 tablespoon Soy Sauce - Adds a salty, savory backbone.
- 1 tablespoon Sesame Oil - Provides nutty richness, tying together the bold flavors with an authentic Korean aroma.
- 1 tablespoon Sugar - Balances the spice and saltiness with a touch of sweetness, creating a well-rounded sauce.
- 1 tablespoon White Vinegar - Introduces acidity to brighten the sauce and prevent it from tasting too heavy.
- 1 teaspoon Minced Garlic - Adds savory depth and aromatic punch that complements the gochujang.
- 2 tablespoons Water - Helps thin the sauce so it coats the beef evenly.
Main Dish
- 1/2 pound Lean Ground Beef - The protein centerpiece of the bowl.
- 1 tablespoon Soy Sauce - Enhances the beef with extra umami and saltiness.
- 1 tablespoon Sesame Oil - Infuses the beef with nutty aroma and helps prevent dryness.
- 2 teaspoons Minced Garlic - Provides a savory, aromatic layer to the beef’s flavor.
- 1 teaspoon Kosher Salt - Ensures the beef is well-seasoned, balancing sweetness from the sauce.
- 1 cup Jasmine Rice - A fragrant, fluffy rice that serves as the hearty base for the bowl.
- 1.25 cups Water - Used to cook the rice and to sauté or steam vegetables.
- 1 cup Mushrooms - Add an earthy, umami-rich element that complements the beef and soaks up the sauce.
Veggie Packet
- 1 cup Bean Sprouts - Provide a crunchy, fresh texture that balances the richness of the beef.
- 3 cups Spinach Leaves - Wilt into tender greens, adding nutrients and balancing the dish.
- 2 cups Shredded Carrots - Contribute sweetness, color, and crunch.
- 1 tablespoon Sesame Oil - Adds a nutty coating to the vegetables.
- 1/2 teaspoon Salt - Seasons the vegetables so they don’t taste flat.
How To Make This Instant Pot Korean Beef Bowl
- Sauce. In a medium mixing bowl , whisk together the gochujang, soy sauce, sesame oil, sugar, vinegar, garlic, and water. Set the bowl aside.
- Vegetables. In a large mixing bowl , stir together spinach leaves, sesame oil and salt. Use your hands to roughly macerate the spinach. Toss in bean sprouts and carrots and mix gently. Place vegetables on a large sheet of aluminum foil, and fold up the foil to enclose the vegetables. Close up the foil packet and set aside.
- Beef. Select SAUTÉ/Normal on the Instant Pot . When the pot is hot, add the ground beef and break up as much as you can. Add ¼ cup of water and deglaze thoroughly allowing the water to evaporate.
- Rice. Add in rice, soy sauce, sesame oil, garlic, and salt and stir well. Add mushrooms and water. Press CANCEL to turn the pot off.
- Steamer rack. Place a tall steamer rack in the pot on top of the rice. Place the foil packet on the rack.
- Pressure cook. Secure the lid on the pot. Close the pressure-release valve. Select MANUAL/PRESSURE COOK and set the pot at HIGH pressure for 4 minutes.
- Pressure release. When cook time is complete, let the pot release pressure naturally for 10 minutes. At the end of the cooking time, use a quick release to depressurize.
- Stir. Carefully remove and unpack the foil packet. Stir the contents of the packet into the rice.
- Serve. Serve the rice with the gochujang sauce.
What Is The Difference Between Bulgogi And Bibimbap?
Bulgogi , which literally translates to “fire meat”, is a dish made up of grilled slices of beef or pork.
Bibimbap, which translates to “mixed rice”, is a Korean rice dish consisting of various ingredients, namely rice, sauteed vegetables gochujang, soy sauce, beef and/or an egg.
How Do You Eat Bibimbap?
There are a few things you’ll want to do to ensure that you get the best Korean Beef Bowl experience:
- Use a spoon. Though chopsticks are often used to enjoy Korean food, it is actually more common to use a spoon when enjoying a rice dish such as this.
- Don’t skip out on the sauce. Drizzling a healthy portion of this delicious gochujang-based sauce really makes all the difference in how tasty this dish is.
- Mix it up. Don’t just layer the ingredients and then eat them layer by layer! Use your spoon to mix all of the deliciousness together into one cohesive and delectable bite.
- Add an egg. Top your deliciously easy Korean Beef Bowl with a perfectly fried egg. This simple addition really takes the dish to a whole new level.
Tips And Tricks
Instant Pot Korean Beef Bowls are quick, flavorful, and perfect for busy weeknights. With just a few smart techniques, you can elevate this simple dish into a restaurant-quality meal.
- Use Lean Ground Beef . Lean beef (around 90/10) absorbs the flavors of the sauce without releasing too much grease. If you use fattier beef, be sure to drain excess fat before adding the sauce.
- Cut Vegetables Evenly . For the foil packet veggies, slice mushrooms, carrots, and spinach in even portions so they steam at the same rate.
- Finish with Fresh Garnishes . Add sesame seeds, chopped green onions, or a drizzle of extra sesame oil before serving to brighten the flavors and add texture.
Variations
One of the best things about Korean Beef Bowls is how easy they are to customize. You can swap out proteins, adjust flavors, or change up the vegetables to fit your taste and dietary needs.
- Protein Swap - Use ground chicken, turkey, or pork in place of beef for a lighter or slightly different flavor profile. Tofu or tempeh also work well for a vegetarian option.
- Low-Carb Version - Replace the jasmine rice with cauliflower rice or zucchini noodles for a keto-friendly and lower-carb meal.
- Extra Veggie Boost - Add bell peppers, zucchini, or snap peas to the foil packet for more color, texture, and nutrients.
If you need gochujang substitutions for an Instant Pot Korean beef bowl, the closest swap is a mix of mild chili paste like sambal oelek or sriracha with a little soy sauce, a touch of sugar or honey, and a splash of rice vinegar to mimic gochujang’s sweet salty tang. For a deeper bibimbap style flavor, add a small amount of miso or doenjang if you have it, plus toasted sesame oil. If you want a non spicy version, use a little tomato paste or ketchup for body with soy sauce, garlic, and sesame oil, then adjust heat separately with red pepper flakes or gochugaru.
To reheat an Instant Pot Korean beef bowl and keep the rice fluffy, sprinkle 1 to 2 tablespoons of water or broth over the rice, cover, and warm it gently in the microwave or on the stovetop so it steams instead of drying out. Store and reheat the gochujang sauce and vegetables separately when possible, then toss everything together after the rice is hot to avoid soggy veggies and thickened sauce. If the rice clumps, fluff it with a fork right after reheating and finish with a few drops of toasted sesame oil for fresh Korean rice bowl flavor.
To keep rice fluffy in a one pot Instant Pot Korean beef bowl and avoid mushy rice, rinse jasmine rice well until the water runs mostly clear, then use the correct water or broth ratio and do not over-stir once the rice is layered in the pot. Deglaze after sautéing the beef so no browned bits are stuck to the bottom, then add rice on top and avoid mixing thick sauce like gochujang directly into the base, where it can scorch. After pressure cooking, let it sit on natural release for a few minutes, then fluff immediately with a fork and keep the lid off briefly so extra steam escapes.
More Korean Recipes
- Spicy Korean Beef Stew - A great keto beef stew recipe that’s just a little bit out of the ordinary.
- Korean Oi Muchim - A wonderful vegan, keto and simple cucumber salad recipe.
- Beef Bulgogi Burgers - A Korean twist on burgers.
- Korean Tacos - Crazy easy to make, and you’re going to love the flavors!
- Spicy Korean Grilled Por k - A wonderful way to get a savory, umami, spicy Korean grilled pork dish.
- Korean Short Ribs - A super yummy Korean short rib recipe.
- Gochujang Wings - the best air fryer chicken wings ever.
Instant Pot Korean Beef Bowl
Equipment
- Instant Pot
- Steamer Rack
Ingredients
Bibimbap Sauce
- ▢ 2 tablespoons Gochujang
- ▢ 1 tablespoon Soy Sauce
- ▢ 1 tablespoon Sesame Oil
- ▢ 1 tablespoon Sugar
- ▢ 1 tablespoon White Vinegar
- ▢ 1 teaspoon Minced Garlic
- ▢ 2 tablespoons Water
Main Dish
- ▢ 1/2 pound Lean Ground Beef
- ▢ 1 tablespoon Soy Sauce
- ▢ 1 tablespoon Sesame Oil
- ▢ 2 teaspoons Minced Garlic
- ▢ 1 teaspoon Kosher Salt
- ▢ 1 cup Jasmine Rice , rinsed and drained
- ▢ 1.25 cups Water , divided
- ▢ 1 cup Mushrooms , sliced
Foil Packet Vegetables
- ▢ 1 cup Bean Sprouts
- ▢ 3 cups Spinach Leaves
- ▢ 2 cups shredded carrots
- ▢ 1 tablespoon Sesame Oil
- ▢ 1/2 teaspoon Kosher Salt
Instructions
- In a medium mixing bowl , whisk together the gochujang, soy sauce, sesame oil, sugar, vinegar, garlic, and water. Set the bowl aside.
- In a large mixing bowl , stir together spinach leaves, sesame oil and salt. Use your hands to roughly macerate the spinach. Toss in bean sprouts and carrots and mix gently. Place vegetables on a large sheet of aluminum foil, and fold up the foil to enclose the vegetables. Close up the foil packet and set aside.
- Select SAUTÉ/Normal on the Instant Pot . When the pot is hot, add the ground beef and break up as much as you can. Add ¼ cup of water and deglaze thoroughly allowing the water to evaporate.
- Add in rice, soy sauce, sesame oil, garlic, and salt and stir well. Add mushrooms and water. Press CANCEL to turn the pot off.
- Place a tall steamer rack in the pot on top of the rice. Place the foil packet on the rack.
- Secure the lid on the pot. Close the pressure-release valve. Select MANUAL/PRESSURE COOK and set the pot at HIGH pressure for 4 minutes.
- When cook time is complete, let the pot release pressure naturally for 10 minutes. At the end of the cooking time, use a quick release to depressurize.
- Carefully remove and unpack the foil packet. Stir the contents of the packet into the rice, stirring gently.
- Serve the rice with the gochujang sauce.
Korean Beef Bowl Tips And Tricks
- You may also choose to reduce the ground meat to half a pound.
- This dish is perfect with a fried egg or two on top of the rice.
- For a meatless version, you can use Sliced Shiitake Mushrooms or large portobello mushrooms that have been sliced. Dried Shiitake Mushrooms: Soak the mushrooms in hot water while you get everything else together. Drain the water, and add mushrooms along with rice. The mushrooms will finish hydrating under pressure. Fresh Shiitake or Portobello: Discard the woody parts of the stem. If you’re using portobello mushrooms, use a spoon to remove the gills under the mushrooms to avoid a muddy dark color to your finished dish. Add with rice and proceed as directed.
Get support & connect with our community on Facebook!
Nutrition
Don’t forget to check out my otherBest-selling Instant Pot Cookbooks!
Indian Instant Pot , Keto Instant Pot, Instant Pot Fast and Easy , Healthy Instant Pot & Vegetarian Instant Pot .
