
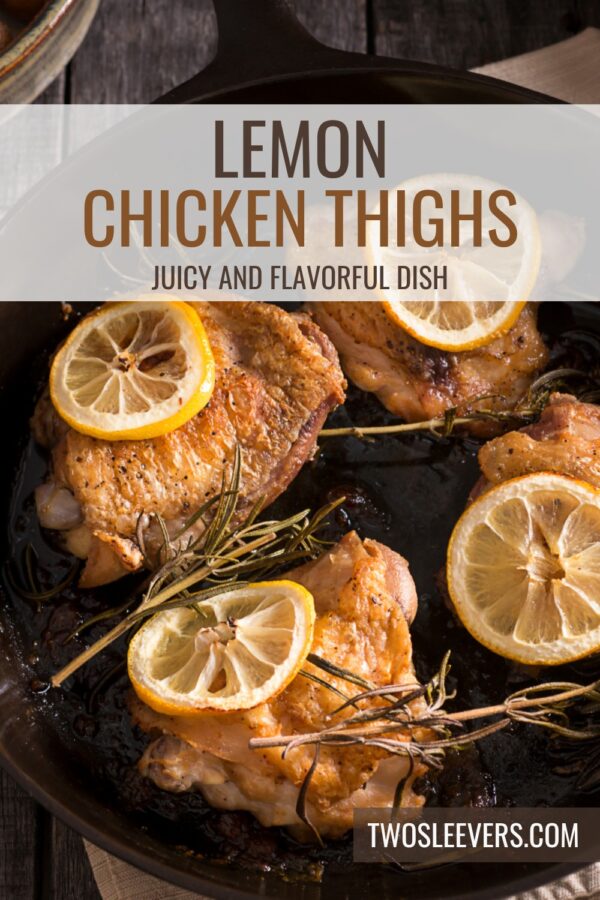
If you’re looking for a simple, yet incredibly flavorful chicken dish, these Baked Lemon Chicken Thighs are the perfect solution! They’re easy to prepare, loaded with citrusy goodness, and have a perfectly crispy exterior with a juicy, tender interior. In just one bite, you’ll fall in love with the zesty lemon flavor paired with juicy chicken thighs.
Why You’ll Love This Easy Chicken Recipe
- Simple Ingredients . This recipe uses everyday kitchen staples like chicken thighs, fresh lemon, garlic, and herbs. No fancy ingredients needed!
- Flavor-Packed . The combination of lemon zest, fresh lemon juice, and garlic creates an irresistible marinade.
- Juicy & Tender . Baking chicken thighs keeps them juicy, and the lemon marinade ensures every bite bursts with flavor.
- Versatile . Perfect for a weeknight dinner, meal prep, or even entertaining guests. It pairs well with various sides like roasted veggies or a fresh salad.
Whether you’re cooking for your family or meal prepping for the week, this baked lemon chicken recipe is sure to become a household favorite.
What Do Lemon Chicken Thighs Taste Like?
Lemon chicken thighs are known for their bright, tangy, and savory flavor profile. The acidity from the lemon adds a refreshing zest, cutting through the richness of the chicken.
The chicken thighs themselves are juicy and tender, offering a slightly fattier and more flavorful bite compared to other cuts of chicken.
When baked or roasted, the lemon enhances the natural flavors of the chicken, often combined with garlic, herbs, and olive oil to create a savory, aromatic experience.
Are Lemon Chicken Thighs Healthy?
Absolutely! Chicken thighs are rich in protein, and using fresh lemon juice not only enhances flavor but also brings a dose of vitamin C to your meal. Baking the thighs also reduces the need for excessive oils, making it a wholesome, guilt-free dinner option.
Plus, this dish is naturally low-carb and gluten-free, so it fits into a variety of diets!
Ingredients You’ll Need
- Chicken Thighs - Bone-in, skin-on thighs are the star of this dish, offering juicy meat and crispy skin.
- Olive Oil - Adds richness to the marinade and helps crisp up the skin during baking.
- Lemon - Fresh lemon juice and zest infuse the chicken with bright, zesty flavor.
- Garlic - Minced garlic adds a punch of aromatic flavor.
- Dried Oregano - A perfect herb to complement the lemon and garlic.
- Salt & Black Pepper - Enhances all the flavors in the dish.
- Fresh Parsley - For a fresh, vibrant garnish.
How To Make Lemon Chicken Thighs
- Prepare the Marinade . In a small bowl, whisk together olive oil, fresh lemon juice, lemon zest, minced garlic, dried oregano, salt, and black pepper. The combination of lemon and garlic makes a bright and flavorful marinade.
- Marinate the Chicken . Pat the chicken thighs dry with paper towels (this ensures crispy skin!). Place them in a large resealable bag or shallow dish and pour the lemon marinade over the top. Seal and let the chicken marinate in the refrigerator for at least 30 minutes, or up to 4 hours for more intense flavor.
- Preheat the Oven . Preheat your oven to 400°F. Line a baking sheet with foil for easy cleanup and place a wire rack on top to elevate the chicken thighs for even cooking.
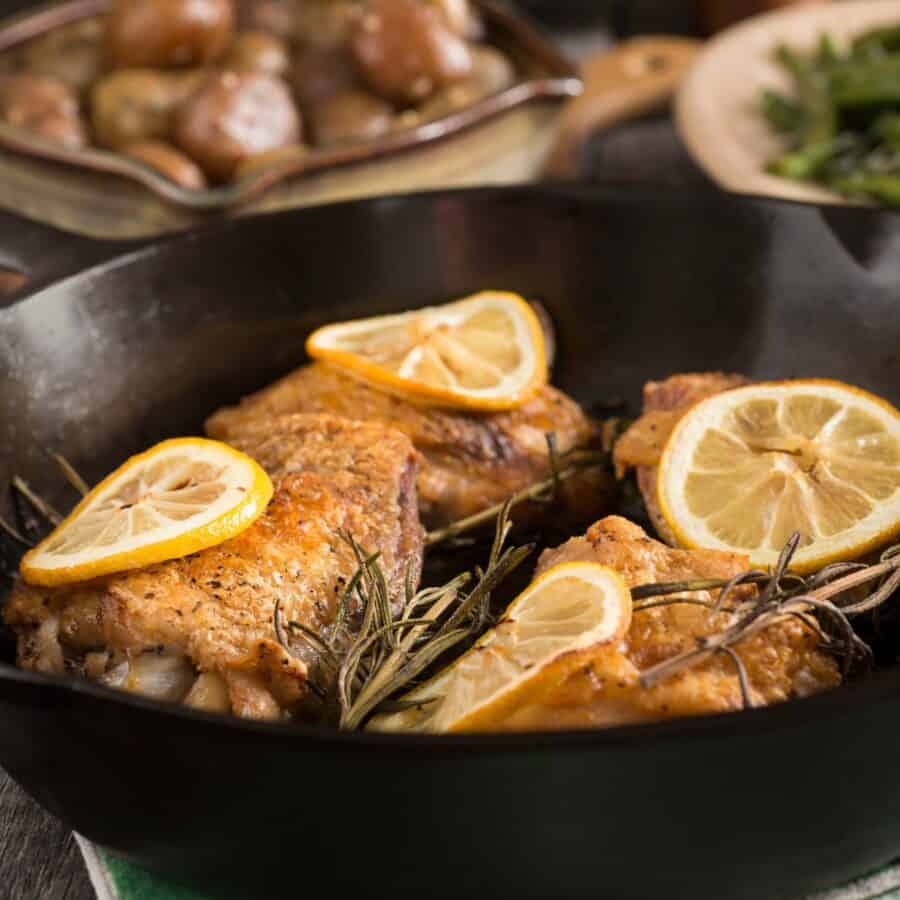
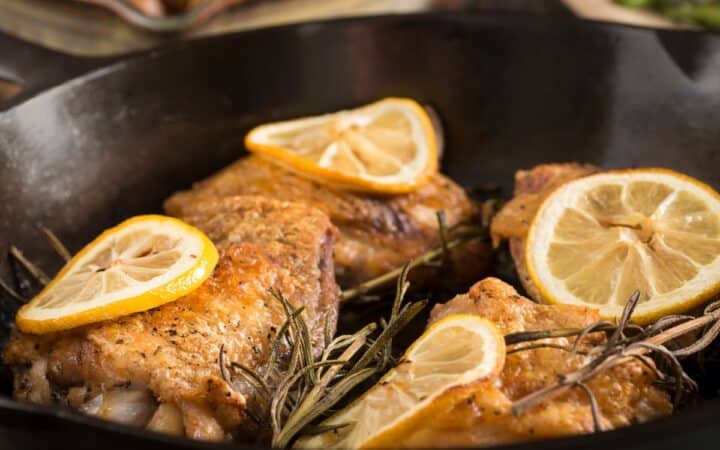
- Bake to Perfection . Arrange the marinated chicken thighs on the wire rack, skin side up. Place a slice of lemon on top of each thigh. Bake for 35-40 minutes or until the skin is golden and crispy, and the internal temperature of the chicken reaches 165°F.
- Garnish and Serve . Once the chicken is done, remove it from the oven and let it rest for 5 minutes. Garnish with fresh chopped parsley and a few lemon wedges on the side for an extra burst of citrus.

Tips And Tricks
Here are some helpful tips and tricks to ensure your lemon chicken thighs turn out juicy, flavorful, and perfectly crispy every time:
- Crispier Skin . For extra crispy chicken skin, place the thighs under the broiler for the last 2-3 minutes of cooking. Keep a close eye to avoid burning.
- Marinate Longer for More Flavor . While 30 minutes of marinating is sufficient, allowing the chicken to marinate for up to 4 hours will deepen the flavor.
- Pat Chicken Dry . Make sure to pat the chicken thighs dry before baking. Removing excess moisture ensures the skin becomes golden and crispy.
Variations
Here are some delicious variations to change up your classic lemon chicken thighs recipe while keeping the citrusy goodness intact:
- Herb Lovers’ Delight - Add some fresh thyme or rosemary to the marinade for an extra layer of herbaceous flavor.
- Spicy - For a spicy kick, add ½ teaspoon of crushed red pepper flakes to the marinade.
- Garlic Butter - Melt 2 tablespoons of butter and drizzle it over the chicken before baking for a richer, buttery flavor.
What To Serve With Lemon Chicken Thighs
This lemon chicken is so versatile! Here are a few serving suggestions to complete your meal:
- Roasted Vegetables - Try roasted Brussels sprouts, carrots, or asparagus for a healthy and delicious side.
- Mashed Potatoes - Creamy mashed potatoes are a classic pairing with baked chicken thighs.
- Rice or Quinoa - Serve the chicken over rice, quinoa, or couscous to soak up the zesty lemon juices.
- Salad - A simple green salad with vinaigrette complements the bright flavors of the lemon chicken.
How Long Do They Last?
Store any leftover chicken in an airtight container in the refrigerator for up to 3 days. Reheat in the oven or microwave until warmed through. These baked thighs also make excellent leftovers for meal prep!
Can You Freeze Them?
Yes! You can freeze cooked chicken thighs for up to 3 months. To reheat, let them thaw in the refrigerator overnight and then warm them in the oven until heated through.
More Lemon Flavored Recipes
- Lemon Tarts
- Lemon Brownies
- Keto Lemon Mousse
- Lemon Blueberry Muffins
- Lemon Pepper Wings
Lemon Chicken Thighs | Baked Lemon Chicken Thigh Recipe
Ingredients
- ▢ 4 Bone-in Skin-on Chicken Thighs
- ▢ 2 tbsp Olive Oil
- ▢ 2 Lemons
- ▢ 3 cloves Garlic , minced
- ▢ 1 tsp Dried Oregano
- ▢ 1/2 tsp Kosher Salt
- ▢ 1/4 tsp Ground Black Pepper
- ▢ 2 tbsp Fresh Parsley
- ▢ Rosemary , optional for garnish
Instructions
- Prepare the Marinade . In a small bowl, whisk together olive oil, fresh lemon juice, lemon zest, minced garlic, dried oregano, salt, and black pepper. The combination of lemon and garlic makes a bright and flavorful marinade.
- Marinate the Chicken . Pat the chicken thighs dry with paper towels (this ensures crispy skin!). Place them in a large resealable bag or shallow dish and pour the lemon marinade over the top. Seal and let the chicken marinate in the refrigerator for at least 30 minutes, or up to 4 hours for more intense flavor.
- Preheat the Oven . Preheat your oven to 400°F. Line a baking sheet with foil for easy cleanup and place a wire rack on top to elevate the chicken thighs for even cooking.
- Bake to Perfection . Arrange the marinated chicken thighs on the wire rack, skin side up. Place a slice of lemon on top of each thigh. Bake for 35-40 minutes or until the skin is golden and crispy, and the internal temperature of the chicken reaches 165°F.
- Garnish and Serve . Once the chicken is done, remove it from the oven and let it rest for 5 minutes. Garnish with fresh chopped parsley and a few lemon wedges on the side for an extra burst of citrus.
Get support & connect with our community on Facebook!
Nutrition
Don’t forget to check out my other Ketocookbooks.
Keto Instant Pot, Keto Fat Bombs, Sweets, & Treats , and Easy keto in 30 minutes.


If you already signed up, you should have received an email with a password to give you unlimited access to our FREE Printable Library. The password is case sensitive. Enter it below and get printing!
Password:

Lemon Chicken Thighs | Baked Lemon Chicken Thigh Recipe
Ingredients
- 4 Bone-in Skin-on Chicken Thighs
- 2 tbsp Olive Oil
- 2 Lemons
- 3 cloves Garlic minced
- 1 tsp Dried Oregano
- 1/2 tsp Kosher Salt
- 1/4 tsp Ground Black Pepper
- 2 tbsp Fresh Parsley
- Rosemary optional for garnish
Instructions
- Prepare the Marinade . In a small bowl, whisk together olive oil, fresh lemon juice, lemon zest, minced garlic, dried oregano, salt, and black pepper. The combination of lemon and garlic makes a bright and flavorful marinade.
- Marinate the Chicken . Pat the chicken thighs dry with paper towels (this ensures crispy skin!). Place them in a large resealable bag or shallow dish and pour the lemon marinade over the top. Seal and let the chicken marinate in the refrigerator for at least 30 minutes, or up to 4 hours for more intense flavor.
- Preheat the Oven . Preheat your oven to 400°F. Line a baking sheet with foil for easy cleanup and place a wire rack on top to elevate the chicken thighs for even cooking.
- Bake to Perfection . Arrange the marinated chicken thighs on the wire rack, skin side up. Place a slice of lemon on top of each thigh. Bake for 35-40 minutes or until the skin is golden and crispy, and the internal temperature of the chicken reaches 165°F.
- Garnish and Serve . Once the chicken is done, remove it from the oven and let it rest for 5 minutes. Garnish with fresh chopped parsley and a few lemon wedges on the side for an extra burst of citrus.
Lemon Chicken Thighs | Baked Lemon Chicken Thigh Recipe https://twosleevers.com/lemon-chicken-thighs/

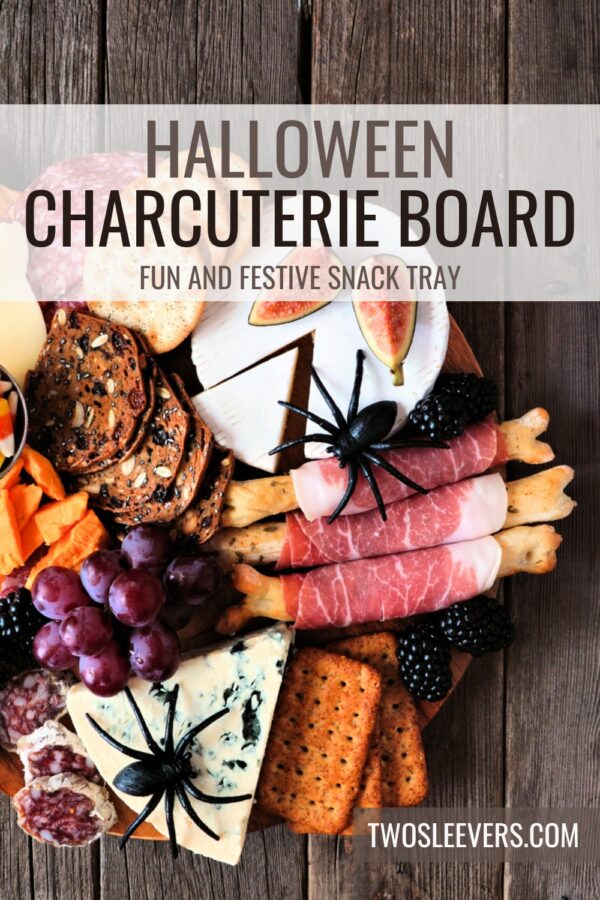
If you’re looking to add a spooky and delicious touch to your Halloween festivities, this Halloween Charcuterie Board is the perfect addition! This board is packed with seasonal flavors, fun treats, and eerie decorations that are sure to impress your guests. It’s ideal for Halloween parties, gatherings, or just a spooky movie night at home. The best part? It’s completely customizable, so you can add your favorite snacks and get creative with the spooky theme.

Why You’ll Love This Spooky Snack Tray
- Spooky and Festive . A perfect combination of eerie and delicious, this charcuterie board will get everyone into the Halloween spirit.
- Customizable . Whether you prefer sweet treats, savory snacks, or a mix of both, you can tailor the board to your liking.
- No Cooking Required . Simply assemble the ingredients, and you’ve got a stunning centerpiece ready for your event.
- Crowd-Pleaser . There’s something for everyone on this board, making it a great choice for parties or family gatherings.
This Halloween Charcuterie Board is all about combining festive, seasonal foods with a bit of spooky flair. From candy eyeballs to ghost-shaped cheeses, it’s the perfect balance of creativity and fun!
What Is The 3-3-3 Rule For Charcuterie?
The 3-3-3 rule for charcuterie is a simple guideline to help you create a well-balanced and varied charcuterie board. It’s a great way to ensure you have a good mix of flavors, textures, and items on your board, without overwhelming yourself or your guests. Here’s how it breaks down:
- 3 Cheeses : Choose three different types of cheese that vary in texture and flavor. For example: One soft cheese (like brie or goat cheese) One semi-hard cheese (like cheddar or gouda) One hard or aged cheese (like parmesan or aged manchego)
- 3 Meats : Select three types of cured meats to add savory flavors and variety. A good mix would include: One thinly sliced meat (like prosciutto or salami) One spicy or flavorful option (like chorizo or spicy salami) One more substantial or bold meat (like pepperoni or smoked sausage)
- 3 Extras : These are your accompaniments that add extra texture, flavor, and interest to your board. Choose three from options like: Fresh or dried fruits (like grapes, figs, or dried apricots) Nuts (like almonds, walnuts, or pistachios) Crackers or bread (a mix of crispy crackers and soft bread) Jams, honey, or olives
By following the 3-3-3 rule, you ensure that your charcuterie board is balanced, appealing, and offers a little something for everyone.
What Should You Avoid On A Halloween Charcuterie Board?
When creating a charcuterie board, it’s important to carefully select your ingredients to ensure the best experience for your guests. Here are some things you should avoid putting on your charcuterie board:
- Overly Pungent or Strong Smelling Cheeses : Some cheeses, like blue cheese or very aged cheeses, can have overpowering smells or flavors. If you include them, balance them with milder options to avoid overwhelming the palate.
- Too Much of One Texture : Avoid having all soft or all crunchy items. A great charcuterie board should have a variety of textures (soft cheeses, crunchy crackers, firm meats) to keep it interesting.
- Wet or Soggy Items : Anything too watery, like juicy fruits (watermelon or peaches), can make other items on the board soggy. If you want to include something like pickles or olives, drain them well and place them in separate bowls.
- Overloading with Sweet Items : While it’s great to have some sweet items (like fruits or jams), too many can clash with the savory elements. Balance sweetness with salty and tangy flavors.
- Heavily Seasoned Meats : Some meats may be overly salty or spicy. Avoid meats that might overpower the other items or alienate guests with sensitive palates. Provide a variety of mild to bold options.
- Foods that Don’t Keep Well at Room Temperature : Avoid highly perishable items like fresh seafood or raw vegetables that can wilt quickly, especially if the board will be out for an extended period.
Ingredients You’ll Need
One of the best things about creating a Halloween charcuterie board is that the possibilities are endless. You can mix and match sweet and savory items for the ultimate snacking experience. Here are some popular ideas:
- Cheeses - Use a variety of cheeses like aged cheddar, gouda, or mozzarella balls to add texture and flavor to the board. You can even carve them into spooky shapes like ghosts or pumpkins.
- Cured Meats - Salami, prosciutto, and pepperoni are always a hit on charcuterie boards.
- Crackers & Breadsticks - Offer different types of crackers and breadsticks, including some “witch fingers” made by adding sliced almonds as nails on the ends of breadsticks.
- Olives - Black and green olives add a briny, savory flavor and can be styled as “monster eyes.”
- Nuts - Include a selection of roasted nuts for some crunch.
- Candy Eyeballs - These are fun to add to various snacks or just sprinkle across the board for decoration.
- Chocolate Pretzel Rods - Dip pretzel rods in white or dark chocolate and decorate with sprinkles or icing to resemble witch’s brooms.
- Halloween Candies - No Halloween board is complete without candy! Add mini candy bars, candy corn, or gummy worms for a festive touch.
- Cookies & Macarons - Include spooky-shaped cookies or Halloween-colored macarons to bring in a variety of textures and flavors.
How To Make A Halloween Charcuterie Board
- Choose Your Board . Start by selecting a large wooden board or platter. You want plenty of space to arrange all your items without things looking too cluttered.
- Arrange the Cheese . Begin by placing your cheeses on the board. If you’re using ghost-shaped cheeses or other fun cutouts, arrange these towards the center for maximum visual impact.
- Add the Meats and Crackers . Surround the cheeses with your cured meats and crackers. You can fan out slices of salami or roll prosciutto into spooky “roses” for an elegant touch.
- Fill in with Fruits, Nuts, and Olives . Scatter your olives, nuts, and seasonal fruits (like apple slices or grapes) across the board. Use small bowls for things like olives or dips, which also adds height and dimension.
- Add Sweet Treats . For that Halloween twist, place candy eyeballs on various items or even right on the board. Add Halloween candy, pretzel rods, and any themed cookies or desserts to bring in the festive spirit.
- Decorate . Finally, add a spooky flair with mini pumpkins, decorative spiders, or plastic skeleton hands to enhance the Halloween vibe.

Tips And Tricks
Here are a few tips to make sure your Halloween Charcuterie Board is both stunning and delicious:
- Balance Flavors . Mix sweet and savory items so there’s something for everyone. Aim for a balance of textures too – creamy, crunchy, salty, and sweet.
- Use Seasonal Produce . Incorporate seasonal fall fruits like figs, pears, or apples to bring in a fresh element.
- Create Visual Interest . Place bowls of dips, nuts, or olives throughout the board to add height and make it more visually dynamic.
- Make It Spooky . Use cookie cutters to create ghost or pumpkin shapes from cheeses and meats. Adding edible googly eyes or candy eyeballs is an easy way to add a spooky twist.
- Serve with Dips . Add a couple of dips like hummus or a whipped goat cheese spread for extra flavor and variety.
Variations
The beauty of a Halloween Charcuterie Board is that you can customize it to suit your preferences. Here are a few fun variations:
- Sweet - Focus on Halloween-themed candies, chocolates, cookies, and cupcakes. You can include marshmallows and candy corn for a full-on sweet treat board.
- Healthy - Incorporate more fruits, veggies, and nuts for a lighter option. Add fun touches like “jack-o’-lantern” clementines and “witch finger” carrots.
- Mini - Create individual mini charcuterie boards if you’re serving a smaller group or want to give each person their own selection of snacks.
What To Serve With A Halloween Charcuterie Board
Pair your spooky charcuterie board with a few fun Halloween beverages to complete the theme:
- Witches’ Brew Punch - A fruity punch with floating “eyeballs” made from lychee and blueberries.
- Spooky Sangria - A dark red sangria with added blackberries and sliced oranges for a ghoulish look.
- Spiced Cider - A warm or chilled drink perfect for fall gatherings.
How Long Does It Last?
Your Halloween Charcuterie Board is best enjoyed fresh, but you can store leftovers in an airtight container in the refrigerator for up to 2-3 days. Be sure to separate the crackers so they don’t get soggy from the other items.
Can You Make It Ahead?
Yes! You can prep most of the ingredients for your board ahead of time. Cut the cheeses, meats, and fruits in advance, then store them in airtight containers in the refrigerator.
When it’s time to serve, all you need to do is assemble the board, which saves you time on the day of your event.
More Spectacular Snacks
- White Bean Dip
- Strawberry Mousse
- Homemade Granola Bars
- Chocolate Covered Pretzels
- Air Fryer Churros
- Pumpkin Rice Krispies Treats

Halloween Charcuterie Board | Make A Halloween Grazing Board
Ingredients
Dips And Spreads
- ▢ 8 oz Dips or spreads such as jelly, tzatziki, marinara, or ranch
Cheese And Meats
- ▢ 8 oz Soft cheese such as brie, mozzarella, feta, or gorgonzola.
- ▢ 8 oz Cured or chilled cooked meats such as salami, prosciutto, pepperoni, or ham
- ▢ 8 oz 8 oz Hard cheese such as cheddar, provolone, or gouda
Fruits And Vegetables
- ▢ 8 oz Strawberries
- ▢ 8 oz Blueberries
- ▢ 8 oz Raspberries
- ▢ 4 oz Sweet Peppers
- ▢ 4 oz Cherry Tomatoes
Breads And Crackers
- ▢ 8 oz Crackers
- ▢ 1/4 loaf Artisan Bread , sliced
Filler Ingredients
- ▢ 8 oz Mixed Nuts
- ▢ 4 oz Olives
- ▢ 4 oz Banana Peppers
- ▢ 8 Chocolate Truffles
Instructions
- Choose Your Board . Start by selecting a large wooden board or platter. You want plenty of space to arrange all your items without things looking too cluttered.
- Arrange the Cheese . Begin by placing your cheeses on the board. If you’re using ghost-shaped cheeses or other fun cutouts, arrange these towards the center for maximum visual impact.
- Add the Meats and Crackers . Surround the cheeses with your cured meats and crackers. You can fan out slices of salami or roll prosciutto into spooky “roses” for an elegant touch.
- Fill in with Fruits, Nuts, and Olives . Scatter your olives, nuts, and seasonal fruits (like apple slices or grapes) across the board. Use small bowls for things like olives or dips, which also adds height and dimension.
- Add Sweet Treats . For that Halloween twist, place candy eyeballs on various items or even right on the board. Add Halloween candy, pretzel rods, and any themed cookies or desserts to bring in the festive spirit.
- Decorate . Finally, add a spooky flair with mini pumpkins, decorative spiders, or plastic skeleton hands to enhance the Halloween vibe.
