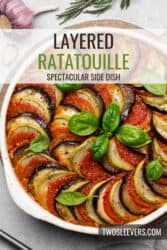
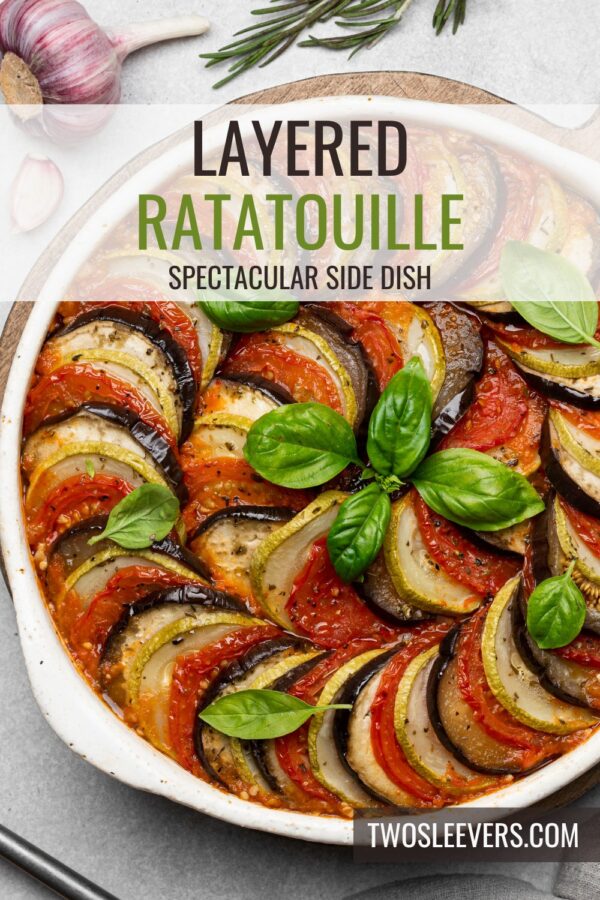
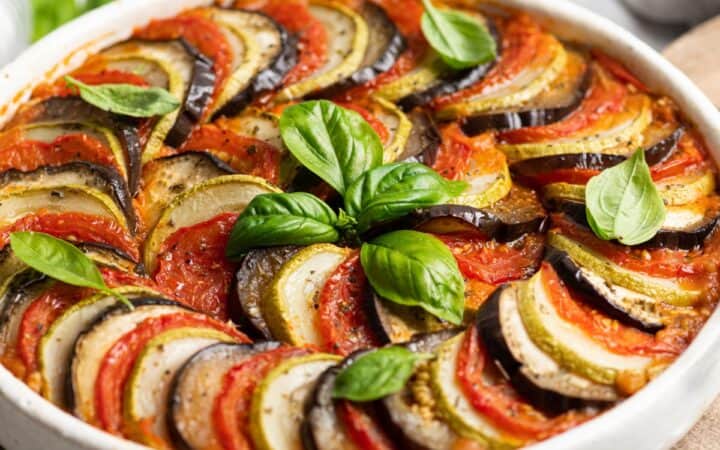
If you’re a fan of vibrant, fresh vegetables and bold Mediterranean flavors, you’re going to love this Layered Ratatouille Recipe! This dish combines thinly sliced zucchini, eggplant, bell peppers, and tomatoes, all arranged in a beautiful layered pattern and baked to perfection in a rich, herb-infused tomato sauce.
Why You’ll Love This Spectacular Side Dish
- Healthy & Nutritious – Packed with fresh vegetables, fiber, and antioxidants.
- Visually Stunning – The layered pattern makes this dish an eye-catching side dish masterpiece.
- Easy to Customize – Adapt the flavors to your liking with different herbs and spices.
- Great for Meal Prep – Ratatouille tastes even better the next day, making it perfect for leftovers.
Ratatouille is a classic French dish that originated in Provence and has become a favorite among home cooks and food lovers worldwide. Whether you’re looking for a delicious plant-based meal or a stunning side dish, this baked ratatouille will impress everyone at the table.
What Is Ratatouille?
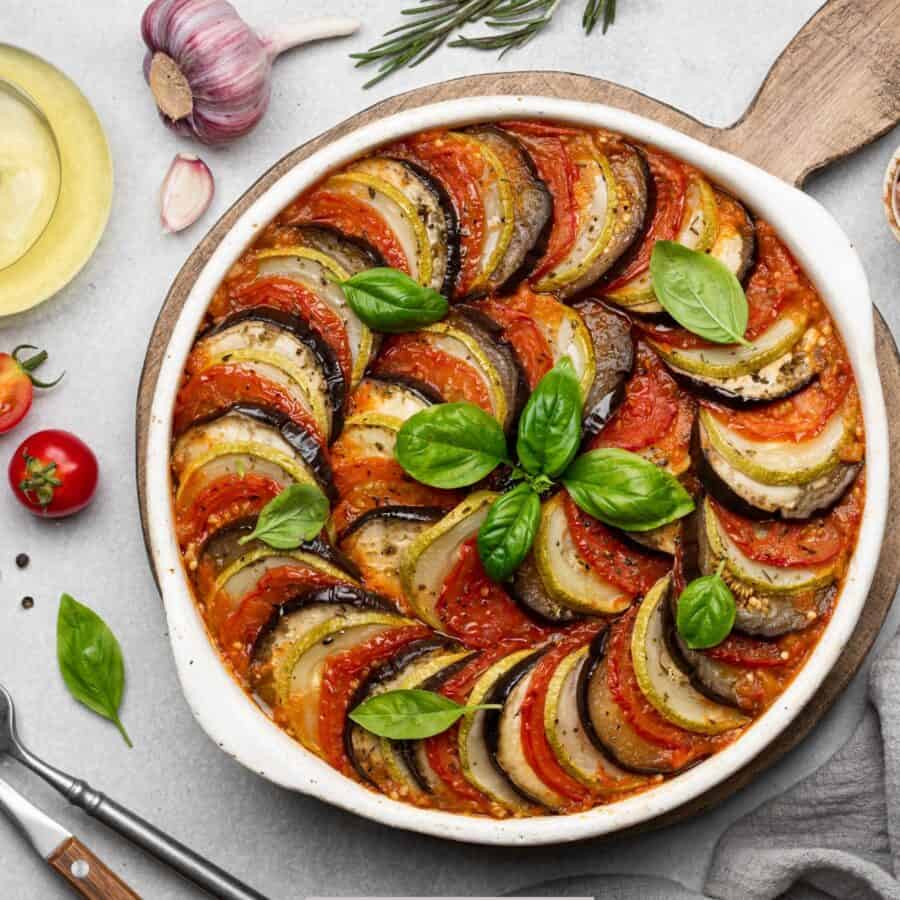
Ratatouille is a French Provençal vegetable stew that has been adapted into many versions, including this layered baked variation. Traditionally, it’s made by sautéing or stewing vegetables, but this recipe takes inspiration from the movie “Ratatouille” with a beautifully arranged spiral of sliced vegetables.
This method enhances the presentation while allowing the flavors to meld together as they bake in a garlicky tomato sauce. The result? A dish that is just as delicious as it is gorgeous!
Is It Healthy?
Layered Ratatouille is one of the healthiest vegetable-based dishes you can enjoy! It’s low in calories, low carb , rich in vitamins and fiber, and bursting with fresh, natural flavors.
Whether you’re following a plant-based diet, looking for a low-carb meal, or just want to eat more veggies, this dish is a delicious and nutritious choice.
Ingredients You’ll Need
- Olive Oil - Used to sauté the onions and garlic, adding depth and richness to the sauce.
- Garlic - Enhances the sauce with a bold, aromatic flavor that complements the vegetables.
- Onion - Adds a natural sweetness and depth to the sauce as it caramelizes.
- Crushed Tomatoes - Forms the base of the sauce, giving it a slightly tangy, umami-rich taste.
- Balsamic Vinegar - Provides a slight acidity and a hint of sweetness, balancing the flavors.
- Dried Oregano & Basil - Classic Mediterranean herbs that add earthy and slightly peppery notes.
- Salt & Black Pepper - Enhances the overall flavor, ensuring the sauce is well-seasoned.
- Zucchini - Mild and slightly sweet, zucchini absorbs the flavors of the sauce while adding a tender bite.
- Yellow Squash - Similar to zucchini but with a slightly firmer texture and a hint of nuttiness.
- Eggplant - Softens beautifully as it bakes, absorbing the flavors of the sauce and adding a meaty texture.
- Roma Tomatoes - Their natural acidity and juiciness enhance the overall richness of the dish.
- Fresh Basil or Parsley - Adds a fresh, herbaceous aroma and a pop of green color.
- Grated Parmesan or Feta (Optional) - If added, cheese brings a savory, slightly salty contrast to the sweet and tangy vegetables.
Each ingredient plays a crucial role in building the layers of flavor and texture in this beautifully baked ratatouille!
How To Make Layered Ratatouille
- Prepare the Tomato Sauce . Heat olive oil in a pan over medium heat. Add the chopped onion and cook for 3-4 minutes until softened. Stir in the minced garlic and cook for 1 more minute. Add the crushed tomatoes, balsamic vinegar, oregano, basil, salt, and black pepper. Let simmer for 10 minutes, then spread the sauce evenly in the bottom of a baking dish.
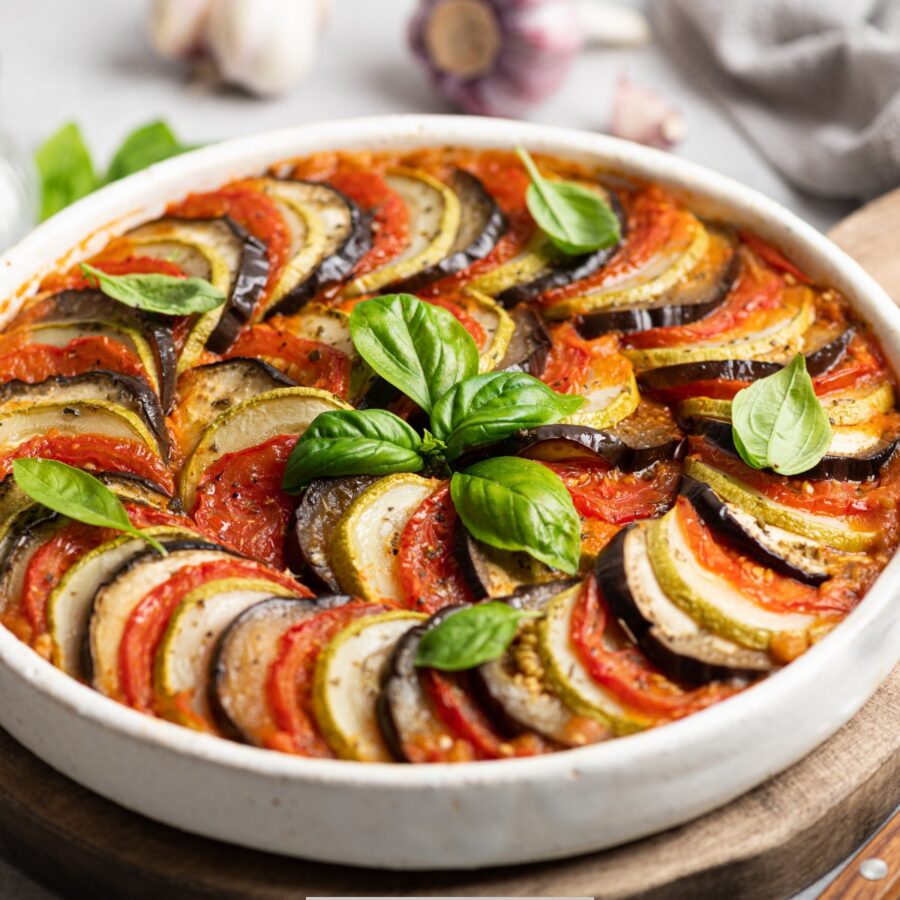
- Slice & Arrange the Vegetables . Using a sharp knife or mandoline, thinly slice the zucchini, squash, eggplant, and tomatoes into uniform rounds. Start arranging the slices in an alternating pattern (zucchini, eggplant, tomato, etc.) in a spiral or neat rows over the sauce.
- Bake to Perfection . Drizzle a little olive oil over the vegetables and sprinkle with a pinch of salt and pepper. Cover the dish with foil and bake in a 375°F oven for 30 minutes. Remove the foil and bake for another 15-20 minutes until the vegetables are tender and slightly caramelized.
- Garnish & Serve . Sprinkle fresh basil or parsley on top before serving. For an extra flavor boost, add grated Parmesan or crumbled feta before serving.
Tips And Tricks
- Use a Mandoline Slicer . This helps achieve uniformly thin slices , ensuring even cooking.
- Choose Fresh, Firm Vegetables . Avoid overly ripe eggplant or tomatoes, as they can become mushy.
- Let It Rest Before Serving . This allows the flavors to develop and makes slicing easier.
- Add Fresh Herbs . Enhance the flavor with thyme, rosemary, or basil for a more fragrant dish.
Variations
Layered Ratatouille is a versatile dish that can be customized in many ways to suit different tastes, diets, and occasions. Here are some delicious variations to try:
- Cheesy Ratatouille - Add shredded mozzarella or goat cheese on top before baking.
- Spicy Kick - Sprinkle red pepper flakes into the tomato sauce for a little heat.
- Rustic Stew Style - Instead of layering, chop the vegetables and sauté them in the sauce for a traditional ratatouille texture.
- Mediterranean Twist - Add olives and capers for a salty, tangy twist.
What To Eat With Layered Ratatouille
Layered Ratatouille is a versatile dish that pairs well with a variety of sides, proteins, and grains. Whether you’re looking for a light vegetarian meal or a more substantial pairing, here are the best foods to serve with it:
- Bread - Perfect for soaking up the flavorful tomato sauce.
- Rice or Quinoa - A hearty, gluten-free option to serve alongside.
- Grilled Chicken or Fish - A great protein pairing for a well-balanced meal.
- Goat Cheese Crostini - Add a creamy contrast to the rich flavors.
How Long Does It Last?
Layered Ratatouille is a dish that stores well, allowing you to enjoy its flavors for several days. When stored in an airtight container in the refrigerator, ratatouille lasts for about 3 to 4 days.
As it sits, the flavors continue to develop, making it even more delicious the next day. To reheat, simply warm it in the oven at 350°F for about 15 minutes, or heat individual portions in the microwave.
Can You Freeze It?
If you’d like to store it for longer, ratatouille can be frozen for up to 3 months. To freeze, let the dish cool completely, then transfer it to a freezer-safe container.
When ready to eat, thaw it in the refrigerator overnight before reheating.
More Of Our Best Zucchini Recipes
- Roasted Zucchini
- Zucchini Casserole
- Zucchini Roll Ups
- Poblano Zucchini
- Instant Pot Lasagna
Layered Ratatouille Recipe | Homemade Baked Ratatouille
Ingredients
For The Tomato Sauce
- ▢ 2 tbsp Olive Oil
- ▢ 3 cloves Garlic , minced
- ▢ 1 Onion , chopped
- ▢ 14 ounces Crushed Tomatoes
- ▢ 1 tsp Balsamic Vinegar
- ▢ 1 tsp Dried Oregano
- ▢ 1 tsp Dried Basil
- ▢ 1/2 tsp Kosher Salt
- ▢ 1/4 tsp Ground Black Pepper
For the Veggies
- ▢ 1 Zucchini , thinly sliced
- ▢ 1 Yellow Squash , thinly sliced
- ▢ 1 Eggplant , thinly sliced
- ▢ 3 Roma Tomatoes , thinly slcied
- ▢ Fresh Basil , for garnish
- ▢ 1/4 cup Feta Cheese , optional, for garnish
Instructions
- Prepare the Tomato Sauce . Heat olive oil in a pan over medium heat. Add the chopped onion and cook for 3-4 minutes until softened. Stir in the minced garlic and cook for 1 more minute. Add the crushed tomatoes, balsamic vinegar, oregano, basil, salt, and black pepper. Let simmer for 10 minutes, then spread the sauce evenly in the bottom of a baking dish.
- Slice & Arrange the Vegetables . Using a sharp knife or mandoline, thinly slice the zucchini, squash, eggplant, and tomatoes into uniform rounds. Start arranging the slices in an alternating pattern (zucchini, eggplant, tomato, etc.) in a spiral or neat rows over the sauce.
- Bake to Perfection . Drizzle a little olive oil over the vegetables and sprinkle with a pinch of salt and pepper. Cover the dish with foil and bake in a 375°F oven for 30 minutes. Remove the foil and bake for another 15-20 minutes until the vegetables are tender and slightly caramelized.
- Garnish & Serve . Sprinkle fresh basil or parsley on top before serving. For an extra flavor boost, add grated Parmesan or crumbled feta before serving.
Get support & connect with our community on Facebook!
Nutrition
If you’re a fan of vibrant, fresh vegetables and bold Mediterranean flavors, you’re going to love this Layered Ratatouille Recipe! This dish combines thinly sliced zucchini, eggplant, bell peppers, and tomatoes, all arranged in a beautiful layered pattern and baked to perfection in a rich, herb-infused tomato sauce.
Why You’ll Love This Spectacular Side Dish
- Healthy & Nutritious – Packed with fresh vegetables, fiber, and antioxidants.
- Visually Stunning – The layered pattern makes this dish an eye-catching side dish masterpiece.
- Easy to Customize – Adapt the flavors to your liking with different herbs and spices.
- Great for Meal Prep – Ratatouille tastes even better the next day, making it perfect for leftovers.
Ratatouille is a classic French dish that originated in Provence and has become a favorite among home cooks and food lovers worldwide. Whether you’re looking for a delicious plant-based meal or a stunning side dish, this baked ratatouille will impress everyone at the table.
What Is Ratatouille?
Ratatouille is a French Provençal vegetable stew that has been adapted into many versions, including this layered baked variation. Traditionally, it’s made by sautéing or stewing vegetables, but this recipe takes inspiration from the movie “Ratatouille” with a beautifully arranged spiral of sliced vegetables.
This method enhances the presentation while allowing the flavors to meld together as they bake in a garlicky tomato sauce. The result? A dish that is just as delicious as it is gorgeous!
Is It Healthy?
Layered Ratatouille is one of the healthiest vegetable-based dishes you can enjoy! It’s low in calories, low carb , rich in vitamins and fiber, and bursting with fresh, natural flavors.
Whether you’re following a plant-based diet, looking for a low-carb meal, or just want to eat more veggies, this dish is a delicious and nutritious choice.
Ingredients You’ll Need
- Olive Oil - Used to sauté the onions and garlic, adding depth and richness to the sauce.
- Garlic - Enhances the sauce with a bold, aromatic flavor that complements the vegetables.
- Onion - Adds a natural sweetness and depth to the sauce as it caramelizes.
- Crushed Tomatoes - Forms the base of the sauce, giving it a slightly tangy, umami-rich taste.
- Balsamic Vinegar - Provides a slight acidity and a hint of sweetness, balancing the flavors.
- Dried Oregano & Basil - Classic Mediterranean herbs that add earthy and slightly peppery notes.
- Salt & Black Pepper - Enhances the overall flavor, ensuring the sauce is well-seasoned.
- Zucchini - Mild and slightly sweet, zucchini absorbs the flavors of the sauce while adding a tender bite.
- Yellow Squash - Similar to zucchini but with a slightly firmer texture and a hint of nuttiness.
- Eggplant - Softens beautifully as it bakes, absorbing the flavors of the sauce and adding a meaty texture.
- Roma Tomatoes - Their natural acidity and juiciness enhance the overall richness of the dish.
- Fresh Basil or Parsley - Adds a fresh, herbaceous aroma and a pop of green color.
- Grated Parmesan or Feta (Optional) - If added, cheese brings a savory, slightly salty contrast to the sweet and tangy vegetables.
Each ingredient plays a crucial role in building the layers of flavor and texture in this beautifully baked ratatouille!
How To Make Layered Ratatouille
- Prepare the Tomato Sauce . Heat olive oil in a pan over medium heat. Add the chopped onion and cook for 3-4 minutes until softened. Stir in the minced garlic and cook for 1 more minute. Add the crushed tomatoes, balsamic vinegar, oregano, basil, salt, and black pepper. Let simmer for 10 minutes, then spread the sauce evenly in the bottom of a baking dish.
- Slice & Arrange the Vegetables . Using a sharp knife or mandoline, thinly slice the zucchini, squash, eggplant, and tomatoes into uniform rounds. Start arranging the slices in an alternating pattern (zucchini, eggplant, tomato, etc.) in a spiral or neat rows over the sauce.
- Bake to Perfection . Drizzle a little olive oil over the vegetables and sprinkle with a pinch of salt and pepper. Cover the dish with foil and bake in a 375°F oven for 30 minutes. Remove the foil and bake for another 15-20 minutes until the vegetables are tender and slightly caramelized.
- Garnish & Serve . Sprinkle fresh basil or parsley on top before serving. For an extra flavor boost, add grated Parmesan or crumbled feta before serving.
Tips And Tricks
- Use a Mandoline Slicer . This helps achieve uniformly thin slices , ensuring even cooking.
- Choose Fresh, Firm Vegetables . Avoid overly ripe eggplant or tomatoes, as they can become mushy.
- Let It Rest Before Serving . This allows the flavors to develop and makes slicing easier.
- Add Fresh Herbs . Enhance the flavor with thyme, rosemary, or basil for a more fragrant dish.
Variations
Layered Ratatouille is a versatile dish that can be customized in many ways to suit different tastes, diets, and occasions. Here are some delicious variations to try:
- Cheesy Ratatouille - Add shredded mozzarella or goat cheese on top before baking.
- Spicy Kick - Sprinkle red pepper flakes into the tomato sauce for a little heat.
- Rustic Stew Style - Instead of layering, chop the vegetables and sauté them in the sauce for a traditional ratatouille texture.
- Mediterranean Twist - Add olives and capers for a salty, tangy twist.
What To Eat With Layered Ratatouille
Layered Ratatouille is a versatile dish that pairs well with a variety of sides, proteins, and grains. Whether you’re looking for a light vegetarian meal or a more substantial pairing, here are the best foods to serve with it:
- Bread - Perfect for soaking up the flavorful tomato sauce.
- Rice or Quinoa - A hearty, gluten-free option to serve alongside.
- Grilled Chicken or Fish - A great protein pairing for a well-balanced meal.
- Goat Cheese Crostini - Add a creamy contrast to the rich flavors.
How Long Does It Last?
Layered Ratatouille is a dish that stores well, allowing you to enjoy its flavors for several days. When stored in an airtight container in the refrigerator, ratatouille lasts for about 3 to 4 days.
As it sits, the flavors continue to develop, making it even more delicious the next day. To reheat, simply warm it in the oven at 350°F for about 15 minutes, or heat individual portions in the microwave.
Can You Freeze It?
If you’d like to store it for longer, ratatouille can be frozen for up to 3 months. To freeze, let the dish cool completely, then transfer it to a freezer-safe container.
When ready to eat, thaw it in the refrigerator overnight before reheating.
More Of Our Best Zucchini Recipes
- Roasted Zucchini
- Zucchini Casserole
- Zucchini Roll Ups
- Poblano Zucchini
- Instant Pot Lasagna
Layered Ratatouille Recipe | Homemade Baked Ratatouille
Ingredients
For The Tomato Sauce
- ▢ 2 tbsp Olive Oil
- ▢ 3 cloves Garlic , minced
- ▢ 1 Onion , chopped
- ▢ 14 ounces Crushed Tomatoes
- ▢ 1 tsp Balsamic Vinegar
- ▢ 1 tsp Dried Oregano
- ▢ 1 tsp Dried Basil
- ▢ 1/2 tsp Kosher Salt
- ▢ 1/4 tsp Ground Black Pepper
For the Veggies
- ▢ 1 Zucchini , thinly sliced
- ▢ 1 Yellow Squash , thinly sliced
- ▢ 1 Eggplant , thinly sliced
- ▢ 3 Roma Tomatoes , thinly slcied
- ▢ Fresh Basil , for garnish
- ▢ 1/4 cup Feta Cheese , optional, for garnish
Instructions
- Prepare the Tomato Sauce . Heat olive oil in a pan over medium heat. Add the chopped onion and cook for 3-4 minutes until softened. Stir in the minced garlic and cook for 1 more minute. Add the crushed tomatoes, balsamic vinegar, oregano, basil, salt, and black pepper. Let simmer for 10 minutes, then spread the sauce evenly in the bottom of a baking dish.
- Slice & Arrange the Vegetables . Using a sharp knife or mandoline, thinly slice the zucchini, squash, eggplant, and tomatoes into uniform rounds. Start arranging the slices in an alternating pattern (zucchini, eggplant, tomato, etc.) in a spiral or neat rows over the sauce.
- Bake to Perfection . Drizzle a little olive oil over the vegetables and sprinkle with a pinch of salt and pepper. Cover the dish with foil and bake in a 375°F oven for 30 minutes. Remove the foil and bake for another 15-20 minutes until the vegetables are tender and slightly caramelized.
- Garnish & Serve . Sprinkle fresh basil or parsley on top before serving. For an extra flavor boost, add grated Parmesan or crumbled feta before serving.
Get support & connect with our community on Facebook!
Nutrition

If you already signed up, you should have received an email with a password to give you unlimited access to our FREE Printable Library. The password is case sensitive. Enter it below and get printing!
Password:

Layered Ratatouille Recipe | Homemade Baked Ratatouille
Ingredients
For The Tomato Sauce
- 2 tbsp Olive Oil
- 3 cloves Garlic minced
- 1 Onion chopped
- 14 ounces Crushed Tomatoes
- 1 tsp Balsamic Vinegar
- 1 tsp Dried Oregano
- 1 tsp Dried Basil
- 1/2 tsp Kosher Salt
- 1/4 tsp Ground Black Pepper
For the Veggies
- 1 Zucchini thinly sliced
- 1 Yellow Squash thinly sliced
- 1 Eggplant thinly sliced
- 3 Roma Tomatoes thinly slcied
- Fresh Basil for garnish
- 1/4 cup Feta Cheese optional, for garnish
Instructions
- Prepare the Tomato Sauce . Heat olive oil in a pan over medium heat. Add the chopped onion and cook for 3-4 minutes until softened. Stir in the minced garlic and cook for 1 more minute. Add the crushed tomatoes, balsamic vinegar, oregano, basil, salt, and black pepper. Let simmer for 10 minutes, then spread the sauce evenly in the bottom of a baking dish.
- Slice & Arrange the Vegetables . Using a sharp knife or mandoline, thinly slice the zucchini, squash, eggplant, and tomatoes into uniform rounds. Start arranging the slices in an alternating pattern (zucchini, eggplant, tomato, etc.) in a spiral or neat rows over the sauce.
- Bake to Perfection . Drizzle a little olive oil over the vegetables and sprinkle with a pinch of salt and pepper. Cover the dish with foil and bake in a 375°F oven for 30 minutes. Remove the foil and bake for another 15-20 minutes until the vegetables are tender and slightly caramelized.
- Garnish & Serve . Sprinkle fresh basil or parsley on top before serving. For an extra flavor boost, add grated Parmesan or crumbled feta before serving.
Layered Ratatouille Recipe | Homemade Baked Ratatouille https://twosleevers.com/layered-ratatouille-recipe/

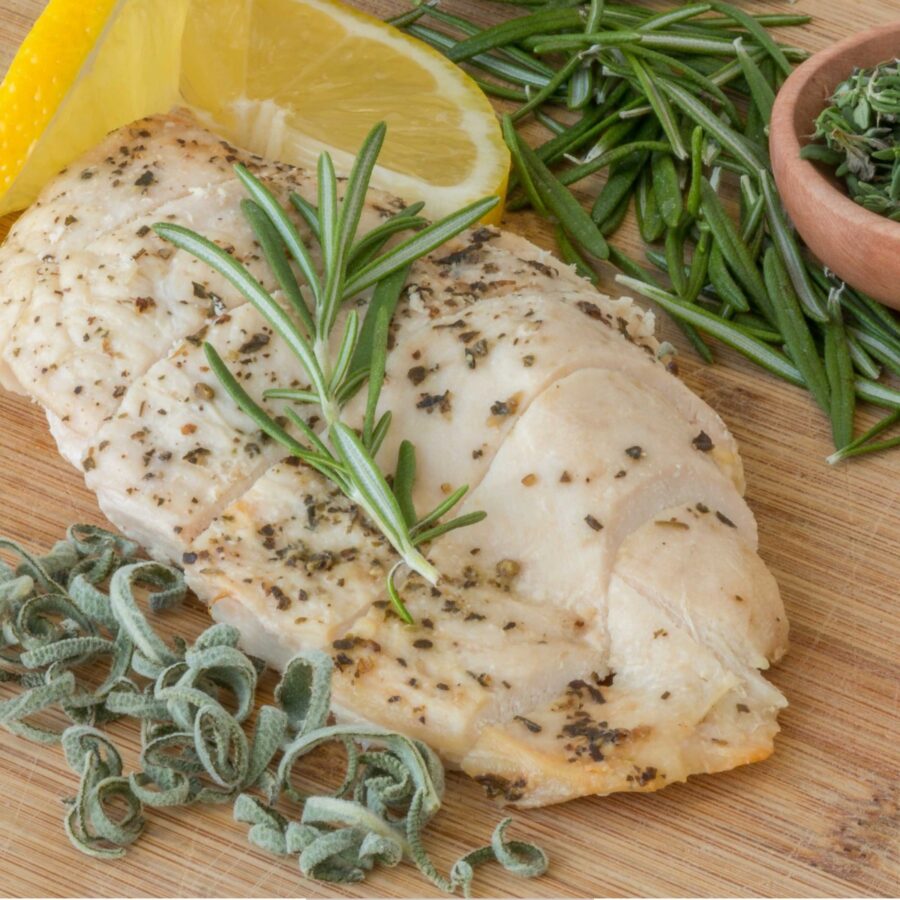
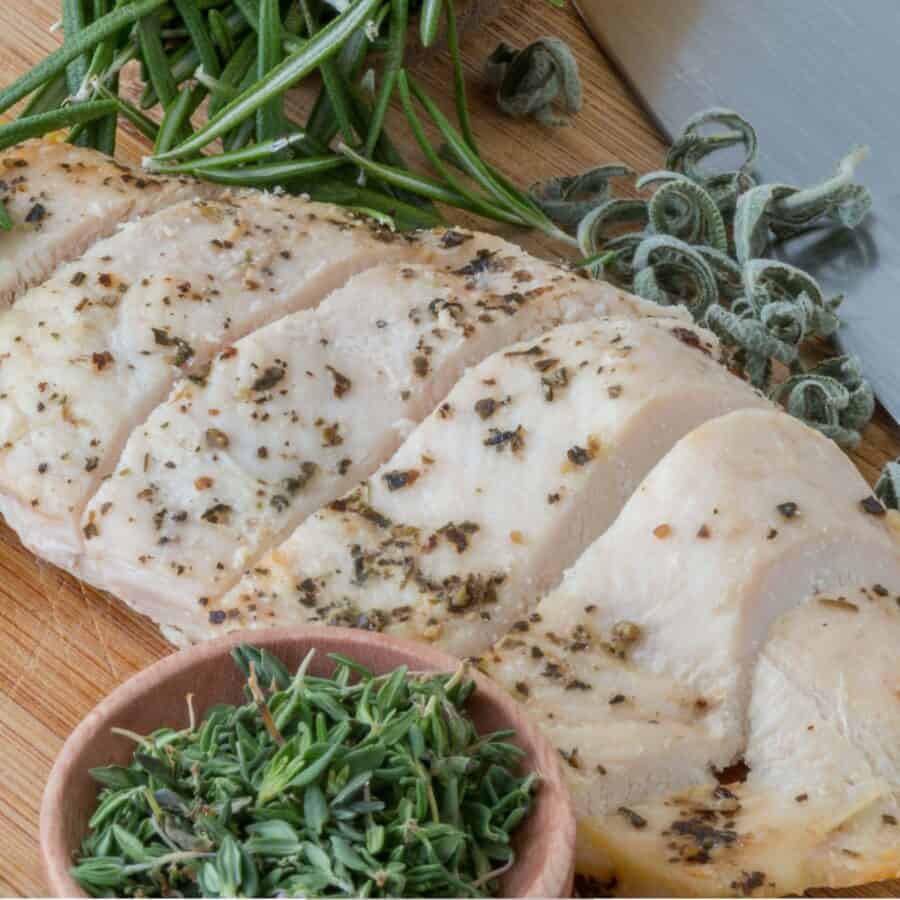
Sous Vide Chicken Breasts are tender, moist, and perfectly seasoned. Use your Instant Pot or sous vide stick to make delicious sous vide chicken at home for a healthy and tasty meal.
Why You’ll Love Cooking Chicken This Way
- Simple. Season your chicken breasts, place them in an air tight bag, and use either an Instant Pot or Sous Vide Stick to do all of the work.
- Low Carb. Only net carbs per serving.
- High Protein. An easy and delicious way to increase the amount of protein in your next meal.
- Flawless execution. Using a completely controlled cooking temperature ensures you’ll get perfectly cooked chicken breasts every time!
Sous vide is a cooking technique that involves cooking food in a precisely controlled water bath. This method is particularly effective when cooking chicken breasts. It allows you to cook the chicken to a precise temperature, resulting in juicy and tender meat that is full of flavor.
Ingredients To Grab
The spices you use to create delicious sous vide chicken breast can easily be adjusted to suit your flavor preferences. Use the ingredients below as a guide, not as a rule to create your perfect bite.
- Chicken breasts
- Salt
- Pepper
- Garlic
- Lemon
Equipment You’ll Need
There are two different kitchen gadgets you can use to make these sous vide chicken breasts. Below I’ve listed what you’ll need to have before you get started for both sous vide stick, and Instant Pot sous vide.
What you’ll need to sous vide chicken breasts using a sous vide stick:
- Zip top bags/vacuum seal bags
- Sous vide stick
- Large plastic tub/bowl
If you have an Instant Pot with a sous vide function, you’ll need:
- Zip top bags/vacuum seal bags
- Instant Pot
What Temperature Do You Sous Vide Chicken Breast?
The temperature you use to sous vide chicken isn’t a cookie cutter number. You can adjust the temperature that you are cooking your chicken, but it will also impact the amount of time it takes to cook.
Here are the most commonly used temperatures and how long the chicken should be cooked. As always, make sure you check the internal temperature of the chicken to ensure it is 165F before you enjoy it.
Sous Vide Chicken Breast Time/Temperatures
| 140F | 1.5-4 hours |
|---|---|
| 150F | 1-4 hours |
| 160F | 1-4 hours |
You’ll see in the chart that the cooking time can be very similar, even with a slight adjustment in the cooking temperature.
The main difference in the chicken will be the texture after it is cooked. The lower the temperature, the more tender the chicken will be.
If you’re using the chicken for a decadent chicken dish where the chicken breast is the star of the show, the lower temperature is better.
If you’re wanting to use the chicken for incredibly moist and flavorful pulled or shredded chicken, the higher temperature will be the better choice.
Why Is My Sous Vide Chicken Rubbery?
There are two main factors that can cause your sous vide chicken breasts to come out rubbery. For perfectly cooked chicken every time, ensure you’re not making either one of these common mistakes:
- Temperature - Sous vide cooking relies on precise temperature control to achieve the desired texture. If the temperature is too high or too low, the chicken can become rubbery. Make sure you are using a reliable sous vide machine and thermometer to ensure the temperature is accurate.
- Cooking Time - The length of time you cook the chicken can also affect its texture. Overcooking the chicken can make it tough and rubbery. Make sure to follow recommended cooking times for the size and cut of chicken you are using.
How To Sous Vide Chicken Breast
Using A Sous Vide Stick
If you have an Instant Pot that doesn’t have built-in sous vide function, or it is occupied with another dish, you can use a sous vide stick to make these chicken breasts. Here’s how to make them using this handy kitchen gadget:
- Preheat your water bath - Fill a large pot or container with water and attach your sous vide machine to the side. Set the temperature to 150°F for a moist and tender texture.
- Season the chicken - Season the chicken breasts with salt and pepper, or any other desired seasonings such as garlic powder, paprika, or thyme. For an extra boost of flavor, you can also marinate the chicken in a bag with oil and herbs for a few hours before cooking.
- Vacuum-seal the chicken - Place the seasoned chicken breasts in a vacuum-seal bag, making sure they are in a single layer and not overlapping. Seal the bag using a vacuum sealer, removing as much air as possible. If you don’t have a vacuum sealer, you can use a zip-top bag and remove the air by partially sealing it and then immersing it in water until the air is pushed out.
- Cook the chicken - Place the sealed bag of chicken in the preheated water bath and cook for 1.5-4 hours, depending on the thickness of the chicken breasts. For a perfectly cooked chicken, use a digital thermometer to ensure the internal temperature of the chicken is at least 165°F.
- Finish the chicken - Once the chicken is cooked, remove it from the bag and pat dry with paper towels. If desired, you can sear the chicken in a hot pan or on a grill for a crispy exterior. You can slice the chicken and serve it immediately, or refrigerate or freeze it for later use.
Using An Instant Pot
- Prepare the chicken. Place the chicken, along with the prepared seasonings inside an airtight bag, ensuring there is no excess air inside the bag.
- Place water in your Instant Pot. Fill your Instant Pot 1/2 to 3/4 of the way with water, enough to submerge your vacuum-sealed chicken.
- Select Sous Vide on your Instant Pot. Select this setting on your Instant Pot and follow the prompts it gives you to finish the programming for the preferred time and temperature.
- Set the sous vide temperature. Adjust the cooking temperature to reflect the texture you prefer for your chicken, according to the chart above. This will be between 140F and 160F
- Set the sous vide cook time. Again, this will vary depending on which texture you want your chicken to have when it is done cooking. This time will be between 1.5 and 4 hours.
- Press start. Once you have successfully finished programming the sous vide time and temperature, you will place the lid on the Instant Pot and walk away! While it is a longer process than cooking shredded chicken in your Instant Pot, it will yield much more tender and juicy chicken and it is incredibly easy to do.
Variations
There are a variety of ways that you can switch up these sous vide chicken breasts that will make them a tasty addition to your next meal or meal prep session. Below are a few of my favorite ways to change it up a little bit while still yielding great results:
- Change up the temperature.
- Swap out the seasonings.
- Take the time to marinate.
What To Serve With Them
Sous vide chicken breasts can be served with a variety of sides and accompaniments, depending on your personal preference and the meal you’re using them to create. Here are some of my favorite things to enjoy with them, both low carb and not:
- Roasted Vegetables - Roasted asparagus, Brussels sprouts, or carrots are a great complement to sous vide chicken breasts. Simply toss the veggies with olive oil, salt, and pepper, and roast them in the oven until they’re tender and slightly caramelized.
- Rice or Quinoa - A simple side of rice or quinoa can help soak up the juices from the chicken and provide a hearty base for your meal.
- Salad - A light, refreshing salad can be a great complement to rich sous vide chicken. Try a mix of greens, cherry tomatoes, and a light vinaigrette dressing.
- Mashed Potatoes - Creamy mashed potatoes are a classic side that pairs well with chicken. You can also try mashed sweet potatoes for a healthier alternative.
- Corn on the cob - Corn on the cob is a tasty and easy side dish that pairs well with sous vide chicken. Simply brush the corn with butter and grill it until it’s slightly charred.
- Pasta - A simple pasta dish, such as spaghetti or linguine with olive oil and garlic, can be a great accompaniment to the chicken.
How Long Does It Last?
Sous vide chicken breasts when properly cooked and stored in an airtight container can last for 3-4 days in the refrigerator.
More Simple Chicken Recipes
Love the convenience of using kitchen gadgets to help you make dinner? These super simple chicken recipes are ready in a flash and take just a few easy steps to make perfect every time.
- Instant Pot Butter Chicken
- Salsa Chicken
- Instant Pot BBQ Chicken
- Instant Pot Chicken Tacos
- Honey Mustard Chicken
- Chicken Pesto
- Chicken A La King
- Bang Bang Chicken
- Bacon Wrapped Chicken


Sous Vide Chicken Breast | Simple Sous Vide Chicken Breast Recipe
Ingredients
- ▢ 4 Boneless, Skinless Chicken Breasts
- ▢ 1/2 tsp Kosher Salt
- ▢ 1/4 tsp Ground Black Pepper
- ▢ 2 cloves Garlic , minced
- ▢ Lemon , sliced, for garnish
Instructions
Instant Pot Sous Vide Chicken
- Prepare the chicken. Place the chicken, along with the prepared seasonings inside an airtight bag, ensuring there is no excess air inside the bag.
- Place water in your Instant Pot. Fill your Instant Pot 1/2 to 3/4 of the way with water, enough to submerge your vacuum-sealed chicken.
- Select Sous Vide on your Instant Pot. Select this setting on your Instant Pot and follow the prompts it gives you to finish the programming for the preferred time and temperature.
- Set the sous vide temperature. Adjust the cooking temperature to reflect the texture you prefer for your chicken, according to the chart above. This will be between 140F and 160F
- Set the sous vide cook time. Again, this will vary depending on which texture you want your chicken to have when it is done cooking. This time will be between 1.5 and 4 hours.
- Press start. Once you have successfully finished programming the sous vide time and temperature, you will place the lid on the Instant Pot and walk away! While it is a longer process than cooking shredded chicken in your Instant Pot, it will yield much more tender and juicy chicken and it is incredibly easy to do.
Sous Vide Stick
- Preheat your water bath - Fill a large pot or container with water and attach your sous vide machine to the side. Set the temperature to 150°F for a moist and tender texture.
- Season the chicken - Season the chicken breasts with salt and pepper, or any other desired seasonings such as garlic powder, paprika, or thyme. For an extra boost of flavor, you can also marinate the chicken in a bag with oil and herbs for a few hours before cooking.
- Vacuum-seal the chicken - Place the seasoned chicken breasts in a vacuum-seal bag, making sure they are in a single layer and not overlapping. Seal the bag using a vacuum sealer, removing as much air as possible. If you don’t have a vacuum sealer, you can use a zip-top bag and remove the air by partially sealing it and then immersing it in water until the air is pushed out.
- Cook the chicken - Place the sealed bag of chicken in the preheated water bath and cook for 1.5-4 hours, depending on the thickness of the chicken breasts. For a perfectly cooked chicken, use a digital thermometer to ensure the internal temperature of the chicken is at least 165°F.
- Finish the chicken - Once the chicken is cooked, remove it from the bag and pat dry with paper towels. If desired, you can sear the chicken in a hot pan or on a grill for a crispy exterior. You can slice the chicken and serve it immediately, or refrigerate or freeze it for later use.
Get support & connect with our community on Facebook!
Nutrition
Don’t forget to check out my otherBest-selling Instant Pot Cookbooks!
Indian Instant Pot , Keto Instant Pot, Instant Pot Fast and Easy , Healthy Instant Pot & Vegetarian Instant Pot .

