
If you’re a fan of bold, savory flavors and crave a snack that’s crispy on the outside and packed with flavor on the inside, you’re going to love this Kimchi Pancake recipe. Known as Kimchi Jeon (김치전) in Korean, these addictive savory pancakes are a popular comfort food that’s quick, easy, and absolutely delicious.

Why You’ll Love This Spectacular Side Dish
- Fast. These come together in under 20 minutes, making them perfect for a quick lunch or snack.
- Crispy. The edges get delightfully crisp while the inside stays tender and flavorful.
- Bold Flavor. Thanks to the fermented kimchi and scallions, every bite is tangy, spicy, and satisfying.
- Pantry-Friendly. Made with common ingredients you likely already have on hand.
Whether you serve them as an appetizer, side dish, or a late-night snack, these Kimchi Pancakes are always a hit.
What Does A Kimchi Pancake Taste Like?
This kimchi pancake recipe offers a savory, spicy, and slightly sour flavor from the kimchi, balanced by a crispy batter made with flour and seasonings. They’re satisfying without being heavy and can be customized with added vegetables or proteins.
Serve them with a simple soy dipping sauce and you’ve got an umami-rich dish you’ll want to make again and again.
Are They Healthy?
Kimchi pancakes are relatively healthy, especially if made with wholesome ingredients and mindful cooking methods. They’re a flavorful, veggie-rich way to enjoy a Korean classic without going overboard on calories.
Ingredients You’ll Need
- Kimchi - The star ingredient. Use well-fermented kimchi for the best depth of flavor. Chop it into small pieces.
- All-Purpose Flour - Forms the base of the pancake batter.
- Cornstarch (Optional) - Helps increase crispiness.
- Egg - Binds the batter together.
- Cold Water - Keeps the batter light and helps crisp the edges.
- Kimchi Juice - Adds even more flavor and that signature red hue.
- Scallions - Adds freshness and a bit of sharpness.
- Sugar - Just a pinch to balance the tanginess of the kimchi.
- Sesame Oil - Adds nutty richness.
- Neutral Oil (for frying) - Use a high-heat oil like vegetable or canola.
How To Make A Kimchi Pancake
- Prepare the Batter. In a bowl, whisk together all-purpose flour, cornstarch (if using), egg, cold water, kimchi juice, and a pinch of sugar. Stir in the chopped kimchi and scallions until just combined.
- Heat the Pan. Add enough oil to a skillet to coat the bottom and heat it over medium-high heat until shimmering.
- Cook the Pancakes. Pour about ⅓ cup of the batter into the pan and spread it out into a thin circle. Fry for 2–3 minutes on each side or until golden brown and crispy.
- Drain and Serve. Remove the pancake and place it on paper towels to drain excess oil. Repeat with the remaining batter.

Tips And Tricks
Here are some tips and tricks for making perfect Kimchi Pancake that is crispy, flavorful, and satisfying every time:
- Use Fermented Kimchi. The older, the better. Fermented kimchi has a stronger flavor and gives the pancakes their signature tang.
- Cold Batter = Crispier Texture. Cold water helps create a light batter that crisps up nicely in the pan.
- Don’t Overcrowd the Pan. Cook one pancake at a time to ensure even browning.
- Thin is Best. Spread the batter thinly for maximum crispiness.
- Double the Recipe. These go fast! Make extra and reheat in a pan to bring back the crisp.
Variations
Want to put your own twist on classic kimchi pancakes? Try one of these variations:
- Seafood - Add chopped shrimp or squid for a protein boost.
- Cheese - Stir in shredded mozzarella for a gooey fusion version.
- Vegan Version - Omit the egg and use water + 1 tbsp ground flaxseed as a binder.
- Spicy Kick - Mix in a bit of gochugaru (Korean chili flakes) for extra heat.
What To Eat With Kimchi Pancakes
Kimchi pancakes are amazing on their own, but even better with:
- Soy Dipping Sauce - Mix soy sauce, rice vinegar, a dash of sesame oil, and a sprinkle of sesame seeds.
- Korean Pickles - Light and tangy banchan to balance the richness.
- Miso Soup - A warm, comforting addition to the table.
- Bibimbap or Korean BBQ - Serve as part of a larger Korean meal spread.
How Long Do They Last?
Store leftover kimchi pancakes in the refrigerator for up to 3 days. To reheat, place in a skillet with a splash of oil over medium heat until warmed through and crisp again. Avoid microwaving, as it can make them soggy.
Can You Freeze Them?
Yes! Once cooled, stack them between layers of parchment paper and freeze in a sealed bag for up to 1 month. Reheat in a pan or air fryer for best results.
More Korean-Inspired Dishes
- Korean Beef Bowls
- Cucumber Kimchi
- Korean Cucumber Salad
- Gochujang Chicken
- Korean Beef Tacos


Kimchi Pancake Recipe | Crispy Korean Kimchi Jeon
Ingredients
- ▢ 1 1/2 cups Kimchi
- ▢ 3/4 cup All Purpose Flour
- ▢ 2 tbsp Cornstarch
- ▢ 1 Egg
- ▢ 1/3 cup Cold Water
- ▢ 1/3 cup Kimchi Juice
- ▢ 2 Scallions , chopped
- ▢ 1/2 tsp Sugar
- ▢ 1 tsp Sesame Oil
- ▢ 1 tbsp Vegetable Oil , for frying
Instructions
- Prepare the Batter. In a bowl, whisk together all-purpose flour, cornstarch (if using), egg, cold water, kimchi juice, and a pinch of sugar. Stir in the chopped kimchi and scallions until just combined.
- Heat the Pan. Add enough oil to a skillet to coat the bottom and heat it over medium-high heat until shimmering.
- Cook the Pancakes. Pour about ⅓ cup of the batter into the pan and spread it out into a thin circle. Fry for 2–3 minutes on each side or until golden brown and crispy.
- Drain and Serve. Remove the pancake and place it on paper towels to drain excess oil. Repeat with the remaining batter.
Get support & connect with our community on Facebook!
Nutrition

If you already signed up, you should have received an email with a password to give you unlimited access to our FREE Printable Library. The password is case sensitive. Enter it below and get printing!
Password:

Kimchi Pancake Recipe | Crispy Korean Kimchi Jeon
Ingredients
- 1 1/2 cups Kimchi
- 3/4 cup All Purpose Flour
- 2 tbsp Cornstarch
- 1 Egg
- 1/3 cup Cold Water
- 1/3 cup Kimchi Juice
- 2 Scallions chopped
- 1/2 tsp Sugar
- 1 tsp Sesame Oil
- 1 tbsp Vegetable Oil for frying
Instructions
- Prepare the Batter. In a bowl, whisk together all-purpose flour, cornstarch (if using), egg, cold water, kimchi juice, and a pinch of sugar. Stir in the chopped kimchi and scallions until just combined.
- Heat the Pan. Add enough oil to a skillet to coat the bottom and heat it over medium-high heat until shimmering.
- Cook the Pancakes. Pour about ⅓ cup of the batter into the pan and spread it out into a thin circle. Fry for 2–3 minutes on each side or until golden brown and crispy.
- Drain and Serve. Remove the pancake and place it on paper towels to drain excess oil. Repeat with the remaining batter.
Kimchi Pancake Recipe | Crispy Korean Kimchi Jeon https://twosleevers.com/kimchi-pancake-recipe/

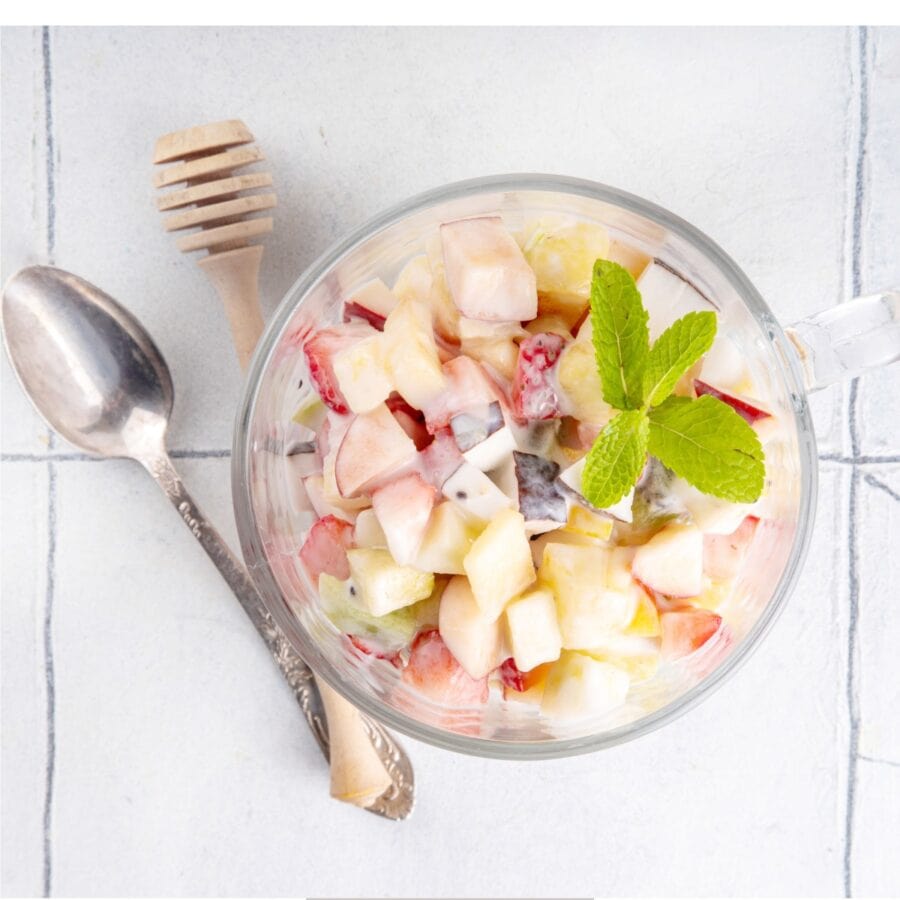
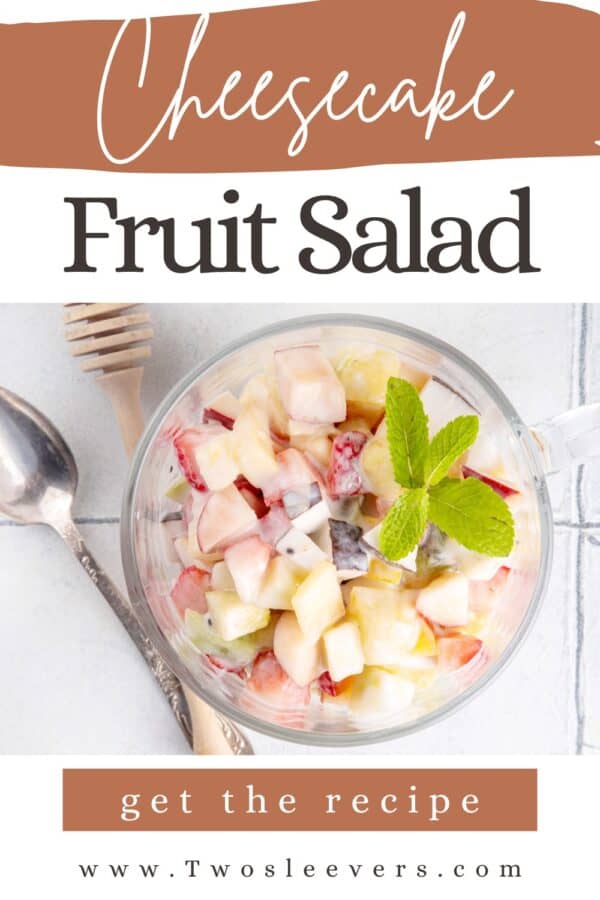
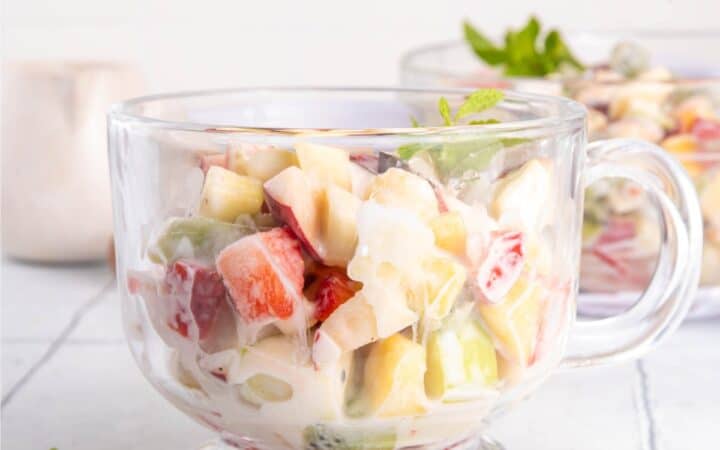
If you’re looking for a refreshing, sweet, and creamy dessert that’s sure to be a crowd-pleaser, this Cheesecake Fruit Salad is for you! Imagine all of your favorite fruits mixed with a smooth and velvety cheesecake-inspired dressing. Delicious, right?
Why You’ll Love This Delicious Dessert
- Super Easy to Make . With just a few ingredients and a quick mix, you’ll have this cheesecake fruit salad ready in no time.
- Perfectly Creamy . The cheesecake-flavored dressing gives this fruit salad a rich, smooth texture that everyone will love.
- Versatile . You can use any fruits you like, from berries to tropical fruits. It’s a great way to use up what you have in the fridge!
- Great for Any Occasion . Whether you’re hosting a spring BBQ, a summer picnic, or a holiday dinner, this fruit salad will steal the show!
This easy-to-make fruit salad has everything you need: sweetness, creaminess, and a burst of fruity freshness. It’s perfect for any occasion, from picnics to potlucks and holiday gatherings.
What Does Cheesecake Fruit Salad Taste Like?
This cheesecake fruit salad is a delightful balance of sweetness and tanginess. The fruits add a burst of freshness, while the cheesecake dressing is indulgent and creamy, creating a rich yet refreshing taste.
The soft, smooth texture of the dressing pairs beautifully with the crispness of the fruit, making every bite a perfect combination of flavors. With its creamy, slightly sweet, and fruity layers, this dessert will remind you of a classic cheesecake but in fruit salad form!
Ingredients You’ll Need
- Cream Cheese - Cream cheese serves as the base for the creamy cheesecake-like dressing. It adds richness and tanginess, which balances the sweetness of the fruits.
- Whipped Topping - This lightens the creamy dressing, making it fluffy and airy while keeping the texture smooth and creamy.
- Greek Yogurt - Greek yogurt provides an extra layer of tanginess and helps thicken the dressing without adding too much sweetness.
- Granulated Sugar - A touch of sugar sweetens the dressing to complement the natural sweetness of the fruit.
- Vanilla Extract - Vanilla adds a comforting, aromatic flavor that elevates the richness of the cheesecake dressing.
- Mixed Fresh Fruit - The star of the show! Choose fruits like strawberries, blueberries, pineapple, grapes, and peaches. You can customize based on what’s in season or your personal preferences.
- Honey (optional) - For extra sweetness, a drizzle of honey can be added to the dressing or over the fruit.
How To Make Cheesecake Fruit Salad
- Prepare the Cheesecake Dressing . Start by placing the softened cream cheese in a mixing bowl. Add the Greek yogurt, granulated sugar, and vanilla extract. Using a hand mixer or stand mixer, beat everything together until the mixture is smooth and creamy. Slowly fold in the whipped topping and mix until combined. This is the creamy cheesecake filling for your fruit salad!
- Prepare the Fruit . While the cheesecake dressing is coming together, wash and chop your fresh fruit into bite-sized pieces. You can mix and match any fruits you like, but we recommend a combination of berries, grapes, and tropical fruits like pineapple for a refreshing twist. Once the fruit is prepped, set it aside.
- Combine the Fruit and Dressing . In a large bowl, gently fold the prepared fruit into the cheesecake dressing. Be careful not to mash the fruit. Just mix until everything is coated with the creamy dressing.
- Chill the Salad . Once everything is combined, cover the bowl and refrigerate the fruit salad for at least 1 hour to allow the flavors to meld together. This also allows the cheesecake dressing to thicken slightly, making it even creamier.
- Serve and Enjoy . Once chilled, your cheesecake fruit salad is ready to serve! You can garnish it with extra fresh fruit on top or a sprinkle of cinnamon if desired. This dessert is best enjoyed cold, so keep it in the fridge until ready to serve.

Tips And Tricks
- Use Fresh Fruit . Fresh fruit works best in this salad, but if you’re in a pinch, you can use frozen fruit. Just make sure to thaw and drain it well to avoid excess liquid in the salad.
- Adjust Sweetness . If you prefer a sweeter dressing, add a little extra sugar or honey. On the flip side, you can also adjust the tanginess by adding more yogurt or cream cheese.
- Don’t Overmix . When combining the fruit and the dressing, mix gently so the fruit doesn’t get mashed or squished.
Variations
Here are some delicious variations you can try when making Cheesecake Fruit Salad to customize the flavor profile and texture to your liking:
- Berry - Focus on berries like strawberries, blueberries, raspberries, and blackberries for a tangy, sweet dessert.
- Tropical - Use tropical fruits such as pineapple, mango, and kiwi for a fun, vacation-inspired twist.
- Add Marshmallows - For a fluffier texture and more sweetness, stir in some mini marshmallows. They’re a classic addition to fruit salads.
- Coconut - Add shredded coconut to the fruit and dressing to bring a tropical flair to your salad.
What To Enjoy With Cheesecake Fruit Salad
This creamy fruit salad is perfect on its own, but if you want to make it even more decadent, serve it with:
- Whipped Cream - A dollop of whipped cream on top will make the dessert even more indulgent.
- Fresh Baked Biscuits or Scones - Serve with some warm, flaky biscuits or scones for a brunch-worthy pairing.
- Ice Cream - For a truly indulgent treat, serve your fruit salad with a scoop of vanilla or coconut ice cream.
How Long Does It Last?
This fruit salad can be stored in the refrigerator in an airtight container for up to 3 days. The fruit will start to release some liquid, so it’s best enjoyed within that time frame for the best texture.
Can You Freeze It?
While you can technically freeze the cheesecake fruit salad, the texture of the fruit will change once thawed, and the dressing may separate. It’s best served fresh or stored in the fridge for a few days.
More Sweet Treats
- Chocolate Chip Scones
- Texas Sheet Cake
- Lemonade Pie
- Peach Crisp
- Mini Cheesecakes
- Zucchini Cake
- Blackberry Crisp
Cheesecake Fruit Salad Recipe | Creamy Fruit Salad
Ingredients
- ▢ 4 ounces Cream Cheese
- ▢ 1/2 cup Whipped Topping
- ▢ 1/4 cup Greek Yogurt
- ▢ 2 tbsp Granulated Sugar
- ▢ 1/2 tsp Vanilla Extract
- ▢ 1 cup Strawberries
- ▢ 1 cup Blueberries
- ▢ 1 cup Pineapple , diced
- ▢ 1 cup Grapes
- ▢ 1 cup Apples , diced
- ▢ 1 cup Peaches , diced
- ▢ 1 tbsp Honey
Instructions
- Prepare the Cheesecake Dressing . Start by placing the softened cream cheese in a mixing bowl. Add the Greek yogurt, granulated sugar, and vanilla extract. Using a hand mixer or stand mixer, beat everything together until the mixture is smooth and creamy. Slowly fold in the whipped topping and mix until combined. This is the creamy cheesecake filling for your fruit salad!
- Prepare the Fruit . While the cheesecake dressing is coming together, wash and chop your fresh fruit into bite-sized pieces. You can mix and match any fruits you like, but we recommend a combination of berries, grapes, and tropical fruits like pineapple for a refreshing twist. Once the fruit is prepped, set it aside.
- Combine the Fruit and Dressing . In a large bowl, gently fold the prepared fruit into the cheesecake dressing. Be careful not to mash the fruit. Just mix until everything is coated with the creamy dressing.
- Chill the Salad . Once everything is combined, cover the bowl and refrigerate the fruit salad for at least 1 hour to allow the flavors to meld together. This also allows the cheesecake dressing to thicken slightly, making it even creamier.
- Serve and Enjoy . Once chilled, your cheesecake fruit salad is ready to serve! You can garnish it with extra fresh fruit on top or a sprinkle of cinnamon if desired. This dessert is best enjoyed cold, so keep it in the fridge until ready to serve.
