
Nut and Seed Bread is a keto, gluten-free loaf made with a mix of whole nuts and seeds (like pistachios, almonds, flax seed, walnuts, sesame seeds, and cashews) plus eggs, oil, and salt. It’s quick and works well for a low-carb, gluten-free, yeast-free breakfast or snack (especially sliced and toasted). Unlike traditional bread recipes that rely on flour and yeast, this version is “bread-ish” but sturdy because it’s held together by flax and eggs. No flour, no leavening, just nuts-and-seeds goodness.
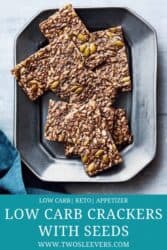
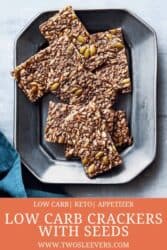
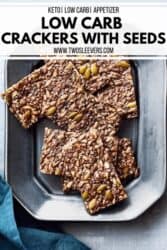
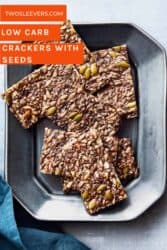
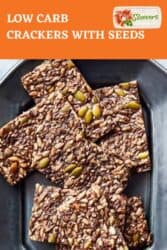
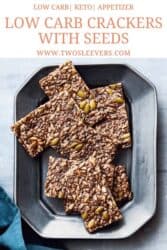
One of the hardest things to find a good alternative for when on a keto diet is crackers and chips. They’re both high carb snacks , but are easily one of the most popular and addictive snacks out there.
So this got me thinking, “How can I recreate the deliciousness of crackers while keeping the carb count low?” After much deliberation, I came up with this unbelievably satisfying Healthy Crackers with Seeds recipe.
What Makes These Low Carb Crackers So Good?
- Gluten Free . These are great to make for anyone with food allergies.
- Low Carb . Only 1 net carb per serving.
- Full of Fiber. 5 grams of fiber per serving.
- Great For Dipping. The perfect cripsy, crunchy vessel to use with your favorite dip recipe.
- Filling. With 10g of fat per serving, these will keep you fuller, longer.
What Kind Of Crackers Can You Eat On Keto?
Most of the crackers you will find in your local grocery store will be LOADED with carbs and should be avoided if you’re living a low carb lifestyle. My advice? Give this keto cracker recipe a try.
They’re super simple to make, low carb, and delicious. Best of all? They actually taste like crackers. Forget the days of trying to eat your favorite dip on a lackluster replacement or making charcuterie trays with veggies and meat only.
What Is In These Healthy Crackers?
If you’ve been eating low carb for any length of time, you likely already have these ingredients on hand. However, if you’re just getting started and want to make the perfect go-to snack, here’s what you’ll need:
- 2 cups Water
- 3 TBSP psyllium husk powder
- 1/2 tsp Kosher Salt
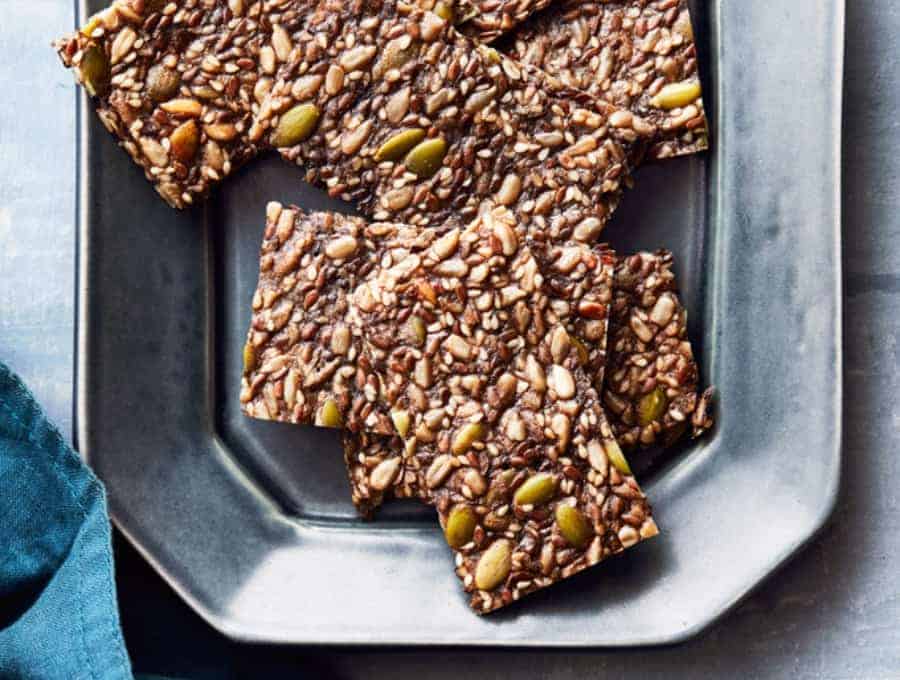
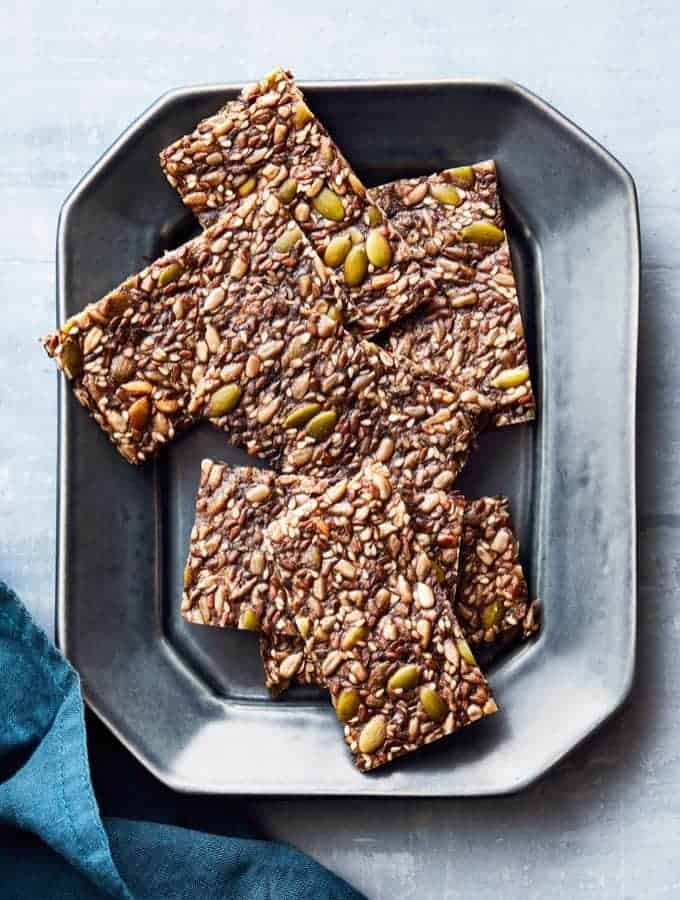
- 2 Cups Mixed seeds, for example (The ones I used are listed below) Sunflower Seeds pumpkin seeds flax seeds Sesame Seeds
How to Make This Keto Crackers Recipe
- Pour 2 cups of tap water into a mixing bowl . Add in the psyllium husk powder, a little at a time, whisking all the while.
- Once all the lumps are dissolved, add the salt and then the seeds. Stir well.
- Let the mixture rest for about 10-15 minutes. This gives the psyllium a chance to gel. At this point, you may need to add more seeds.
- Preheat your oven to 350F while allowing the mixture to rest.
- Grease an 18 x 13-inch pan . Alternatively, you can also place a silicone mat on the pan to prevent the mixture from sticking.
- Once the mixture has gelled, spread it as thinly and evenly as you can on the mat.
- Place in the oven and set the timer to 30 minutes.
- When the timer goes off, remove the pan and use a pizza cutter or a sharp knife to score the mixture into cracker shapes.
- Put them back in the oven for another 15 minutes. Your crackers will likely take between 45-60 minutes to crisp up. Seeds burn easily, so you will have to watch them after the timer goes off.
- Once they’re done, remove and break along the scored lines. Allow the keto crackers to cool and then put them in a sealed container. Enjoy them whenever you get the craving for something crunchy and low carb!
Variations To Try
In this keto cracker recipe, I give you the seeds I used to make this specific batch, but you could also use whatever seeds you have on hand (or prefer the taste of best). I liked mixing up the size of the seeds I used to make these, and I really like the consistency of the cracker.
Tips and Tricks
Making keto nut and seed crackers at home is a simple way to enjoy a crunchy, low-carb snack that’s both healthy and satisfying. To help you get the best results, here are some tips and tricks:
- It’s important that you have the right amount of psyllium husk powder. This is what forms the gel and is what allows it to turn into a nice cracker.
- Make sure to pat out the mixture as thin as you can . Not only will it speed up the cooking process, but it also makes it more likely to get crispy, which is exactly what we want.
- Make sure to give it plenty of time to crisp up after it is done baking. No gobbling it while it’s still hot!
- Though you can use whatever seeds you like, it’s important that you use seeds that are on the small side (like sesame seeds, hemp seeds, etc). This is not a good place to put in almonds and cashews and the such. If you have larger nuts and seeds, check out my Nut and Seed Bread recipe !
How Long Do They Last?
These Keto Crackers will last for up to two weeks if you keep them in an airtight container. It’s a good excuse to put an old cookie jar to use!
Can You Freeze Them?
Yes, you can freeze keto crackers made with nuts and seeds, and it’s actually a good way to extend their shelf life.
They’ll keep well in the freezer for up to 2–3 months. When ready to enjoy, you can thaw them at room temperature, or pop them into a low oven or air fryer for a few minutes to crisp them back up.
What Should You Dip These Keto Crackers In?
- Lebanese Muhammara - Delectably low carb roasted pepper dip that goes really well with these crackers.
- Keto Savory Thyme Dip - It’s crazy simple and so, so good.
- Sugar free Jam - a sweet take on a low carb dip.
- Buffalo Chicken Casserole - A spicy favorite perfect for dipping.
- Baingan Bharta - Try eggplant in the most delicious way.
- Persian Beet Dip - As beautiful as it is delicious.
- Spicy Crab Dip - satisfy your seafood cravings.
- Low Carb Spinach Dip - Like your favorite takeout version, just without the carbs.
- Charcuterie Board - Stack these on a yummy low carb charcuterie board for a nice crunch.
If your keto crackers aren’t crispy and keep coming out soft, it’s almost always because the dough was rolled too thick or uneven, there was too much moisture, or they weren’t baked long enough to fully dry. For crispy keto crackers, roll to about 1/8 inch, dock holes so they don’t puff, bake until the edges are well set, and let them cool completely (they crisp as they cool). If they’re still bendy, do a short second “drying” bake or re-crisp in the oven/air fryer for a few minutes, and store airtight so humidity doesn’t turn them chewy again.
Often, yes. Keto seed crackers (made with chia, flaxseed meal, sesame, sunflower, etc.) can be lower in net carbs than almond flour crackers because seeds typically bring more fiber per serving, which reduces net carbs. That said, the real answer depends on the exact recipe ratios (some almond-flour crackers use a lot of cheese or psyllium and end up very low net carb too), so the best move is to calculate net carbs per serving for your batch and watch add-ins like honey/sweeteners or starchy seasonings.
For crispy keto crackers, parchment paper is usually better than a silicone mat because parchment lets a bit more moisture escape, helping the crackers dry out and get that clean “snap." Silicone can trap steam and leave the bottoms slightly softer. That said, a silicone mat can still work if you roll the dough very thin (about 1/8 inch) and you flip the sheet halfway or do a short second “drying” bake. So, if your keto crackers aren’t crispy, switching to parchment is an easy win.
Yes, you can double a keto crackers recipe easily. Just mix a larger batch and bake in multiple thin, evenly rolled sheets rather than trying to crowd one pan, since thickness is what makes keto crackers crispy (not soft). Use two baking sheets (or bake in rounds), rotate pans halfway for even drying, and keep the dough around 1/8 inch so the crackers bake at the same rate. Then cool them completely and store airtight to keep them crunchy.
For the best thickness for crispy keto crackers, roll the dough very thin. Aim for bout 1/8 inch (3 mm) for a snappy, crunchy cracker, and go closer to 1/16 inch if you want extra-crispy “chip-like” results (just watch for browning). If your keto crackers aren’t crispy, they’re usually too thick or uneven, so aim for a uniform sheet, dock holes to prevent puffing, and bake until dry. Then let them cool completely to set (you can also do a short second “drying” bake to lock in crunch).
Keto Crackers | Low Carb Crackers with Seeds
Equipment
- HALF SHEET BAKING PAN
Ingredients
- ▢ 2 cups ( 500 g ) Water
- ▢ 3 tablespoons ( 3 tablespoons ) psyllium husk powder
- ▢ 1/2 teaspoon ( 0.5 teaspoon ) Kosher Salt
- ▢ 2 cups ( 280 g ) Mixed seeds for example
- ▢ 1 cup ( 218 g ) Sunflower Seeds
- ▢ 1/2 cup ( 32 g ) pumpkin seeds
- ▢ 1/3 cup ( 56 g ) flax seeds
- ▢ 1/3 cup ( 50 g ) Sesame Seeds
Instructions
- Into a large mixing bowl, pour in 2 cups of tap water.
- A little at a time, mix in the psyllium husk powder, whisking all the time. Do not use hot water. Do not put in powder first and then try to add water #askmehowiknow
- When all lumps are dissolved, add the salt and then the seeds. Stir well.
- Depending on your husk powder, you may need to add a few more seeds. But before you do that, just let it rest for about 10-15 minutes. This gives the psyllium a chance to gel.
- Heat oven to 350F while it is resting.
- Grease an 18 x 13-inch pan or use a silicone mat to prevent the mixture from sticking.
- Once the mixture has gelled, spread it as thinly and evenly as you can on the mat. I found it handy to have a small bowl of water that I could dip my fingers into from time to time to reduce the sticky factor.
- Place in the oven and set a timer to 30 minutes.
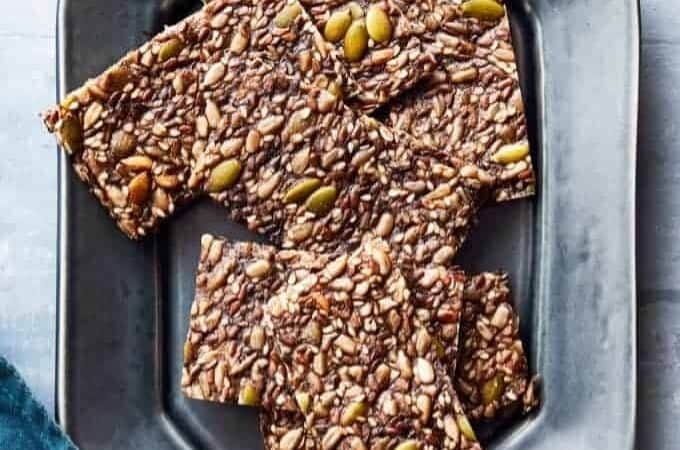
- When the timer goes off, remove the pan. Use a pizza cutter or a sharp knife to score the mixture into cracker shapes. I scored 4 long strips and 8 short strips for a total of 32 crackers.
- Put them back in the oven and set the timer for 15 minutes. Your crackers will likely take between 45-60 minutes to crisp up. Seeds burn easily, so you will have to watch them after the timer goes off. You’re aiming for crisp crackers, but keep in mind they continue to cook a little when you get them out of the oven.
- Once they’re done, remove and break along the scored lines. Allow them to cool and then put them in a sealed container. Enjoy them whenever you get the craving for something crunchy and low carb!
- It’s important that you have the right amount of psyllium husk powder. This is what forms the gel and is what allows it to turn into a nice cracker.
- Make sure to pat out the mixture as thin as you can . Not only will it speed up the cooking process, but it also makes it more likely to get crispy, which is exactly what we want.
- Make sure to give it plenty of time to crisp up after it is done baking. No gobbling it while it’s still hot!
- Though you can use whatever seeds you like, it’s important that you use seeds that are on the small side (like sesame seeds, hemp seeds, etc). This is not a good place to put in almonds and cashews and the such. If you have larger nuts and seeds, check out my Nut and Seed Bread recipe !
- These will keep for about a week or two if you store them in a cookie jar. Coincidentally, keeping these crackers in a cookie jar is also why my kids have trust issues 😂
- I counted 4 crackers as a serving, out of 32 crackers.
- Your macros will vary depending on what types of seeds and nuts you use.
- To calculate macros for this recipe I used the seeds I specified, but you can use whatever you like.
Get support & connect with our community on Facebook!
Nutrition
Don’t forget to check out my other Ketocookbooks.
Keto Instant Pot, Keto Fat Bombs, Sweets, & Treats , and Easy keto in 30 minutes.

Nut and Seed Bread is a keto, gluten-free loaf made with a mix of whole nuts and seeds (like pistachios, almonds, flax seed, walnuts, sesame seeds, and cashews) plus eggs, oil, and salt. It’s quick and works well for a low-carb, gluten-free, yeast-free breakfast or snack (especially sliced and toasted). Unlike traditional bread recipes that rely on flour and yeast, this version is “bread-ish” but sturdy because it’s held together by flax and eggs. No flour, no leavening, just nuts-and-seeds goodness.
One of the hardest things to find a good alternative for when on a keto diet is crackers and chips. They’re both high carb snacks , but are easily one of the most popular and addictive snacks out there.
So this got me thinking, “How can I recreate the deliciousness of crackers while keeping the carb count low?” After much deliberation, I came up with this unbelievably satisfying Healthy Crackers with Seeds recipe.
What Makes These Low Carb Crackers So Good?
- Gluten Free . These are great to make for anyone with food allergies.
- Low Carb . Only 1 net carb per serving.
- Full of Fiber. 5 grams of fiber per serving.
- Great For Dipping. The perfect cripsy, crunchy vessel to use with your favorite dip recipe.
- Filling. With 10g of fat per serving, these will keep you fuller, longer.
What Kind Of Crackers Can You Eat On Keto?
Most of the crackers you will find in your local grocery store will be LOADED with carbs and should be avoided if you’re living a low carb lifestyle. My advice? Give this keto cracker recipe a try.
They’re super simple to make, low carb, and delicious. Best of all? They actually taste like crackers. Forget the days of trying to eat your favorite dip on a lackluster replacement or making charcuterie trays with veggies and meat only.
What Is In These Healthy Crackers?
If you’ve been eating low carb for any length of time, you likely already have these ingredients on hand. However, if you’re just getting started and want to make the perfect go-to snack, here’s what you’ll need:
- 2 cups Water
- 3 TBSP psyllium husk powder
- 1/2 tsp Kosher Salt
- 2 Cups Mixed seeds, for example (The ones I used are listed below) Sunflower Seeds pumpkin seeds flax seeds Sesame Seeds
How to Make This Keto Crackers Recipe
- Pour 2 cups of tap water into a mixing bowl . Add in the psyllium husk powder, a little at a time, whisking all the while.
- Once all the lumps are dissolved, add the salt and then the seeds. Stir well.
- Let the mixture rest for about 10-15 minutes. This gives the psyllium a chance to gel. At this point, you may need to add more seeds.
- Preheat your oven to 350F while allowing the mixture to rest.
- Grease an 18 x 13-inch pan . Alternatively, you can also place a silicone mat on the pan to prevent the mixture from sticking.
- Once the mixture has gelled, spread it as thinly and evenly as you can on the mat.
- Place in the oven and set the timer to 30 minutes.
- When the timer goes off, remove the pan and use a pizza cutter or a sharp knife to score the mixture into cracker shapes.
- Put them back in the oven for another 15 minutes. Your crackers will likely take between 45-60 minutes to crisp up. Seeds burn easily, so you will have to watch them after the timer goes off.
- Once they’re done, remove and break along the scored lines. Allow the keto crackers to cool and then put them in a sealed container. Enjoy them whenever you get the craving for something crunchy and low carb!
Variations To Try
In this keto cracker recipe, I give you the seeds I used to make this specific batch, but you could also use whatever seeds you have on hand (or prefer the taste of best). I liked mixing up the size of the seeds I used to make these, and I really like the consistency of the cracker.
Tips and Tricks
Making keto nut and seed crackers at home is a simple way to enjoy a crunchy, low-carb snack that’s both healthy and satisfying. To help you get the best results, here are some tips and tricks:
- It’s important that you have the right amount of psyllium husk powder. This is what forms the gel and is what allows it to turn into a nice cracker.
- Make sure to pat out the mixture as thin as you can . Not only will it speed up the cooking process, but it also makes it more likely to get crispy, which is exactly what we want.
- Make sure to give it plenty of time to crisp up after it is done baking. No gobbling it while it’s still hot!
- Though you can use whatever seeds you like, it’s important that you use seeds that are on the small side (like sesame seeds, hemp seeds, etc). This is not a good place to put in almonds and cashews and the such. If you have larger nuts and seeds, check out my Nut and Seed Bread recipe !
How Long Do They Last?
These Keto Crackers will last for up to two weeks if you keep them in an airtight container. It’s a good excuse to put an old cookie jar to use!
Can You Freeze Them?
Yes, you can freeze keto crackers made with nuts and seeds, and it’s actually a good way to extend their shelf life.
They’ll keep well in the freezer for up to 2–3 months. When ready to enjoy, you can thaw them at room temperature, or pop them into a low oven or air fryer for a few minutes to crisp them back up.
What Should You Dip These Keto Crackers In?
- Lebanese Muhammara - Delectably low carb roasted pepper dip that goes really well with these crackers.
- Keto Savory Thyme Dip - It’s crazy simple and so, so good.
- Sugar free Jam - a sweet take on a low carb dip.
- Buffalo Chicken Casserole - A spicy favorite perfect for dipping.
- Baingan Bharta - Try eggplant in the most delicious way.
- Persian Beet Dip - As beautiful as it is delicious.
- Spicy Crab Dip - satisfy your seafood cravings.
- Low Carb Spinach Dip - Like your favorite takeout version, just without the carbs.
- Charcuterie Board - Stack these on a yummy low carb charcuterie board for a nice crunch.
If your keto crackers aren’t crispy and keep coming out soft, it’s almost always because the dough was rolled too thick or uneven, there was too much moisture, or they weren’t baked long enough to fully dry. For crispy keto crackers, roll to about 1/8 inch, dock holes so they don’t puff, bake until the edges are well set, and let them cool completely (they crisp as they cool). If they’re still bendy, do a short second “drying” bake or re-crisp in the oven/air fryer for a few minutes, and store airtight so humidity doesn’t turn them chewy again.
Often, yes. Keto seed crackers (made with chia, flaxseed meal, sesame, sunflower, etc.) can be lower in net carbs than almond flour crackers because seeds typically bring more fiber per serving, which reduces net carbs. That said, the real answer depends on the exact recipe ratios (some almond-flour crackers use a lot of cheese or psyllium and end up very low net carb too), so the best move is to calculate net carbs per serving for your batch and watch add-ins like honey/sweeteners or starchy seasonings.
For crispy keto crackers, parchment paper is usually better than a silicone mat because parchment lets a bit more moisture escape, helping the crackers dry out and get that clean “snap." Silicone can trap steam and leave the bottoms slightly softer. That said, a silicone mat can still work if you roll the dough very thin (about 1/8 inch) and you flip the sheet halfway or do a short second “drying” bake. So, if your keto crackers aren’t crispy, switching to parchment is an easy win.
Yes, you can double a keto crackers recipe easily. Just mix a larger batch and bake in multiple thin, evenly rolled sheets rather than trying to crowd one pan, since thickness is what makes keto crackers crispy (not soft). Use two baking sheets (or bake in rounds), rotate pans halfway for even drying, and keep the dough around 1/8 inch so the crackers bake at the same rate. Then cool them completely and store airtight to keep them crunchy.
For the best thickness for crispy keto crackers, roll the dough very thin. Aim for bout 1/8 inch (3 mm) for a snappy, crunchy cracker, and go closer to 1/16 inch if you want extra-crispy “chip-like” results (just watch for browning). If your keto crackers aren’t crispy, they’re usually too thick or uneven, so aim for a uniform sheet, dock holes to prevent puffing, and bake until dry. Then let them cool completely to set (you can also do a short second “drying” bake to lock in crunch).
Keto Crackers | Low Carb Crackers with Seeds
Equipment
- HALF SHEET BAKING PAN
Ingredients
- ▢ 2 cups ( 500 g ) Water
- ▢ 3 tablespoons ( 3 tablespoons ) psyllium husk powder
- ▢ 1/2 teaspoon ( 0.5 teaspoon ) Kosher Salt
- ▢ 2 cups ( 280 g ) Mixed seeds for example
- ▢ 1 cup ( 218 g ) Sunflower Seeds
- ▢ 1/2 cup ( 32 g ) pumpkin seeds
- ▢ 1/3 cup ( 56 g ) flax seeds
- ▢ 1/3 cup ( 50 g ) Sesame Seeds
Instructions
- Into a large mixing bowl, pour in 2 cups of tap water.
- A little at a time, mix in the psyllium husk powder, whisking all the time. Do not use hot water. Do not put in powder first and then try to add water #askmehowiknow
- When all lumps are dissolved, add the salt and then the seeds. Stir well.
- Depending on your husk powder, you may need to add a few more seeds. But before you do that, just let it rest for about 10-15 minutes. This gives the psyllium a chance to gel.
- Heat oven to 350F while it is resting.
- Grease an 18 x 13-inch pan or use a silicone mat to prevent the mixture from sticking.
- Once the mixture has gelled, spread it as thinly and evenly as you can on the mat. I found it handy to have a small bowl of water that I could dip my fingers into from time to time to reduce the sticky factor.
- Place in the oven and set a timer to 30 minutes.
- When the timer goes off, remove the pan. Use a pizza cutter or a sharp knife to score the mixture into cracker shapes. I scored 4 long strips and 8 short strips for a total of 32 crackers.
- Put them back in the oven and set the timer for 15 minutes. Your crackers will likely take between 45-60 minutes to crisp up. Seeds burn easily, so you will have to watch them after the timer goes off. You’re aiming for crisp crackers, but keep in mind they continue to cook a little when you get them out of the oven.
- Once they’re done, remove and break along the scored lines. Allow them to cool and then put them in a sealed container. Enjoy them whenever you get the craving for something crunchy and low carb!
- It’s important that you have the right amount of psyllium husk powder. This is what forms the gel and is what allows it to turn into a nice cracker.
- Make sure to pat out the mixture as thin as you can . Not only will it speed up the cooking process, but it also makes it more likely to get crispy, which is exactly what we want.
- Make sure to give it plenty of time to crisp up after it is done baking. No gobbling it while it’s still hot!
- Though you can use whatever seeds you like, it’s important that you use seeds that are on the small side (like sesame seeds, hemp seeds, etc). This is not a good place to put in almonds and cashews and the such. If you have larger nuts and seeds, check out my Nut and Seed Bread recipe !
- These will keep for about a week or two if you store them in a cookie jar. Coincidentally, keeping these crackers in a cookie jar is also why my kids have trust issues 😂
- I counted 4 crackers as a serving, out of 32 crackers.
- Your macros will vary depending on what types of seeds and nuts you use.
- To calculate macros for this recipe I used the seeds I specified, but you can use whatever you like.
Get support & connect with our community on Facebook!
Nutrition
Don’t forget to check out my other Ketocookbooks.
Keto Instant Pot, Keto Fat Bombs, Sweets, & Treats , and Easy keto in 30 minutes.

If you already signed up, you should have received an email with a password to give you unlimited access to our FREE Printable Library. The password is case sensitive. Enter it below and get printing!
Password:
Keto Crackers | Low Carb Crackers with Seeds
Ingredients
- 2 cups Water
- 3 tablespoons psyllium husk powder
- 1/2 teaspoon Kosher Salt
- 2 cups Mixed seeds for example
- 1 cup Sunflower Seeds
- 1/2 cup pumpkin seeds
- 1/3 cup flax seeds
- 1/3 cup Sesame Seeds
Instructions
- Into a large mixing bowl, pour in 2 cups of tap water.
- A little at a time, mix in the psyllium husk powder, whisking all the time. Do not use hot water. Do not put in powder first and then try to add water #askmehowiknow
- When all lumps are dissolved, add the salt and then the seeds. Stir well.
- Depending on your husk powder, you may need to add a few more seeds. But before you do that, just let it rest for about 10-15 minutes. This gives the psyllium a chance to gel.
- Heat oven to 350F while it is resting.
- Grease an 18 x 13-inch pan or use a silicone mat to prevent the mixture from sticking.
- Once the mixture has gelled, spread it as thinly and evenly as you can on the mat. I found it handy to have a small bowl of water that I could dip my fingers into from time to time to reduce the sticky factor.
- Place in the oven and set a timer to 30 minutes.
- When the timer goes off, remove the pan. Use a pizza cutter or a sharp knife to score the mixture into cracker shapes. I scored 4 long strips and 8 short strips for a total of 32 crackers.
- Put them back in the oven and set the timer for 15 minutes. Your crackers will likely take between 45-60 minutes to crisp up. Seeds burn easily, so you will have to watch them after the timer goes off. You’re aiming for crisp crackers, but keep in mind they continue to cook a little when you get them out of the oven.
- Once they’re done, remove and break along the scored lines. Allow them to cool and then put them in a sealed container. Enjoy them whenever you get the craving for something crunchy and low carb!
- It’s important that you have the right amount of psyllium husk powder. This is what forms the gel and is what allows it to turn into a nice cracker.
- Make sure to pat out the mixture as thin as you can . Not only will it speed up the cooking process, but it also makes it more likely to get crispy, which is exactly what we want.
- Make sure to give it plenty of time to crisp up after it is done baking. No gobbling it while it’s still hot!
- Though you can use whatever seeds you like, it’s important that you use seeds that are on the small side (like sesame seeds, hemp seeds, etc). This is not a good place to put in almonds and cashews and the such. If you have larger nuts and seeds, check out my Nut and Seed Bread recipe !
- These will keep for about a week or two if you store them in a cookie jar. Coincidentally, keeping these crackers in a cookie jar is also why my kids have trust issues 😂
- I counted 4 crackers as a serving, out of 32 crackers.
- Your macros will vary depending on what types of seeds and nuts you use.
- To calculate macros for this recipe I used the seeds I specified, but you can use whatever you like.
Keto Crackers | Low Carb Crackers with Seeds https://twosleevers.com/keto-low-carb-crackers-with-seeds/


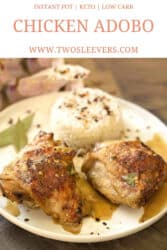

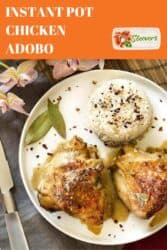


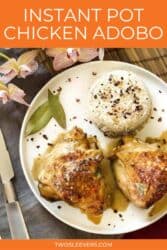


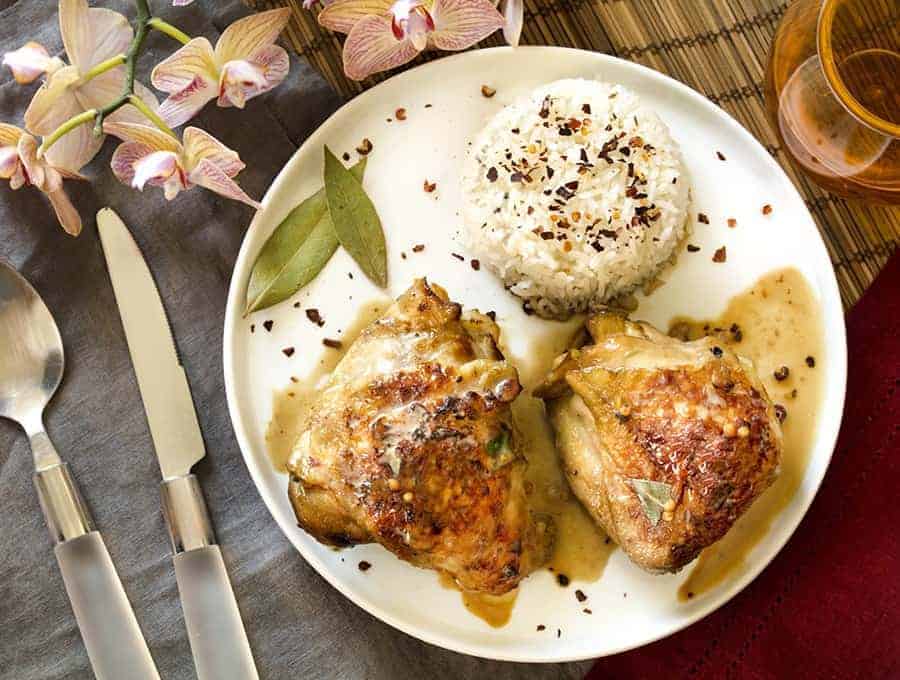
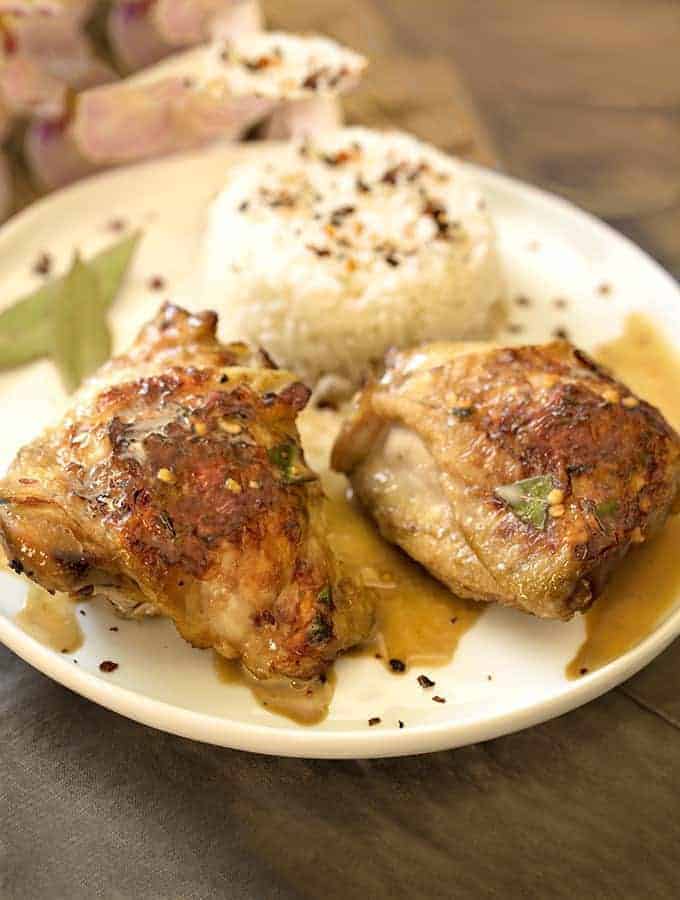
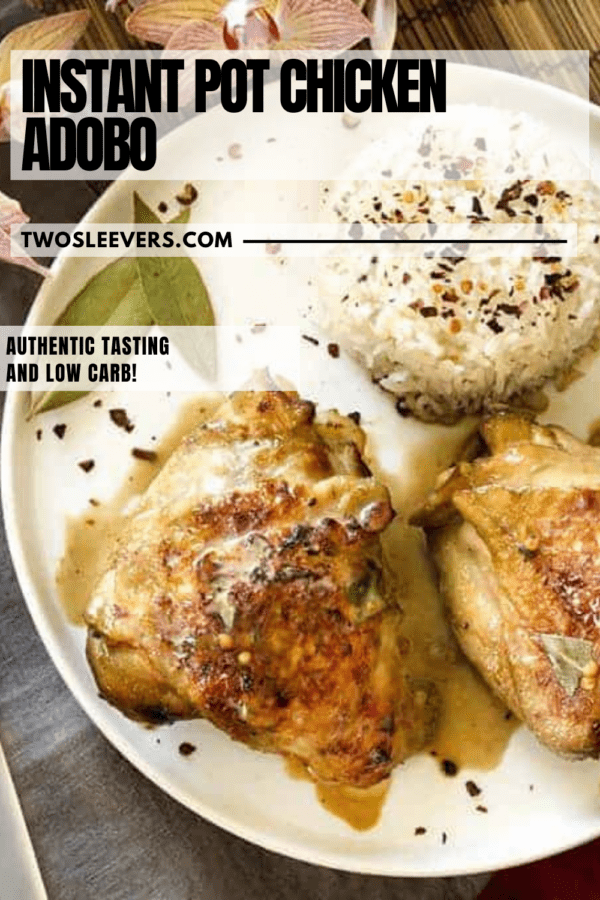
This Instant Pot Chicken Adobo recipe brings an authentic Filipino Chicken dinner to your table in under 30 minutes! All the original flavors of Filipino Chicken Adobo you love in a fraction of the time.
What Makes This The Perfect Weeknight Dinner
- Fast. Done in under 30 minutes .
- Easy. A simple pour and cook Instant Pot recipe .
- Authentic. Authentic Filipino flavors with traditional reverse searing.
- Low Carb . Only 3 net carbs per serving.
Chicken Adobo is one of those recipes that normally takes a lot of time to cook. Typically, you’d combine the tangy sauce made of regular soy sauce (see recipe notes for additional information), vinegar, and spices, and marinate it overnight for the chicken to tenderize. Then, you’d simmer it for hours and hours to get that amazing flavor.
What Is Adobo Chicken?
Pressure Cooker Chicken Adobo is chicken perfectly seasoned with traditional Filipino spices. It is seared after it is fully cooked for the perfect crispy texture.
What is in Chicken Adobo Sauce?
Chicken Adobo Sauce is made up of white vinegar, soy sauce, vegetable oil, garlic, brown sugar, peppercorns, red pepper flakes, and bay leaves. The flavors meld so much better with a little rest time, so this makes a great make-ahead Instant Pot chicken recipe. And you can double the recipe to plan to have leftovers or freeze it for another night.
What Does Chicken Adobo Taste Like?
Chicken Adobo Pressure Cooker Recipe is the perfect blend of sweet and salty. It’s packed with flavor that your entire family will love. The best part? It tastes just as good when it’s reheated.
What Does Adobo Mean?
Adobo is a Filipino dish of chicken or pork stewed in vinegar, garlic, soy sauce, bay leaves, and peppercorns.
Why Reverse Sear?
Another interesting characteristic of this dish–the chicken is browned after cooking. And here you thought reverse searing was some kinda pretentious way of cooking. Turns out, Filipinos have been doing this well before it became popular!
I used my air fryer to reverse sear the chicken, but you can also do it under a broiler, of course, and that’s how I wrote the recipe.
Ingredients You’ll Need
- 1 pound Bone-in Skin-on Chicken Thighs - These provide rich flavor and tender meat. The bone and skin help the chicken stay juicy under pressure and add depth to the adobo sauce as it simmers.
- 1/2 cup White Vinegar - This is the essential tangy backbone of adobo. It tenderizes the chicken, balances the salty soy sauce, and creates that signature bright, slightly sharp flavor.
- 1/4 cup Soy Sauce - Adds umami, saltiness, and color to the braising liquid. Together with the vinegar, it forms the classic adobo flavor base.
- 2 tablespoons Vegetable Oil - Used to brown the chicken before pressure cooking. Browning the skin adds extra flavor and helps render some fat, which enriches the sauce.
- 2 tablespoons Minced Garlic - A key aromatic that infuses the dish with deep, savory, unmistakable adobo flavor. Garlic is one of the foundational ingredients of Filipino adobo.
- 1 tablespoon Brown Sugar - Gives a touch of sweetness to balance the acidity of the vinegar and the saltiness of the soy sauce. This small amount helps round out the sauce.
- 1 teaspoon Whole Black Peppercorns - Adds subtle warmth, spice, and earthiness. Crushing them releases more flavor into the sauce without making it overpowering.
- 1 teaspoon Red Pepper Flakes - Provides heat for those who like their adobo slightly spicy. It’s optional but adds a nice kick if you prefer a more robust flavor.
- 3 Bay Leaves - Bay leaves are essential in adobo. Crushing them releases more aroma, adding a deeper, herbal note that balances the richness and acidity of the sauce.
How To Make Instant Pot Chicken Adobo
- In a large bowl or ziplock bag, combine vinegar, soy sauce, oil, garlic, sugar, black and red pepper, and bay leaves. Place the chicken thighs in the mixture, and coat them well with the sauce. Allow the chicken to marinate for 30 minutes or up to 24 hours in the refrigerator.
- Place the chicken and marinade into the inner liner of the Instant Pot. Set Instant Pot at High pressure for 8 minutes. When cook time is complete, allow the pot to sit undisturbed for 10 minutes, and then release all remaining pressure.
- Remove chicken thighs and set them on a foil-covered sheet pan. Broil under high heat for 3-5 minutes until the skin crisps.
- Meanwhile, set the Instant Pot on Sauté and cook until the sauce has bubbled and thickened, about 3-5 minutes. Pour this thickened sauce over the chicken and serve.
Tips And Tricks
Making Instant Pot Chicken Adobo is incredibly simple, but these tips will help you maximize flavor, texture, and richness every time.
- Use whole peppercorns, not ground pepper. Whole peppercorns release a gentle heat that won’t overpower the sauce. Roughly crush them to maximize their aromatic oils.
- Crush the bay leaves to intensify the aroma. Crushing them slightly helps the herbal notes infuse quickly under pressure.
- Let the chicken rest in the sauce after cooking. A 10–15 minute rest allows the flavors to deepen and the sauce to thicken as it cools.
Variations
Instant Pot Chicken Adobo is incredibly versatile, and these variations let you tailor the dish to different tastes, dietary needs, or regional styles.
- Coconut Milk Adobo (Adobo sa Gata) - Add 1 cup of full-fat coconut milk after pressure cooking and simmer until thick and creamy. This creates a rich, silky, slightly sweet variation popular in Bicolano cooking.
- Spicy Adobo - Increase the red pepper flakes, add sliced chilies, or stir in 1–2 teaspoons of sambal or sriracha for a bold, fiery version.
- Sweet Adobo - Add 1–2 extra tablespoons of brown sugar or a splash of pineapple juice. This creates a slightly sweeter, kid-friendly sauce.
What To Eat With Chicken Adobo
Chicken Adobo pairs beautifully with simple, comforting sides that balance its salty, tangy, garlicky flavors.
- White Rice - The classic and most essential pairing. Rice absorbs all the rich adobo sauce and makes every bite more satisfying.
- Air Fried Bok Choy or Green Beans - Vegetables help balance the richness of the chicken and add freshness to the plate.
- Roasted Vegetables - Broccoli, carrots, cabbage, or cauliflower roast beautifully and complement adobo’s bold flavors.
How Long Does It Last?
Generally, you can expect any chicken dish to last 3-5 days after it is prepared. Of course, you will want to take into account the life of your particular cut of meat when you decide how long it will last.
For best results, and health safety standards, always use your chicken (no matter if it is breast, thigh, or wings) by the use by date.
Can You Freeze It?
Yes, you can absolutely freeze chicken adobo, and it freezes exceptionally well. Because the dish is made with vinegar, soy sauce, and aromatics, the flavors actually improve over time.
After cooking, let the adobo cool completely, then transfer it along with plenty of sauce into an airtight freezer-safe container or zip-top bag. It will keep its quality for up to 3 months in the freezer.
When you’re ready to enjoy it, thaw it overnight in the refrigerator and reheat gently on the stovetop or in the microwave.
More Great Instant Pot Chicken Recipes
- Indian Curry Recipe
- Pesto Chicken recipe
- Instant Pot Chicken Korma Recipe
- Butter Chicken
- Shredded Chicken Tacos
- Instant Pot Chicken and Rice
- Chicken Tikka Masala

Instant Pot Chicken Adobo Recipe | Easy Filipino Chicken
Ingredients
- ▢ 1 pound ( 453.59 g ) Bone-in Skin-on Chicken Thighs
- ▢ 1/2 cup ( 127.5 ml ) White Vinegar
- ▢ 1/4 cup ( 58 ml ) Soy Sauce
- ▢ 2 tablespoons ( 2 tablespoons ) Vegetable Oil
- ▢ 2 tablespoons ( 2 tablespoons ) Minced Garlic
- ▢ 1 tablespoon ( 1 tablespoon ) brown sugar or 1 teaspoon splenda
- ▢ 1 teaspoon ( 1 teaspoon ) Whole Black Peppercorns , roughly crushed
- ▢ 1 teaspoon ( 1 teaspoon ) Red Pepper Flakes , optional
- ▢ 3 ( 3 ) Bay Leaves , crushed
Instructions
In a large bowl or ziplock bag, combine vinegar, soy sauce, oil, garlic, sugar, black and red pepper, and bay leaves. Place the chicken thighs in the mixture, and coat them well with the sauce. Allow the chicken to marinate for 30 minutes, or up to 24 hours in the refrigerator.
Place the chicken and marinade into the inner liner of the Instant Pot. Set Instant Pot at High pressure for 8 minutes. When cook time is complete, allow the pot to sit undisturbed for 10 minutes, and then release all remaining pressure.
Remove chicken thighs and set on a foil-covered sheet pan. Broil under high heat for 3-5 minutes until the skin crisps.
Meanwhile, set the Instant Pot on Sauté and cook until the sauce has bubbled and thickened, about 3-5 minutes. Pour this thickened sauce over the chicken and serve.
Crisping the chicken skin after cooking is the best way to get that crispy skin! If you crisp it before cooking, it will get soggy in the Instant Pot during cook time.
This recipe uses regular soy sauce. Lite often doesn’t mean low salt, just lite colored and thin in consistency. Dark soy sauce is aged longer and has molasses added to it, and tends to be less salty.
Get support & connect with our community on Facebook!
Nutrition
Don’t forget to check out my otherBest-selling Instant Pot Cookbooks!
Indian Instant Pot , Keto Instant Pot, Instant Pot Fast and Easy , Healthy Instant Pot & Vegetarian Instant Pot .

