If you’ve been craving some Buffalo Wings, you need to try out these Cauliflower Chicken Wings. They’re the perfect vegan wings and are lovely little Buffalo Cauliflower Bites for when you’re short on time and want to up your veggie game.

Are These Air Fryer Wings Really That Good?
Heck yeah, they are! Here’s why:
- Flavor. If you love the classic flavor of Buffalo Hot Wings, you’re going to love the similarity you get from these Keto Buffalo Cauliflower Bites!
- Spicy. Nothing is better than the kick from Buffalo Hot Sauce, and these are just the best thing to happen to my Keto meal plan in as long as I can remember! Set the spice level to your liking and enjoy them as an appetizer or main course !
- Low Carb . All the flavor, and none of the guilt of breaded chicken wings .
- Easy. Easily make these Keto Buffalo Cauliflower Bites in your Air Fryer or broil them in your oven for something that’s going to feel like it could never be Keto-Friendly , but totally is.
Ingredients You’ll Need
- Cauliflower
- Garlic
- Vegetable Oil
- Kosher Salt
FOR THE SAUCE
- Hot sauce
- Butter (Coconut oil for a Vegan option)
- Worcestershire Sauce
How Do You Make Buffalo Cauliflower Wings in the Air Fryer?
- Chop. Chop the cauliflower into evenly-sized florets and put them in a large bowl .

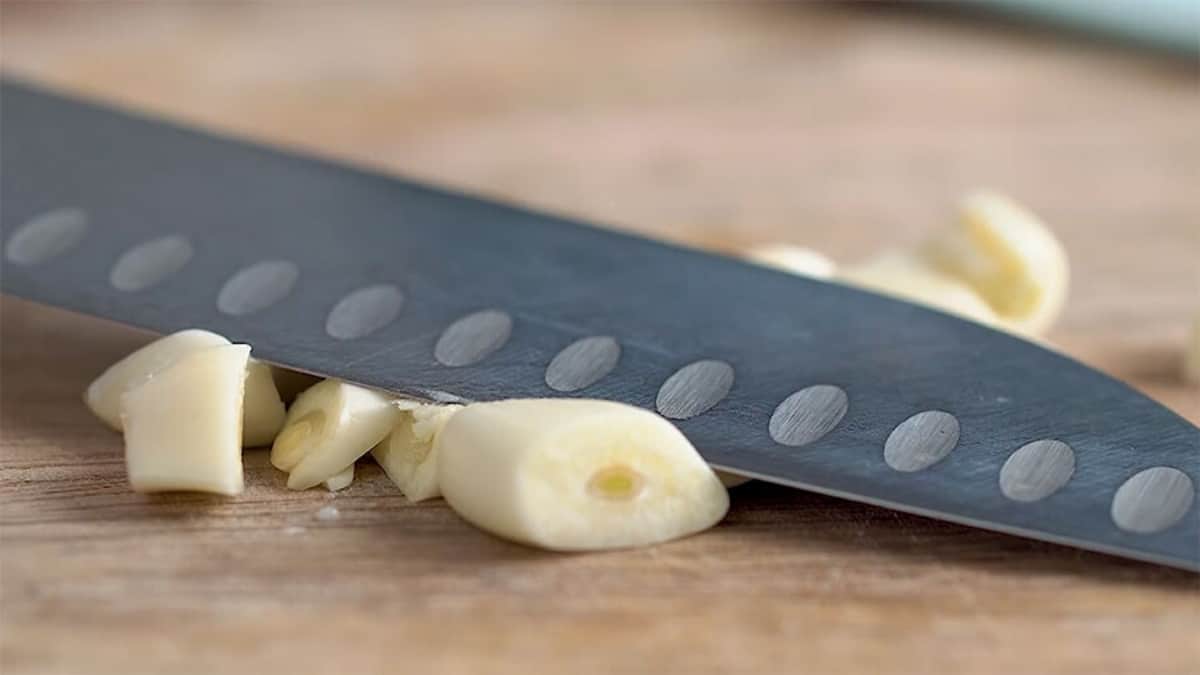
- Garlic. Cut each garlic clove into 3 pieces and smash them down with the side of your knife. Don’t be shy about smashing the garlic. You want to expose as much of the garlicky surface area as possible so that it roasts well. Add this to the cauliflower.
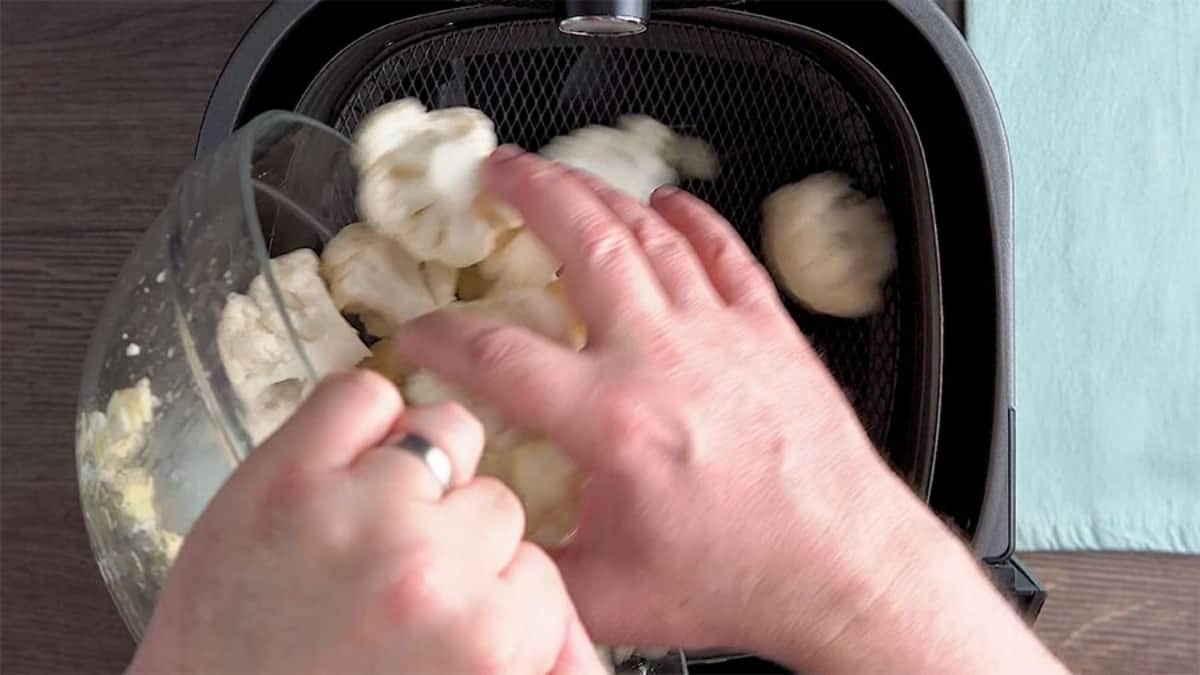
- Pour. Pour over the oil and add salt. Mix well until the cauliflower is well-coated with the oil and salt.

- Air fry. Turn your air fryer to 400F for 20 minutes and add the cauliflower, flipping once at the halfway mark.
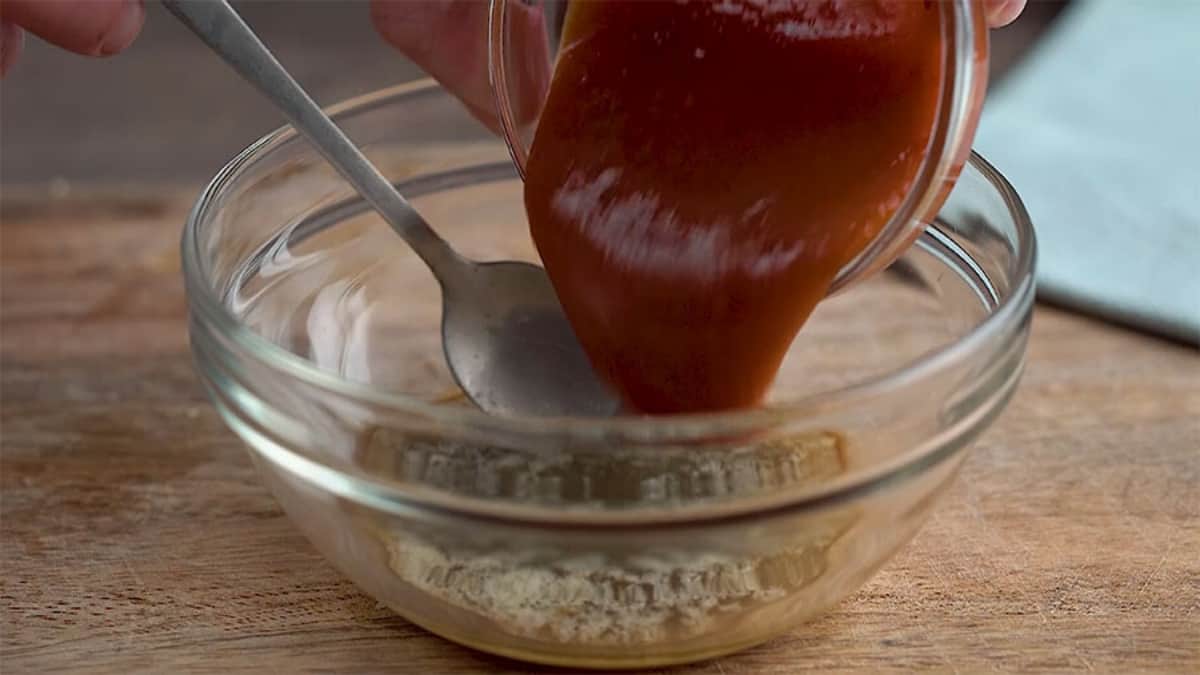
- Sauce. While the cauliflower cooks, make the sauce. In a small bowl , whisk together the hot sauce, butter, and Worcestershire sauce.
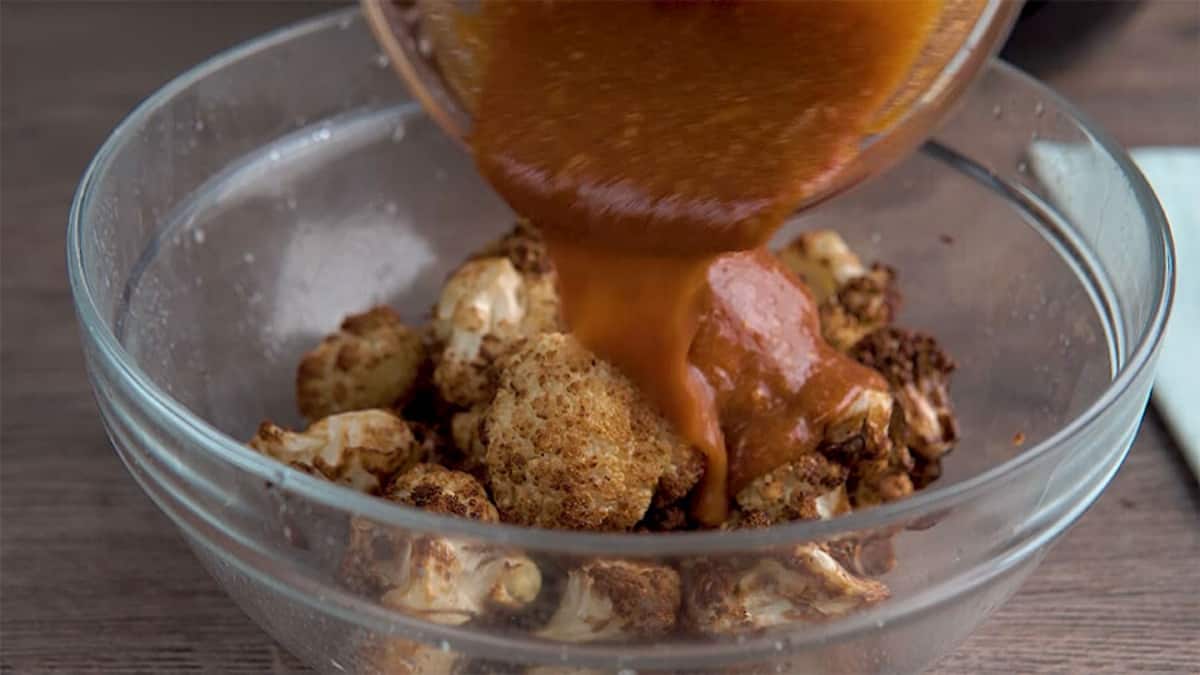
- Mix. Once the cauliflower is cooked, place it into a large serving bowl . Pour the hot sauce over the cauliflower and mix well.
- Air fry. Place the cauliflower back into the air fryer . Set it to 400F for 3-4 minutes to let the sauce set a little.
- Serve. Serve with blue cheese dressing or ranch dressing.

How To Make Cauliflower Buffalo Wings
- Chop. Chop the cauliflower into evenly-sized florets and put them in a large bowl .
- Garlic. Cut each garlic clove into 3 pieces and smash them down with the side of your knife. Don’t be shy about smashing the garlic. You want to expose as much of the garlicky surface area as possible so that it roasts well. Add this to the cauliflower.
- Pour. Pour over the oil and add salt. Mix well until the cauliflower is well-coated with the oil and salt. Don’t be shy about the oil when cooking in the oven, and maybe add another tablespoon of oil to be safe.
- Broil. Broil on HIGH for 10-15 minutes, checking and stirring often.
- Sauce. While the cauliflower cooks, make the sauce. In a small bowl , whisk together the hot sauce, butter, and Worcestershire sauce.
- Mix. Once the cauliflower is cooked, place it into a large serving bowl . Pour the hot sauce over the cauliflower and mix well.
- Cook. Place the cauliflower back into the oven. Set it to 400F for 1-2 minutes to let the sauce set a little.
- Serve. Serve with blue cheese dressing or ranch dressing.
Can I Use Frozen Cauliflower?
It’s not a great idea, but it’s probably doable. The main issue is the excess liquid that comes from frozen cauliflower. No one wants soggy hot wings .
The best way to use frozen cauliflower would be to let it thaw completely, then to drain off the liquid and pat it dry as much as possible, and then follow the recipe steps as directed below.
Tips and Tricks for Makeing Cauliflower Buffalo Wings
- Crisp. Everyone loves crispy wings, so don’t undercook these Cauliflower Hot Wings. You want them crispy!
- Heat. Don’t want them too spicy? Easily customize this recipe by using the brand of hot sauce you love the most.
- Dip. Don’t be afraid to pair these with some delicious dips like some Blue Cheese, Ranch Dressing, or any of these Keto Salad Dressings .
- Frozen. If using frozen cauliflower, thaw completely, then drain the liquid and pat down for best results.
- Sauce. Mix it up and make these with my Gochujang Mayo instead of the hot sauce recipe for a fun flavor twist!
Want More Cauliflower Recipes?
- Cauliflower Rice - It’s SO SIMPLE to make your own!
- Cauliflower Chaffles - The BEST Keto bread alternative!
- Gobi Manchurian - The easy way to make it!
- Cauliflower “Mac” n Cheese with Jalapeno and Bacon - Make this and thank me later!
- Keto Cauliflower and Cheese - A creamy, delicious keto side dish .
- Cauliflower Breadsticks - Delicious and I can’t wait for you to try them.
- Air Fryer Cauliflower with Tahini - Tahini-slathered and delightfully air fried.
- Instant Pot Spicy Cauliflower Soup - Delicious, low carb and perfect for any day of the week.
- Keto Cauliflower Soup - Creamy and completely satisfying.
And if you’re feeding a group that wants a more traditional approach to wings, check out our Best Wing Recipes here!
So whether you’re looking for vegan cauliflower recipes, or just want to try your hand at Vegetarian Hot Wings, these Buffalo Cauliflower Wings are just what you need! Pin this recipe on Pinterest or share it on Facebook to save it.

Keto Buffalo Cauliflower Bites
Equipment
- PHILLIPS AIR FRYER
Ingredients
- ▢ 5 cups Cauliflower , chopped, about one large head
- ▢ 6 cloves Garlic , peeled and chopped
- ▢ 4 tablespoons Vegetable Oil
- ▢ 1/2 teaspoon Kosher Salt
FOR THE SAUCE
- ▢ 1/3 cup hot sauce
- ▢ 2 tablespoons Butter , or coconut oil for vegan
- ▢ 1 teaspoon Worcestershire Sauce
Instructions
FOR THE AIR FRYER
- Chop the cauliflower into evenly-sized florets and put them in a large bowl .
- Cut each garlic clove into 3 pieces and smash them down with the side of your knife. Don’t be shy about smashing the garlic. You want to expose as much of the garlicky surface area as possible so that it roasts well. Add this to the cauliflower.
- Pour over the oil and add salt. Mix well until the cauliflower is well-coated with the oil and salt.
- Turn your air fryer to 400F for 20 minutes and add the cauliflower, flipping once at the halfway mark.
MAKE THE SAUCE
- While the cauliflower cooks, make the sauce. In a small bowl , whisk together the hot sauce, butter, and Worcestershire sauce.
- Once the cauliflower is cooked, place it into a large serving bowl . Pour the hot sauce over the cauliflower and mix well.
- Place the cauliflower back into the air fryer . Set it to 400F for 3-4 minutes to let the sauce set a little.
- Serve with blue cheese dressing or ranch dressing
FOR THE OVEN
- Chop the cauliflower into evenly-sized florets and put them in a large bowl .
- Cut each garlic clove into 3 pieces and smash them down with the side of your knife. Don’t be shy about smashing the garlic. You want to expose as much of the garlicky surface area as possible so that it roasts well. Add this to the cauliflower.
- Pour over the oil and add salt. Mix well until the cauliflower is well-coated with the oil and salt. Don’t be shy about the oil when cooking in the oven, and maybe add another tablespoon of oil to be safe.
- Broil on HIGH for 10-15 minutes, checking and stirring often.
MAKE THE SAUCE
- While the cauliflower cooks, make the sauce. In a small bowl , whisk together the hot sauce, butter, and Worcestershire sauce.
- Once the cauliflower is cooked, place it into a large serving bowl . Pour the hot sauce over the cauliflower and mix well.
- Place the cauliflower back into the oven. Set it to 400F for 1-2 minutes to let the sauce set a little.
- Serve with blue cheese dressing or ranch dressing
Tips and Tricks for Making Keto Buffalo Cauliflower
- Crisp. Everyone loves crispy wings, so don’t undercook these Cauliflower Hot Wings. You want them crispy!
- Heat. Don’t want them too spicy? Easily customize this recipe by using the brand of hot sauce you love the most.
- Dip. Don’t be afraid to pair these with some delicious dips like some Blue Cheese, Ranch Dressing, or any of these Keto Salad Dressings .
- Frozen. If using frozen cauliflower, thaw completely, then drain the liquid and pat down for best results.
- Sauce. Mix it up and make these with my Gochujang Mayo instead of the hot sauce recipe for a fun flavor twist!
Get support & connect with our community on Facebook!
Nutrition
And don’t forget to check out my air fryer cookbooks! Every day easy air fryer , and Air Fryer Revolution .


If you already signed up, you should have received an email with a password to give you unlimited access to our FREE Printable Library. The password is case sensitive. Enter it below and get printing!
Password:
Buy Meal Plans & Ebooks
MONTHLY MEAL PLANS
Weekly Meal Plans

Keto Buffalo Cauliflower Bites
Ingredients
- 5 cups Cauliflower chopped, about one large head
- 6 cloves Garlic peeled and chopped
- 4 tablespoons Vegetable Oil
- 1/2 teaspoon Kosher Salt
FOR THE SAUCE
- 1/3 cup hot sauce
- 2 tablespoons Butter or coconut oil for vegan
- 1 teaspoon Worcestershire Sauce
Instructions
FOR THE AIR FRYER
- Chop the cauliflower into evenly-sized florets and put them in a large bowl .
- Cut each garlic clove into 3 pieces and smash them down with the side of your knife. Don’t be shy about smashing the garlic. You want to expose as much of the garlicky surface area as possible so that it roasts well. Add this to the cauliflower.
- Pour over the oil and add salt. Mix well until the cauliflower is well-coated with the oil and salt.
- Turn your air fryer to 400F for 20 minutes and add the cauliflower, flipping once at the halfway mark.
MAKE THE SAUCE
- While the cauliflower cooks, make the sauce. In a small bowl , whisk together the hot sauce, butter, and Worcestershire sauce.
- Once the cauliflower is cooked, place it into a large serving bowl . Pour the hot sauce over the cauliflower and mix well.
- Place the cauliflower back into the air fryer . Set it to 400F for 3-4 minutes to let the sauce set a little.
- Serve with blue cheese dressing or ranch dressing
FOR THE OVEN
- Chop the cauliflower into evenly-sized florets and put them in a large bowl .
- Cut each garlic clove into 3 pieces and smash them down with the side of your knife. Don’t be shy about smashing the garlic. You want to expose as much of the garlicky surface area as possible so that it roasts well. Add this to the cauliflower.
- Pour over the oil and add salt. Mix well until the cauliflower is well-coated with the oil and salt. Don’t be shy about the oil when cooking in the oven, and maybe add another tablespoon of oil to be safe.
- Broil on HIGH for 10-15 minutes, checking and stirring often.
MAKE THE SAUCE
- While the cauliflower cooks, make the sauce. In a small bowl , whisk together the hot sauce, butter, and Worcestershire sauce.
- Once the cauliflower is cooked, place it into a large serving bowl . Pour the hot sauce over the cauliflower and mix well.
- Place the cauliflower back into the oven. Set it to 400F for 1-2 minutes to let the sauce set a little.
- Serve with blue cheese dressing or ranch dressing
Tips and Tricks for Making Keto Buffalo Cauliflower
- Crisp. Everyone loves crispy wings, so don’t undercook these Cauliflower Hot Wings. You want them crispy!
- Heat. Don’t want them too spicy? Easily customize this recipe by using the brand of hot sauce you love the most.
- Dip. Don’t be afraid to pair these with some delicious dips like some Blue Cheese, Ranch Dressing, or any of these Keto Salad Dressings .
- Frozen. If using frozen cauliflower, thaw completely, then drain the liquid and pat down for best results.
- Sauce. Mix it up and make these with my Gochujang Mayo instead of the hot sauce recipe for a fun flavor twist!
Keto Buffalo Cauliflower Bites https://twosleevers.com/keto-buffalo-cauliflower/


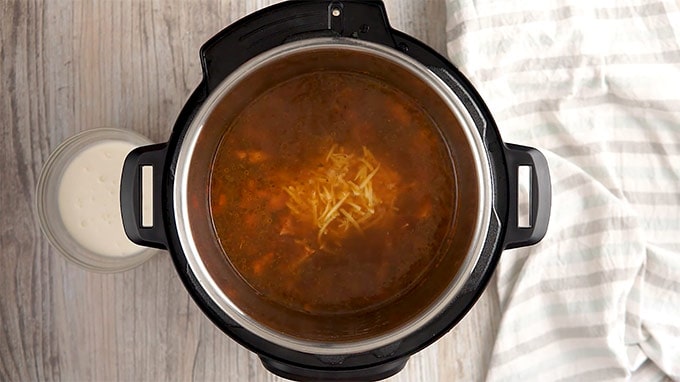
Serve a bowl of chicken taco soup made in the Instant Pot for a delicious and easy low-carb dinner made in 30 minutes!

The beauty of this easy taco soup recipe is that your choice of vegetables can make this a low carb/keto soup. If you can’t find a frozen soup mix near you, then just use whatever combination of veggies you want. A bag of frozen vegetables are perfect and you probably have them in your freezer.
Not every day is a fancy cooking day, and on the days when you just can’t even, I find this 4 ingredient chicken taco soup recipe to be very handy.
Best of all, this is an easy pantry/freezer supper that requires very little pre-planning. This easy taco soup recipe is ready in 30 minutes. It makes the perfect busy weeknight meal. It is perfect for when the weather cools down, or even if you want to switch up your taco night. Serve a soup instead!
What is in Instant Pot Chicken Taco Soup
The wonderful thing is that you can use whatever frozen vegetables you have in the house, and best of all, you don’t even need to defrost them. Throw them in the pressure cooker as is, add in chicken, water, and taco seasoning and you’re good to go. Finish up with a little evaporated milk, and you have a savory, well-spiced, creamy soup ready in minutes.
If you want to use fresh vegetables, you will need to cut the chicken very small, and layer with the chicken at the bottom, the fresh veggies on top. Then, only cook for 3-4 minutes.
Watch the Video on How To Make Instant Pot Chicken Taco Soup
How To Make Chicken Taco Soup
I’ve provided step by step instructions so you can also enjoy my chicken taco soup recipe.
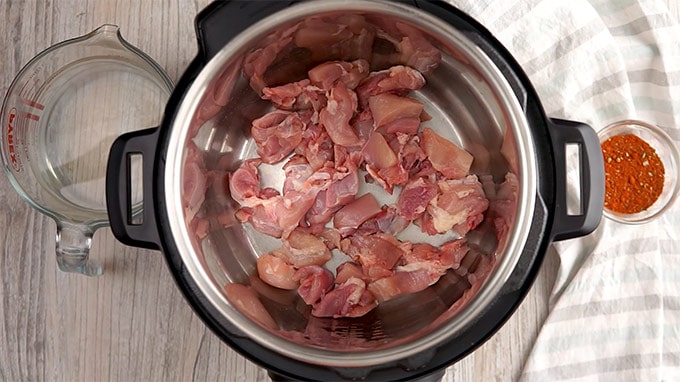
Step 1: Chop the skinless boneless chicken thighs into bite-sized pieces.

Step 2: Place the chicken into the inner liner of your Instant Pot.
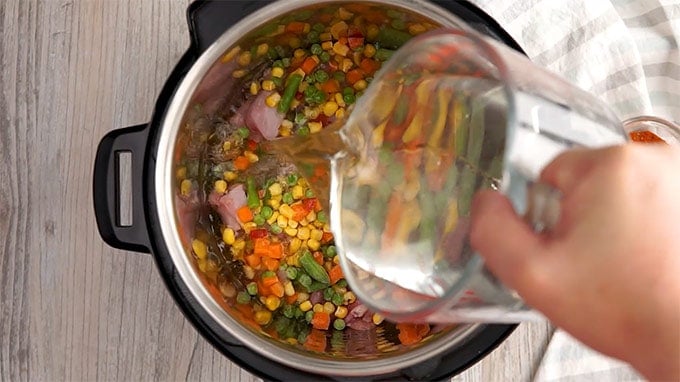
Step 3: Add the frozen vegetable mix and 3 cups of water to the chicken.
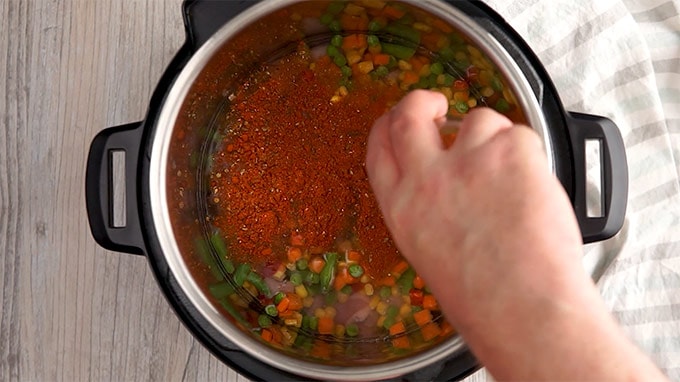
Step 4: Add 2 tablespoons of Taco Seasoning.
Step 5: Close the lid and turn the knob to Sealing. Set the pressure cooker at HP for 10 minutes. Once it is done, allow the IP to rest undisturbed for 10 minutes. Then, release all remaining pressure.

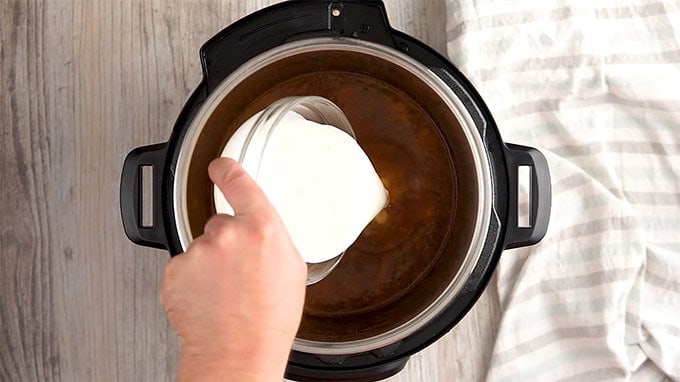
Step 6: Stir in the evaporated milk or substitute.
Step 7: Add cheese if using and stir.
Step 8: Taste and add salt if needed before serving.

What To Serve With Chicken Taco Soup
Add some keto cheese biscuits or some ready-made rolls, and you’re ready to go for some dipping action. Toppings for Mexican Soup can be anything. You can go crazy here. Anything you have laying around and need to use up.
Cilantro, sour cream, fresh salsa, and taco sauce are some of my favorites.

Stovetop and Slow Cooker Instructions
You can make it on the stovetop, or the slow cooker. If you are making it on the stovetop, I would make it in one pot.
Combine all the ingredients in a large soup pot, bring it to a low simmer, and let it bubble away for 20 minutes. Then add the evaporated milk and cheese. Turn the heat down to low, and cook a few minutes longer until creamy.
If you make it on the stovetop, you want to allow the flavors to develop, so once it’s fully cooked, turn the heat down to low, and let it lightly bubble so the flavors can blend together. You can, of course, eat it when the chicken is fully cooked. The leftovers will be even tastier.
If you have a slow cooker, the technique is the same. Layer the chicken, water, and Mexican spices in the bottom, cover and cook on high for 4 hours, or low 8 hours. Add the evaporated milk and cheese the last half hour of the cooking time to get a creamy spicy soup.
Tips and Tricks
- For lower carb veggies that will do well in here, I’d recommend kabocha squash, cauliflower, and hardy greens such as kale or collard greens.
- Switch out the evaporated milk with heavy cream or half and half.
- Do not add the evaporated milk to the initial cooking. Milk separates under pressure and you will have a curdled mess. Add it after cooking as I have shown.
- If you keep kosher or are dairy free, you can use coconut milk instead.
- Note that I have not asked for salt in the main recipe. This is because Taco seasonings vary is how much salt they contain.
- Taste the soup after you’ve added everything including the milk, and then you can add salt if needed.
More Of OurBest Taco Recipes
- Tacos de Alambre
- Low Carb Taco Stuffed Peppers
- Low Carb Taco Chile Relleno Casserole
- Keto Easy Taco Dip
- Baked Chicken Tacos
- Buffalo Chicken Tacos
Another fantastic Mexican soup recipe is my Caldo de Pollo ! It’s a deliciously warming soup that’s bursting with Mexican flavors!


Instant Pot Chicken Taco Soup
Equipment
- Instant Pot
Ingredients
- ▢ 1 pound boneless skinless chicken thighs , cut into bite sized pieces
- ▢ 1 10 oz Frozen Soup Mix
- ▢ 3 cups Water
- ▢ 2 TBS Taco Seasoning
- ▢ 4-6 oz Evaporated Milk
- ▢ Kosher Salt , to taste
- ▢ 1/2 cup shredded Mexican cheese blend , optional
Instructions
- Place the cut boneless chicken thighs into the inner liner of your Instant Pot or Pressure Cooker.
- Add frozen soup blend (frozen veggies), water, and taco seasoning.
- Close the lid and turn the knob to Sealing. Set at high pressure for 10 minutes.
- At the end of the cooking cycle, allow the pot to rest undisturbed for 10 minutes. Then release all remaining pressure.
- Stir in the evaporated milk (or milk substitute). Add cheese if using and stir.
- Taste and add salt if needed before serving.
Watch The Video
- For lower-carb veggies that will do well in here, I’d recommend kabocha squash, cauliflower, and hardy greens such as kale or collard greens.
- Switch out the evaporated milk with heavy cream or half and half.
- Do not add the evaporated milk to the initial cooking. Milk separates under pressure and you will have a curdled mess. Add it after cooking as I have shown.
- If you keep kosher or are dairy-free, you can use coconut milk instead.
- Note that I have not asked for salt in the main recipe. This is because Taco seasonings vary is how much salt they contain.
- Taste the soup after you’ve added everything including the milk, and then you can add salt if needed.
