
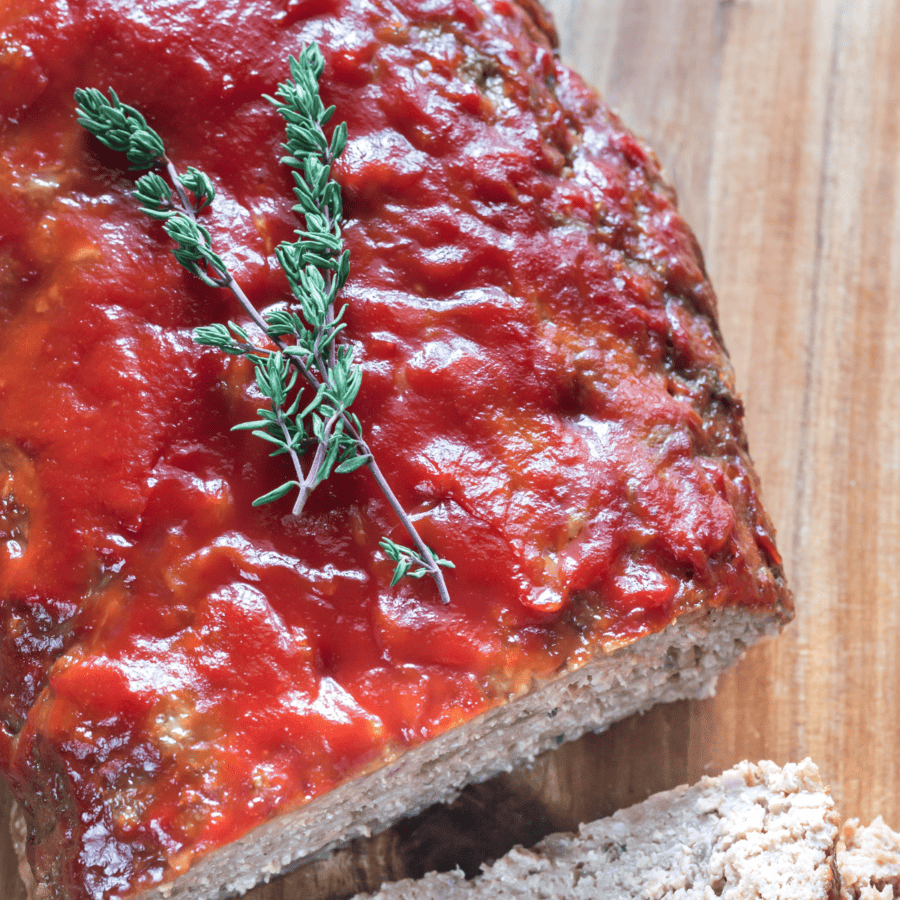
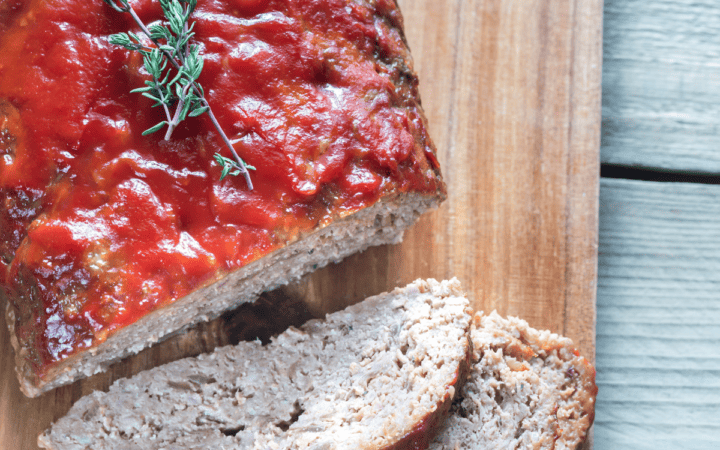
If you’re looking to put a flavorful twist on a classic comfort food, look no further than Italian Meatloaf. Bursting with herbs, spices, and aromatic ingredients, this variation takes the traditional meatloaf to new heights.

Why This Makes A Great Weeknight Meal
- Quick.
- Easy.
- Versatile.
- Delicious.
By combining traditional meatloaf ingredients with aromatic Italian herbs and spices, you can create a mouthwatering dish that is sure to impress. The air fryer ensures even cooking and a perfectly caramelized glaze. So, grab your ingredients, preheat your air fryer, and follow the simple steps outlined in this recipe to enjoy a delightful Italian Meatloaf that will have your taste buds singing.
What Is The Secret To Tender Meatloaf?
The secret to achieving a tender meatloaf lies in a few key techniques and ingredients. Here are some tips to help you create a tender and moist meatloaf:
- Don’t Overmix the Meat. Overmixing can lead to a dense and tough texture in the meatloaf. Gently mix the ingredients just until they are combined. Overworking the mixture can cause the proteins to become tightly packed, resulting in a dense meatloaf.
- Add Moisture . Incorporate ingredients that add moisture to the meatloaf, such as milk, broth, or even grated vegetables like onions or zucchini. These ingredients help keep the meatloaf moist during cooking.
- Avoid Overcooking. Overcooking meatloaf can result in a dry and tough texture. Use a meat thermometer to ensure the internal temperature reaches 160F and then remove the meatloaf from the oven or air fryer promptly.
Is Meatloaf Italian Or American?
Meatloaf is primarily considered an American dish. It has roots in European cuisine, particularly German and Belgian meatloaf recipes. However, the modern concept of meatloaf as we know it today, with a mixture of ground meat, breadcrumbs, and various seasonings, is closely associated with American cuisine.
While meatloaf itself is typically considered American, there are variations of meatloaf in other culinary traditions as well. For example, in Italian cuisine, there is a dish called “polpettone” that shares similarities with meatloaf. Polpettone is an Italian-style meatloaf often made with ground beef, breadcrumbs, eggs, and seasonings, and it is sometimes stuffed with cheese, vegetables, or other ingredients.
So, while meatloaf originated in Europe and has various regional variations, it is most commonly associated with American cuisine.
What Is Italian Meatloaf Made Of?
- Ground Beef
- Breadcrumbs
- Parmesan cheese
- Milk
- Onion
- Garlic
- Parsley
- Basil
- Oregano
- Salt
- Pepper
- Red Pepper Flakes
- Egg
- Marinara Sauce
How To Make Italian Meatloaf
- Warm Up The Air Fryer . Preheat your air fryer to 375F for approximately 5 minutes. Preheating ensures that the meatloaf cooks evenly and efficiently.
- Prepare the Meatloaf . Mixture In a large mixing bowl, combine the ground beef, breadcrumbs, grated Parmesan cheese, milk, chopped onion, minced garlic, fresh parsley, fresh basil, dried oregano, salt, black pepper, red pepper flakes (if using), and beaten egg. Use your hands or a wooden spoon to mix the ingredients until well combined. Avoid overmixing, as it can result in a dense meatloaf.
- Shape the Meatloaf . Transfer the meatloaf mixture onto a clean surface and shape it into a loaf shape. Place the meatloaf on a greased or parchment-lined tray that fits into your air fryer basket.
- Apply the Sauce . Brush the marinara over the top of the meatloaf, ensuring it is evenly coated. Reserve a small amount of the tomato sauce for later use.
- Air Fry the Meatloaf . Place the tray with the meatloaf in the preheated air fryer basket. Air fry at 375F for approximately 30-35 minutes, or until the internal temperature reaches 160F using a meat thermometer. Halfway through the cooking time, brush the reserved glaze over the meatloaf.
- Rest and Slice. Once the meatloaf is cooked, carefully remove it from the air fryer and let it rest for about 5 minutes. This resting period allows the juices to redistribute, making the meatloaf easier to slice. Cut the meatloaf into thick slices and serve.
- Serve and Enjoy! Serve the Italian Meatloaf slices alongside your favorite side dishes such as roasted vegetables, mashed potatoes, or a fresh salad. The flavorful herbs and spices, combined with the tender and juicy meat, will make this Italian-inspired meatloaf a family favorite.
Tips And Tricks
Here are some tips and tricks to help you make a delicious Italian meatloaf using the air fryer:
- Soak Breadcrumbs . Soak the breadcrumbs in milk or broth before adding them to the meat mixture. This helps keep the meatloaf moist and tender during cooking.
- Shape the Meatloaf Firmly . When shaping the meatloaf, press it together firmly but avoid over-packing it. A well-shaped meatloaf will hold its form and cook more evenly.
- Let it Rest . Once the meatloaf is cooked, allow it to rest for a few minutes before slicing. This resting period allows the juices to redistribute, resulting in a juicier and more flavorful meatloaf.
Variations
Check out some variations and twists you can try to add your own unique flair to this Italian meatloaf recipe:
- Try it stuffed . Create a surprise inside the meatloaf by stuffing it with ingredients like mozzarella cheese, sun-dried tomatoes, spinach, or roasted red peppers. Slice the meatloaf to reveal the delicious filling.
- Wrap it up. Wrap the meatloaf with slices of prosciutto before cooking. The prosciutto adds a savory and slightly salty flavor that complements the Italian seasonings.
- Use a combination of ground meats. Use a combination of ground beef and Italian sausage in the meat mixture. The Italian sausage adds an extra layer of flavor and richness to the meatloaf.
What To Serve With It
Italian meatloaf pairs well with a variety of side dishes that complement its flavors. Try some of my favorites to find which dish pairs best with your new favorite weeknight comfort meal:
- Garlic Mashed Potatoes - Creamy garlic mashed potatoes provide a comforting and classic side dish that complements the Italian flavors of the meatloaf. The creamy texture and garlicky taste are a perfect match.
- Roasted Vegetables - Roast a medley of vegetables like zucchini, bell peppers, cherry tomatoes, and eggplant with olive oil, Italian herbs, and a sprinkle of Parmesan cheese. The roasted veggies add color, freshness, and a delightful contrast to the meatloaf.
- Caprese Salad - Create a simple and refreshing Caprese salad with ripe tomatoes, fresh mozzarella cheese, and basil leaves. Drizzle with balsamic glaze or a tangy Italian dressing for added flavor.
How Long Does It Last?
Italian meatloaf can be stored in the refrigerator for up to 3-4 days.
Allow the meatloaf to cool completely before storing it. Wrap the meatloaf tightly in plastic wrap or place it in an airtight container to protect it from air exposure and odors. This will help maintain its freshness and prevent it from drying out.
Can You Freeze It?
If you want to extend the shelf life of Italian meatloaf, you can freeze it. Properly wrapped and stored, Italian meatloaf can be frozen for up to 2-3 months. Thaw it in the refrigerator overnight before reheating.
More Italian-Inspired Recipes
- Skillet Lasagna
- Chicken Broccoli Alfredo
- Chicken Milanese
- Antipasto Salad
- Keto Tuscan Chicken

Italian Meatloaf | Air Fryer Italian Style Meatloaf
Ingredients
- ▢ 1 pound ground beef
- ▢ 1/2 cup breadcrumbs
- ▢ 1/4 cup parmesan cheese
- ▢ 1 cup marinara sauce
- ▢ 1/4 cup milk
- ▢ 1/4 cup onion
- ▢ 2 tbsp minced garlic
- ▢ 2 tbsp parsley
- ▢ 1 tsp dried basil
- ▢ 1 tsp oregano
- ▢ 1 tsp salt
- ▢ 1/2 tsp black pepper
- ▢ 1/2 tsp red pepper flakes
- ▢ 1 egg
Instructions
- Warm Up The Air Fryer . Preheat your air fryer to 375F for approximately 5 minutes. Preheating ensures that the meatloaf cooks evenly and efficiently.
- Prepare the Meatloaf . Mixture In a large mixing bowl, combine the ground beef, breadcrumbs, grated Parmesan cheese, milk, chopped onion, minced garlic, fresh parsley, fresh basil, dried oregano, salt, black pepper, red pepper flakes (if using), and beaten egg. Use your hands or a wooden spoon to mix the ingredients until well combined. Avoid overmixing, as it can result in a dense meatloaf.
- Shape the Meatloaf . Transfer the meatloaf mixture onto a clean surface and shape it into a loaf shape. Place the meatloaf on a greased or parchment-lined tray that fits into your air fryer basket.
- Apply the Sauce . Brush the marinara over the top of the meatloaf, ensuring it is evenly coated. Reserve a small amount of the tomato sauce for later use.
- Air Fry the Meatloaf . Place the tray with the meatloaf in the preheated air fryer basket. Air fry at 375F for approximately 30-35 minutes, or until the internal temperature reaches 160F using a meat thermometer. Halfway through the cooking time, brush the reserved glaze over the meatloaf.
- Rest and Slice. Once the meatloaf is cooked, carefully remove it from the air fryer and let it rest for about 5 minutes. This resting period allows the juices to redistribute, making the meatloaf easier to slice. Cut the meatloaf into thick slices and serve.
- Serve and Enjoy! Serve the Italian Meatloaf slices alongside your favorite side dishes.
Get support & connect with our community on Facebook!
Nutrition
And don’t forget to check out my air fryer cookbooks! Every day easy air fryer , and Air Fryer Revolution .


If you already signed up, you should have received an email with a password to give you unlimited access to our FREE Printable Library. The password is case sensitive. Enter it below and get printing!
Password:

Italian Meatloaf | Air Fryer Italian Style Meatloaf
Ingredients
- 1 pound ground beef
- 1/2 cup breadcrumbs
- 1/4 cup parmesan cheese
- 1 cup marinara sauce
- 1/4 cup milk
- 1/4 cup onion
- 2 tbsp minced garlic
- 2 tbsp parsley
- 1 tsp dried basil
- 1 tsp oregano
- 1 tsp salt
- 1/2 tsp black pepper
- 1/2 tsp red pepper flakes
- 1 egg
Instructions
- Warm Up The Air Fryer . Preheat your air fryer to 375F for approximately 5 minutes. Preheating ensures that the meatloaf cooks evenly and efficiently.
- Prepare the Meatloaf . Mixture In a large mixing bowl, combine the ground beef, breadcrumbs, grated Parmesan cheese, milk, chopped onion, minced garlic, fresh parsley, fresh basil, dried oregano, salt, black pepper, red pepper flakes (if using), and beaten egg. Use your hands or a wooden spoon to mix the ingredients until well combined. Avoid overmixing, as it can result in a dense meatloaf.
- Shape the Meatloaf . Transfer the meatloaf mixture onto a clean surface and shape it into a loaf shape. Place the meatloaf on a greased or parchment-lined tray that fits into your air fryer basket.
- Apply the Sauce . Brush the marinara over the top of the meatloaf, ensuring it is evenly coated. Reserve a small amount of the tomato sauce for later use.
- Air Fry the Meatloaf . Place the tray with the meatloaf in the preheated air fryer basket. Air fry at 375F for approximately 30-35 minutes, or until the internal temperature reaches 160F using a meat thermometer. Halfway through the cooking time, brush the reserved glaze over the meatloaf.
- Rest and Slice. Once the meatloaf is cooked, carefully remove it from the air fryer and let it rest for about 5 minutes. This resting period allows the juices to redistribute, making the meatloaf easier to slice. Cut the meatloaf into thick slices and serve.
- Serve and Enjoy! Serve the Italian Meatloaf slices alongside your favorite side dishes.
Italian Meatloaf | Air Fryer Italian Style Meatloaf https://twosleevers.com/italian-meatloaf/

Giardiniera, the tangy and vibrant Italian condiment, has charmed taste buds for generations with its medley of colorful vegetables soaked in a zesty brine. Whether spooned onto sandwiches, tossed into salads, or enjoyed as a standalone snack, giardiniera offers a burst of flavor that elevates any dish.

Why You’ll Want These Veggies With Every Meal
- Incredibly versatile . works as a topping, condiment, side dish, or flavor booster for countless meals.
- Perfect balance of tangy, spicy, and crunchy flavors that elevate even simple dishes.
- Customizable heat level . It can be mad mild, medium, or hot depending on the peppers you use.
Crafting your own refrigerator giardiniera is a rewarding experience that brings the flavors of Italy right to your kitchen. With its versatility and zesty profile, this homemade condiment is bound to become a staple in your culinary repertoire.
What Does Giardiniera Taste Like?
Giardiniera offers a unique and robust flavor profile that combines tanginess, crunchiness, and a delightful medley of vegetable flavors.
Here’s a general overview of what you can expect from your refrigerator pickled vegetables:
- Tangy - The pickling brine gives giardiniera a signature tangy taste. This tanginess balances the richness of the vegetables and adds a zesty kick to each bite.
- Crunchy Vegetables- The combination of cauliflower, carrots, celery, and bell peppers provides a satisfying crunch to the giardiniera. The vegetables are typically brined just enough to retain their texture while absorbing the flavors of the brine.
- Umami and Sweetness- Some recipes might incorporate ingredients like garlic and onions, which add layers of umami and subtle sweetness to the mix.
What Is Giardiniera Made Of?
- 1 cup Cauliflower florets - Cauliflower adds a hearty crunch and absorbs the brine beautifully.
- 1 cup Carrots - Carrots provide sweetness, vibrant color, and a firm texture that holds up well in the pickling process.
- 1 cup Celery - Celery adds a fresh, crisp snap and a mild herbal flavor that complements the stronger vegetables. It also helps maintain a refreshing, crunchy texture throughout the mix.
- 1 cup Bell Peppers - Bell peppers contribute sweetness, color, and juiciness.
- 1/2 cup Banana Peppers - Banana peppers add mild, tangy heat and that classic giardiniera “zing.”
- 1/2 cup Pearl Onions - Pearl onions add a subtle sweetness and pungency. They pickle beautifully and provide little bursts of flavor in every bite.
- 4 cloves Garlic - Minced garlic infuses the brine with bold, savory depth. It enhances the overall complexity and adds that unmistakable garlicky kick.
- 1 tablespoon Oregano - Oregano delivers earthy, herbaceous notes that are a hallmark of Italian-style giardiniera.It ties together the vegetables and helps create the signature flavor.
- 1 teaspoon Red Pepper Flakes - Red pepper flakes add heat and spice. They can be adjusted up or down depending on how hot you’d like your giardiniera to be.
- 2 cups White Wine Vinegar - White wine vinegar forms the acidic backbone of the pickling brine. It preserves the vegetables, provides tanginess, and creates the classic giardiniera taste.
- 1 cup Water - Water helps dilute the vinegar so the acidity is balanced but still strong enough to pickle the vegetables effectively.
- 1 tablespoon Salt - Salt enhances all the vegetable flavors and helps with the pickling process. It draws out moisture and ensures the brine is well-seasoned.
- 3 tablespoons Olive Oil - Olive oil adds richness and body to the giardiniera.
How To Make Giardiniera
- Prepare the Vegetables . Wash and clean all the vegetables thoroughly. Cut the cauliflower into small florets. Slice the carrots, celery, bell peppers, garlic, and peppers into appropriate sizes.
- Create the Brine . In a medium saucepan, combine the vinegar, water, and kosher salt. Bring the mixture to a boil, stirring until the salt is fully dissolved. Remove the saucepan from the heat and let the brine cool slightly.
- Assemble the Giardiniera . In a large glass jar or multiple smaller jars, layer the prepared vegetables, starting with the cauliflower. Sprinkle dried oregano and red pepper flakes over the vegetables for added flavor and color. Tuck the garlic and onion in between the layers of vegetables.
- Pour the Brine . Carefully pour the slightly cooled brine over the vegetables in the jars, ensuring that the vegetables are fully covered. Leave about half an inch of space at the top of the jars.
- Seal and Refrigerate . Using a clean utensil, gently press down on the vegetables to release any air bubbles. Drizzle a thin layer of olive oil on top of the brine. This helps create an additional seal and prevents oxidation. Seal the jars tightly with the lids. Place the jars in the refrigerator.
- Flavor Development . Allow the giardiniera to marinate in the refrigerator for at least 48 hours before enjoying it. The flavors will continue to develop over time.
- Serve and Enjoy! Once the giardiniera has marinated to your liking, it’s ready to enjoy! Store any leftovers in the refrigerator and continue to enjoy the giardiniera’s bold flavors.

Tips And Tricks
Crafting delicious giardiniera requires a bit of attention to detail and a love for pickled flavors. Here are some tips and tricks to ensure your homemade giardiniera turns out flavorful and satisfying:
- Choose Fresh Vegetables. Opt for fresh, high-quality vegetables for the best taste and texture. Look for vibrant colors and avoid vegetables that are overly wilted or bruised.
- Adjust Heat Level . The heat of your giardiniera depends on the type of peppers you use. If you prefer milder flavors, remove the seeds and membranes from hot peppers. Experiment with different pepper varieties to find your preferred level of heat.
- Let Flavors Develop . Allow the giardiniera to marinate in the refrigerator for at least 48 hours before consuming. This gives the flavors time to meld and intensify.
Variations
Giardiniera is a versatile condiment that can be customized to suit your taste preferences and creative culinary ideas. Here are some variations to consider when making it:
- Mild or Spicy - Adjust the heat level by choosing mild or hot pepper varieties. For a milder version, opt for banana peppers or sweet bell peppers. If you’re a fan of heat, include jalapenos, serranos, or even habaneros for an extra kick.
- Colorful Blend - Play with the colors of your vegetables to create a visually appealing giardiniera. Include a mix of red, yellow, and orange bell peppers along with the traditional green ones. This adds vibrancy to your pickled creation.
- Greek-Inspired - Incorporate Mediterranean flavors by using Greek olives and capers along with your pickled vegetables. This adds a briny and savory twist.
What Is Giardiniera Used For?
You can use these delicious Italian pickled vegetables in a variety of ways.
Spoon the pickled vegetables onto sandwiches, pizzas, antipasto platters, or salads to add a delightful crunch and tangy flavor. You can even pair the giardiniera with your favorite cheeses and cured meats for a delicious appetizer.
How Long Does It Last?
Refrigerator giardiniera, due to its fresh and pickled nature, has a relatively shorter shelf life compared to canned giardiniera. When properly stored in the refrigerator, homemade refrigerator giardiniera can last for about 2-3 weeks.
More Easy Vegetable Recipes
- Roasted Pearl Onions
- Air Fryer Brussels Sprouts
- Cauliflower Mac and Cheese
- Instant Pot Green Beans and Bacon
- Keto Broccoli Salad
- Sheet Pan Bhindi
- Swiss Chard With Bacon
- Instant Pot Beet Salad
- Oven Roasted Veggies


Giardiniera Recipe | Refrigerator Italian Pickled Vegetables
Ingredients
- ▢ 1 cup Cauliflower florets
- ▢ 1 cup Carrots
- ▢ 1 cup Celery
- ▢ 1 cup Bell Peppers
- ▢ 1/2 cup Banana Peppers
- ▢ 1/2 cup Pearl Onions
- ▢ 4 cloves Garlic , Minced
- ▢ 1 tbsp Oregano
- ▢ 1 tsp Red Pepper Flakes
- ▢ 2 cups White Wine Vinegar
- ▢ 1 cup Water
- ▢ 1 tbsp Salt
- ▢ 3 tbsp Olive Oil
Instructions
- Prepare the Vegetables . Wash and clean all the vegetables thoroughly. Cut the cauliflower into small florets. Slice the carrots, celery, bell peppers, garlic, and peppers into appropriate sizes.
- Create the Brine . In a medium saucepan, combine the vinegar, water, and kosher salt. Bring the mixture to a boil, stirring until the salt is fully dissolved. Remove the saucepan from the heat and let the brine cool slightly.
- Assemble the Giardiniera . In a large glass jar or multiple smaller jars, layer the prepared vegetables, starting with the cauliflower. Sprinkle dried oregano and red pepper flakes over the vegetables for added flavor and color. Tuck the garlic and onion in between the layers of vegetables.
- Pour the Brine . Carefully pour the slightly cooled brine over the vegetables in the jars, ensuring that the vegetables are fully covered. Leave about half an inch of space at the top of the jars.
- Seal and Refrigerate . Using a clean utensil, gently press down on the vegetables to release any air bubbles. Drizzle a thin layer of olive oil on top of the brine. This helps create an additional seal and prevents oxidation. Seal the jars tightly with the lids. Place the jars in the refrigerator.
- Flavor Development . Allow the giardiniera to marinate in the refrigerator for at least 48 hours before enjoying it. The flavors will continue to develop over time.
- Serve and Enjoy! Once the giardiniera has marinated to your liking, it’s ready to enjoy! Store any leftovers in the refrigerator and continue to enjoy the giardiniera’s bold flavors.
Get support & connect with our community on Facebook!
Nutrition
Don’t forget to check out my other Ketocookbooks.
Keto Instant Pot, Keto Fat Bombs, Sweets, & Treats , and Easy keto in 30 minutes.

