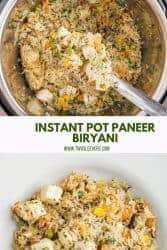

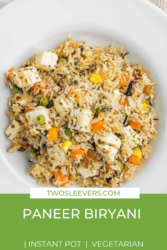
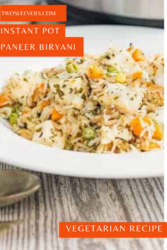
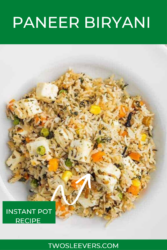
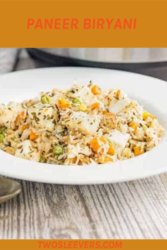


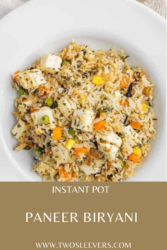
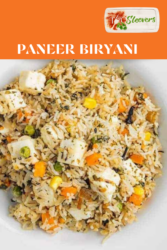
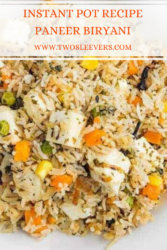
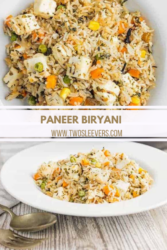

Fantastic, and supremely easy Instant Pot Vegetarian Paneer Biryani is an easy, authentic, kid-friendly, vegetarian dinner in under 30 minutes.

Why You’re Going To Love This Paneer Biryani Recipe
- Fast. Done in under 30 minutes with the help of your Instant Pot .
- Easy. A simple pour and cook recipe .
- Vegetarian. A great main course for your vegetarian family and friends.
- Authentic. All of the flavors you would expect in a traditional Indian Biryani recipe.
Ever since I created a one-pot, easy but authentic Chicken Biryani, readers have asked for a vegetarian version, and I finally made it yesterday.
Armed with home-made paneer , and a cup of frozen vegetables, I was ready to get started with this one.
I also have a low-carb chicken biryani that is full of flavor, and definitely worth trying. This one, of course, is not low carb. What it is, however, is delicious and easy.
What is Paneer?
Paneer is essentially a soft cheese, which in addition to being delicious, also tends to stay intact vs. melting when heated. This makes it really versatile to use in recipes such as this Paneer tikka for example.
Check out my very simple recipe for making paneer here .
How to Make Paneer Biryani Video
Steps For Making Paneer Biryani
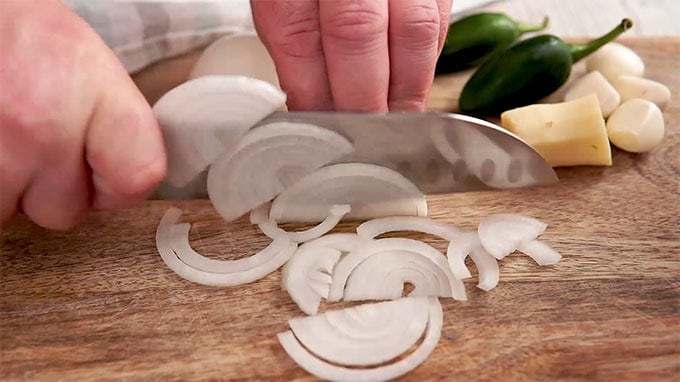
Step 1: Thinly slice onions, ginger, garlic, and serrano or jalapeño peppers .
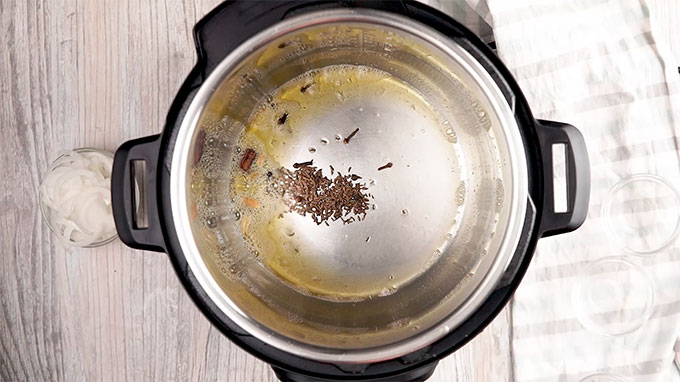
Step 2: Heat the Instant Pot on Sauté, High heat, and add ghee. To the hot ghee, add cumin, cardamom, cassia (cinnamon) and cloves and let them splutter like popcorn.
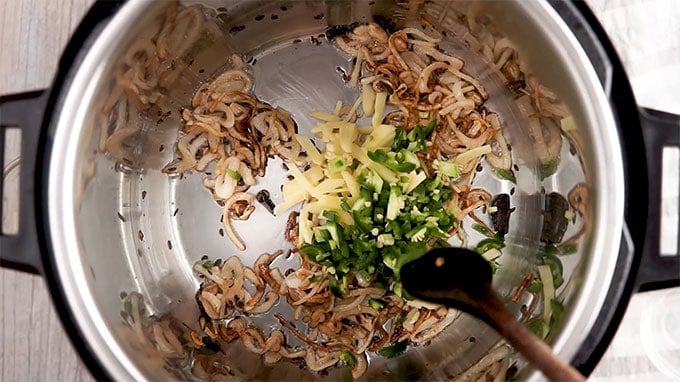
Step 3: Add the onions and cook until somewhat browned. Then, add the ginger, garlic, and peppers and cook until they have softened.
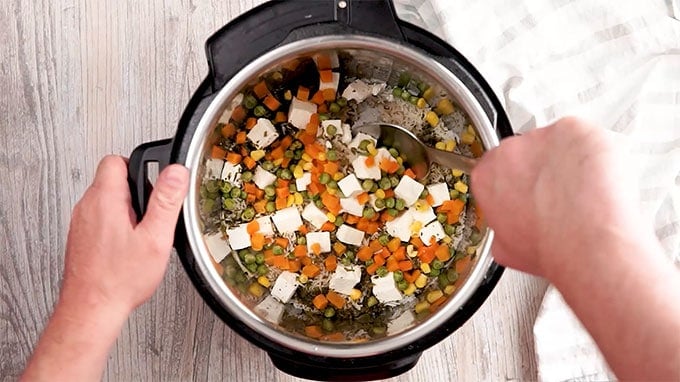
Step 4: Spread the rinsed and drained rice over the vegetables. Add water and push the rice down so no little bits are poking up over the water. Scatter the mint and cilantro on top of the rice.
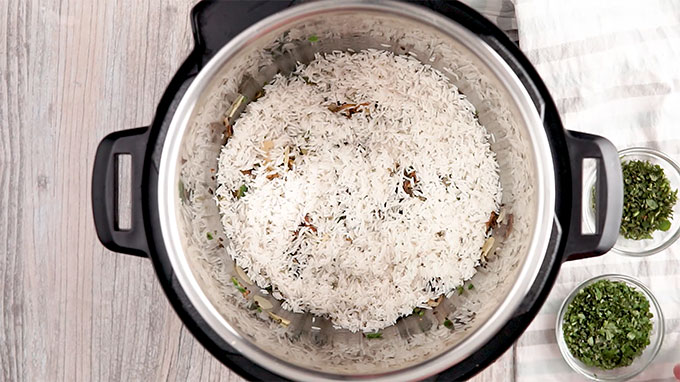
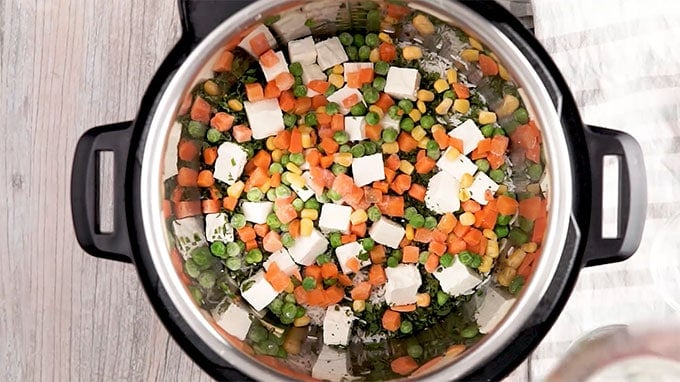
Step 5: Scatter the paneer and frozen vegetables on the top. Do not stir.
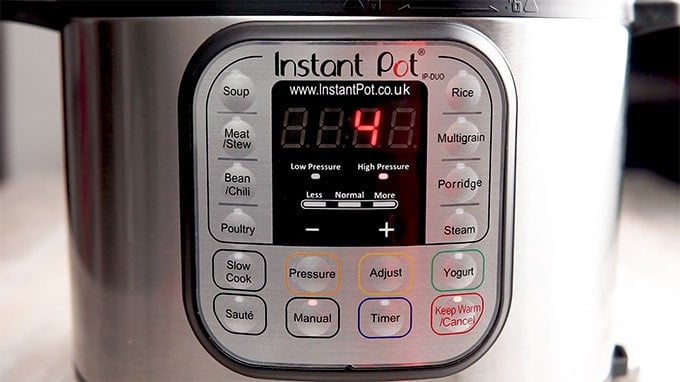
Step 6: Set the Instant to High pressure for 4 minutes.
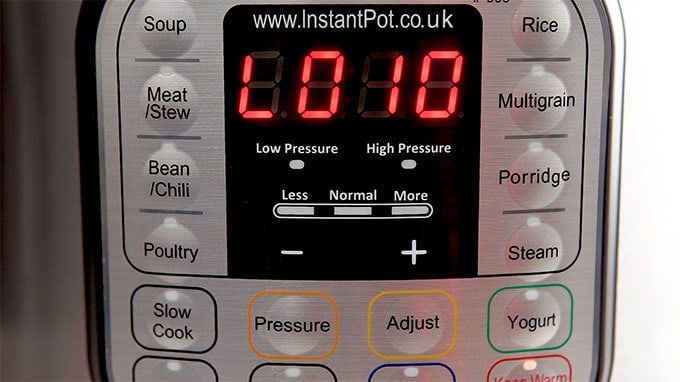
Step 7: Allow the Pressure cooker to rest undisturbed for 10 minutes. This part is important, as the rice needs this steaming time to continue to cook. At the end of the 10 minutes, release all remaining pressure.
Step 8: Stir gently and serve your fragrant and colorful masterpiece!
How Do You Make Biryani Taste Better?
One of the biggest complaints I have with Biryani that I order from some of my favorite take out places is how it can be so lacking in flavor.
My trick to making a delicious Paneer Biryani recipe ? Spices. But let’s be honest. That’s the trick for making most of my recipes delicious. Without them, all you would have is a pot of rice, cheese, and veggies.
Tips and Tricks to Making A GREAT Paneer Biryani
- I know most of you will want to add more water to this recipe–don’t do that. The rice was al dente, each grain was separate as you see in the picture, and it all just worked.
- Use long-grain basmati for this recipe and be sure to rinse and drain well.
- Don’t use starchy vegetables like potatoes, that will absorb water. I used a package of frozen mixed vegetables for this.
- You could add a little frozen cauliflower or frozen broccoli to this recipe.
- This rice freezes very well and also tastes great as leftovers.
- Serve this with raita , or with this Instant Pot Kadhi Recipe .
- Some of you will ask if you can make this with Tofu. I haven’t tried that, but I’d recommend that you use extra firm tofu, that you drain it first, and potentially also pan fry it to make it less likely to disintegrate. If you do this, leave me a comment to let me know how it went!
- I have also used frozen paneer which I got from the Indian grocery store, although I would HIGHLY recommend that you use my Instant Pot Paneer Recipe to make your own! It’s so much tastier and creamier, and it takes no time at all. But if you’re pressed for time, just use the storebought version.
- If you make your own paneer, make extra. Once it’s done, you can make Instant pot Matar Paneer , or a low carb paneer tikka as well. And of course, there’s always classic Instant Pot Palak Paneer or saag paneer.
How Many Calories Are There In Paneer Biryani?
The calories in Paneer Biryani can vary widely based on the recipe you decide to use or where you order it from. For this Paneer Biryani recipe , you can expect around 300 calories per serving.
Want More Paneer Recipes?
- Palak Paneer
- Paneer Tikka
- Matar Paneer
- How To Make Paneer

If you love this Instant Pot Paneer Biryani recipe as much as I do, make sure you share it with your friends on Facebook and Pinterest so they can try it too.

Instant Pot Paneer Vegetable Biryani
Equipment
- Instant Pot
Ingredients
Spices for Tempering
- ▢ 2 tablespoons ( 2 tablespoon ) Ghee
- ▢ ½ teaspoon ( 0.5 teaspoon ) cumin seeds
- ▢ 1 inch ( 1 ) Cinnamon
- ▢ 3-4 ( 3 ) Whole Cloves
- ▢ 4-5 ( 4 ) Whole Black Peppercorns
- ▢ 4-5 ( 4 ) Cardamom Pods
Veggies
- ▢ 1 small ( 1 ) Onion , thinly sliced
- ▢ 1 piece ( 1 piece ) Ginger , thinly sliced ( about 2 teaspoons)
- ▢ 4 cloves ( 4 cloves ) Garlic , crushed
- ▢ 2 ( 2 ) Jalapeño Peppers , diced
- ▢ ½ cup ( 8 g ) Cilantro , chopped
- ▢ 1/4 cup ( 6 ) mint leaves , finely chopped
Other Ingredients
- ▢ 1 cup ( 225 g ) paneer, , cut into cubes
- ▢ 1 cup ( 40 g ) of mixed frozen vegetables such as
- ▢ 1 cup ( 185 g ) Basmati Rice , rinsed and drained
- ▢ 1 cup ( 250 g ) Water
- ▢ Kosher Salt
Instructions
- Heat ghee in the Instant Pot and when it’s hot, put in all the tempering spices. Once they start to sizzle, put in the thinly sliced onion and cook until the onions well-browned and crisp at the edges.
- Add in the ginger, garlic, jalapeños, and cook for 2-3 minutes.
- Add salt to taste and mix well.
- If you’re using ready-made garam masala instead of whole spices, add it now and mix well.
- Spread the rinsed, drained rice across everything.
- Pour in the water, and gently push the rice so that it is covered by the water. This step is important. If any of the rice pokes up above the water, it is likely to stay a little crunchy.
- Add in paneer and the frozen vegetables. Spread out the paneer and veggie mixture.
- Sprinkle the chopped cilantro and mint on top it.
- Cook on high pressure for 4 minutes. Then, let the pot rest undisturbed for 10 minutes and then release all remaining pressure.
- Open and inhale deeply! Enjoy the true-to-tradition aroma of this dish and then mix it gently from the bottom.
Watch The Video
- I know most of you will want to add more water to this recipe–don’t do that. The rice was al dente, each grain was separate as you see in the picture, and it all just worked.
- Use long-grain basmati for this recipe and be sure to rinse and drain well.
- Don’t use starchy vegetables like potatoes, that will absorb water. I used a package of frozen mixed vegetables for this.
- You could add a little frozen cauliflower, or frozen broccoli to this recipe.
- This rice freezes very well, and also tastes great as leftovers.
- Serve this with raita , or with this Instant Pot Kadhi Recipe .
- Some of you will ask if you can make this with Tofu. I haven’t tried that, but I’d recommend that you use extra firm tofu, that you drain it first, and potentially also pan fry it to make it less likely to disintegrate. If you do this, leave me a comment to let me know how it went!
- I have also used frozen paneer which I got from the Indian grocery store, although I would HIGHLY recommend that you use my Instant Pot Paneer Recipe to make your own! It’s so much tastier and creamier, and it takes no time at all. But if you’re pressed for time, just use the storebought version.
- If you make your own paneer, make extra. Once it’s done, you can make Instant pot Matar Paneer , or a low carb paneer tikka as well. And of course, there’s always classic Instant Pot Palak Paneer or saag paneer.
Get support & connect with our community on Facebook!
Nutrition
Originally Published June 13, 2017
Don’t forget to check out my otherBest-selling Instant Pot Cookbooks!
Indian Instant Pot , Keto Instant Pot, Instant Pot Fast and Easy , Healthy Instant Pot & Vegetarian Instant Pot .

Fantastic, and supremely easy Instant Pot Vegetarian Paneer Biryani is an easy, authentic, kid-friendly, vegetarian dinner in under 30 minutes.
Why You’re Going To Love This Paneer Biryani Recipe
- Fast. Done in under 30 minutes with the help of your Instant Pot .
- Easy. A simple pour and cook recipe .
- Vegetarian. A great main course for your vegetarian family and friends.
- Authentic. All of the flavors you would expect in a traditional Indian Biryani recipe.
Ever since I created a one-pot, easy but authentic Chicken Biryani, readers have asked for a vegetarian version, and I finally made it yesterday.
Armed with home-made paneer , and a cup of frozen vegetables, I was ready to get started with this one.
I also have a low-carb chicken biryani that is full of flavor, and definitely worth trying. This one, of course, is not low carb. What it is, however, is delicious and easy.
What is Paneer?
Paneer is essentially a soft cheese, which in addition to being delicious, also tends to stay intact vs. melting when heated. This makes it really versatile to use in recipes such as this Paneer tikka for example.
Check out my very simple recipe for making paneer here .
How to Make Paneer Biryani Video
Steps For Making Paneer Biryani
Step 1: Thinly slice onions, ginger, garlic, and serrano or jalapeño peppers .
Step 2: Heat the Instant Pot on Sauté, High heat, and add ghee. To the hot ghee, add cumin, cardamom, cassia (cinnamon) and cloves and let them splutter like popcorn.
Step 3: Add the onions and cook until somewhat browned. Then, add the ginger, garlic, and peppers and cook until they have softened.
Step 4: Spread the rinsed and drained rice over the vegetables. Add water and push the rice down so no little bits are poking up over the water. Scatter the mint and cilantro on top of the rice.
Step 5: Scatter the paneer and frozen vegetables on the top. Do not stir.
Step 6: Set the Instant to High pressure for 4 minutes.
Step 7: Allow the Pressure cooker to rest undisturbed for 10 minutes. This part is important, as the rice needs this steaming time to continue to cook. At the end of the 10 minutes, release all remaining pressure.
Step 8: Stir gently and serve your fragrant and colorful masterpiece!
How Do You Make Biryani Taste Better?
One of the biggest complaints I have with Biryani that I order from some of my favorite take out places is how it can be so lacking in flavor.
My trick to making a delicious Paneer Biryani recipe ? Spices. But let’s be honest. That’s the trick for making most of my recipes delicious. Without them, all you would have is a pot of rice, cheese, and veggies.
Tips and Tricks to Making A GREAT Paneer Biryani
- I know most of you will want to add more water to this recipe–don’t do that. The rice was al dente, each grain was separate as you see in the picture, and it all just worked.
- Use long-grain basmati for this recipe and be sure to rinse and drain well.
- Don’t use starchy vegetables like potatoes, that will absorb water. I used a package of frozen mixed vegetables for this.
- You could add a little frozen cauliflower or frozen broccoli to this recipe.
- This rice freezes very well and also tastes great as leftovers.
- Serve this with raita , or with this Instant Pot Kadhi Recipe .
- Some of you will ask if you can make this with Tofu. I haven’t tried that, but I’d recommend that you use extra firm tofu, that you drain it first, and potentially also pan fry it to make it less likely to disintegrate. If you do this, leave me a comment to let me know how it went!
- I have also used frozen paneer which I got from the Indian grocery store, although I would HIGHLY recommend that you use my Instant Pot Paneer Recipe to make your own! It’s so much tastier and creamier, and it takes no time at all. But if you’re pressed for time, just use the storebought version.
- If you make your own paneer, make extra. Once it’s done, you can make Instant pot Matar Paneer , or a low carb paneer tikka as well. And of course, there’s always classic Instant Pot Palak Paneer or saag paneer.
How Many Calories Are There In Paneer Biryani?
The calories in Paneer Biryani can vary widely based on the recipe you decide to use or where you order it from. For this Paneer Biryani recipe , you can expect around 300 calories per serving.
Want More Paneer Recipes?
- Palak Paneer
- Paneer Tikka
- Matar Paneer
- How To Make Paneer
If you love this Instant Pot Paneer Biryani recipe as much as I do, make sure you share it with your friends on Facebook and Pinterest so they can try it too.
Instant Pot Paneer Vegetable Biryani
Equipment
- Instant Pot
Ingredients
Spices for Tempering
- ▢ 2 tablespoons ( 2 tablespoon ) Ghee
- ▢ ½ teaspoon ( 0.5 teaspoon ) cumin seeds
- ▢ 1 inch ( 1 ) Cinnamon
- ▢ 3-4 ( 3 ) Whole Cloves
- ▢ 4-5 ( 4 ) Whole Black Peppercorns
- ▢ 4-5 ( 4 ) Cardamom Pods
Veggies
- ▢ 1 small ( 1 ) Onion , thinly sliced
- ▢ 1 piece ( 1 piece ) Ginger , thinly sliced ( about 2 teaspoons)
- ▢ 4 cloves ( 4 cloves ) Garlic , crushed
- ▢ 2 ( 2 ) Jalapeño Peppers , diced
- ▢ ½ cup ( 8 g ) Cilantro , chopped
- ▢ 1/4 cup ( 6 ) mint leaves , finely chopped
Other Ingredients
- ▢ 1 cup ( 225 g ) paneer, , cut into cubes
- ▢ 1 cup ( 40 g ) of mixed frozen vegetables such as
- ▢ 1 cup ( 185 g ) Basmati Rice , rinsed and drained
- ▢ 1 cup ( 250 g ) Water
- ▢ Kosher Salt
Instructions
- Heat ghee in the Instant Pot and when it’s hot, put in all the tempering spices. Once they start to sizzle, put in the thinly sliced onion and cook until the onions well-browned and crisp at the edges.
- Add in the ginger, garlic, jalapeños, and cook for 2-3 minutes.
- Add salt to taste and mix well.
- If you’re using ready-made garam masala instead of whole spices, add it now and mix well.
- Spread the rinsed, drained rice across everything.
- Pour in the water, and gently push the rice so that it is covered by the water. This step is important. If any of the rice pokes up above the water, it is likely to stay a little crunchy.
- Add in paneer and the frozen vegetables. Spread out the paneer and veggie mixture.
- Sprinkle the chopped cilantro and mint on top it.
- Cook on high pressure for 4 minutes. Then, let the pot rest undisturbed for 10 minutes and then release all remaining pressure.
- Open and inhale deeply! Enjoy the true-to-tradition aroma of this dish and then mix it gently from the bottom.
Watch The Video
- I know most of you will want to add more water to this recipe–don’t do that. The rice was al dente, each grain was separate as you see in the picture, and it all just worked.
- Use long-grain basmati for this recipe and be sure to rinse and drain well.
- Don’t use starchy vegetables like potatoes, that will absorb water. I used a package of frozen mixed vegetables for this.
- You could add a little frozen cauliflower, or frozen broccoli to this recipe.
- This rice freezes very well, and also tastes great as leftovers.
- Serve this with raita , or with this Instant Pot Kadhi Recipe .
- Some of you will ask if you can make this with Tofu. I haven’t tried that, but I’d recommend that you use extra firm tofu, that you drain it first, and potentially also pan fry it to make it less likely to disintegrate. If you do this, leave me a comment to let me know how it went!
- I have also used frozen paneer which I got from the Indian grocery store, although I would HIGHLY recommend that you use my Instant Pot Paneer Recipe to make your own! It’s so much tastier and creamier, and it takes no time at all. But if you’re pressed for time, just use the storebought version.
- If you make your own paneer, make extra. Once it’s done, you can make Instant pot Matar Paneer , or a low carb paneer tikka as well. And of course, there’s always classic Instant Pot Palak Paneer or saag paneer.
Get support & connect with our community on Facebook!
Nutrition
Originally Published June 13, 2017
Don’t forget to check out my otherBest-selling Instant Pot Cookbooks!
Indian Instant Pot , Keto Instant Pot, Instant Pot Fast and Easy , Healthy Instant Pot & Vegetarian Instant Pot .

If you already signed up, you should have received an email with a password to give you unlimited access to our FREE Printable Library. The password is case sensitive. Enter it below and get printing!
Password:

Instant Pot Paneer Vegetable Biryani
Ingredients
Spices for Tempering
- 2 tablespoons Ghee
- ½ teaspoon cumin seeds
- 1 inch Cinnamon
- 3-4 Whole Cloves
- 4-5 Whole Black Peppercorns
- 4-5 Cardamom Pods
Veggies
- 1 small Onion thinly sliced
- 1 piece Ginger thinly sliced ( about 2 teaspoons)
- 4 cloves Garlic crushed
- 2 Jalapeño Peppers diced
- ½ cup Cilantro chopped
- 1/4 cup mint leaves finely chopped
Other Ingredients
- 1 cup paneer, cut into cubes
- 1 cup of mixed frozen vegetables such as
- 1 cup Basmati Rice rinsed and drained
- 1 cup Water
- Kosher Salt
Instructions
Heat ghee in the Instant Pot and when it’s hot, put in all the tempering spices. Once they start to sizzle, put in the thinly sliced onion and cook until the onions well-browned and crisp at the edges.
Add in the ginger, garlic, jalapeños, and cook for 2-3 minutes.
Add salt to taste and mix well.
If you’re using ready-made garam masala instead of whole spices, add it now and mix well.
Spread the rinsed, drained rice across everything.
Pour in the water, and gently push the rice so that it is covered by the water. This step is important. If any of the rice pokes up above the water, it is likely to stay a little crunchy.
Add in paneer and the frozen vegetables. Spread out the paneer and veggie mixture.
Sprinkle the chopped cilantro and mint on top it.
Cook on high pressure for 4 minutes. Then, let the pot rest undisturbed for 10 minutes and then release all remaining pressure.
Open and inhale deeply! Enjoy the true-to-tradition aroma of this dish and then mix it gently from the bottom.
I know most of you will want to add more water to this recipe–don’t do that. The rice was al dente, each grain was separate as you see in the picture, and it all just worked.
Use long-grain basmati for this recipe and be sure to rinse and drain well.
Don’t use starchy vegetables like potatoes, that will absorb water. I used a package of frozen mixed vegetables for this.
You could add a little frozen cauliflower, or frozen broccoli to this recipe.
This rice freezes very well, and also tastes great as leftovers.
Serve this with raita , or with this Instant Pot Kadhi Recipe .
Some of you will ask if you can make this with Tofu. I haven’t tried that, but I’d recommend that you use extra firm tofu, that you drain it first, and potentially also pan fry it to make it less likely to disintegrate. If you do this, leave me a comment to let me know how it went!
I have also used frozen paneer which I got from the Indian grocery store, although I would HIGHLY recommend that you use my Instant Pot Paneer Recipe to make your own! It’s so much tastier and creamier, and it takes no time at all. But if you’re pressed for time, just use the storebought version.
If you make your own paneer, make extra. Once it’s done, you can make Instant pot Matar Paneer , or a low carb paneer tikka as well. And of course, there’s always classic Instant Pot Palak Paneer or saag paneer.
Instant Pot Paneer Vegetable Biryani https://twosleevers.com/instant-pot-paneer-vegetable-biryani/


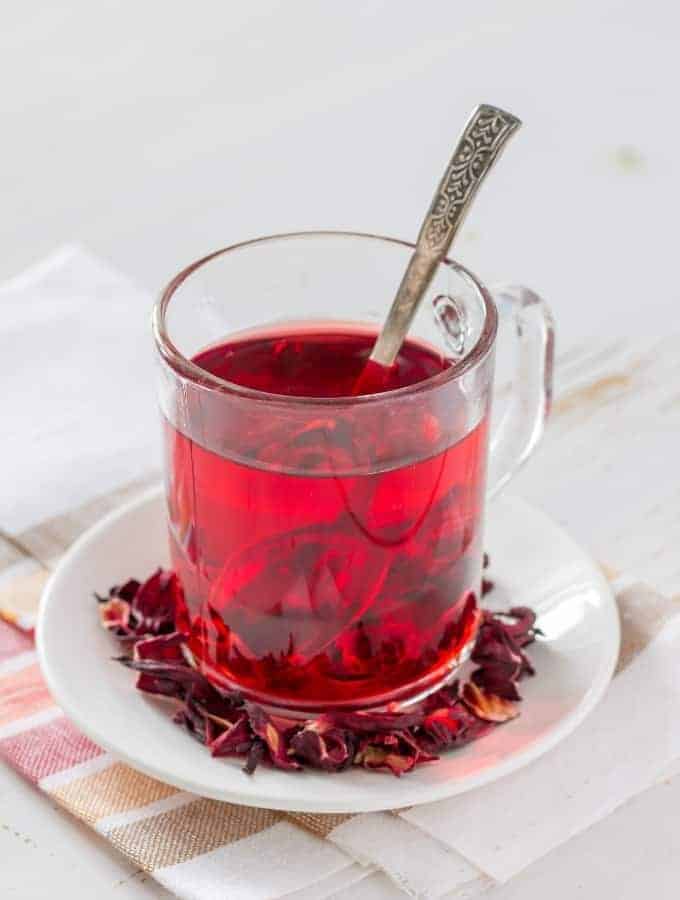
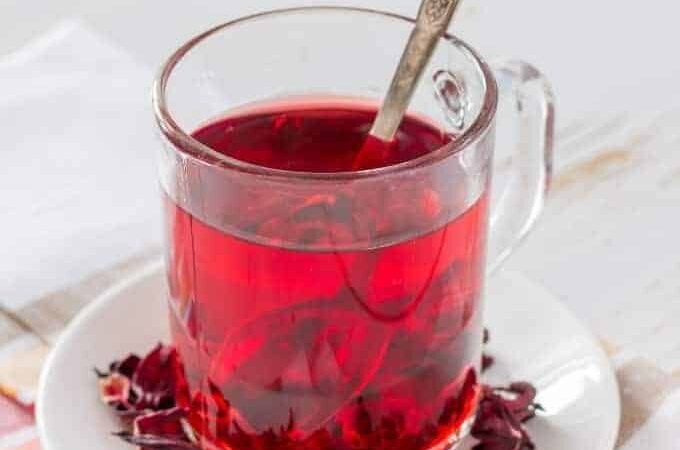
Dried hibiscus leaves make a lovely, refreshing Agua De Jamaica or Hibiscus Tea in your Instant Pot or Pressure Cooker. It’s a perfect refreshing drink!

Why You’ll Love This Jamaica Juice
Did you know that pressure cooking dried hibiscus leaves make a lovely, refreshing Hibiscus Tea in your Instant Pot or Pressure Cooker? And it’s super easy to learn how to make Hibiscus tea in your Instant Pot !
Why Did I Make this Agua De Jamaica In The Pressure Cooker?
- Less Acidic. My usual issue with Hibiscus Tea is that it can be slightly acidic.
- Less Bitter . I made Iced tea in the Instant Pot and realized how it reduced bitterness to make it that way, I was fairly sure this method would cut down on the acidity in the Hibiscus Tea recipe as well–and sure enough, it did.
- Beautiful Color . This recipe makes a very deep, red drink. I had to take it out in the sunshine so you could see pink in it.
- Smooth . Making this in the Instant Pot or pressure cooker gives it such a lovely, smooth taste.
- Easy to Strain . Straining it was a breeze. The petals sank to the bottom and all I had to do was pour carefully.
What are the Benefits of Hibiscus Tea?
I have not seen a whole range of scientific studies to support these assertions (just individual studies here and there). But Hibiscus Tea is known to:
- Lowers blood pressure
- Reduces blood sugar
- Improves liver health
- Fights bacteria in the body
How Much Hibiscus Tea Should I Drink Per Day?
If you suffer from low blood sugar or low blood pressure, try not to drink more than 2 cups a day or so. Definitely don’t guzzle this whole pot, even though you will want to drink all the deliciousness.
Does It Make You Sleepy?
It is said that hibiscus tea contains a certain level of melatonin which is linked to better sleep. Melatonin helps to calm the mind and relax the body which, in turn, usually makes a person sleepy. The Journal of Nutrition states that it could take up to three cups a day of hibiscus tea for it to work effectively for sleepiness and even blood pressure reduction.
Useful Information About This Recipe
First things first. Do not pronounce this like “Jamaica” as in the country. The “J” is pronounced as an “H” - “Hamaika.”
Is This Really Tea?
While it’s called a tea, it’s more accurately a tisane–made from steeping dried flowers. I won’t call it Tisane since I’m not a Victorian lady, but I do want you to know that little cultural tidbit about hibiscus tea.
So, what this means is that you must use dried hibiscus flowers for it. No point going to your yard in Florida, picking off a fresh hibiscus flower and then writing to me to complain how awful your tea was! Use THIS LINK to get the right flowers for this tea recipe.
Tips and Tricks on How to Make Hibiscus Tea
- Use dried hibiscus flowers for this tea, which is actually a tisane. 2. If you do not have an Instant Pot , just brew this tea on the stovetop using the same recipe. 3. Feel free to substitute sugar or another sweetener for this recipe if you choose. 4. Add fresh lemon juice at the end for an amazing tang and zip to this drink. 5. Break up a cinnamon stick or use a few pieces of cassia bark for a great flavor in this hibiscus tea. 6. The tea will keep well in the refrigerator for 3-4 days. So drink up!
Want To Try MoreDrink Recipes?
- Keto Iced Caramel Macchiato
- Boba Tea
- Instant Pot Iced Tea
- Aam Ka Panha
- Instant Pot Horchata
- Apple Cider
- Lemon Ginger Tea
So, if you’re looking for a deliciously refreshing drink for the spring, summer, or really any time of year, make this delightful Hibiscus Tea . Simply brew the tea in the Instant Pot and serve it over ice for an unbelievably simple and refreshing beverage!
Hibiscus Tea
Ingredients
- ▢ 1 cup dried hibiscus flowers
- ▢ 64 ounce Water , (2 quarts)
- ▢ 1 cup Truvia , or another sweetener
- ▢ 1/2 teaspoons Minced Ginger , (optional)
- ▢ 1 stick Cinnamon , (optional)
- ▢ Lime juice to taste , (optional)
- ▢ ice to serve
Instructions
- In the inner liner of your Instant Pot, add all ingredients except lime juice and ice.
- Cook at high pressure for 4 mins, allow 10 mins NPR and then release all pressure.
- The flowers will have settled to the bottom. Decant the liquid into a glass pitcher and when cool, add lime juice if you want a little more acidity.
- This is a semi-concentrate, so serve over ice.
Get support & connect with our community on Facebook!
Nutrition
Originally Published May 13, 2017
Don’t forget to check out my otherBest-selling Instant Pot Cookbooks!
Indian Instant Pot , Keto Instant Pot, Instant Pot Fast and Easy , Healthy Instant Pot & Vegetarian Instant Pot .
