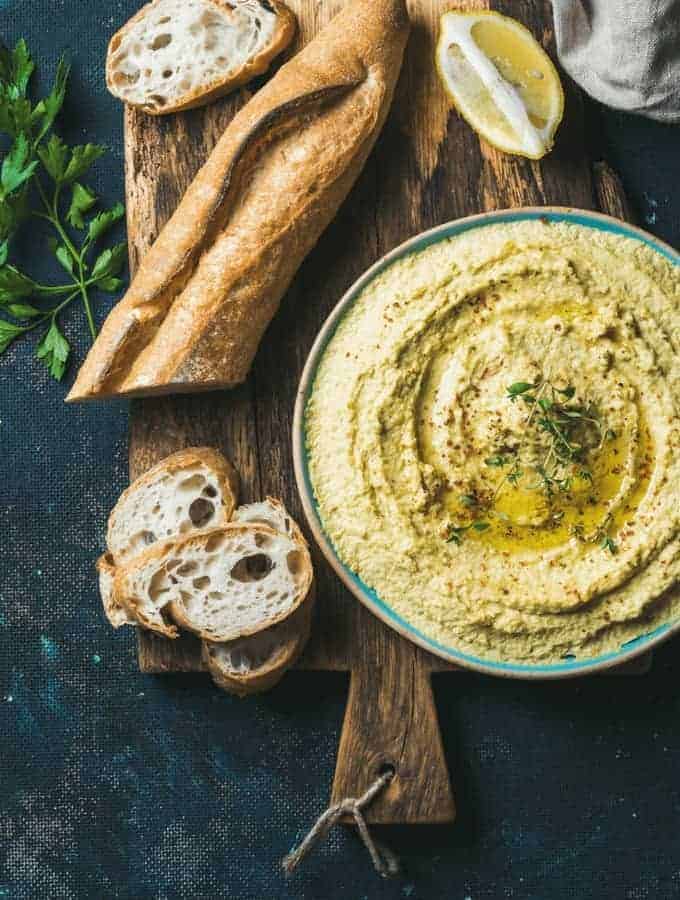
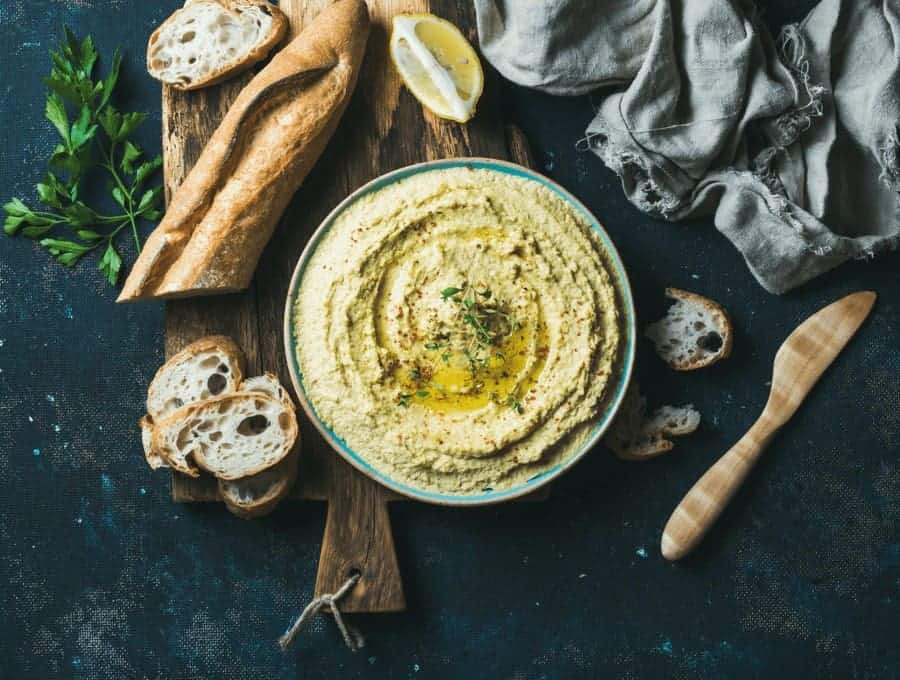
Instant Pot Hummus is so good, you’re never going to want to make it a different way. Pressure cooking the chickpeas not only changes their texture but cooks them in a fraction of the time that it would take on the stovetop. This is absolutely worth the minimal effort to make it this way.
I posted a hummus recipe from canned chickpeas several years ago, but I like cooking my own chickpeas.
Yesterday I made twice as many chickpeas as I need, and now I have enough to make chana masala or this vegan Chickpea soup recipe . You can use your Instant Pot to make this Pressure Cooker Hummus recipe with ease.
Instant Pot Hummus
This Instant Pot Hummus recipe is much like one I’ve made in the past, except I made the chickpeas in the Instant Pot. Another nice aspect of cooking your own chickpeas because you don’t have to use a whole can if you don’t want to.
Canned chickpeas do not need to be soaked, but I think going through the extra steps of soaking them yourself takes this hummus recipe to the next level.
You can eat canned chickpeas straight out of the can, because they have already been cooked. Dry chickpeas cannot be eaten raw and need to be soaked before consuming.
Preparing Dry Chickpeas For Instant Pot Hummus
I never remember to soak chickpeas the night before. Ever. So I quick-soak, which is done by soaking your beans in boiling water. An hour later, they’re fully soaked and ready to go. I love it. An even faster way to get me quickly enjoying Instant Pot Hummus.
Ingredients You’ll Need
- Dried Chickpeas , dried
- Kosher Salt
- Garlic
- tahini
- Lemon
How To Make Instant Pot Hummus
- Rinse and remove any debris from the chickpeas. Soak in boiling water for one hour.
- Place soaked chickpeas in the Instant Pot with enough hot water to cover. Add salt to taste so it infuses with the chickpeas, and cook with High Pressure for 20 minutes. Use Natural Pressure Release.
- Drain the chickpeas, make sure to save about 1/4 cup of the water.
- Place 1 cup of chickpeas in a blender or food processor, along with reserved water, garlic cloves, tahini, and lemon juice. Blend until smooth.
- Pour into a serving bowl and garnish with the olive oil, smoked paprika, and Italian Parsley. Top with toasted pine nuts.
Make Instant Pot Hummus From Chickpeas
This Pressure Cooker Chickpea Hummus recipe is another dump and go recipe. Make the chickpeas in the Instant Pot, dump everything into a blender until smooth, you’re done. Easy peasy. Not to mention this tastes far better than any store-bought hummus you’ve ever eaten.
How Long Does It Last?
Homemade hummus doesn’t last as long as store-bought hummus, but it is still worth making. If you’re not a big snacker, no need to worry. This recipe lasts between 3-4 days in an airtight container in the refrigerator.
Other Dips And Bites To Eat
Try out my low carb crackers !
My Instant Pot Baba Ghanoush Dip ! It’s a delightful treat for guests and they won’t know you saved 45 minutes by making it in the Instant Pot rather than the oven!
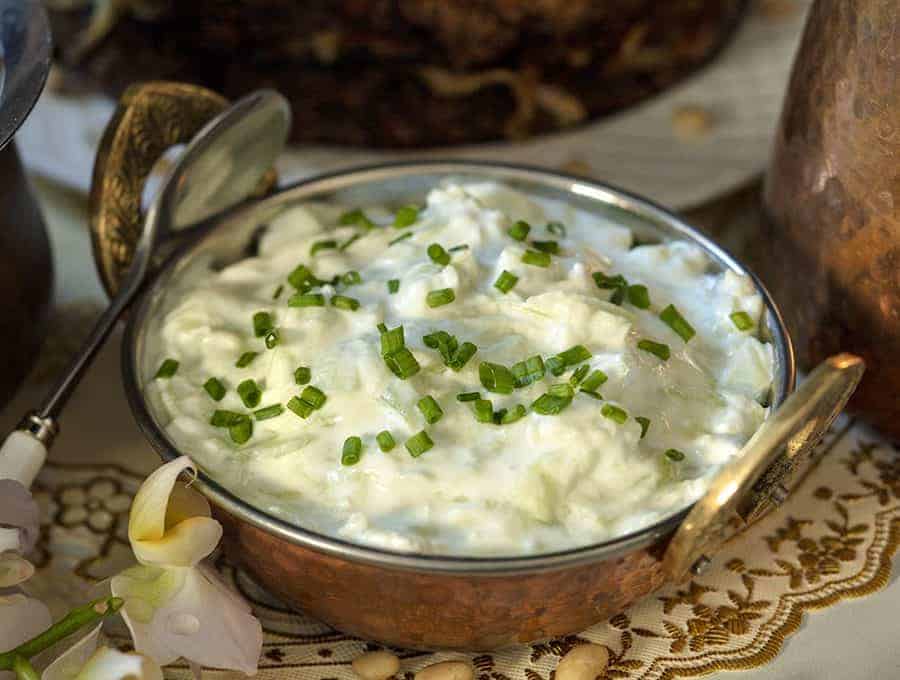
Still can’t get enough Greek recipes? Make my 5 ingredient Tzatikiki Dip that you can eat with pita chips or spoon over Gyros also made in the Instant Pot.
Tips And Tricks For Instant Pot Hummus
- Rinse and remove debris from the dried chickpeas.
- After they have soaked in water, you know they are done when the chickpeas split easily between two fingers.
- Toast whatever nuts you have in your pantry for a depth of flavor and an added crunch to the hummus!
If you like this Instant Pot Hummus recipe as much as we do, make sure you share it with your friends on Facebook and Pinterest so they can try it too.

Instant Pot Hummus
Ingredients
- ▢ 1/2 cup ( 82 g ) Dried Chickpeas , dried
- ▢ hot water, , to cover the chickpeas
- ▢ 1 teaspoon ( 1 teaspoon ) Kosher Salt ,
- ▢ 3-4 cloves ( 3 cloves ) Garlic , peeled
- ▢ 2 tablespoons ( 2 tablespoons ) tahini , (sesame paste)*
- ▢ 1 ( 1 ) Lemon , juiced
Optional Garnish:
- ▢ Smoked Paprika
- ▢ 2 tablespoons ( 2 tablespoons ) Chopped Parsley , chopped
- ▢ 1 tablespoon ( 1 tablespoon ) olive oil
- ▢ 1/4 cup ( 33.75 g ) pine nuts, , toasted (put into a small pan and toast over low-medium heat until they turn light brown)
Instructions
Soak the chickpeas in hot water for 1 hour. Consider doubling the amount you’re making so you will have leftovers for chana masala or other yummy dishes.
Once they’re soaked, place in an Instant Pot with enough water to cover, add a little salt to taste, and pressure cook them for 20 minutes at High Pressure. Use Natural Pressure Release.
Drain the beans and reserve about 1/4 cup of the water. You need about 1 cup of cooked chickpeas.
Place all ingredients except garnish in the bowl of a food processor or blender.
Process until smooth.
Pour into a bowl and decorate with garnish ingredients.
Eat.
Rinse and remove debris from the dried chickpeas.
After they have soaked in water, you know they are done when the chickpeas split easily between two fingers.
Toast whatever nuts you have in your pantry for a depth of flavor and an added crunch to the hummus!
Get support & connect with our community on Facebook!
Nutrition
Don’t forget to check out my otherBest-selling Instant Pot Cookbooks!
Indian Instant Pot , Keto Instant Pot, Instant Pot Fast and Easy , Healthy Instant Pot & Vegetarian Instant Pot .


If you already signed up, you should have received an email with a password to give you unlimited access to our FREE Printable Library. The password is case sensitive. Enter it below and get printing!
Password:
Instant Pot Hummus
Ingredients
- 1/2 cup Dried Chickpeas dried
- hot water, to cover the chickpeas
- 1 teaspoon Kosher Salt
- 3-4 cloves Garlic peeled
- 2 tablespoons tahini (sesame paste)*
- 1 Lemon juiced
Optional Garnish:
- Smoked Paprika
- 2 tablespoons Chopped Parsley chopped
- 1 tablespoon olive oil
- 1/4 cup pine nuts, toasted (put into a small pan and toast over low-medium heat until they turn light brown)
Instructions
Soak the chickpeas in hot water for 1 hour. Consider doubling the amount you’re making so you will have leftovers for chana masala or other yummy dishes.
Once they’re soaked, place in an Instant Pot with enough water to cover, add a little salt to taste, and pressure cook them for 20 minutes at High Pressure. Use Natural Pressure Release.
Drain the beans and reserve about 1/4 cup of the water. You need about 1 cup of cooked chickpeas.
Place all ingredients except garnish in the bowl of a food processor or blender.
Process until smooth.
Pour into a bowl and decorate with garnish ingredients.
Eat.
Rinse and remove debris from the dried chickpeas.
After they have soaked in water, you know they are done when the chickpeas split easily between two fingers.
Toast whatever nuts you have in your pantry for a depth of flavor and an added crunch to the hummus!
Instant Pot Hummus https://twosleevers.com/pressure-cooker-hummus/
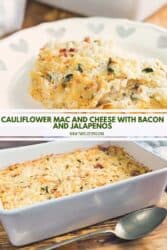
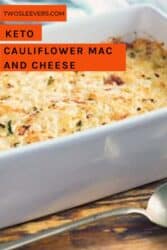
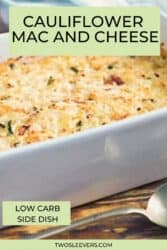
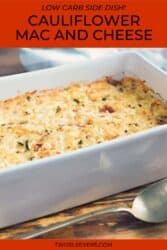
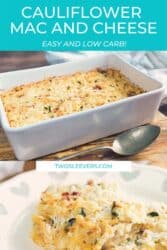
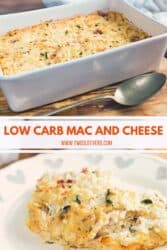
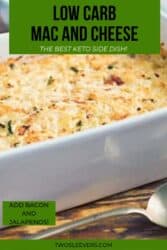
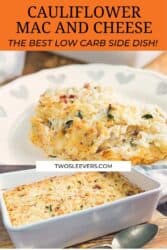
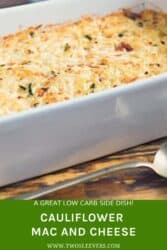
Love mac and cheese but trying to avoid the carbs? My Low Carb Cauliflower Mac and Cheese with Bacon and Jalapenos will satisfy your cravings without knocking you out of ketosis–and with no pasta for a lovely, gluten-free keto side dish .
Why This Is The BEST Keto Cauliflower Mac and Cheese Recipe
I know there are a lot of Low Carb Cauliflower Mac and Cheese recipes out there. So what makes mine one of the best keto recipes ?
Well, let’s see.
- Low Carb . It’s a perfect keto side dish .
- Delicious. It’s ooey, gooey, and cheesy.
- One-Pot Recipe. It’s all made in one pan on the stovetop .
- Gluten-Free . Great for any families with a gluten allergy.
- Fast. It’s ready in under 30 minutes .
And that, my friends, is why this is the best Keto Mac and Cheese recipe out there.
Can You Eat Mac And Cheese On A Keto Diet?
Well, yes and no. As you know, pasta is generally too high in carbs to eat in a low carb lifestyle. So, finding a delicious, low-carb alternative to pasta that has the same flavor profile as mac and cheese makes eating one of your favorite comfort foods possible.
Skip the pasta and add in cauliflower . Sure, it’s not traditional, but I assure you that it’s incredibly delicious and a great alternative.
How Do I Substitute Cauliflower For Pasta?
I promise you, replacing pasta with cauliflower in this Keto Mac and Cheese recipe is SO SIMPLE. It’s actually even easier to use cauliflower than pasta .
If you are making traditional mac and cheese (you know, the carb-loaded kind with pasta) you would have to cook your noodles first and then add all of the other ingredients. With this Cauliflower Mac and Cheese recipe , there’s no need to cook the cauliflower first. Just put it in the pan with a lid and let the steam cook the cauliflower while it melts the cheese to perfection.
How to Make Loaded Keto Cauliflower Mac and Cheese
I am just waiting for the day when people turn cauliflower into keto wine. Or a cake that actually tastes like cake.
But until then, I have found other creative, low carb cauliflower recipes to make.
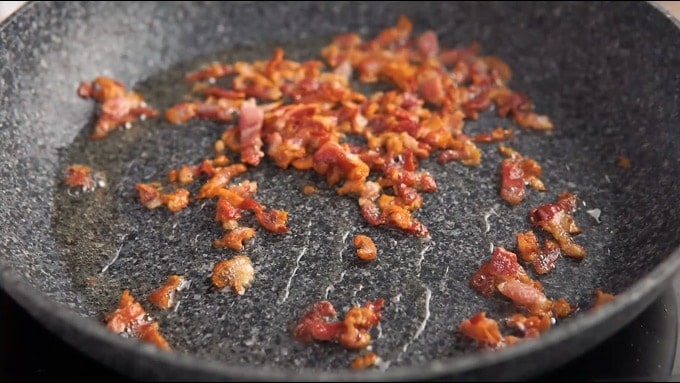
- Using a 10 or 12 inch saucepan with a lid, start browning the bacon. While it browns, you can get your other ingredients together. NOTE: You can also cook the bacon in the air fryer for this step.
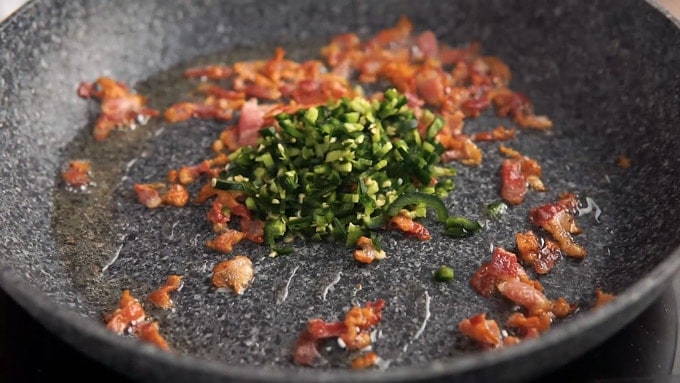
- Add in the Jalapenos and cook for a little while.
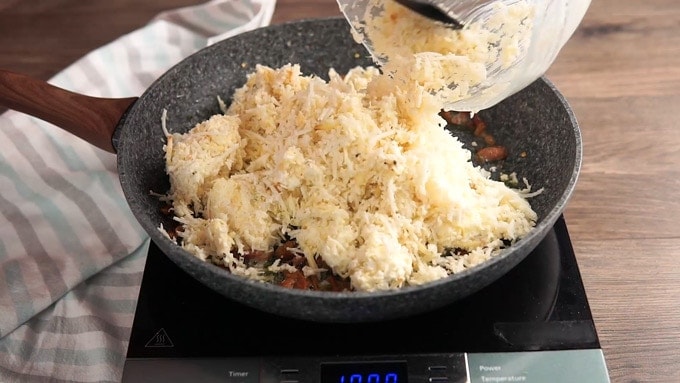
- Mix the cauliflower, cheese, half and half and seasonings. Don’t worry about everything mixing well. Once the cheese heats, it will mix in just fine.

- Pour the mixture into the pan to cook. Cover with a lid.
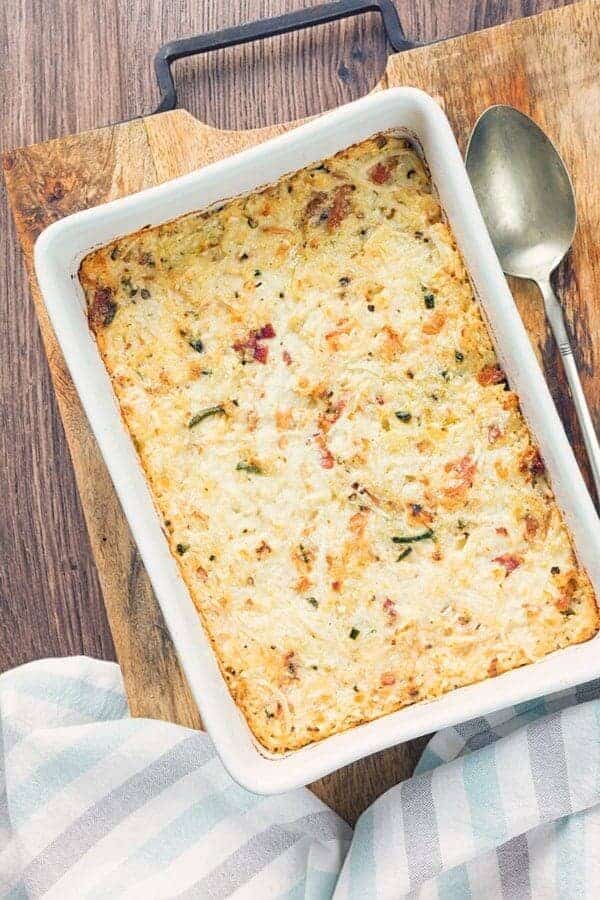
- And there you are. You can sprinkle a little extra cheese on top and broil if you prefer.
I hope the pictures above help you see how easy it is to make this great keto side dish . As I said earlier, the whole recipe cooks in less than 30 minutes and it’s definitely something everyone will enjoy
Keto Comfort Foods
I asked people in my TwoSleevers Facebook group what foods they considered comfort foods when they’re brainstorming Keto dinner ideas . Ooey, gooey, cheesy casseroles seemed to be at the top of the list for most folks.
Paradoxically, those are also the things that people struggle to make into keto side dishes.
If you can’t use cream of something soup, and you can’t use flour, how is one supposed to make a keto casserole ?
I’ll tell you how.
With lots of yummy cheese, heavy whipping cream, and other keto-friendly goodies.
Not only do they taste good, but they are keto, and because of all the fat in them, they tend to be very satisfying.
But in this case, I wanted something with even more flavor. And I wanted it fast. Enter bacon and jalapeno.
How Spicy Is This Cauliflower Mac and Cheese Keto Dish?
Well, you know, it’s all about the jalapenos. They can be deceptive. They all look the same, but some of them definitely pack a bigger punch than others.
I have a ridiculous but failproof way to tell which ones are too spicy and which ones aren’t spicy enough.
Eat a little bit of each of them when raw.
I know, I know, it sounds crazy. But if you want your keto mac and cheese to taste well-flavored but not crazy spicy, it’s worth the nibble or two to be sure you won’t be burning the roof off someone’s mouth.
When I made this, with the proportions specified below, I could taste the jalapeno, but the dish was not spicy.
I think all that cream and cheese offset some of the heat. Remember that a lot of the heat comes from the seeds, so if you want to keep the spice to a minimum, remove the seeds before adding the peppers.
What Sides Can You Eat On Keto?
- Check out my Cauliflower Breadsticks . They’re so good you won’t even notice that they aren’t real bread!
- Make this Curry Roasted Cauliflower .
- Another fantastic keto substitute recipe is my Pecan Chicken Tenders recipe . They’re every bit as delicious as breaded chicken tenders without all of the carbs!
- Enjoy another keto side dish with my Mushrooms and Bacon recipe.
- This Cauliflower Chaffle is an amazing bread substitute .
- Make this Aloo Gobi low carb by omitting the potatoes.
- Here are 16+ Keto Cauliflower Recipes You Need To Try .
- Keto Loaded Mashed Cauliflower is like loaded mashed potatoes without the guilt.
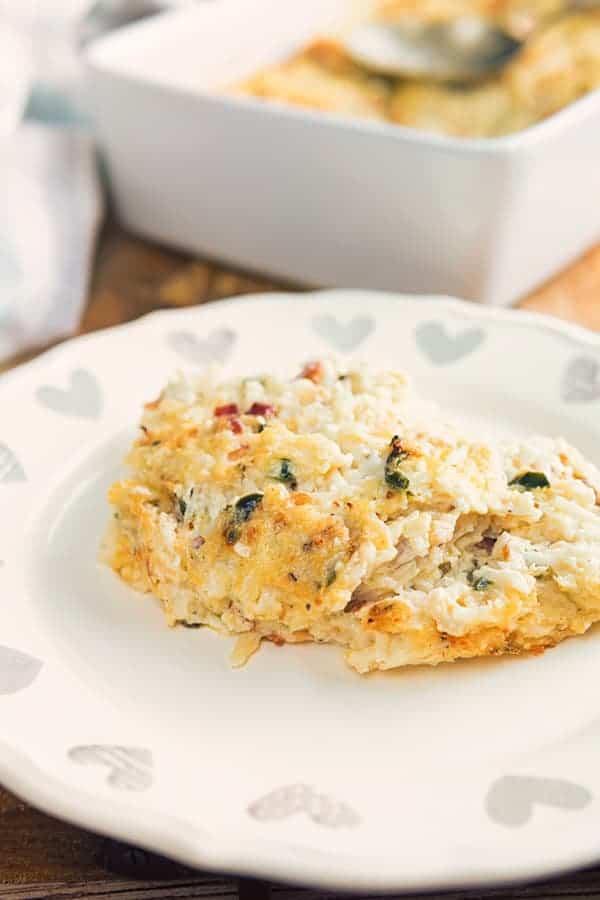
I am pleased to tell you that this Cauliflower Mac and Cheese recipe with bacon and jalapenos absolutely hit the spot and gave me all the flavor I was hoping for!

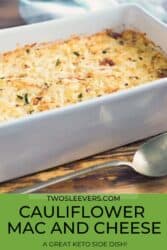
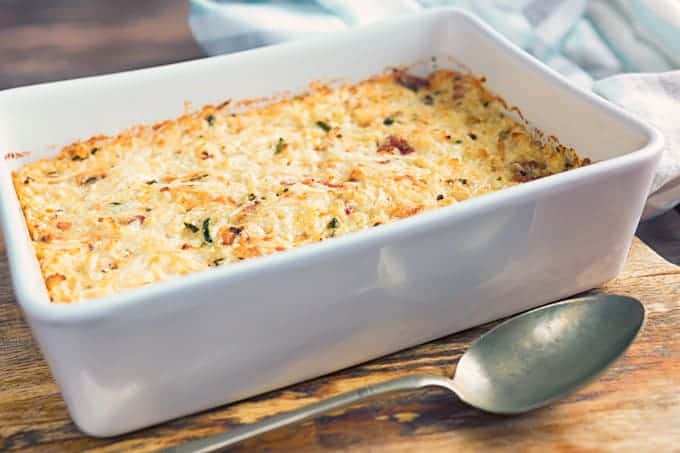
Cauliflower Mac and Cheese with Bacon and Jalapenos
Equipment
- 12 inch Skillet
- Measuring Cups
- Measuring Spoons
Ingredients
- ▢ 6 Bacon , chopped
- ▢ 2 tablespoons diced jalapenos
- ▢ 4 ounces Cream Cheese , room temperature, cubed
- ▢ 1.5 cups Mexican Blend Shredded Cheese
- ▢ 1/2 cup Heavy Whipping Cream
- ▢ 3 cups riced cauliflower
- ▢ 1/2 teaspoon Kosher Salt
- ▢ 1 teaspoon Ground Black Pepper
Instructions
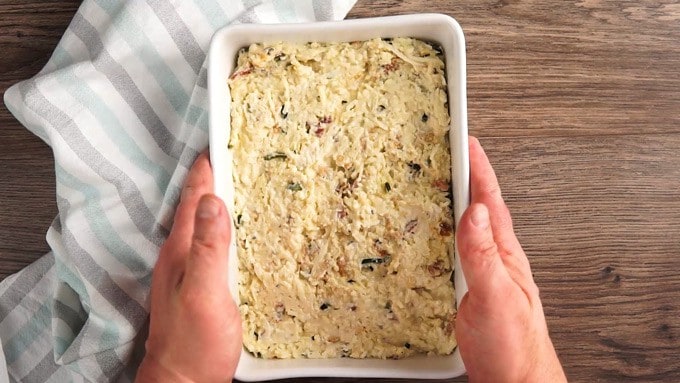
- In a 12-inch sauté pan over high heat, start cooking the bacon. While the bacon cooks, in a large bowl mix together cauliflower, cream cheese, whipping cream, shredded cheese, salt, pepper. You do not need to get a homogenous mixture just mix it up as well as you can. Once the cheeses melt, it will be a lot easier to get an even mixture.
- When the bacon is cooked, about 8-10 minutes, put in the jalapeños and sauté for one minute.
- Add the cauliflower mixture stir well, place a lid. Lower the heat to medium-low. Cook for 8 minutes or until the cheese has melted. Stir once again.
- You could also choose to microwave the bacon, put everything into a sprayed 8 x 8 baking dish, and bake at 3:50 for 15 to 20 minutes.
Watch The Video
- Use ready-made riced frozen cauliflower. Set it out as you begin to gather ingredients. Don’t worry if it isn’t fully thawed. You will just have to cook a little longer at step 3.
- Double the recipe. Cook one batch now, and freeze the other. Thaw and bake as specified.
- You can freeze this recipe easily.
- If you’re avoiding pork and bacon, use turkey bacon.
Get support & connect with our community on Facebook!
Nutrition
Originally Published May 15, 2018
Don’t forget to check out my other Ketocookbooks.
Keto Instant Pot, Keto Fat Bombs, Sweets, & Treats , and Easy keto in 30 minutes.

