This Indian Tomato Soup recipe is just like normal tomato soup. However, there are some delicious traditional Indian spices included. Get a taste of the classic along with an Indian twist.

I’m sure many of you have had tomato soup before, since it’s a winter staple. However, have you ever had Indian Tomato Soup? It’s not likely many of you have, mainly because I made it up, but, it’s a definite “must try.”
Can You Make Soup In A Blender?
If you haven’t tried the Instant Pot Blender yet, you’re missing out. It makes recipes like this Indian Tomato Soup, a breeze. It makes an already easy meal even easier.
I love the heating portion on the Instant Pot Blender. It makes your soup for you while also heating it. This means, you put all the ingredients in and what comes out is a delicious soup ready to be devoured.
If you’re still on the fence about this blender, watch my Ace Blender video on YouTube, or in the box to the right of your screen on this post.
What Makes This Indian Tomato Soup?
The biggest thing that makes this tomato soup an Indian Tomato Soup is the spices I use when I make it. It has a wonderful blend of Garam Masala, Turmeric, Cayenne, and Ginger that reminds you of all your favorite Indian flavors.
I make my own Garam Masala, and that’s what I’ve used in this recipe. If you use a store-bought Garam Masala, know that the flavors can vary drastically and may make your soup taste differently than intended in this Indian Tomato Soup recipe.
Is Indian Tomato Soup Spicy?
The great thing about making your own recipes is that you are in charge of what goes into them. I love spicy food, and I sprinkle Cayenne on just about everything.
That being said, if you’re concerned about the spice level, you can reduce or eliminate the Cayenne seasoning.
Ingredients You’ll Need
- 2 cans (14 oz each) Tomatoes - Form the rich, tangy base of the soup, providing robust tomato flavor and smooth texture once blended.
- 1/2 cup Water - Helps thin the soup to the right consistency and prevents it from becoming overly thick during cooking.
- 6 Garlic Cloves - Add bold, aromatic depth and classic Indian savory notes that enhance the tomato base.
- 6 slices Ginger - Contributes warmth, freshness, and a slightly spicy brightness that balances the acidity of the tomatoes.
- 1 teaspoon Salt - Enhances all the flavors and balances the natural acidity of the tomatoes.
- 2 teaspoons Turmeric - Adds earthiness, warm color, and subtle bitterness while providing traditional Indian flavor.
- 1.5 teaspoons Garam Masala (plus 1.5 teaspoons for finishing) - Provides warming, aromatic spice notes; the portion added at the end boosts freshness and complexity.
- 1/2–1 teaspoon Cayenne Pepper - Adds heat and depth, allowing you to adjust the spice level to taste.
- 4 ounces Butter - Adds richness, silkiness, and a velvety mouthfeel, helping mellow the acidity of the tomatoes.
- 1/2 cup Heavy Whipping Cream - Creates luxurious creaminess and balances the spices with a smooth, slightly sweet finish.
- 1/4 cup Cilantro - Sprinkled at the end for freshness, color, and a bright herbal note that complements the warm spices.
How To Make Indian Tomato Soup?
- Place undrained tomatoes, water, ginger, garlic, salt, turmeric, cayenne, and 1 teaspoon of garam masala into the heated blender container.
- Press the Soup 2 button.
- When the blender shows DONE, using a hot pad carefully remove the inner insert on the lid and set aside. Add the cubes of butter and 1 teaspoon of garam masala through the opening in the lid. Place a towel on top of the opening and press BLEND LOW.
- Allow the blender to process the butter and soup for 10 seconds. Then, add 1/2 cup of cream in a slow steady stream.
- Process for 10 seconds until the cream is well-incorporated into the sauce. Press CANCEL to turn off the blender.
- Garnish with cilantro and serve.
Tips And Tricks
Making Indian Tomato Soup in the Ace Blender is incredibly easy, and these tips will help you get the smoothest texture and most vibrant flavor every time.
- Roughly chop aromatics like garlic and ginger. No need to mince them since the blender will puree everything to a silky finish.
- Use canned tomatoes with no added sugar so the flavor stays bright and natural without unwanted sweetness.
- Layer ingredients properly by adding liquids first and heavier ingredients on top to prevent sticking or burning.
- Add butter and cream only after blending to keep them from separating and to create a smoother, richer finish.
Variations
If you want to switch up the flavor profile or adapt the soup to different dietary needs, these variations offer easy and flavorful ways to personalize your Indian Tomato Soup.
- Coconut Tomato Soup (Dairy-Free/Vegan) - Replace butter and cream with coconut milk for a rich, tropical flavor that pairs beautifully with ginger and garam masala.
- Spicy Tomato Soup - Add extra cayenne, a chopped green chili, or a spoonful of red chili paste for more heat.
- Roasted Tomato Soup - Use fire-roasted canned tomatoes or roast fresh tomatoes before blending for deeper, smokier flavor.
- Creamy Tomato Bisque Style - Add more cream and a bit of vegetable broth to make the soup extra silky and indulgent.
What To Eat With Indian Tomato Soup
Indian tomato soup is rich, aromatic, and full of warm spices, and pairing it with the right sides can turn it into a complete, satisfying meal.
- Naan or Garlic Naan - Soft, warm bread perfect for dipping into the creamy, spiced soup.
- Raita - Cool, refreshing yogurt with cucumber that balances the warmth of the soup.
- Basmati Rice or Cauliflower Rice - A simple side that makes the meal heartier without overpowering the flavors.
How Long Does It Last?
Indian tomato soup typically lasts 3 to 4 days in the refrigerator when stored properly in an airtight container.
Because it contains dairy (butter and cream), it’s important to let the soup cool completely before refrigerating to prevent condensation from watering it down.
The flavors tend to deepen as it sits, making it even better the next day.
Can You Freeze It?
If you want to keep it longer, Indian tomato soup freezes well for up to 2–3 months, especially if you add the cream after thawing to maintain the smoothest texture.
When reheating, warm it gently on the stovetop or in the microwave, stirring well to bring the creamy consistency back together.
More Spectacular Soups

- Butternut Squash Soup - this soup is so simple and is perfect for cool weather!
- Spicy Chicken Poblano Soup - this is a twist on classic chicken soup, and will leave you wanting more!
- Moroccan Chickpea Soup - This hearty soup is full of warm spices and great flavors!
- Pork Belly Cabbage Soup - A delightfully hearty and warming soup.
And if you’re looking for more great recipes to make in your Instant Pot Ace Blender, check out my Spiced Turmeric Latte . It can be served hot or iced and is made easily in an Instant Pot Blender!

If you like traditional tomato soup, you’ll love this Indian Tomato Soup recipe . It’s delicious, creamy, and super easy to make. Not to mention, it’s perfect for cold weather.

Indian Tomato Soup Recipe | Easy Indian Soup With Tomatoes
Equipment
- Instant Pot Ace Blender
- STAINLESS STEEL MEASURING CUPS
- Measuring Spoons
Ingredients
- ▢ 2 14-oz cans ( 822 g ) Tomatoes
- ▢ 1/2 cup ( 125 ml ) Water
- ▢ 6 ( 6 ) Garlic Cloves
- ▢ 6 slices ( 6 ) Ginger , equivalent to 2 tablespoons minced
- ▢ 1 teaspoon ( 1 teaspoon ) Kosher Salt
- ▢ 2 teaspoons ( 2 teaspoons ) Turmeric
- ▢ 1.5 teaspoon ( 1.5 teaspoon ) Garam Masala , + 1.5 teaspoon garam masala for finishing
- ▢ 1/2-1 teaspoon ( 0.5 teaspoon ) Cayenne Pepper
- ▢ 4 ounces ( 113.4 g ) Butter , diced into cubes
- ▢ 1/2 cup ( 119 g ) Heavy Whipping Cream
- ▢ 1/4 cup ( 4 g ) Cilantro , chopped
Instructions
Place undrained tomatoes, water, ginger, garlic, salt, turmeric, cayenne, and 1 teaspoon of garam masala into the heated blender container.
Press the Soup 2 button.
When the blender shows DONE, using a hot pad carefully remove the inner insert on the lid and set aside. Add the cubes of butter and 1 teaspoon of garam masala through the opening in the lid. Place a towel on top of the opening and press BLEND LOW.
Allow the blender to process the butter and soup for 10 seconds. Then, add 1/2 cup of cream in a slow steady stream.
Process for 10 seconds until the cream is well-incorporated into the sauce. Press CANCEL to turn off the blender.
Garnish with cilantro and serve.
Do not add your butter and cream until after your soup is done cooking, for best results.
Remember the blender will be hot, so be careful!
Get support & connect with our community on Facebook!
Nutrition

If you already signed up, you should have received an email with a password to give you unlimited access to our FREE Printable Library. The password is case sensitive. Enter it below and get printing!
Password:

Indian Tomato Soup Recipe | Easy Indian Soup With Tomatoes
Ingredients
- 2 14-oz cans Tomatoes
- 1/2 cup Water
- 6 Garlic Cloves
- 6 slices Ginger equivalent to 2 tablespoons minced
- 1 teaspoon Kosher Salt
- 2 teaspoons Turmeric
- 1.5 teaspoon Garam Masala + 1.5 teaspoon garam masala for finishing
- 1/2-1 teaspoon Cayenne Pepper
- 4 ounces Butter diced into cubes
- 1/2 cup Heavy Whipping Cream
- 1/4 cup Cilantro chopped
Instructions
Place undrained tomatoes, water, ginger, garlic, salt, turmeric, cayenne, and 1 teaspoon of garam masala into the heated blender container.
Press the Soup 2 button.
When the blender shows DONE, using a hot pad carefully remove the inner insert on the lid and set aside. Add the cubes of butter and 1 teaspoon of garam masala through the opening in the lid. Place a towel on top of the opening and press BLEND LOW.
Allow the blender to process the butter and soup for 10 seconds. Then, add 1/2 cup of cream in a slow steady stream.
Process for 10 seconds until the cream is well-incorporated into the sauce. Press CANCEL to turn off the blender.
Garnish with cilantro and serve.
Do not add your butter and cream until after your soup is done cooking, for best results.
Remember the blender will be hot, so be careful!
Indian Tomato Soup Recipe | Easy Indian Soup With Tomatoes https://twosleevers.com/indian-tomato-soup/

Tired of paying way too much for keto-friendly chocolate chips? Save yourself some money with these 2 ingredients, low carb, and sugar-free chocolate chips!

Why I Love These Keto Friendly Chocolate Chips
- Affordable. Have you ever purchased sugar free chocolate chips at the grocery store? They’re EXPENSIVE. Making them at home isn’t.
- Easy. Mix, pour, cool, and store. That’s all you have to do.
- Sugar Free. No real sugar to be found in this recipe
- Low Carb. 8 net carbs per serving. While these aren’t SUPER low carb, they still fit in your macros if you’re living a low carb lifestyle.
- Delicious. Who needs the real thing? These sugar free chocolate chips are amazing in any low carb recipe.
The low cost of making these keto-friendly chocolate chips is just one of the many reasons why I love making them. Not only are they cheaper than store-bought, but they only take two ingredients to make! Believe it or not, two ingredients are all it takes to make yourself some deliciously low carb and sugar-free chocolate chips.
Not only are they 2 ingredient chocolate chips, but they can be made easily right in your microwave. No need to mess with a double boiler or any of that nonsense. Just a couple of ingredients, a microwave-safe container, and a microwave and you’ve got yourself some delectable low carb chocolate chips in no time.
Is Chocolate Keto Friendly?
Yes! But you do have to do some research and be open to change. Most milk chocolate that we all love has tons of sugar and is high in carbs. For chocolate on a keto diet, look for unsweetened chocolate, cocoa nibs, and dark chocolate.
Do not buy Chocolate Chips with sweeteners with maltitol like Hershey’s chips since it raises blood sugar. Dark chocolate should contain 70% of cocoa solids. One ounce of unsweetened chocolate is the lowest carb content of your chocolate options.
If you melt the chocolate down, you can add Swerve, and then add it to your favorite recipes for a depth of chocolate flavor.
Ingredients You’ll Need To Make Sugar Free Chocolate Chips
Two things. Seriously, that’s all you’ll need for a great low carb alternative to chocolate chips.
Grab these ingredients before getting started:
- Bakers Unsweetened Chocolate, (about half a package)
- Powdered Swerve
What Is Swerve?
Can you use Swerve on a keto diet? I love substituting Swerve for sugar in my keto recipes. Swerve is a low-carb sugar substitute that has about 5 carbs per serving. You can swap it out in place of sugar cup for cup in recipes. And, it has no aftertaste so it truly does not affect the taste of your favorite recipes.
Here is a great article from My Keto Kitchen talking about sweetener options for a low carb lifestyle
How To Make Sugar Free Chocolate Chips
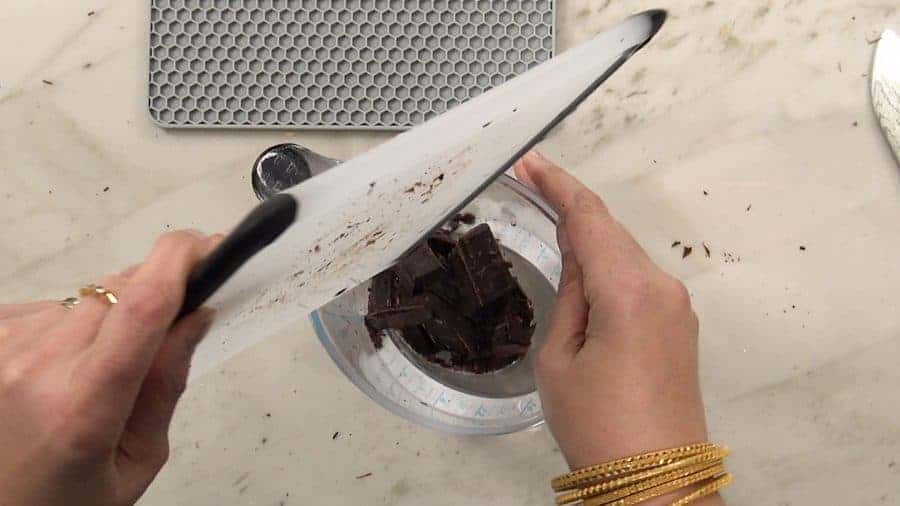
- Rough chop the chocolate and place it in a microwave-safe container.
- Add the powdered swerve in with the chocolate and shake it around a bit to make sure that it is evenly distributed.

Place the container into the microwave for one minute to a minute and a half.
In the meantime, grab a silicon mat or chocolate chips mold and a spoon spatula.

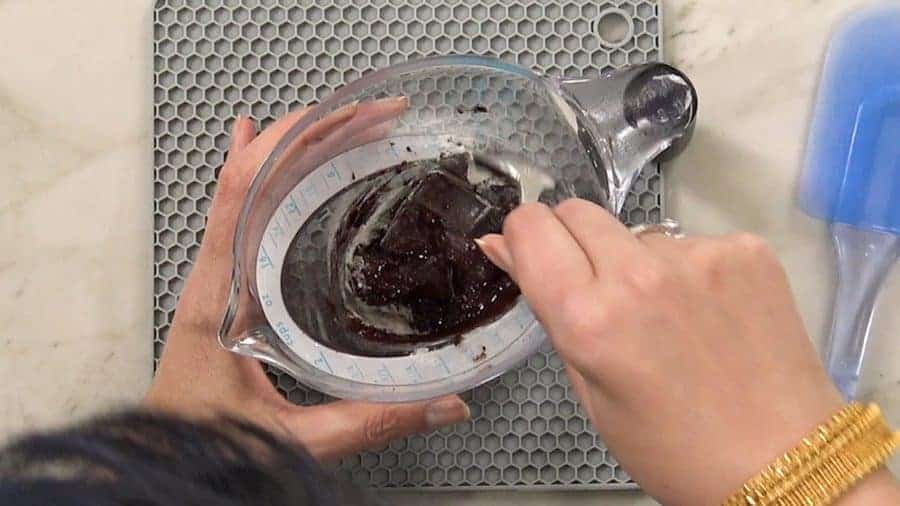
- Take the container out of the microwave and mix the ingredients together. If the chocolate is still too solid, simply microwave it for another 30 seconds and mix again. Repeat until you have a smooth mixture, making sure not to over microwave it and burn the chocolate.
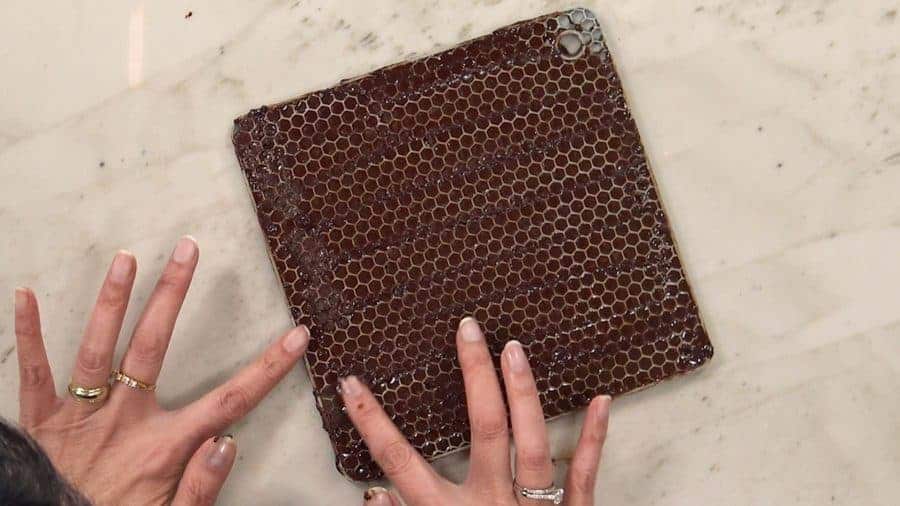
- Take a spoon or spatula and spread the mixture evenly across the silicon mat or chocolate chips mold.
Place the mold into the fridge and allow the chips to cool for a while.
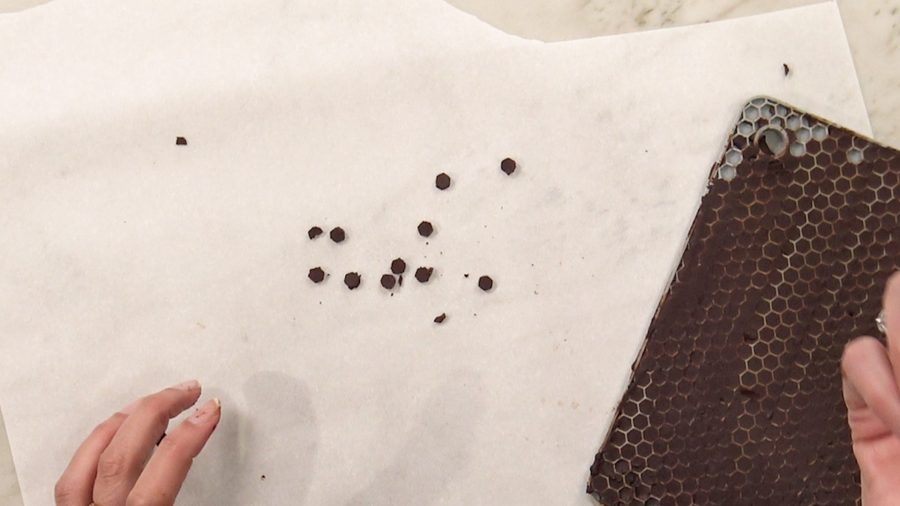
Once the chocolate chips have cooled enough to solidify, simply flip the silicone mold over onto a piece of parchment paper and pop the chocolate chips out.

- Let the chips sit out for a little bit to allow them to harden.
Tips And Tricks For Making Sugar Free Chocolate Chips
- Only microwave the ingredients for 1 minute to start and in 30 second increments after that. It’s super important that you don’t burn the chocolate as that will ruin the taste and consistency of the chips.
- If you don’t have a honeycomb silicone pot holder as I have, you can purchase one HERE . If you prefer to use a chocolate chip mold, you can use these silicon molds .
- Make sure to taste the mixture before placing it into the mold. Feel free to add an additional teaspoon of powdered Swerve if the sweetness is not to your liking.
- Make sure you really smash the mixture down into the molds. That way you don’t have any weird air pockets or missing sections in your chocolate chips.
- Make sure to place down some wax paper before you pop the chips out of the mold. This will save you the trouble of having the clean your countertops afterward.
- If you’re having trouble getting the chips out of the molds, place the mold back into the fridge and allow it to cool for a bit longer.
How Long Do They Last?
When stored properly, these chocolate chips can last up to a year. The likelihood of them lasting longer than that is high, but a year is a rough estimate.
Basically, the expiration date on the low carb chocolate you use in this recipe will be the expiration date for your chocolate chips.
For the best storage, keep the sugar free chocolate chips in an air tight container in a cool place out of sunlight. They are small and will melt together to form a large chocolate blob if stored improperly.
Looking For A Great Use For Sugar Free Chocolate Chips?
If you don’t plan on just eating chocolate chips by the handful as they are, you can use them to make some great keto-friendly recipes!
- These wonderfully delicious Low Carb Chocolate Chip Cookie s will have even the most discerning cookie enthusiast swearing these aren’t low carb!
- These Keto Chocolate Cheesecake Brownies are a chocolate cheesecake lover’s dream!
- Few things go together like mint and chocolate, and these Keto Mint Chocolate Bars are a fine example of that!
- Keto Cookies - the perfect sweet treat for your cookie cravings!


Sugar Free Chocolate Chips
Equipment
- Honeycomb Silicone Mat or
- Chocolate chip molds
Ingredients
- ▢ 2 ounces Bakers Unsweetened Chocolate , (about half a package)
- ▢ 5-6 teaspoons Powdered Swerve
Instructions
Rough chip the chocolate and place it in a microwave save container.
Add the powdered swerve in with the chocolate and shake it around a bit to make sure that it is evenly distributed.
Place the container into the microwave for one minute to a minute and a half.
In the meantime, grab a silicon mat or chocolate chips mold and a spoon spatula.
Take the container out of the microwave and mix the ingredients together. If the chocolate is still too solid, simply microwave it for another 30 seconds and mix again. Repeat until you have a smooth mixture, making sure not to over microwave it and burn the chocolate.
Take a spoon or spatula and spread the mixture evenly across the silicon mat or chocolate chips mold.
Place the mold into the fridge and allow the chips to cool for a while.
Once the chocolate chips have cooled enough to solidify, simply flip the silicon mold over onto a piece of parchment paper and pop the chocolate chips out.
Let the chips sit out for a little bit to allow them to harden.
Only microwave the ingredients for 1 minute to start and in 30 second increments after that. It’s super important that you don’t burn the chocolate as that will ruin the taste and consistency of the chips.
If you don’t have a honeycomb silicon pot holder like I have, you can purchase one HERE . If you prefer to use a chocolate chip mold, you can use these silicon molds .
Make sure to taste the mixture before placing it into the mold. Feel free to add an additional teaspoon of powdered Swerve if the sweetness is not to your liking.
Make sure you really smash the mixture down into the molds. That way you don’t have any weird air pockets or missing sections in your chocolate chips.
Make sure to place down some wax paper before you pop the chips out of the mold. This will save you the trouble of having the clean your counter tops afterwards.
If you’re having trouble getting the chips out of the molds, place the mold back into the fridge and allow it to cool for a bit longer.
Get support & connect with our community on Facebook!
Nutrition
Originally Published October 14, 2019
Don’t forget to check out my other Ketocookbooks.
Keto Instant Pot, Keto Fat Bombs, Sweets, & Treats , and Easy keto in 30 minutes.

