

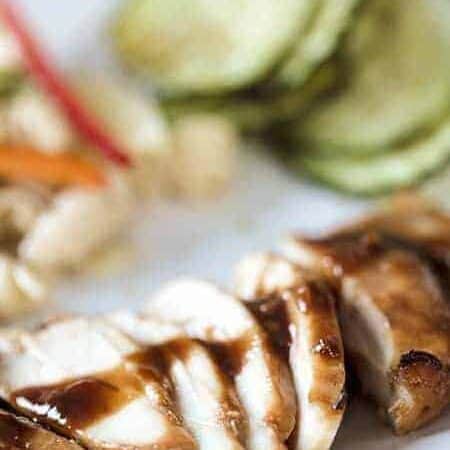
If you want to give your chicken a tropical flare, you need to make this Air Fryer Huli Huli Chicken. Make the sauce and the chicken at the same time, and get a sweet and slightly spicy, family-friendly dinner on the table fast. If this isn’t the best Air Fryer Huli Huli Chicken, then please send me your recipe because we loved this one, and I can’t imagine how it gets better than this!
Why You’ll Love This Huli Huli Chicken Recipe
- Fast. Not counting the time it takes to marinate the chicken, this dish is ready in under 30 minutes .
- Easy. Prepare the marinade, air fry , and serve with sauce.
- Low Carb . Only 12 net carbs per serving.
- Flavorful. Packed with flavor that will leave you wanting to make this Huli Huli Chicken over and over again. It’s one of our best air fryer chicken recipes !
Why Is It Called Huli Huli Chicken?
“Huli” means, “turn” in Hawaiian. Traditional Hawaiian barbecue is made over a fire pit where it’s turned constantly over the heat to get an even cook. Huli Huli Chicken is marinated chicken that tastes great cooked in your Air Fryer.
The Huli Huli sauce has all the amazing tropical flavors you’d expect from a Hawaiian dish. You get a nice tang from the pineapple, and rich and savory contrast from the soy sauce making a beautiful combination of flavors.
What Is Hawaiian Chicken Made Of?
- Boneless Skinless Chicken Thighs
For the sauce:
- Canned pineapple chunks- Use the kind in juice, not heavy syrup.
- Soy Sauce - Adds a salty, umami flavor to the sauce/marinade.
- Splenda - You can use any variety of sugar or sugar substitute for this, just keep in mind it will change the nutritional values per serving.
- Ketchup - Yes, ketchup. It adds a unique flavor to the sauce while keeping the ingredients to a minimum.
- Minced Garlic - You can mince your own, or use one of my favorite hacks–a tube of garlic paste. It keeps prep time down and comes in handy if you have mobility issues.
- Minced Ginger - This adds a small amount of spice to the dish without being overly hot. You can also find minced ginger in a squeeze tube.
- Chopped Green Scallions - These add a fresh note to the recipe to help break up the heaviness of the sauce.
Why Do I Need To Double The Sauce?
Here’s a tip about air frying. Unless you want to fill your house with a lot of smoke, you really need the meats relatively dry before they go in. So what I do is that I marinate the meats to tenderize and provide flavor–but then I put them in relatively dry. After they are cooked, I pour some sauce on top.
It is EXTREMELY important that you don’t use the marinade for the sauce. You really don’t want to risk getting sick with raw chicken marinade.
Instead, just do what I tell you to, which is make twice the sauce needed, use half the marinade, and pour the other half over the cooked meat.
What Do You Serve With Huli Huli Chicken?
This dish is incredibly versatile, so the possibilities of sides to serve with it are virtually limitless. Here are some of my favorite things to serve alongside Huli Huli Chicken:
- Cucumber Salad
- Instant Pot Rice
- Roasted Ratatouille
- Keto Broccoli Salad
- Cauliflower Rice
How Long Does It Last?
Huli Huli Chicken can be kept for up to 4 days in an air-tight container in the refrigerator. Feel free to double the entire recipe, as it’s just as tasty reheated as it is fresh.
Want MoreAir Fryer Recipes?
- Air Fryer Zucchini
- Air Fryer Corn on the Cob
- French Toast
- Keto Shrimp Scampi
- Air Fryer Mushrooms
- Fish Nuggets
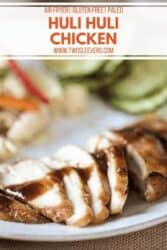
Huli Huli Chicken
Ingredients
- ▢ 4 ( 4 ) Boneless Skinless Chicken Thighs
For the sauce:
- ▢ 8 ounces ( 226.8 g ) canned pineapple chunks , n juice, drained with juice reserved
- ▢ 1/4 cup ( 58 ml ) Soy Sauce
- ▢ 1/4 cup ( 50 g ) Splenda , or sugar
- ▢ 2 tbsp ( 2 tbsp ) Ketchup
- ▢ 1 tbsp ( 1 tbsp ) Minced Garlic
- ▢ 1 tbsp ( 1 tbsp ) Minced Ginger
- ▢ 1/4 cup ( 25 g ) Chopped Green Scallions , chopped
Instructions
- Use a fork to poke holes into the chicken and place the chicken in a large bowl or in a Ziploc bag.
- Make the sauce.
- Remove 1/4 cup of juice from the canned pineapple and drink the rest as your reward. Set aside the pineapple chunks.
- In a small microwave safe bowl, mix together 1/4 cup of pineapple juice, soy sauce, sugar, ketchup, ginger and garlic.
- Pour half the sauce over the chicken Mix until the thighs are well-coated with the marinade. Reserve the rest of the sauce to cook as a dipping sauce (below).
- Set aside the chicken to marinate for 30 minutes or up to 24 hours in the refrigerator.
- Place the marinated chicken in the airfryer at 360F for 15 minutes, turning half way through.
- Meanwhile, place the reserved sauce in the microwave and cook on high for 45-60 seconds, stirring every 15 seconds. You are going to cook this until you get a thick glaze or pouring sauce that you can use with the cooked chicken
- Using a meat thermometer, ensure your chicken has reached an internal temperature of 165F.
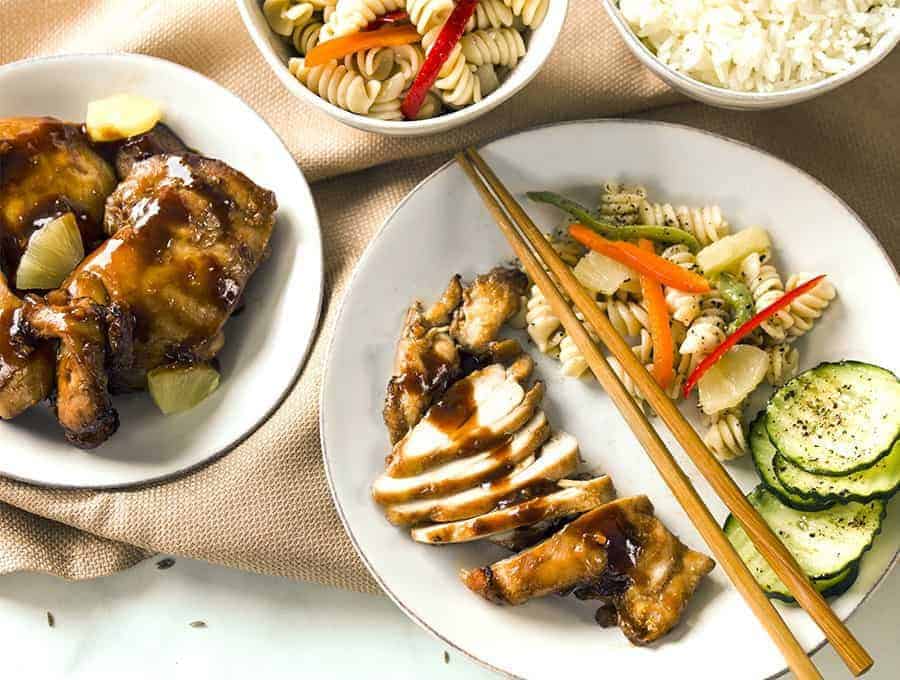
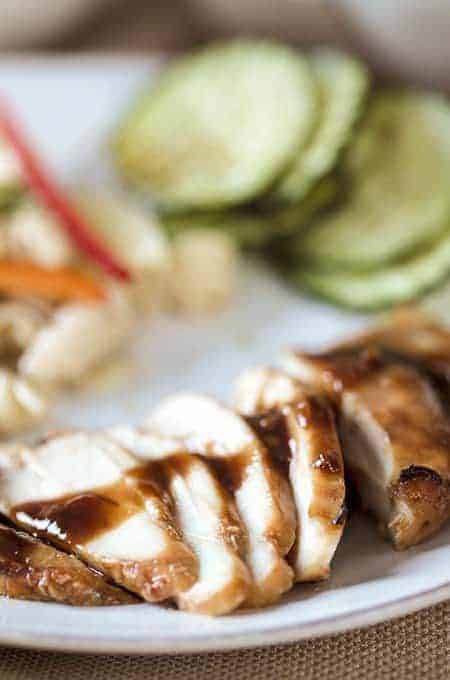
- Remove chicken to a serving tray, garnish with pineapples and green onions and serve with the thickened sauce poured over all of it.
Get support & connect with our community on Facebook!
Nutrition
And don’t forget to check out my air fryer cookbooks! Every day easy air fryer , and Air Fryer Revolution .

If you want to give your chicken a tropical flare, you need to make this Air Fryer Huli Huli Chicken. Make the sauce and the chicken at the same time, and get a sweet and slightly spicy, family-friendly dinner on the table fast. If this isn’t the best Air Fryer Huli Huli Chicken, then please send me your recipe because we loved this one, and I can’t imagine how it gets better than this!
Why You’ll Love This Huli Huli Chicken Recipe
- Fast. Not counting the time it takes to marinate the chicken, this dish is ready in under 30 minutes .
- Easy. Prepare the marinade, air fry , and serve with sauce.
- Low Carb . Only 12 net carbs per serving.
- Flavorful. Packed with flavor that will leave you wanting to make this Huli Huli Chicken over and over again. It’s one of our best air fryer chicken recipes !
Why Is It Called Huli Huli Chicken?
“Huli” means, “turn” in Hawaiian. Traditional Hawaiian barbecue is made over a fire pit where it’s turned constantly over the heat to get an even cook. Huli Huli Chicken is marinated chicken that tastes great cooked in your Air Fryer.
The Huli Huli sauce has all the amazing tropical flavors you’d expect from a Hawaiian dish. You get a nice tang from the pineapple, and rich and savory contrast from the soy sauce making a beautiful combination of flavors.
What Is Hawaiian Chicken Made Of?
- Boneless Skinless Chicken Thighs
For the sauce:
- Canned pineapple chunks- Use the kind in juice, not heavy syrup.
- Soy Sauce - Adds a salty, umami flavor to the sauce/marinade.
- Splenda - You can use any variety of sugar or sugar substitute for this, just keep in mind it will change the nutritional values per serving.
- Ketchup - Yes, ketchup. It adds a unique flavor to the sauce while keeping the ingredients to a minimum.
- Minced Garlic - You can mince your own, or use one of my favorite hacks–a tube of garlic paste. It keeps prep time down and comes in handy if you have mobility issues.
- Minced Ginger - This adds a small amount of spice to the dish without being overly hot. You can also find minced ginger in a squeeze tube.
- Chopped Green Scallions - These add a fresh note to the recipe to help break up the heaviness of the sauce.
Why Do I Need To Double The Sauce?
Here’s a tip about air frying. Unless you want to fill your house with a lot of smoke, you really need the meats relatively dry before they go in. So what I do is that I marinate the meats to tenderize and provide flavor–but then I put them in relatively dry. After they are cooked, I pour some sauce on top.
It is EXTREMELY important that you don’t use the marinade for the sauce. You really don’t want to risk getting sick with raw chicken marinade.
Instead, just do what I tell you to, which is make twice the sauce needed, use half the marinade, and pour the other half over the cooked meat.
What Do You Serve With Huli Huli Chicken?
This dish is incredibly versatile, so the possibilities of sides to serve with it are virtually limitless. Here are some of my favorite things to serve alongside Huli Huli Chicken:
- Cucumber Salad
- Instant Pot Rice
- Roasted Ratatouille
- Keto Broccoli Salad
- Cauliflower Rice
How Long Does It Last?
Huli Huli Chicken can be kept for up to 4 days in an air-tight container in the refrigerator. Feel free to double the entire recipe, as it’s just as tasty reheated as it is fresh.
Want MoreAir Fryer Recipes?
- Air Fryer Zucchini
- Air Fryer Corn on the Cob
- French Toast
- Keto Shrimp Scampi
- Air Fryer Mushrooms
- Fish Nuggets
Huli Huli Chicken
Ingredients
- ▢ 4 ( 4 ) Boneless Skinless Chicken Thighs
For the sauce:
- ▢ 8 ounces ( 226.8 g ) canned pineapple chunks , n juice, drained with juice reserved
- ▢ 1/4 cup ( 58 ml ) Soy Sauce
- ▢ 1/4 cup ( 50 g ) Splenda , or sugar
- ▢ 2 tbsp ( 2 tbsp ) Ketchup
- ▢ 1 tbsp ( 1 tbsp ) Minced Garlic
- ▢ 1 tbsp ( 1 tbsp ) Minced Ginger
- ▢ 1/4 cup ( 25 g ) Chopped Green Scallions , chopped
Instructions
- Use a fork to poke holes into the chicken and place the chicken in a large bowl or in a Ziploc bag.
- Make the sauce.
- Remove 1/4 cup of juice from the canned pineapple and drink the rest as your reward. Set aside the pineapple chunks.
- In a small microwave safe bowl, mix together 1/4 cup of pineapple juice, soy sauce, sugar, ketchup, ginger and garlic.
- Pour half the sauce over the chicken Mix until the thighs are well-coated with the marinade. Reserve the rest of the sauce to cook as a dipping sauce (below).
- Set aside the chicken to marinate for 30 minutes or up to 24 hours in the refrigerator.
- Place the marinated chicken in the airfryer at 360F for 15 minutes, turning half way through.
- Meanwhile, place the reserved sauce in the microwave and cook on high for 45-60 seconds, stirring every 15 seconds. You are going to cook this until you get a thick glaze or pouring sauce that you can use with the cooked chicken
- Using a meat thermometer, ensure your chicken has reached an internal temperature of 165F.
- Remove chicken to a serving tray, garnish with pineapples and green onions and serve with the thickened sauce poured over all of it.
Get support & connect with our community on Facebook!
Nutrition
And don’t forget to check out my air fryer cookbooks! Every day easy air fryer , and Air Fryer Revolution .

If you already signed up, you should have received an email with a password to give you unlimited access to our FREE Printable Library. The password is case sensitive. Enter it below and get printing!
Password:

Huli Huli Chicken
Ingredients
- 4 Boneless Skinless Chicken Thighs
For the sauce:
- 8 ounces canned pineapple chunks n juice, drained with juice reserved
- 1/4 cup Soy Sauce
- 1/4 cup Splenda or sugar
- 2 tbsp Ketchup
- 1 tbsp Minced Garlic
- 1 tbsp Minced Ginger
- 1/4 cup Chopped Green Scallions chopped
Instructions
- Use a fork to poke holes into the chicken and place the chicken in a large bowl or in a Ziploc bag.
- Make the sauce.
- Remove 1/4 cup of juice from the canned pineapple and drink the rest as your reward. Set aside the pineapple chunks.
- In a small microwave safe bowl, mix together 1/4 cup of pineapple juice, soy sauce, sugar, ketchup, ginger and garlic.
- Pour half the sauce over the chicken Mix until the thighs are well-coated with the marinade. Reserve the rest of the sauce to cook as a dipping sauce (below).
- Set aside the chicken to marinate for 30 minutes or up to 24 hours in the refrigerator.
- Place the marinated chicken in the airfryer at 360F for 15 minutes, turning half way through.
- Meanwhile, place the reserved sauce in the microwave and cook on high for 45-60 seconds, stirring every 15 seconds. You are going to cook this until you get a thick glaze or pouring sauce that you can use with the cooked chicken
- Using a meat thermometer, ensure your chicken has reached an internal temperature of 165F.
- Remove chicken to a serving tray, garnish with pineapples and green onions and serve with the thickened sauce poured over all of it.
Huli Huli Chicken https://twosleevers.com/air-fryer-huli-huli-chicken/


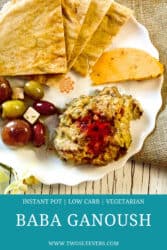


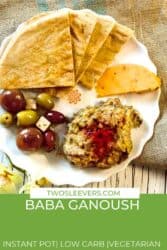


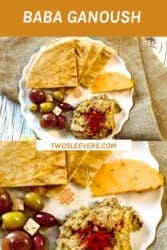
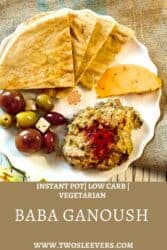

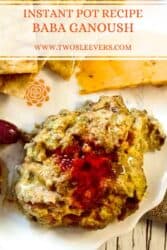

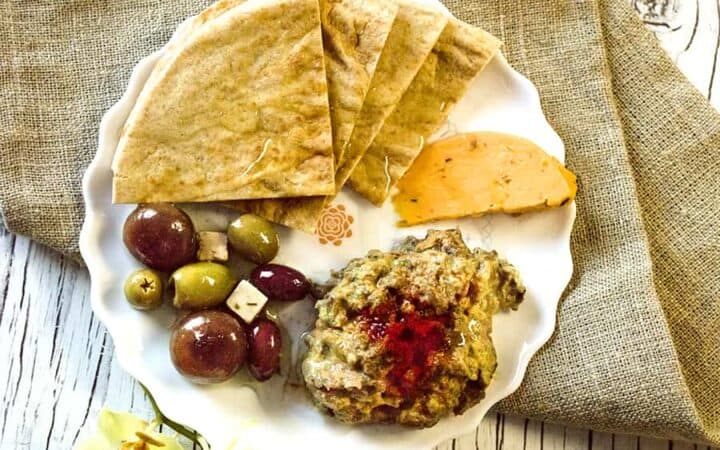
This Instant Pot Baba Ganoush recipe is quick, flameless, and tastes delicious! Get the traditional flavor of a roasted eggplant dip in a fraction of the time .
Why You’ll Love This Amazing Appetizer
- Fast. Ready in under 30 minutes .
- Easy. A simple pour and cook recipe .
- Keto . Only 2 net carbs per serving.
- Vegan . Skipping the meat? No problem. This is full of protein and incredibly fulfilling.
There’s a recipe for Instant Pot Baba Ganoush here that really intrigues me. I tried the basic method for my Eggplant Baingan Bharta , and honestly, the taste of that lacked for nothing. It tasted exactly as though I’d worked on it for hours over an open flame.
So I figured I’d try it for a Lebanese Baba Ganoush recipe , but I wanted to add a few ingredients to it.
Traditionally, when preparing eggplant for Baba Ganoush you pierce a whole eggplant, cover it in oil, and broil it in an oven , flipping from side to side. This takes a good 30-45 minutes.
Then you put the eggplant in a paper bag and let it steam, so the inside flesh cooks in that residual heat. Chalk up another 15-20 minutes of wait–which you could spend cleaning up the pan you just used to roast.
I have clear instructions on how to make perfect roasted eggplant here that you should also check out.
Making this Baba Ganoush recipe all in the Instant Pot held a lot of appeal. I mean, not having to go through the process of roasting the eggplant and having to peel it after it’s been roasted not only saves time but makes the process far less messy. And getting a delicious eggplant dip in only 30 minutes is certainly a win for me.
The short answer is no, as you want the peel intact to keep the juices in. As a matter of fact, you don’t even have to peel the eggplant after roasting if you don’t want to as the peel is entirely edible, but it can be a little tough with larger eggplants I tend to peel the eggplant after roasting as I typically mash the eggplant for most of my recipes.
You only need to salt the eggplant before roasting if you are cubing or slicing before roasting in order to get rid of some of the moisture. It’s very common for people to salt eggplant before roasting it, and it’s widely believed that salting before roasting can take away some of the bitterness in eggplant. In my experience, it doesn’t seem to have any bearing on removing bitterness. So if you’re cubing or slicing, salt away, but if you’re roasting it with the skin on you can put the salt away.
Eggplant actually has a myriad of health benefits . It’s chock full of nutrients like protein, fiber, potassium, vitamin K and vitamin C. It’s rich in antioxidants which could help prevent heart disease and cancer. Due to the high fiber content of roasted eggplant, it can help lower blood sugar by slowing the rate of digestion and absorption of sugar in the body. Eggplant is also quite low in carbs , with only 8 grams of carbs in a 1 cup serving of chopped, cooked eggplant.
What Is Baba Ganoush Made Of?
- 1 Eggplant - The main ingredient and base of the dip, providing a creamy, smoky flavor once cooked and blended.
- 1/3 cup Vegetable Oil - Helps roast and soften the eggplant while adding richness and smooth texture to the dip.
- 5 cloves Garlic - Adds sharp, savory flavor and depth to balance the mild, creamy eggplant.
- 1/2 teaspoon Salt - Enhances the natural flavors of the eggplant and other ingredients.
- 1/4 cup Water - Creates steam in the Instant Pot to cook the eggplant evenly and achieve a tender consistency.
- 2 tablespoons Tahini - Adds a nutty, creamy richness that’s essential to the traditional flavor of baba ganoush.
- 1/4 teaspoon Liquid Smoke - Replaces the flavor of char-grilled eggplant, giving the dip a subtle smoky aroma.
- 2 tablespoons Chopped Parsley - Adds a fresh, herbal note and bright color for garnish.
- 1 tablespoon Olive Oil - Drizzled on top for extra smoothness and a touch of richness.
- 1 sprinkle Smoked Paprika - Used as a garnish for color and a hint of smoky spice to finish the dish beautifully.
Baba Ganoush (or Baba Ghanoush , whatever your preferred spelling may be) is a pretty straightforward dish in terms of ingredients. It consists of eggplant, tahini (also known as tahina), and lemon juice , but the ingredients can vary from recipe to recipe.
For this Instant Pot Baba Ganoush recipe , I went without the lemon juice and added in some smoked paprika and liquid smoke to give it that smoky flavor you get from using a char broil gas grill while making the recipe entirely in a pressure cooker.
How To Make Baba Ganoush
- Heat the Instant Pot pot, and when it’s hot, put in a few tablespoons of oil.
- Once the oil is hot, put in one layer of eggplant slices. This is the tough part now, do not mess with them until they are properly charred at the bottom. Without this char, you won’t get the smoky taste you need. Once these slices char, they will shrink a bit and you can put in some more eggplant slices. At this point, you may need to put in more oil. This thing sucks oil, so just embrace that. Use a spatula or spoon and scrape up the char from the bottom as needed. This took me about 10-15 minutes to get it all charred.
- Once the eggplant is charred and somewhat soft, add the garlic, salt, and water.
- Pressure cook on High for 3 minutes, and release pressure quickly.
- If you have too much water at the bottom when you open it, turn your Instant Pot on sauté and let some of it cook away.
- Tilt the pot up slightly, and using an immersion blender , roughly purée the eggplant mix, taking care not to make baby food out of it (I mean unless you DO plan to feed it to a baby).
- Add the Tahini and liquid smoke, taste and adjust as needed.
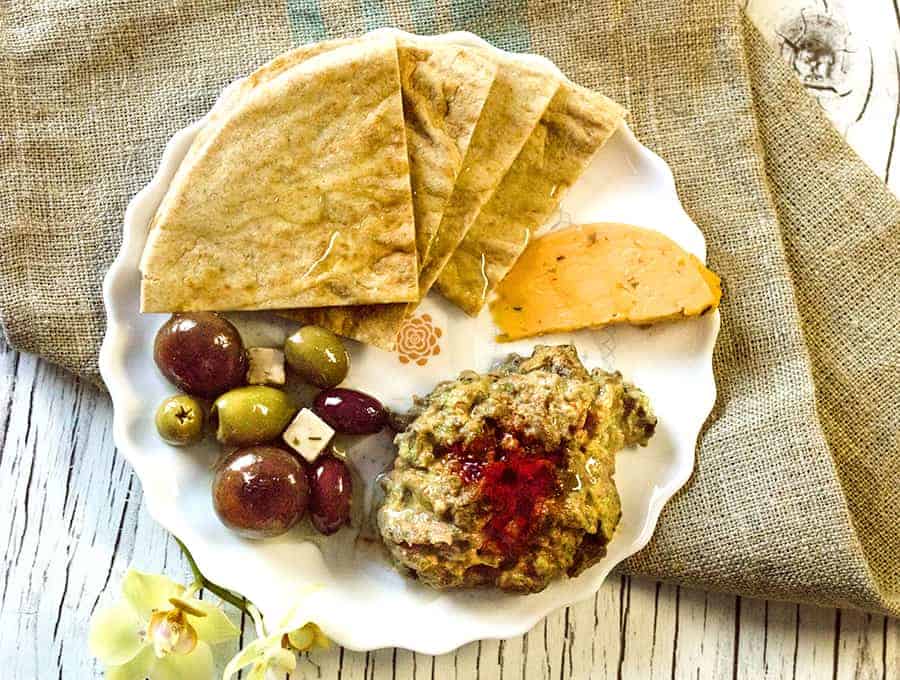
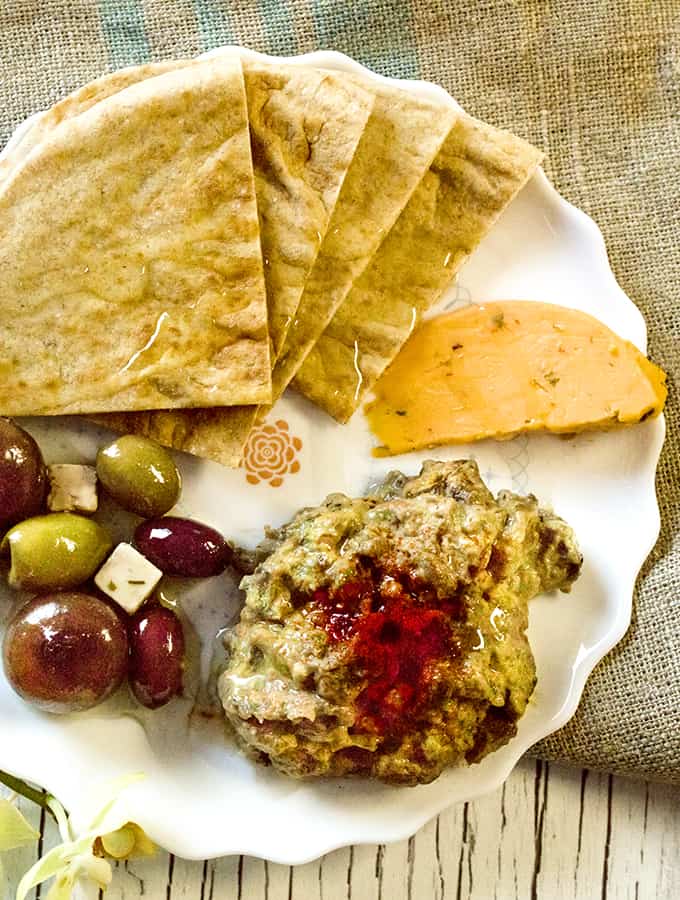
- Pour into a bowl , top with parsley and the olive oil, sprinkle with smoked paprika.
- Serve with pita bread or raw veggies as a dip.
Tips And Tricks
Making Instant Pot Baba Ganoush is simple and convenient, but a few helpful tips can elevate the flavor and texture to restaurant quality. Here’s how to make the most out of your dish:
- Choose the Right Eggplant . Look for small to medium eggplants with smooth, shiny skin. They’re less bitter and have a creamier texture.
- Blend to Your Preference . Use a food processor for a smooth dip or mash by hand for a chunkier, rustic texture.
- Add Tahini Gradually . Stir in tahini a little at a time to control how rich and nutty the flavor becomes.
Variations
Instant Pot Baba Ganoush is wonderfully versatile, and you can easily adjust the ingredients or flavors to suit your taste or dietary preferences. Here are a few creative variations to try:
- Spicy- Add a pinch of cayenne pepper, red pepper flakes, or a drizzle of chili oil for a gentle heat.
- Roasted Garlic- Swap raw garlic for roasted garlic to create a sweeter, milder flavor.
- Herbed- Blend in fresh herbs like cilantro, basil, or mint for a bright, aromatic twist.
- Lemon Zest Upgrade- Add a bit of lemon zest along with the juice for extra citrusy freshness.
- Greek Yogurt Blend- Stir in a spoonful of Greek yogurt for a creamier, tangier dip.
What To Eat With It
Baba Ganoush is a creamy, smoky dip that pairs beautifully with a wide range of dishes, from Mediterranean classics to fresh, modern sides. Here are some delicious ways to enjoy it:
- Pita Bread or Pita Chips - The most traditional pairing. It’s perfect for scooping up the dip.
- Fresh Vegetables - Serve with cucumber slices, bell pepper strips, cherry tomatoes, or carrot sticks for a light, crunchy option.
- Falafel - The creamy texture of baba ganoush balances the crispy, spiced exterior of falafel perfectly.
- Grilled Meats or Kebabs - Use it as a smoky, tangy sauce for chicken, beef, or lamb skewers.
How Long Does It Last?
This eggplant dip should last about 3-5 days in the fridge when properly stored in an airtight container. But let’s be honest, you’re likely to finish it all up in a single sitting because it’s just that good.
Can You Freeze It?
Yes, you can freeze baba ganoush, although the texture may change slightly after thawing.
To freeze, place the cooled baba ganoush in an airtight container or freezer-safe bag, leaving a little room at the top for expansion. It will keep well in the freezer for up to 3 months.
When you’re ready to enjoy it, thaw it overnight in the refrigerator, then stir well to restore its creamy consistency.
More Great Eggplant Recipes

- Indian Baingan Bharta - Wonderfully smoky and made in your Instant Pot.
- Malai Baingan - A creamy, spicy, hearty Indian Instant Pot recipe.
- Tomato Eggplant Soup - A great vegan soup recipe.
Easy Baba Ganoush Recipe | Instant Pot Baba Ganoush
Equipment
- Instant Pot
Ingredients
- ▢ 1 ( 1 ) Eggplant , peeled, cut in half, and then sliced lengthwise
- ▢ 1/3 cup ( 72.67 g ) Vegetable Oil
- ▢ 5 cloves ( 5 cloves ) Garlic , minced
- ▢ 1/2 teaspoon ( 0.5 teaspoon ) Kosher Salt
- ▢ 1/4 cup ( 62.5 g ) Water
For Finishing
- ▢ 2 tablespoons ( 2 tablespoons ) Tahini , (sesame paste)
- ▢ 1/4 teaspoon ( 0.25 teaspoon ) Liquid Smoke
- ▢ 2 tablespoons ( 2 tablespoons ) Chopped Parsley , chopped
- ▢ 1 tablespoon ( 1 tablespoon ) olive oil
- ▢ 1 sprinkle ( 1 sprinkle ) Smoked Paprika , if desired
Instructions
- Heat the Instant Pot pot, and when it’s hot, put in a few tablespoons of oil.
- Once the oil is hot, put in one layer of eggplant slices. This is the tough part now, do not mess with them until they are properly charred at the bottom. Without this char, you won’t get the smoky taste you need. Once these slices char, they will shrink a bit and you can put in some more eggplant slices. At this point, you may need to put in more oil. This thing sucks oil, so just embrace that. Use a spatula or spoon and scrape up the char from the bottom as needed. This took me about 10-15 minutes to get it all charred.
- Once the eggplant is charred and somewhat soft, add the garlic, salt, and water.
- Pressure cook on High for 3 minutes, and release pressure quickly.
- If you have too much water at the bottom when you open it, turn your Instant Pot on sauté and let some of it cook off.
- Tilt the pot up slightly, and using an immersion blender , roughly purée the eggplant mix, taking care not to make baby food out of it (I mean unless you DO plan to feed it to a baby).
- Add the Tahini and liquid smoke, taste and adjust as needed.
- Pour into a bowl , top with parsley and the olive oil, sprinkle with smoked paprika.
- Serve with pita bread or raw veggies as a dip.
Get support & connect with our community on Facebook!
Nutrition
I have more Instant Pot Fast and Easy Recipes as well as Vegetarian Instant Pot Recipes in my cookbooks you might want to check out, as well as other best selling cookbooks here.