


Want to learn how to make homemade Ghee authentically and easily in 20 minutes on your stovetop? Yes, please! A simple, fool-proof recipe for ghee is precisely what you need, no matter how smart you are.

I’m tired of overpaying for ghee when it’s so easy to make at home so I decided to take the time to make Homemade Ghee .
If you’re going keto, there’s nothing better than butter in all its various forms for satiety as well as flavor.
Why You’ll Love This Homemade Ghee Recipe
- Pure and Natural. You control the ingredients, ensuring there are no additives or preservatives.
- Rich Flavor . Homemade ghee has a deep, nutty, buttery taste that enhances both sweet and savory dishes.
- High Smoke Point . Perfect for frying, roasting, and sautéing without burning like regular butter.
In short, people love homemade ghee for its incredible flavor, versatility, and wholesome quality that elevates everyday cooking.
What is Ghee And Why Is It Healthy?
Ghee is butter that is clarified to the point where it’s just pure fat. All the milk solids and all the water has been removed from the erstwhile butter.
Not only does this make the ghee taste different, but it is also the best way to preserve ghee.
Ghee was used as long as 5000 years ago. In Hindu culture, it’s used as food, but also for ritual offerings during prayers.
It’s also used as a common ingredient in Indian cooking.
Made from cow’s milk butter, it’s often considered sacred in a country where cows themselves are held as sacred.
Ghee in India is often made with cultured butter. Yogurt is added to milk cream which is allowed to ferment overnight. The cultured cream is then churned, resulting in butter, and what is referred to as butter milk–although it’s nothing like the buttermilk you might get in Western Countries.
This homemade butter is then used for daily consumption, and as it gets a little stale, it is turned into ghee.
It is, however, perfectly acceptable to use regular, unsalted butter that is widely available instead.
Ghee also has a high smoke point. This makes it easier to cook with than a lot of other oils or melted butter.
What Is The Difference Between Butter & Ghee?
There are two main differences, both of which are interrelated.
For clarified butter , you let the butter come to a boil, and you cook for about a minute or two. You then skim off the milk solids, and you let the mixture settle.
The fat and water separate, you skim off the white milk solids from the top, and voila! Bring on the lobster for that clarified butter !
If you keep cooking this a little bit longer, you will have brown butter–yet another delicious concoction.
If you want to make ghee , you want to let the butter come to a boil–and then cook it on medium heat for a good 15 minutes or so after that.
This allows the ghee to develop a nuttier taste. It also causes the milk solids to settle to the bottom and caramelize.
While both delicious, ghee tastes nuttier and tends to be browner. It also lasts longer than clarified butter .
Is Ghee Healthier Than Butter?
There are so many benefits to cooking with ghee . Besides reminding me of the comforts of home, here are a few:
- Great to help hit fat macros on a Keto diet .
- Delicious, nutty flavor.
- Higher smoke point than a lot of oils.
- Since all of the milk protein has been removed from ghee, those with lactose or milk protein allergies often find they are safely able to include ghee in their diet.
Pure ghee offers something for everyone. Vegetarian , whole-30, paleo, keto, seafood diet, or even a “See-food” diet–ghee is good for everyone!
What Is The Correct Texture?
My ghee turned grainy and solid. What did I do wrong?
Absolutely nothing wrong. Ghee is like coconut oil. It is semi-solid at room temperature, and solid in cold rooms. This is normal. Just enjoy the fruits of your ghee-making labor and don’t worry so much.
Why Is It Dark?
Ghee is incredibly forgiving and incredibly delicious. Even if it’s a bit darker, it is probably still usable. Taste it. If it doesn’t taste bitter? Use up that liquid gold!
Equipment Needed To Make Homemade Ghee
Here is what I use to make my ghee
- 1.5 quart Lodge Cast Iron enamel pot. I like this one because it has a white interior, which lets you see when the milk solids are growing.
- A strainer
- A ladle
- 16-ounce heatproof jar
What Is Ghee Made Out Of?
- 16 Ounces Unsalted Butter
Butter. That’s it. All you need is 4 sticks of unsalted butter, a pan, and some patience to make this delicious ghee recipe.
How To Make Ghee
- Put four sticks of regular butter into a heavy-bottomed pan and heat. Some people prefer high-quality butter such as organic butter or Kerrygold butter (made from grass-fed cows), but it’s not necessary to make perfect ghee.
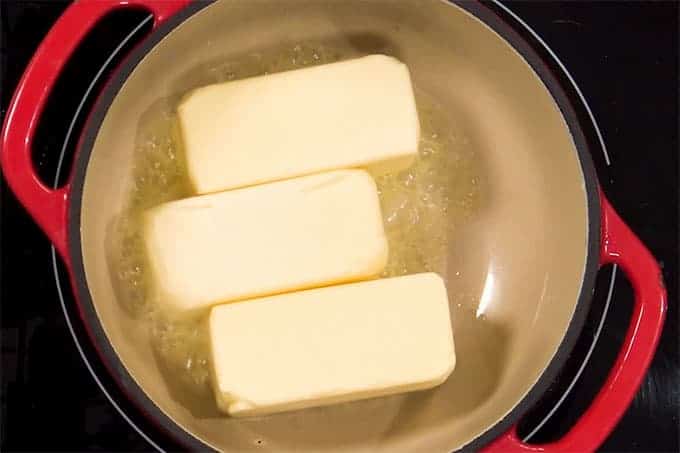
- Once the butter starts to boil, turn down the heat a little. No need to cook on high heat.

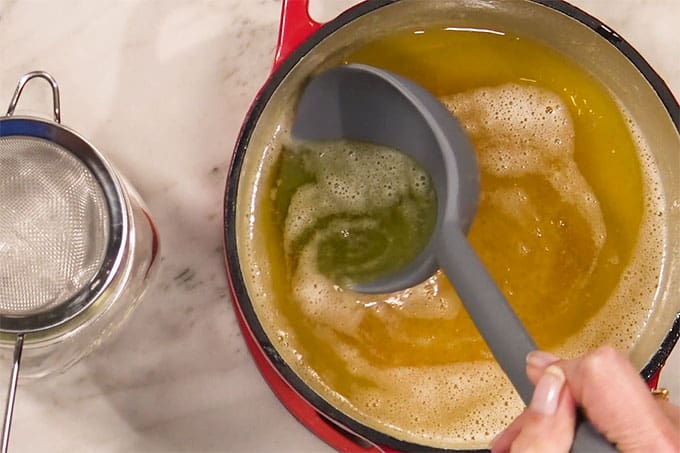
- LEAVE IT ALONE! Don’t be messing with it and stirring it etc. Just let it be for 10-15 minutes until the browned milk solids settle to the bottom and brown slightly. See the photo below for the color you are after.
- Let it cool a little, strain through a fine-mesh strainer or a clean piece of cheesecloth into small glass jars, and let cool. Be sure to rinse the cheesecloth in hot water right away and then wash it as soon as possible. You do not want the residual milk solids to sour in the cheesecloth.

Click the following link if you want a video on how to make your own Ghee .
How Do I Know When The Ghee Is Ready?
Really, the hardest thing to figure out when making homemade ghee is when it’s done. So I took a picture to show you.
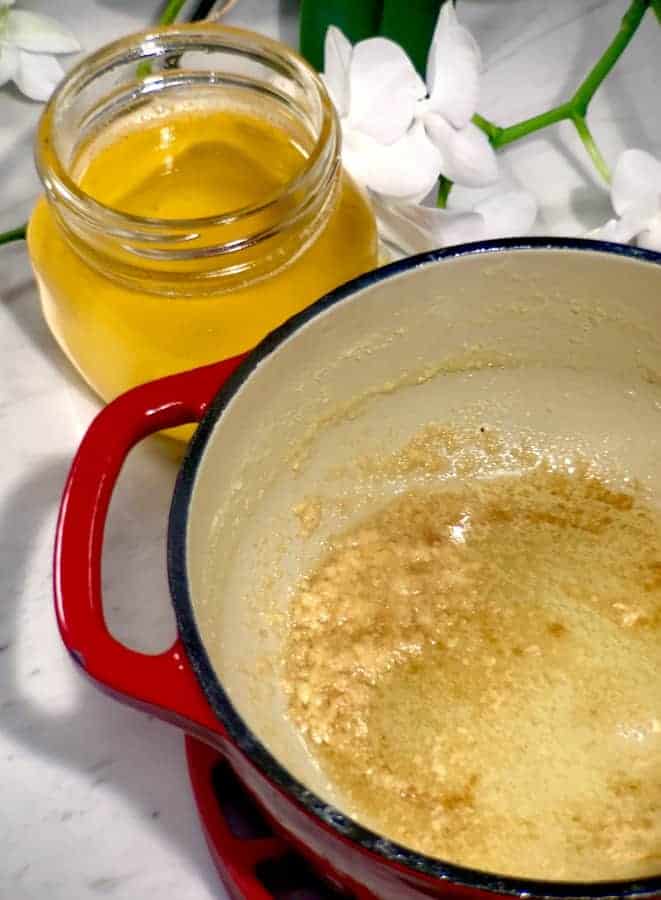
What you want is for the milk solids to start turning brown and settling into the bottom of the pan.
If you give up before this stage you are either a) a quitter or b) trying to make clarified butter , not ghee . Anything much darker and you’ve burned your ghee a little. It’s pretty forgiving though.
For that authentic, slightly nutty taste, you need this color for the milk solids.
This is great to do when you’re messing about in the kitchen with other stuff. Let it simmer in the background while you do your regular chores.
If you try this homemade ghee recipe , I’d love to know how it turned out.
How To Make Instant Pot Ghee
Can you make ghee in the Instant Pot? Yes But.
Yes. It would be possible to make this ghee recipe in your Instant Pot.
But. Why?
There’s literally NO advantage to doing it in the Instant Pot. You’d use the Sauté setting. Just like you would on the stovetop.
You can’t use a lid. You can’t cook it under pressure since you want the water to evaporate and the milk solids to separate.
So basically you’re using sauté–and now you have a large inner pot to clean.
WHY?
Instead of using your Instant Pot, use a small 1.5 to 2-quart pot on your stove top or induction burner, and you will be all set.
How To Make Slow Cooker Ghee
Another method that isn’t optimal to produce the results you want as fast as you want. Ghee requires a steady boil to cause the milk solids to separate and fall to the bottom of the pan.
Having said that, it is POSSIBLE to make slow cooker ghee if you want a less hands-on method. Here’s how you do it:
- Add . Place butter in your Crockpot
- Set . Adjust your Crockpot to high for 2-4 hours or low for 4-6 hours. Do not cover!
- Cook . Watch your butter magically turn into ghee in the slow cooker.
- Babysit . You will need to look for the perfectly browned milk solids at the bottom.
- Strain . Use a cheesecloth to remove the milk solids from your ghee.
- Store . Store in at room temperature in a safe container of your choice or in the refrigerator for longer-lasting ghee.
Do I Use Salted Or Unsalted Butter To Make Ghee?
I prefer to use unsalted butter for my desi ghee. I’ve tried it with salted butter and it didn’t produce the flavors I wanted. I also tend to buy good quality butter–but not the best quality.
You’re going to be cooking this butter down, and you’ll be changing the taste considerably anyway. So grass-fed butter is totally optional.
So I often use Costco’s unsalted Kirkland butter making ghee , but you use whatever you can get.
Tips And Tricks
Making Homemade Ghee is simple, but a few smart tips can help you achieve that perfect golden color, nutty aroma, and clean, clarified flavor every time. Here are some helpful tricks to guide you:
- Start with good-quality butter. Use unsalted, grass-fed butter for the best flavor and nutritional value.
- Use a heavy-bottomed pan. This helps distribute heat evenly and prevents the milk solids from burning.
- Keep the heat low. Slow and steady simmering allows the butter to clarify properly without scorching.
- Watch the color and aroma. The ghee is ready when the liquid turns a deep golden color and gives off a nutty, caramel-like scent.
Variations
Homemade ghee can easily be customized to add unique flavors and aromas that elevate your cooking. Here are some creative variations to try:
- Spiced- Add whole spices like cardamom, cinnamon, or cloves while melting the butter for a warm, aromatic flavor.
- Garlic- Infuse with a few crushed garlic cloves during simmering for a savory, buttery spread that’s perfect for vegetables or meats.
- Herb-Infused- Stir in fresh rosemary, thyme, or sage for a fragrant version that pairs beautifully with roasted dishes.
How Long Does Ghee Last?
You can store it outside at room temperature for 3-4 months, and in the refrigerator in an airtight container for up to a year.
Does Ghee Need To Be Refrigerated?
You do not need to refrigerate ghee. Being shelf-stable, ghee can be stored in a clean mason jar container at room temperature by your stovetop or in a cabinet.
Two things to note.
- Always use a clean spoon to scoop out your ghee.
- Never allow water or other liquids to get into that jar.
Just following these rules will allow you to keep your ghee pure and clean.

How To Use Ghee
Wondering how to use ghee? Absolutely HOWEVER YOU WANT!
Initially, you can use it as called for in recipes.
Over time though, as you become more familiar with how it tastes, you might realize you prefer it on your popcorn rather than butter. Or you might like it with toast.
Use it however you want. There are no ghee rules, nor, as far as I know, any ghee police that will come after you.
I use it to cook veggies or meats, in rice , over everything (except maybe bacon). I wish I could say there was a complicated recipe for this but it’s really very simple.
For me, there’s nothing better than ghee on top of my pressure cooker dal and rice recipe.

Rice and dal
It is also very important for Indian desserts, such as Pakistani Zarda recipe.
And during Ramadan, ghee, with its satiety factor during fasts, is very important in Haleem recipes.
More Tasty Indian Dishes
- Instant Pot Butter Chicken
- Chicken Korma
- Lamb Rogan Josh
- Chicken Biryani
- Aloo Gobi


How To Make Ghee | Authentic Homemade Ghee Recipe
Equipment
- LODGE 1.5 QUART
- STRAINER
- heatproof jar
- LADLE
Ingredients
- ▢ 16 ounces ( 453.59 g ) Unsalted Butter , (4 sticks)
Instructions
- Use a heavy bottom pan with a lighter inside for this recipe so you can see what is going on in that pan.
- Place the pan on high heat and add the sticks of butter. Allow the butter to come to a boil.
- Turn the heat down to where the butter is gently simmering and bubbling. Cook for another 10-15 minutes undisturbed.
- Slowly you will see that the milk solids, rather than floating on the top of the pan, have started to sink to the bottom of the pan. The sound of the bubbling ghee will start to change. The bubbles on top get larger, and the sound is akin to popcorn popping
- Once the milk solids have settled to the bottom and lightly browned, your ghee is ready.
- Gather a strainer , a ladle, and heatproof jar. Slowly pour the ghee through the strainer into the jar. I prefer to use the ladle to do this with, to reduce the risk of spillage as well as to not suddenly add a bunch of hot fat to a glass jar.
- Okay! You’re done! See?? Wasn’t that EASY?
Watch The Video
Get support & connect with our community on Facebook!
Nutrition
Don’t forget to check out my other Ketocookbooks.
Keto Instant Pot, Keto Fat Bombs, Sweets, & Treats , and Easy keto in 30 minutes.

Want to learn how to make homemade Ghee authentically and easily in 20 minutes on your stovetop? Yes, please! A simple, fool-proof recipe for ghee is precisely what you need, no matter how smart you are.
I’m tired of overpaying for ghee when it’s so easy to make at home so I decided to take the time to make Homemade Ghee .
If you’re going keto, there’s nothing better than butter in all its various forms for satiety as well as flavor.
Why You’ll Love This Homemade Ghee Recipe
- Pure and Natural. You control the ingredients, ensuring there are no additives or preservatives.
- Rich Flavor . Homemade ghee has a deep, nutty, buttery taste that enhances both sweet and savory dishes.
- High Smoke Point . Perfect for frying, roasting, and sautéing without burning like regular butter.
In short, people love homemade ghee for its incredible flavor, versatility, and wholesome quality that elevates everyday cooking.
What is Ghee And Why Is It Healthy?
Ghee is butter that is clarified to the point where it’s just pure fat. All the milk solids and all the water has been removed from the erstwhile butter.
Not only does this make the ghee taste different, but it is also the best way to preserve ghee.
Ghee was used as long as 5000 years ago. In Hindu culture, it’s used as food, but also for ritual offerings during prayers.
It’s also used as a common ingredient in Indian cooking.
Made from cow’s milk butter, it’s often considered sacred in a country where cows themselves are held as sacred.
Ghee in India is often made with cultured butter. Yogurt is added to milk cream which is allowed to ferment overnight. The cultured cream is then churned, resulting in butter, and what is referred to as butter milk–although it’s nothing like the buttermilk you might get in Western Countries.
This homemade butter is then used for daily consumption, and as it gets a little stale, it is turned into ghee.
It is, however, perfectly acceptable to use regular, unsalted butter that is widely available instead.
Ghee also has a high smoke point. This makes it easier to cook with than a lot of other oils or melted butter.
What Is The Difference Between Butter & Ghee?
There are two main differences, both of which are interrelated.
For clarified butter , you let the butter come to a boil, and you cook for about a minute or two. You then skim off the milk solids, and you let the mixture settle.
The fat and water separate, you skim off the white milk solids from the top, and voila! Bring on the lobster for that clarified butter !
If you keep cooking this a little bit longer, you will have brown butter–yet another delicious concoction.
If you want to make ghee , you want to let the butter come to a boil–and then cook it on medium heat for a good 15 minutes or so after that.
This allows the ghee to develop a nuttier taste. It also causes the milk solids to settle to the bottom and caramelize.
While both delicious, ghee tastes nuttier and tends to be browner. It also lasts longer than clarified butter .
Is Ghee Healthier Than Butter?
There are so many benefits to cooking with ghee . Besides reminding me of the comforts of home, here are a few:
- Great to help hit fat macros on a Keto diet .
- Delicious, nutty flavor.
- Higher smoke point than a lot of oils.
- Since all of the milk protein has been removed from ghee, those with lactose or milk protein allergies often find they are safely able to include ghee in their diet.
Pure ghee offers something for everyone. Vegetarian , whole-30, paleo, keto, seafood diet, or even a “See-food” diet–ghee is good for everyone!
What Is The Correct Texture?
My ghee turned grainy and solid. What did I do wrong?
Absolutely nothing wrong. Ghee is like coconut oil. It is semi-solid at room temperature, and solid in cold rooms. This is normal. Just enjoy the fruits of your ghee-making labor and don’t worry so much.
Why Is It Dark?
Ghee is incredibly forgiving and incredibly delicious. Even if it’s a bit darker, it is probably still usable. Taste it. If it doesn’t taste bitter? Use up that liquid gold!
Equipment Needed To Make Homemade Ghee
Here is what I use to make my ghee
- 1.5 quart Lodge Cast Iron enamel pot. I like this one because it has a white interior, which lets you see when the milk solids are growing.
- A strainer
- A ladle
- 16-ounce heatproof jar
What Is Ghee Made Out Of?
- 16 Ounces Unsalted Butter
Butter. That’s it. All you need is 4 sticks of unsalted butter, a pan, and some patience to make this delicious ghee recipe.
How To Make Ghee
- Put four sticks of regular butter into a heavy-bottomed pan and heat. Some people prefer high-quality butter such as organic butter or Kerrygold butter (made from grass-fed cows), but it’s not necessary to make perfect ghee.
- Once the butter starts to boil, turn down the heat a little. No need to cook on high heat.
- LEAVE IT ALONE! Don’t be messing with it and stirring it etc. Just let it be for 10-15 minutes until the browned milk solids settle to the bottom and brown slightly. See the photo below for the color you are after.
- Let it cool a little, strain through a fine-mesh strainer or a clean piece of cheesecloth into small glass jars, and let cool. Be sure to rinse the cheesecloth in hot water right away and then wash it as soon as possible. You do not want the residual milk solids to sour in the cheesecloth.
Click the following link if you want a video on how to make your own Ghee .
How Do I Know When The Ghee Is Ready?
Really, the hardest thing to figure out when making homemade ghee is when it’s done. So I took a picture to show you.
What you want is for the milk solids to start turning brown and settling into the bottom of the pan.
If you give up before this stage you are either a) a quitter or b) trying to make clarified butter , not ghee . Anything much darker and you’ve burned your ghee a little. It’s pretty forgiving though.
For that authentic, slightly nutty taste, you need this color for the milk solids.
This is great to do when you’re messing about in the kitchen with other stuff. Let it simmer in the background while you do your regular chores.
If you try this homemade ghee recipe , I’d love to know how it turned out.
How To Make Instant Pot Ghee
Can you make ghee in the Instant Pot? Yes But.
Yes. It would be possible to make this ghee recipe in your Instant Pot.
But. Why?
There’s literally NO advantage to doing it in the Instant Pot. You’d use the Sauté setting. Just like you would on the stovetop.
You can’t use a lid. You can’t cook it under pressure since you want the water to evaporate and the milk solids to separate.
So basically you’re using sauté–and now you have a large inner pot to clean.
WHY?
Instead of using your Instant Pot, use a small 1.5 to 2-quart pot on your stove top or induction burner, and you will be all set.
How To Make Slow Cooker Ghee
Another method that isn’t optimal to produce the results you want as fast as you want. Ghee requires a steady boil to cause the milk solids to separate and fall to the bottom of the pan.
Having said that, it is POSSIBLE to make slow cooker ghee if you want a less hands-on method. Here’s how you do it:
- Add . Place butter in your Crockpot
- Set . Adjust your Crockpot to high for 2-4 hours or low for 4-6 hours. Do not cover!
- Cook . Watch your butter magically turn into ghee in the slow cooker.
- Babysit . You will need to look for the perfectly browned milk solids at the bottom.
- Strain . Use a cheesecloth to remove the milk solids from your ghee.
- Store . Store in at room temperature in a safe container of your choice or in the refrigerator for longer-lasting ghee.
Do I Use Salted Or Unsalted Butter To Make Ghee?
I prefer to use unsalted butter for my desi ghee. I’ve tried it with salted butter and it didn’t produce the flavors I wanted. I also tend to buy good quality butter–but not the best quality.
You’re going to be cooking this butter down, and you’ll be changing the taste considerably anyway. So grass-fed butter is totally optional.
So I often use Costco’s unsalted Kirkland butter making ghee , but you use whatever you can get.
Tips And Tricks
Making Homemade Ghee is simple, but a few smart tips can help you achieve that perfect golden color, nutty aroma, and clean, clarified flavor every time. Here are some helpful tricks to guide you:
- Start with good-quality butter. Use unsalted, grass-fed butter for the best flavor and nutritional value.
- Use a heavy-bottomed pan. This helps distribute heat evenly and prevents the milk solids from burning.
- Keep the heat low. Slow and steady simmering allows the butter to clarify properly without scorching.
- Watch the color and aroma. The ghee is ready when the liquid turns a deep golden color and gives off a nutty, caramel-like scent.
Variations
Homemade ghee can easily be customized to add unique flavors and aromas that elevate your cooking. Here are some creative variations to try:
- Spiced- Add whole spices like cardamom, cinnamon, or cloves while melting the butter for a warm, aromatic flavor.
- Garlic- Infuse with a few crushed garlic cloves during simmering for a savory, buttery spread that’s perfect for vegetables or meats.
- Herb-Infused- Stir in fresh rosemary, thyme, or sage for a fragrant version that pairs beautifully with roasted dishes.
How Long Does Ghee Last?
You can store it outside at room temperature for 3-4 months, and in the refrigerator in an airtight container for up to a year.
Does Ghee Need To Be Refrigerated?
You do not need to refrigerate ghee. Being shelf-stable, ghee can be stored in a clean mason jar container at room temperature by your stovetop or in a cabinet.
Two things to note.
- Always use a clean spoon to scoop out your ghee.
- Never allow water or other liquids to get into that jar.
Just following these rules will allow you to keep your ghee pure and clean.
How To Use Ghee
Wondering how to use ghee? Absolutely HOWEVER YOU WANT!
Initially, you can use it as called for in recipes.
Over time though, as you become more familiar with how it tastes, you might realize you prefer it on your popcorn rather than butter. Or you might like it with toast.
Use it however you want. There are no ghee rules, nor, as far as I know, any ghee police that will come after you.
I use it to cook veggies or meats, in rice , over everything (except maybe bacon). I wish I could say there was a complicated recipe for this but it’s really very simple.
For me, there’s nothing better than ghee on top of my pressure cooker dal and rice recipe.
Rice and dal
It is also very important for Indian desserts, such as Pakistani Zarda recipe.
And during Ramadan, ghee, with its satiety factor during fasts, is very important in Haleem recipes.
More Tasty Indian Dishes
- Instant Pot Butter Chicken
- Chicken Korma
- Lamb Rogan Josh
- Chicken Biryani
- Aloo Gobi
How To Make Ghee | Authentic Homemade Ghee Recipe
Equipment
- LODGE 1.5 QUART
- STRAINER
- heatproof jar
- LADLE
Ingredients
- ▢ 16 ounces ( 453.59 g ) Unsalted Butter , (4 sticks)
Instructions
- Use a heavy bottom pan with a lighter inside for this recipe so you can see what is going on in that pan.
- Place the pan on high heat and add the sticks of butter. Allow the butter to come to a boil.
- Turn the heat down to where the butter is gently simmering and bubbling. Cook for another 10-15 minutes undisturbed.
- Slowly you will see that the milk solids, rather than floating on the top of the pan, have started to sink to the bottom of the pan. The sound of the bubbling ghee will start to change. The bubbles on top get larger, and the sound is akin to popcorn popping
- Once the milk solids have settled to the bottom and lightly browned, your ghee is ready.
- Gather a strainer , a ladle, and heatproof jar. Slowly pour the ghee through the strainer into the jar. I prefer to use the ladle to do this with, to reduce the risk of spillage as well as to not suddenly add a bunch of hot fat to a glass jar.
- Okay! You’re done! See?? Wasn’t that EASY?
Watch The Video
Get support & connect with our community on Facebook!
Nutrition
Don’t forget to check out my other Ketocookbooks.
Keto Instant Pot, Keto Fat Bombs, Sweets, & Treats , and Easy keto in 30 minutes.

If you already signed up, you should have received an email with a password to give you unlimited access to our FREE Printable Library. The password is case sensitive. Enter it below and get printing!
Password:

How To Make Ghee | Authentic Homemade Ghee Recipe
Ingredients
- 16 ounces Unsalted Butter (4 sticks)
Instructions
- Use a heavy bottom pan with a lighter inside for this recipe so you can see what is going on in that pan.
- Place the pan on high heat and add the sticks of butter. Allow the butter to come to a boil.
- Turn the heat down to where the butter is gently simmering and bubbling. Cook for another 10-15 minutes undisturbed.
- Slowly you will see that the milk solids, rather than floating on the top of the pan, have started to sink to the bottom of the pan. The sound of the bubbling ghee will start to change. The bubbles on top get larger, and the sound is akin to popcorn popping
- Once the milk solids have settled to the bottom and lightly browned, your ghee is ready.
- Gather a strainer , a ladle, and heatproof jar. Slowly pour the ghee through the strainer into the jar. I prefer to use the ladle to do this with, to reduce the risk of spillage as well as to not suddenly add a bunch of hot fat to a glass jar.
- Okay! You’re done! See?? Wasn’t that EASY?
How To Make Ghee | Authentic Homemade Ghee Recipe https://twosleevers.com/homemade-ghee/


This Savory Bread Pudding recipe is the perfect breakfast casserole recipe for breakfast, dinner, or just about any meal of the day. Breakfast Bread Pudding is super easy to make, has just five ingredients, and you can even make it the night before.

Why You’ll Love This Brilliant Breakfast
If you’re looking for a quick, easy, and unbelievably delicious breakfast/brunch recipe , you’ve come to the right place. This Savory Bread Pudding takes all the things you love about a good breakfast casserole and packs it all into one deliciously savory dish.
It’s packed full of eggs, ham, cheese and sourdough bread and is baked to absolute perfection.
I don’t know about you, but when it comes to breakfast, the easier the recipe the better. Simplicity is exactly what I had in mind when I came up with this Savory Bread Pudding recipe, and it’s truly one of the easiest breakfast bakes I’ve ever made.
The hardest part of the recipe is whisking the eggs, and then you just dump the eggs along with the rest of the ingredients into a pan, give it a quick stir and throw it in the oven .
Is It Good For Meal Prep?
If you’re not a morning person and don’t feel like having to mix everything for breakfast, you can just prepare the dish the night before.
Simply prepare the mixture the day before, refrigerate overnight and throw it in the oven the next morning. I find this particularly helpful for Thanksgiving or Christmas Breakfasts when there is so much real cooking going on that I really don’t think people should be asking for breakfast at all!
This Savory Bread Pudding is a lazy breakfast at its best without compromising on taste. Now let’s get to cooking this delicious egg bake!
Ingredients You’ll Need For Breakfast Bread Pudding
The best part about this breakfast casserole is that it can be thrown together with just a few simple kitchen staples. Here’s what you’ll need to make this tasty family-friendly meal:
- 4 slices Sourdough Bread - The base of the dish. Sourdough adds a slightly tangy flavor and sturdy texture that holds up well to the custard mixture without becoming mushy. Cubing it ensures even soaking and baking.
- 6 Eggs - The key binding ingredient that forms the custard. Eggs create structure and richness, helping the bread pudding set while keeping it tender and moist.
- 1 cup Half and Half - Combines with the eggs to make the custard mixture. It provides creaminess and a luscious texture without being too heavy.
- 1 cup Shredded Cheese - Adds savory flavor, richness, and gooey texture throughout the pudding. You can use cheddar, Swiss, or Gruyère depending on your flavor preference.
- 1 teaspoon Salt - Enhances all the other flavors and balances the richness of the eggs, cheese, and ham.
- 1 teaspoon Ground Black Pepper - Adds a subtle heat and depth of flavor, complementing the savory ingredients perfectly.
- 1/2 pound Diced Ham, or Canadian Bacon - Provides a salty, smoky protein element that transforms the bread pudding into a hearty, satisfying main dish. It also adds contrast to the soft custard and bread with a bit of chewiness.
How To Make Savory Bread Pudding
- Grease a 12-inch heatproof skillet and set aside.
- Preheat oven to 350F.
- Whisk together the eggs, half and half (or milk), salt and pepper. Stir in bread, ham, and cheese.
- Pour the mixture into the greased pan and set it in the oven.
- Bake for 40 minutes until a knife inserted comes out clean.
- Serve with hot sauce.
Tips And Tricks
Making a Savory Bread Pudding is all about balancing texture and flavor so each bite is rich, cheesy, and satisfying. Here are some helpful tips and tricks to ensure it turns out perfectly every time:
- You can save time by preparing the dish the night before you plan on eating it. Simply prepare the mixture the day before, refrigerate overnight and throw it in the oven the next morning.
- You can freeze the uncooked, assembled savory bread pudding ingredients and cook them another day, making it a great meal prep recipe.
- Make sure you’ve greased the skillet well, otherwise you’ll have trouble getting the slices out of the skillet.
- Just because this is a “breakfast” recipe doesn’t mean you can’t enjoy it for dinner as well!
Other Tasty Variations
Savory Bread Pudding is wonderfully versatile, making it easy to customize with different mix-ins and flavor combinations to suit any occasion. Here are some delicious variations to try:
- Switch up the meats. I opted for ham in this recipe because it seems like I always have some leftover in the fridge or freezer. Feel free to use any other precooked meat of your choice to this dish. I love it with sausage crumbles and bacon, too.
- Make it vegetarian. Whether you’re on a budget or just live a meat-free lifestyle, this is a great filling breakfast even without the added animal protein. Cook as directed, just omit the precooked ham.
- Add veggies. Trying to get your daily serving of greens in? Add spinach, bell peppers, onions, jalapenos, or even broccoli for a boost in vitamins and fiber. Careful not to go overboard, the additional water the veggies release can make the texture of this breakfast bread pudding a little more dense.
- Make it sweet with fruit. Love your breakfast on the sweet side? Add in finely chopped apples, peaches, or berries with a pinch of sugar or sugar alternative for a delicious breakfast, snack, or dessert.
What To Eat With Savory Bread Pudding
Savory Bread Pudding is a comforting, versatile dish that pairs well with a variety of sides and accompaniments. Here’s a list of delicious options to enjoy with it:
- Breakfast Proteins - Pair with bacon , sausage , or poached eggs for a hearty brunch spread.
- Spreads and Sauces - Complement with a dollop of herbed butter, pesto, or hollandaise sauce.
- Fresh Fruit or Compote - Add a sweet contrast with berries, citrus slices, or a light fruit compote.
How Long Does It Last?
Savory Bread Pudding will keep well in the refrigerator for up to 4 days when stored properly in an airtight container. Allow it to cool completely before refrigerating to prevent condensation from making it soggy.
To reheat, warm individual portions in the microwave for about 30–60 seconds, or reheat larger portions in a 350°F oven until heated through, which helps maintain its crispy top and soft, custardy center.
Can You Freeze It?
For longer storage, you can freeze it for up to 2 months. Wrap the bread pudding tightly in plastic wrap and aluminum foil or place it in a freezer-safe container.
When ready to enjoy, thaw it overnight in the refrigerator and reheat as desired for a freshly baked flavor and texture.
Make Ahead And Storage
If you’re looking for a tasty make-ahead breakfast for the weekend, this is exactly what you’re craving. Like to sleep in a little on your day off but hate the idea of crawling out of bed just to get to work in the kitchen?
Feel free to make this the night before and pop it in the oven when you’re trying to peel your eyes open for the day.
Looking For More Great Breakfast Recipes?

- Air Fried Herb and Cheese Frittata - Simply delicious and comes together so easily!
- Asparagus Cheese Frittata - A creamy and tasty keto frittata that comes together with little effort.
- Broccoli Frittata with Ham and Peppers - A fabulous breakfast, brunch, or a light one-pot meal.
- Poblano Cheese Frittata - Another incredible frittata recipe for your IP that’s a little more light than the Ham & Pepper version.
- Pressure Cooker Vietnamese Yogurt - The most delicious and foolproof Instant Pot yogurt recipe you’ll make!
- Instant Pot Cranberry Millet Porridge - Deliciously spiced and super simple.
- Cheese Grits - A delicious breakfast southern classic.
- Keto Granola - Just perfect with a little almond milk when you’re craving crunchy cereal.

Whether you make this Savory Bread Pudding for breakfast, lunch, dinner, or even a midnight snack (not that I would do that or anything…), you’re sure to love this simple and delicious breakfast bread pudding!

Savory Bread Pudding | Breakfast Bread Pudding Recipe
Equipment
- 12 inch Skillet
- WHISK
- Mixing Bowl
- Measuring Cups
- Measuring Spoons
Ingredients
- ▢ 4 slices sourdough bread , cut into cubes
- ▢ 6 Eggs
- ▢ 1 cup Half and Half
- ▢ 1 cup shredded cheese
- ▢ 1 teaspoon Kosher Salt
- ▢ 1 teaspoon Ground Black Pepper
- ▢ 1/2 pound Diced Ham , or Canadian bacon
Instructions
Grease a 12-inch heatproof skillet and set aside.
Preheat oven to 350F.
Whisk together the eggs, half and half (or milk), salt and pepper. Stir in bread, ham, and cheese.
Pour the mixture into the greased pan and set it in the oven.
Bake for 40 minutes until a knife inserted comes out clean.
Serve with hot sauce.
You can save time by preparing the dish the night before you plan on eating it. Simply prepare the mixture the day before, refrigerate overnight and throw it in the oven the next morning.
You can freeze the uncooked, assembled savory bread pudding ingredients and cook them another day, making it a great meal prep recipe.
Make sure you’ve greased the skillet well, otherwise you’ll have trouble getting the slices out of the skillet.
Just because this is a “breakfast” recipe doesn’t mean you can’t enjoy it for dinner as well!
