
If you love crispy fries, rich brown gravy, and gooey cheese curds, then this homemade poutine recipe is about to become your new favorite comfort food. This iconic Canadian dish is the perfect balance of textures and flavors, making it a must-try for anyone who appreciates indulgent, savory goodness.

Why You’ll Love This Canadian Classic
- Crispy and Cheesy . Golden fries smothered in melty cheese curds and rich, savory gravy.
- Easy to Make . Simple ingredients and minimal prep time.
- Customizable . Adjust the toppings or gravy to your liking.
- Authentic Flavor . Tastes just like the real thing from Canada’s best diners.
With just a few simple ingredients, you can recreate this Quebec classic right in your own kitchen. Whether you’re serving it as a snack, side dish, or hearty meal, this homemade poutine recipe will deliver restaurant-quality results every time.
What Is Poutine?
Poutine is a Canadian classic that originated in Quebec in the late 1950s. This dish features a simple yet irresistible combination of crispy French fries, fresh cheese curds, and hot brown gravy. The result is a rich, gooey, and satisfying dish that has gained popularity worldwide.
What Does Poutine Taste Like?
Authentic poutine is all about the balance of textures. It is loaded with crispy fries, slightly melted cheese curds, and smooth, flavorful gravy. It’s a must-try for any comfort food lover.
Ingredients You’ll Need
For The Fries
- 4 Russet Potatoes - Russets are the ideal potato for poutine because they’re starchy, which gives you fries that crisp beautifully on the outside while staying fluffy on the inside.
- 3 tbsp Vegetable Oil - Coats the potatoes to help them crisp during baking or air frying. Neutral in flavor, so it doesn’t compete with the gravy or cheese curds.
- 1 tsp Salt - Seasons the fries and enhances their natural flavor. Salt is essential because the fries need enough seasoning to stand up against the rich gravy.
- 1/2 tsp Ground Black Pepper - Adds mild heat and depth, giving the fries a subtle savory kick.
Gravy
- 2 tbsp Unsalted Butter - Forms the base of the roux, which thickens the gravy. Using unsalted butter allows you to control the salt level.
- 2 tbsp All Purpose Flour - Combines with the butter to create the roux. This mixture thickens the gravy to the smooth, velvety consistency poutine is known for.
- 1 1/2 cups Beef Broth - Provides rich, savory depth and the classic beefy flavor that defines authentic poutine gravy.
- 1 tsp Worcestershire Sauce - Adds umami and a slightly tangy, complex depth that enhances the beefy flavor of the gravy.
- 1/2 tsp Onion Powder - Infuses subtle onion flavor without chunks, adding warmth and savory depth.
- 1/2 tsp Garlic Powder - Adds a mellow garlic note that complements the onion powder and rounds out the gravy’s flavor.
- 1/2 tsp Salt - Seasons the gravy and balances all the flavors so it’s not too flat or too salty.
- 1/4 tsp Ground Black Pepper - Adds mild heat and a bit of sharpness that enhances the overall savory profile of the gravy.
The Toppings
- 1 1/2 cups Cheese Curds - The signature component of poutine.Cheese curds provide the iconic squeaky texture and mild creaminess. They slightly melt under the hot gravy but still hold their shape.
- Parsley - Adds a touch of color and freshness, giving the dish a visually appealing finish (optional but nice).
Each ingredient is essential in creating an authentic, flavorful, and satisfying homemade poutine that rivals any diner or restaurant version.
How To Make Homemade Poutine
- Prepare the Fries . Preheat the oven to 425°F. Line a baking sheet with parchment paper. Toss the cut potatoes with vegetable oil, salt, and black pepper. Spread them out in a single layer and bake for 30-35 minutes, flipping halfway through, until golden brown and crispy.
- Make the Gravy . In a medium saucepan, melt the butter over medium heat. Add the flour, whisking constantly, and cook for 1-2 minutes until golden brown. Slowly pour in the beef broth, whisking to prevent lumps. Add Worcestershire sauce, onion powder, garlic powder, salt, and black pepper. Stir well. Bring to a simmer and cook for 5-7 minutes, or until the gravy thickens. Remove from heat.
- Assemble the Poutine . Place the hot fries on a serving plate or dish. Sprinkle cheese curds evenly over the fries. Pour the hot gravy over the fries and cheese curds, allowing the cheese to soften slightly. Garnish with chopped parsley if desired.

Tips And Tricks
Making Canadian poutine fries is simple, but a few key techniques will take it from good to restaurant-quality. From achieving crispy fries to crafting a rich, smooth gravy, these expert tips will help you make the best poutine at home:
- Use Fresh Cheese Curds . For the most authentic taste, use fresh white cheddar cheese curds. They should be slightly soft and squeaky when you bite into them.
- Double-Fry for Extra Crispiness . If deep-frying, fry the potatoes once at 325°F, then again at 375°F for ultra-crispy fries.
- Keep the Gravy Hot . Pour the gravy over the fries while it’s piping hot to help melt the cheese curds slightly.
- Homemade vs. Frozen Fries . Homemade fries taste best, but frozen fries work well for a quicker version.
Variations
Classic poutine is made with crispy fries, cheese curds, and brown gravy, but there are countless delicious variations to try. Whether you want to add protein, spice things up, or give it a gourmet twist, these poutine variations will take this Canadian comfort food to the next level:
- Loaded - Add crispy bacon bits, caramelized onions, or sautéed mushrooms for extra flavor.
- Spicy - Mix hot sauce or cayenne pepper into the gravy for a fiery kick.
- BBQ- Swap out the brown gravy for BBQ sauce and add shredded pulled pork for a smoky twist.
- Vegetarian- Use vegetable broth instead of beef broth for a meat-free version.
- Breakfast- Top with a fried egg and crumbled sausage for a hearty morning meal.
What To Eat With Homemade Poutine
Homemade poutine is a rich, indulgent dish, making it perfect as a main course or a side. To balance its savory, cheesy, and crispy flavors, pair it with dishes that add freshness, acidity, or protein. Here are the best foods to serve with IT:
- Burgers - A classic pairing for a hearty meal.
- Crispy Chicken Tenders - Great for dipping into the leftover gravy.
- Coleslaw - A light and crunchy contrast to the rich dish.
- Grilled Sausages - Serve alongside for a protein boost.
How Long Does It Last?
Canadian poutine is best enjoyed immediately while the fries are hot and crispy, the cheese curds are slightly melted, and the gravy is rich and warm.
However, if you have leftovers, they can be stored in an airtight container in the refrigerator for up to 2 days.
Can You Freeze It?
Freezing poutine fries is not recommended, as the fries tend to become mushy when thawed, and the cheese curds lose their signature squeaky texture.
If you want to prep poutine in advance, consider making the fries and gravy separately and assembling them just before serving.
More Comforting Creations
- Smoked Sausage And Rice
- Slow Cooker Chili
- Cornflake Chicken
- Cheese Manicotti
- Croissant French Toast


Homemade Poutine Recipe | Authentic Canadian Poutine
Ingredients
For The Fries
- ▢ 4 Russet Potatoes , cut into fries
- ▢ 3 tbsp Vegetable Oil
- ▢ 1 tsp Kosher Salt
- ▢ 1/2 tsp Ground Black Pepper
Homemade Gravy
- ▢ 2 tbsp Unsalted Butter
- ▢ 2 tbsp All Purpose Flour
- ▢ 1 1/2 cups Beef Broth
- ▢ 1 tsp Worcestershire Sauce
- ▢ 1/2 tsp Onion Powder
- ▢ 1/2 tsp Garlic Powder
- ▢ 1/2 tsp Kosher Salt
- ▢ 1/4 tsp Ground Black Pepper
Assembly
- ▢ 1 1/2 cups Cheese Curds
- ▢ Parsley , for garnish
Instructions
- Prepare the Fries. Preheat the oven to 425°F. Line a baking sheet with parchment paper. Toss the cut potatoes with vegetable oil, salt, and black pepper. Spread them out in a single layer and bake for 30-35 minutes, flipping halfway through, until golden brown and crispy.
- Make the Gravy . In a medium saucepan, melt the butter over medium heat. Add the flour, whisking constantly, and cook for 1-2 minutes until golden brown. Slowly pour in the beef broth, whisking to prevent lumps. Add Worcestershire sauce, onion powder, garlic powder, salt, and black pepper. Stir well. Bring to a simmer and cook for 5-7 minutes, or until the gravy thickens. Remove from heat.
- Assemble the Poutine . Place the hot fries on a serving plate or dish. Sprinkle cheese curds evenly over the fries. Pour the hot gravy over the fries and cheese curds, allowing the cheese to soften slightly. Garnish with chopped parsley if desired.
Get support & connect with our community on Facebook!
Nutrition

If you already signed up, you should have received an email with a password to give you unlimited access to our FREE Printable Library. The password is case sensitive. Enter it below and get printing!
Password:

Homemade Poutine Recipe | Authentic Canadian Poutine
Ingredients
For The Fries
- 4 Russet Potatoes cut into fries
- 3 tbsp Vegetable Oil
- 1 tsp Kosher Salt
- 1/2 tsp Ground Black Pepper
Homemade Gravy
- 2 tbsp Unsalted Butter
- 2 tbsp All Purpose Flour
- 1 1/2 cups Beef Broth
- 1 tsp Worcestershire Sauce
- 1/2 tsp Onion Powder
- 1/2 tsp Garlic Powder
- 1/2 tsp Kosher Salt
- 1/4 tsp Ground Black Pepper
Assembly
- 1 1/2 cups Cheese Curds
- Parsley for garnish
Instructions
- Prepare the Fries. Preheat the oven to 425°F. Line a baking sheet with parchment paper. Toss the cut potatoes with vegetable oil, salt, and black pepper. Spread them out in a single layer and bake for 30-35 minutes, flipping halfway through, until golden brown and crispy.
- Make the Gravy . In a medium saucepan, melt the butter over medium heat. Add the flour, whisking constantly, and cook for 1-2 minutes until golden brown. Slowly pour in the beef broth, whisking to prevent lumps. Add Worcestershire sauce, onion powder, garlic powder, salt, and black pepper. Stir well. Bring to a simmer and cook for 5-7 minutes, or until the gravy thickens. Remove from heat.
- Assemble the Poutine . Place the hot fries on a serving plate or dish. Sprinkle cheese curds evenly over the fries. Pour the hot gravy over the fries and cheese curds, allowing the cheese to soften slightly. Garnish with chopped parsley if desired.
Homemade Poutine Recipe | Authentic Canadian Poutine https://twosleevers.com/homemade-poutine-recipe/

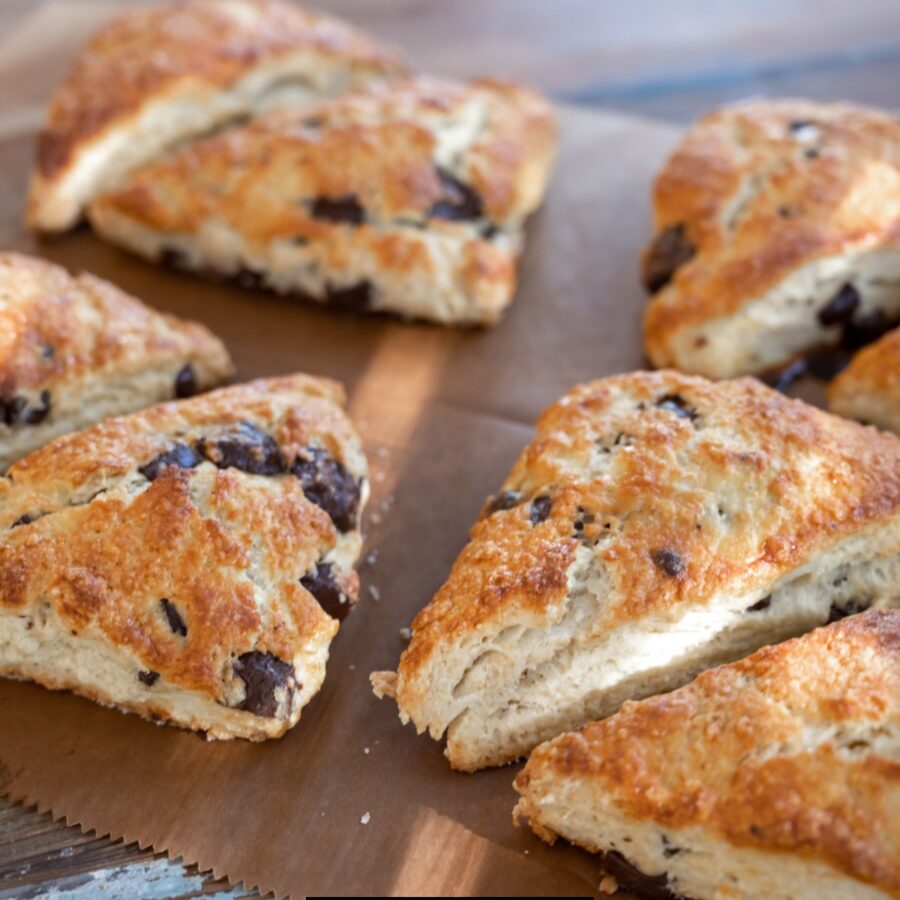
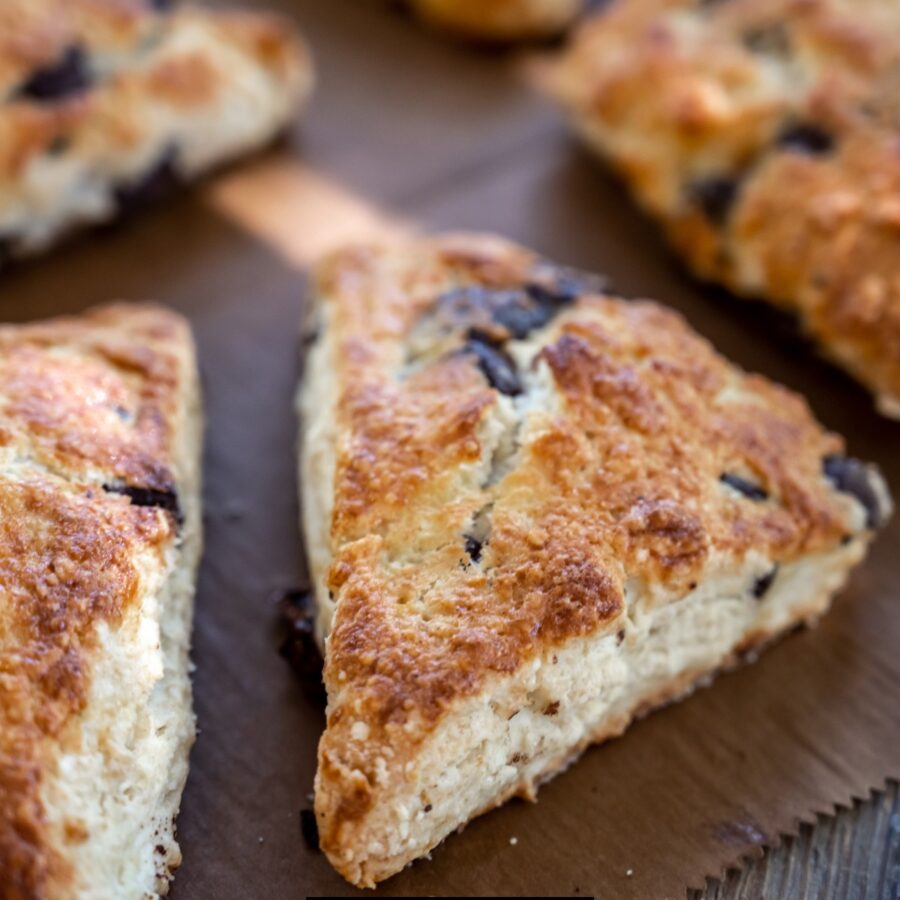
If you love buttery, flaky scones with just the right amount of chocolate, these Chocolate Chip Scones will be your new favorite treat. Perfect for breakfast, brunch, or an afternoon snack, these scones strike the perfect balance between crumbly and tender with pockets of melty chocolate in every bite. Whether you enjoy them with a cup of coffee or tea, they are guaranteed to be a hit.
Why You’ll Love This Sweet Treat
- Perfectly Tender and Flaky . The combination of cold butter and heavy cream creates a light, delicate texture.
- Easy to Make . No special tools required, just mix, shape, and bake.
- Rich Chocolate Flavor . Chocolate chips are evenly distributed for a sweet, indulgent taste.
- Customizable . Add nuts, drizzle with glaze, or use different chocolate varieties to make them your own.
- Make-Ahead Friendly . These scones can be made ahead and frozen for later.
Once you try these homemade chocolate chip scones, you will never go back to store-bought again.
What Do Chocolate Chip Scones Taste Like?
Chocolate chip scones are deliciously rich, buttery, and slightly crumbly. They are not overly sweet, making them the perfect morning pastry or afternoon treat.
The chocolate chips add just the right amount of sweetness, while the flaky, golden-brown crust provides a perfect contrast.
Ingredients You’ll Need
- All-Purpose Flour - The foundation of the scones, providing structure and stability while keeping the texture light and tender.
- Granulated Sugar - Adds just the right amount of sweetness to balance the flavors without overpowering the richness of the scones.
- Baking Powder - The leavening agent that helps the scones rise, creating a flaky, slightly airy texture instead of being dense.
- Salt - Enhances the overall flavor by balancing the sweetness and bringing out the richness of the butter and chocolate.
- Unsalted Butter – Cold butter is essential for achieving a tender, flaky texture. When the butter melts during baking, it creates small air pockets that give the scones a light and crumbly consistency.
- Heavy Cream - Adds moisture and richness, resulting in soft, tender scones with a slightly creamy texture. It also helps bind the dry ingredients together.
- Egg - Provides structure and stability, helping the scones hold their shape while adding a slight richness to the dough.
- Vanilla Extract - Enhances the warm, sweet aroma of the scones, complementing the butter and chocolate flavors.
- Chocolate Chips - The star ingredient, adding melty, rich chocolate pockets throughout the scones for a perfect balance of sweetness and indulgence.
When combined, these ingredients create buttery, tender, and chocolate-filled scones that are perfect for breakfast, brunch, or an afternoon treat.
How To Make Chocolate Chip Scones
- Mix the Dry Ingredients . In a large mixing bowl, whisk together the flour, sugar, baking powder, and salt.
- Cut in the Butter . Add the cold, cubed butter to the dry ingredients. Using a pastry cutter or your fingertips, work the butter into the flour until the mixture resembles coarse crumbs.
- Add the Wet Ingredients . In a separate bowl, whisk together the heavy cream, egg, and vanilla extract. Pour the wet ingredients into the dry ingredients and gently mix until the dough just comes together.
- Fold in the Chocolate Chips . Gently fold in the chocolate chips, being careful not to overwork the dough.
- Shape and Cut the Dough . Turn the dough onto a lightly floured surface and pat it into a 1-inch thick circle. Cut into 8 wedges and place them on a parchment-lined baking sheet.
- Chill the Dough (Optional but recommended) . For flakier scones, chill the shaped scones in the refrigerator for 15-20 minutes before baking.
- Bake to Perfection . Preheat the oven to 400°F. Brush the tops of the scones with a little extra heavy cream for a golden finish. Bake for 18-22 minutes, or until the scones are golden brown.
- Cool and Serve . Let the scones cool slightly before serving. Enjoy them warm with butter, jam, or an extra drizzle of chocolate.
Tips And Tricks
Making Chocolate Chip Scones is simple, but a few key techniques will ensure they turn out flaky, buttery, and perfectly textured every time. Follow these expert tips for bakery-quality scones at home:
- Use Cold Butter . Cold butter creates pockets of steam while baking, leading to a light and flaky texture.
- Do Not Overmix the Dough . Overmixing can make the scones dense and tough. Mix just until the dough comes together.
- Chill the Dough Before Baking . Chilling the dough for 15-20 minutes helps keep the butter cold and results in a better rise.
- Use Heavy Cream Instead of Milk . Heavy cream provides a richer, more tender scone.
- Make Them Extra Buttery . Brush the tops with heavy cream or melted butter before baking for a golden, crisp exterior.
Variations
Chocolate Chip Scones are already a delicious treat, but you can easily customize them to suit your taste. Whether you want to add extra flavors, mix up the textures, or create a healthier version, here are some creative variations to try:
- Dark Chocolate - Swap milk chocolate chips for dark chocolate for a deeper, richer flavor.
- Nutty - Add ½ cup of chopped pecans or walnuts for extra crunch.
- Coconut Chocolate Chip Scones – Stir in ¼ cup of shredded coconut for a tropical twist.
- Double Chocolate - Add ¼ cup of cocoa powder to the dry ingredients for a chocolate-infused scone.
- Glazed - Drizzle with vanilla or chocolate glaze for a bakery-style finish.
- Vegan - Use coconut oil instead of butter, almond milk instead of cream, and a flax egg substitute.
What To Enjoy With Chocolate Chip Scones
Chocolate Chip Scones are a delightful treat on their own, but pairing them with the right accompaniments can make them even more enjoyable. Whether you’re serving them for breakfast, brunch, or dessert, here are some delicious ways to enjoy them:
- Coffee or Tea - A warm cup of coffee or Earl Grey tea is a classic pairing.
- Whipped Cream or Clotted Cream - A rich, creamy topping makes them extra indulgent.
- Fruit Preserves - Raspberry, strawberry, or orange marmalade adds a fruity contrast.
- Greek Yogurt - A protein-packed side that balances the sweetness.
- Warm Milk - A comforting pairing, especially for kids.
How Long Do They Last?
Chocolate Chip Scones can be stored at room temperature for up to 2 days in an airtight container to maintain their freshness.
If you want to keep them longer, they can be refrigerated for up to 5 days, though it’s best to warm them slightly before serving to restore their soft, flaky texture.
Can You Freeze Them?
For longer storage, scones can be frozen for up to 3 months. To freeze, wrap each scone individually in plastic wrap and place them in a freezer-safe bag.
When you’re ready to eat them, thaw the scones at room temperature or warm them in a 350°F oven for 5-7 minutes to bring back their buttery crispness.
More Chocolate Flavored Bites
- Chocolate Pancakes
- Chocolate Covered Pretzels
- White Hot Chocolate
- Chocolate Cobbler
- Chocolate Overnight Oats
- Homemade Crunch Bar
- Chocolate Chip Mug Cake


Chocolate Chip Scones | The Best Chocolate Chip Scone Recipe
Ingredients
- ▢ 2 cups All Purpose Flour
- ▢ 1/4 cup Granulated Sugar
- ▢ 1 tbsp Baking Powder
- ▢ 1/2 tsp Kosher Salt
- ▢ 1/2 cup Unsalted Butter
- ▢ 1/2 cup Heavy Cream , Add Two tbsp for brushing the tops
- ▢ 1 Egg
- ▢ 1 tsp Vanilla Extract
- ▢ 3/4 cup Chocolate Chips
Instructions
- Mix the Dry Ingredients . In a large mixing bowl, whisk together the flour, sugar, baking powder, and salt.
- Cut in the Butter . Add the cold, cubed butter to the dry ingredients. Using a pastry cutter or your fingertips, work the butter into the flour until the mixture resembles coarse crumbs.
- Add the Wet Ingredients . In a separate bowl, whisk together the heavy cream, egg, and vanilla extract. Pour the wet ingredients into the dry ingredients and gently mix until the dough just comes together.
- Fold in the Chocolate Chips . Gently fold in the chocolate chips, being careful not to overwork the dough.
- Shape and Cut the Dough . Turn the dough onto a lightly floured surface and pat it into a 1-inch thick circle. Cut into 8 wedges and place them on a parchment-lined baking sheet.
- Chill the Dough (Optional but recommended) . For flakier scones, chill the shaped scones in the refrigerator for 15-20 minutes before baking.
- Bake to Perfection . Preheat the oven to 400°F. Brush the tops of the scones with a little extra heavy cream for a golden finish. Bake for 18-22 minutes, or until the scones are golden brown.
- Cool and Serve . Let the scones cool slightly before serving. Enjoy them warm with butter, jam, or an extra drizzle of chocolate.
