
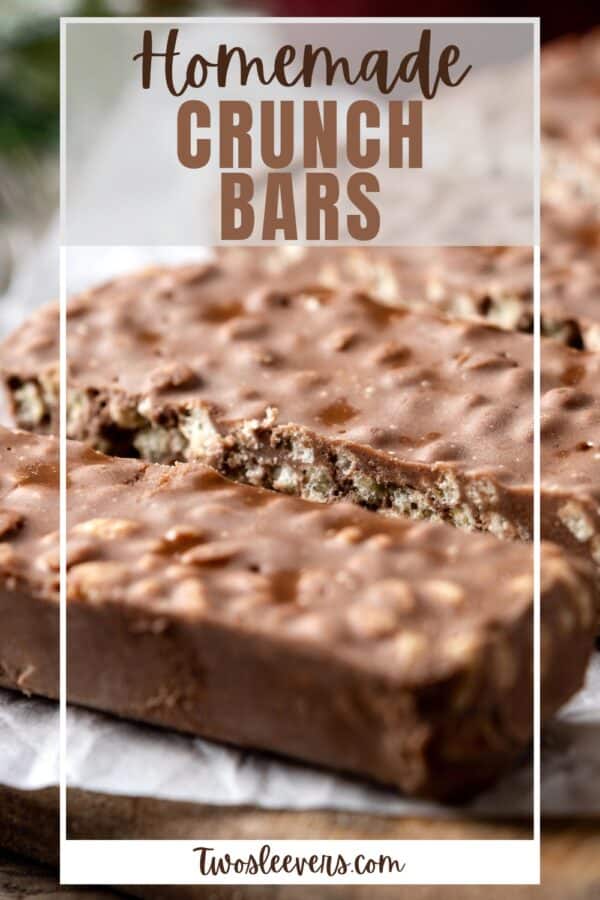
Indulge in the delightful crunch of this homemade Crunch Bar recipe! This recipe transforms simple ingredients into a delectable treat that’s perfect for snacking or sharing.

Why You’ll Love This Sweet Treat
- Quick . Ready in just 30 minutes from start to finish.
- Effortless . Minimal preparation for a no-fuss candy-making experience.
- Incredibly Tasty . The perfect combination of rich chocolate and crispy rice is a match made in heaven.
With the simplicity of this recipe, you’ll achieve that desirable crispy texture without the need for complicated techniques, making it an ideal homemade treat for any occasion.
What’s The Crunchy Stuff In A Crunch Bar?
The crunchy stuff in a Crunch Bar is crispy rice cereal. This cereal, made from puffed rice, provides the signature crunch that makes these bars so delightful. The crispy rice cereal is mixed with melted chocolate, creating a delicious texture contrast that makes Crunch Bars so popular.
Are Crunch Bars Healthy?
Crunch Bars, while delicious, are not typically considered a healthy snack.
If you’re looking for healthier alternatives, consider options with lower sugar content, more fiber, and higher nutritional value, such as dark chocolate with nuts, fruits, or whole-grain snacks. As with any treat, enjoying Crunch Bars in moderation is key to maintaining a balanced diet.
Ingredients You’ll Need
When making homemade Crunch Bars, each ingredient plays a crucial role in achieving the perfect taste and texture. Here’s what each ingredient is used for:
- Chocolate Chips- The primary component providing the rich chocolate flavor that makes Crunch Bars so delightful.
- Crispy Rice Cereal- The cereal adds a light, airy texture and crispy bite that contrasts perfectly with the smooth chocolate.
- Coconut Oil- Ensures the chocolate remains smooth and easy to pour, and once cooled, it helps the bars maintain a firm, yet slightly chewy texture.
- Vanilla Extract - Enhances the overall flavor profile of the chocolate, adding a subtle warmth and depth.
How To Make A Homemade Crunch Bar
- Melt the Chocolate . In a microwave-safe bowl, combine the chocolate chips and coconut oil. Microwave in 30-second intervals, stirring after each, until completely melted and smooth.
- Add Vanilla Extract . Stir in the vanilla extract for enhanced flavor.
- Fold in the Cereal . Gently fold in the crispy rice cereal until evenly coated with the melted chocolate mixture.
- Pour the Mixture . Pour the chocolate-cereal mixture into a lined 8x8-inch baking dish, spreading it out evenly with a spatula.
- Chill . Place the dish in the refrigerator for about 1 hour, or until the mixture is firm and set.
- Cut into Bars . Once set, lift the mixture out of the dish using the parchment paper and cut it into bars or squares of your desired size.
- Enjoy . Serve your homemade Crunch Bars immediately or store them in an airtight container in the refrigerator for up to 2 weeks.

Tips And Tricks
Making this delicious Crunch Bar recipe involves more than just the right ingredients; it’s about technique and a few kitchen tricks to ensure they turn out flavorful and satisfying. Here’s how to perfect them:
- Use High-Quality Chocolate. The quality of your chocolate significantly impacts the final taste. Opt for high-quality chocolate chips for the best results.
- Avoid Overheating the Chocolate. When melting the chocolate, do so gradually to avoid burning. Use short bursts in the microwave and stir frequently.
- Ensure Even Coating. Make sure the crispy rice cereal is evenly coated with the melted chocolate mixture to ensure every bite is perfectly crunchy.
Variations
Crunch Bars are a versatile treat that can be adapted to suit a variety of tastes and dietary needs. Here are some creative variations on the classic:
- Dark Chocolate Almond- Stir in 1/2 cup of chopped almonds for added crunch and a hint of nuttiness. Use dark chocolate chips for a richer flavor.
- Peanut Butter- Mix in 1/4 cup of creamy peanut butter with the melted chocolate for a peanut buttery twist. Use chocolate-flavored crispy rice cereal for an extra chocolate hit.
- Mint Chocolate - Add 1/2 teaspoon of peppermint extract to the melted chocolate for a refreshing mint flavor. Sprinkle crushed peppermint candies on top before chilling
What To Enjoy With A Homemade Crunch Bar
Crunch Bars pair wonderfully with various snacks and beverages. Here are some great options:
- Fresh Fruit- Provide a refreshing contrast with strawberries, blueberries, or apple slices.
- Coffee or Hot Chocolate - Enjoy with a cup of hot coffee or cocoa for a cozy, comforting treat.
- Ice Cream - Serve your Crunch Bar with a scoop of vanilla or chocolate ice cream for a decadent dessert.
How Long Do They Last?
Store any leftovers in an airtight container in the refrigerator for up to 2 weeks. Ensure they are kept in a cool, dry place to maintain their texture and flavor.
Can You Freeze Them?
Absolutely! Freeze the cut bars on a baking sheet, then transfer them to a freezer bag. They can be enjoyed directly from the freezer for a chilled treat or thawed in the refrigerator before serving.
More Delicious Desserts
- No Bake Peanut Butter Bars
- Gluten Free Chocolate Cake
- Lemon Mousse
- Peach Galette
- Cheesecake Brownies
- Sugar Cookie Bars
- Peppermint Patties

Homemade Crunch Bar Recipe | Easy Copycat Crunch Candy
Ingredients
- ▢ 2 cups Chocolate Chips
- ▢ 1 1/2 cups Crispy Rice Cereal
- ▢ 2 tbsp Coconut Oil
- ▢ 1 tsp Vanilla Extract
Instructions
- Melt the Chocolate . In a microwave-safe bowl, combine the chocolate chips and coconut oil. Microwave in 30-second intervals, stirring after each, until completely melted and smooth.
- Add Vanilla Extract . Stir in the vanilla extract for enhanced flavor.
- Fold in the Cereal . Gently fold in the crispy rice cereal until evenly coated with the melted chocolate mixture.
- Pour the Mixture . Pour the chocolate-cereal mixture into a lined 8x8-inch baking dish, spreading it out evenly with a spatula.
- Chill . Place the dish in the refrigerator for about 1 hour, or until the mixture is firm and set.
- Cut into Bars . Once set, lift the mixture out of the dish using the parchment paper and cut it into bars or squares of your desired size.
- Enjoy . Serve your homemade Crunch Bars immediately or store them in an airtight container in the refrigerator for up to 2 weeks.
Get support & connect with our community on Facebook!

If you already signed up, you should have received an email with a password to give you unlimited access to our FREE Printable Library. The password is case sensitive. Enter it below and get printing!
Password:

Homemade Crunch Bar Recipe | Easy Copycat Crunch Candy
Ingredients
- 2 cups Chocolate Chips
- 1 1/2 cups Crispy Rice Cereal
- 2 tbsp Coconut Oil
- 1 tsp Vanilla Extract
Instructions
- Melt the Chocolate . In a microwave-safe bowl, combine the chocolate chips and coconut oil. Microwave in 30-second intervals, stirring after each, until completely melted and smooth.
- Add Vanilla Extract . Stir in the vanilla extract for enhanced flavor.
- Fold in the Cereal . Gently fold in the crispy rice cereal until evenly coated with the melted chocolate mixture.
- Pour the Mixture . Pour the chocolate-cereal mixture into a lined 8x8-inch baking dish, spreading it out evenly with a spatula.
- Chill . Place the dish in the refrigerator for about 1 hour, or until the mixture is firm and set.
- Cut into Bars . Once set, lift the mixture out of the dish using the parchment paper and cut it into bars or squares of your desired size.
- Enjoy . Serve your homemade Crunch Bars immediately or store them in an airtight container in the refrigerator for up to 2 weeks.
Homemade Crunch Bar Recipe | Easy Copycat Crunch Candy https://twosleevers.com/homemade-crunch-bar/

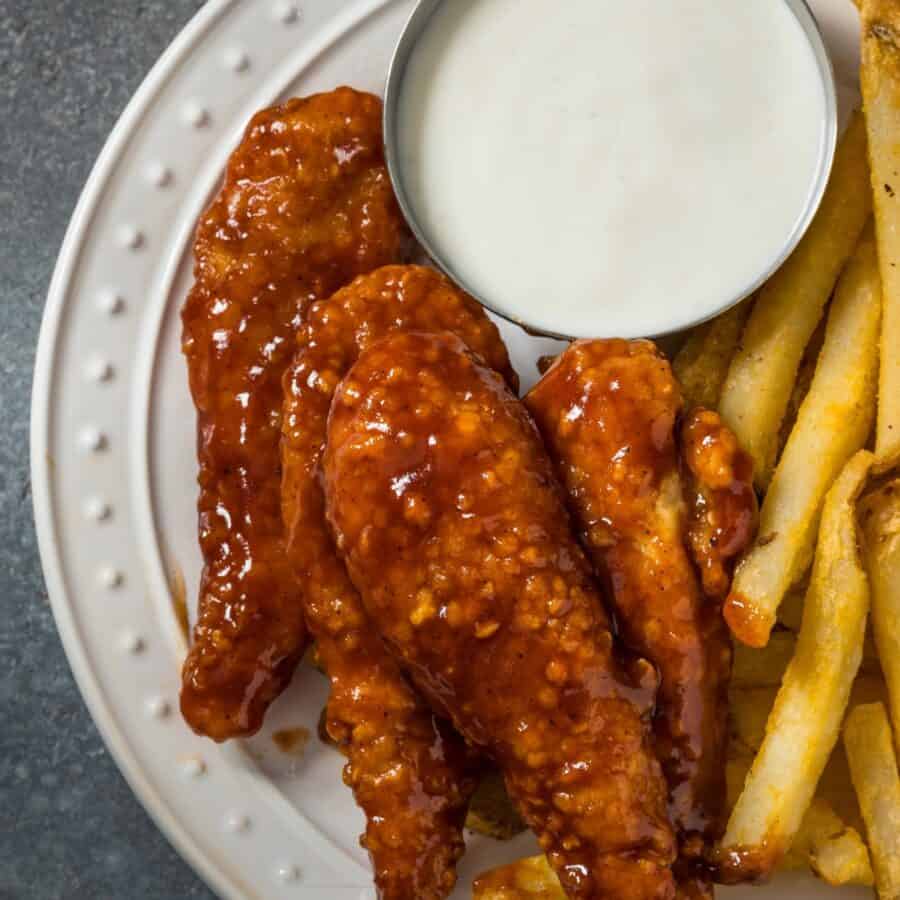
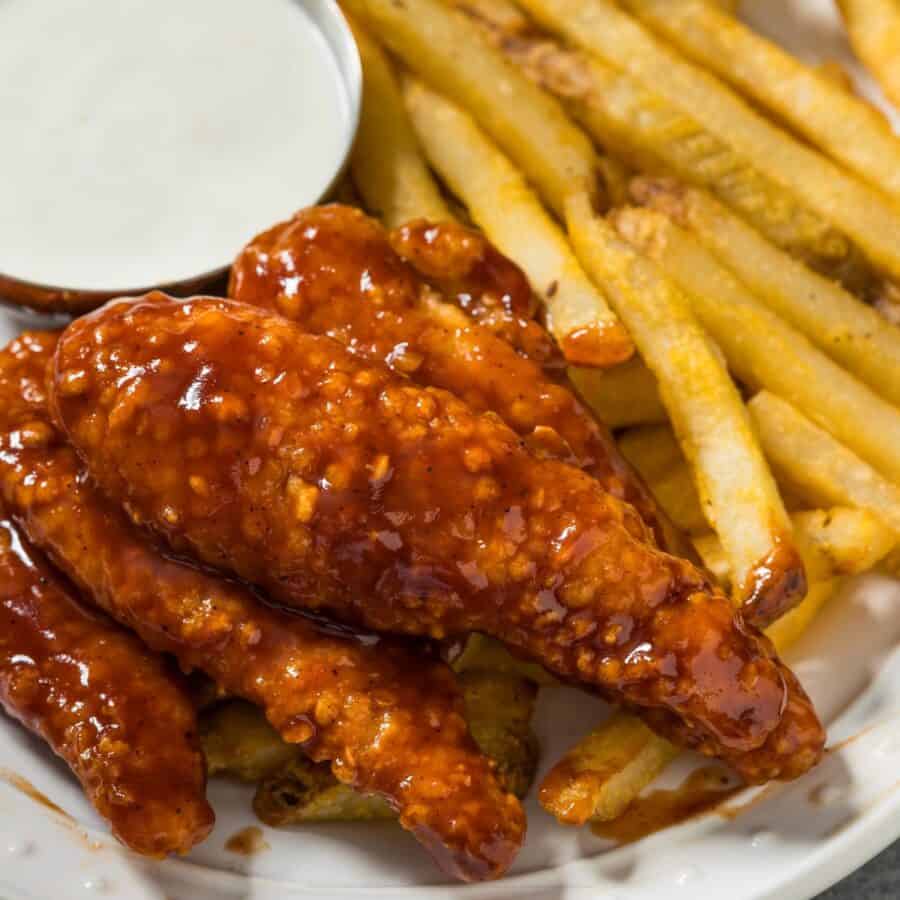
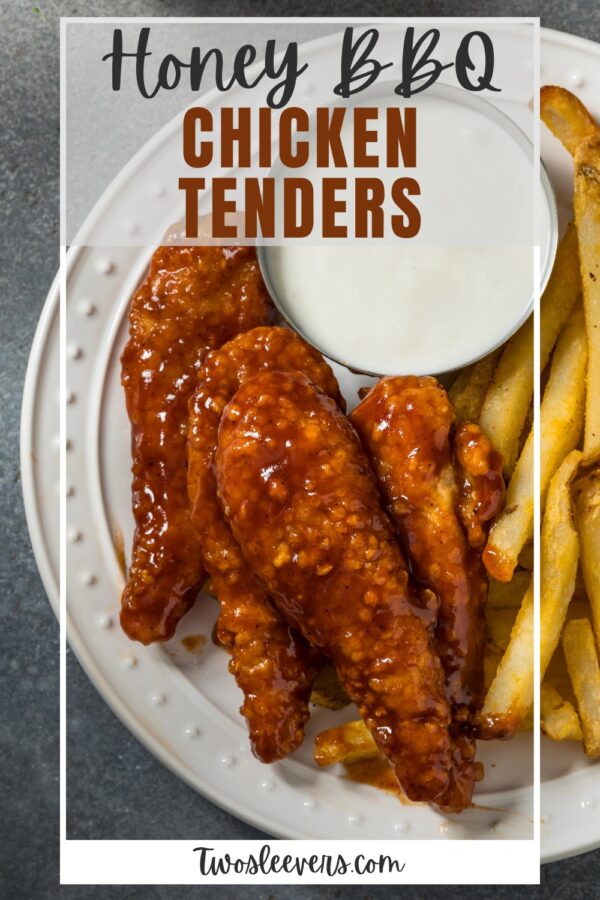
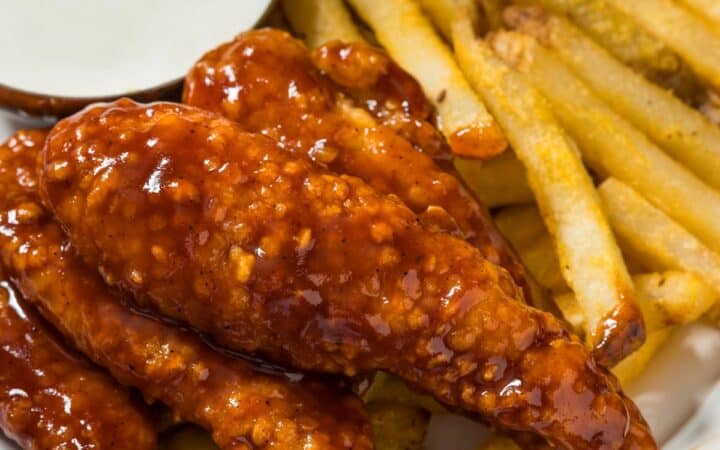
Elevate your dinner with these deliciously crispy Air Fryer Honey BBQ Chicken Tenders! This recipe transforms simple ingredients into a mouth-watering dish with a perfect blend of sweet and tangy flavors.
Why You’ll Love This Sweet And Tangy Chicken Recipe
- Quick - Ready in just 25 minutes from start to finish.
- Effortless - Minimal preparation for a no-fuss cooking experience.
- Incredibly Tasty - The honey BBQ sauce combined with the tender juiciness of the chicken is a match made in heaven.
With the magic of the air fryer, you’ll achieve that desirable crispy coating without the need for deep frying, making it a healthier option that doesn’t sacrifice taste.
What Does Honey BBQ Chicken Taste Like?
Honey BBQ chicken is a harmonious blend of sweet, tangy, smoky, and savory flavors, creating a mouth-watering dish that appeals to a wide range of palates.
The combination of the crispy exterior (from the air fryer) and the tender, juicy interior of the chicken makes for an irresistible texture contrast.
Ingredients You’ll Need
For The Chicken
- Chicken Tenders - The main protein of the dish.
- Honey BBQ Sauce - This sauce provides the distinctive sweet and tangy flavor typical of honey BBQ chicken.
- All-Purpose Flour - Used to create the initial coating on the chicken tenders.
- Egg - The beaten egg acts as a binder, helping the flour coating adhere to the chicken tenders.
- Garlic Powder - Adds a savory depth to the flour mixture, enhancing the overall flavor profile of the chicken tenders.
- Paprika - Paprika not only adds subtle earthiness and sweetness to the coating but also gives the chicken a vibrant, appealing color.
- Salt - Enhances the natural flavors of the chicken and the spices in the flour mixture.
- Black Pepper- Adds a slight heat and sharpness, complementing the other flavors.
- Olive Oil - Helps in crisping up the exterior and prevents the tenders from sticking to the air fryer basket.
For The Sauce
- Honey - Adds natural sweetness to the BBQ sauce.
- BBQ Sauce - The base of the honey BBQ sauce, providing a rich, smoky flavor.
- Butter - Adds richness and mellows out the flavors, creating a balanced, smooth sauce.
How To Make Honey BBQ Chicken
- Prep the Chicken. Start by patting the chicken tenders dry with paper towels. This helps the coating stick better.
- Make the Flour Mixture. In a shallow bowl, mix the all-purpose flour, garlic powder, paprika, salt, and black pepper.
- Dip the Tenders. Dip each chicken tender first in the beaten egg, then dredge thoroughly in the flour mixture, shaking off any excess. This double coating will ensure a crispier finish.
- Air Fry. Preheat the air fryer to 375°F. Spray the chicken tenders with olive oil. Arrange the chicken tenders in a single layer in the air fryer basket. Cook for 10 minutes, then flip the tenders and cook for an additional 5-7 minutes or until the internal temperature reaches 165°F.
- Prepare the Honey BBQ Sauce. In a saucepan, combine the honey, BBQ sauce, and butter. Heat over medium heat until the butter is melted and the sauce is well combined. Stir occasionally to prevent burning.
- Toss with Sauce. Once the chicken tenders are cooked and still hot, toss them in the honey BBQ sauce until they are evenly coated.
- Serve. Serve your honey BBQ chicken tenders hot and enjoy!
Tips And Tricks
Making delicious honey BBQ chicken tenders involves more than just the right ingredients; it’s about technique to ensure they turn out flavorful and satisfying. Here’s how to perfect them:
- Select the Right Cut. Use actual chicken tenders (the tenderloin of the chicken breast) for the best results. They’re naturally tender and cook quickly, making them ideal for a quick and juicy dish.
- Don’t Overcook. Chicken tenders are thin and cook quickly; overcooking will dry them out. Keep an eye on their internal temperature with a meat thermometer. The safe internal temperature for chicken is 165°F.
Variations
Honey BBQ chicken tenders are a versatile dish that can be adapted to suit a variety of tastes and dietary needs. Here are some creative variations on the classic:
- Spicy- Add a teaspoon of hot sauce or a pinch of cayenne pepper to the honey BBQ sauce for a spicy kick.
- Honey Mustard- Mix some honey mustard into your BBQ sauce for a tangy, sweet, and smoky combination.
- Teriyaki- Incorporate some teriyaki sauce into the honey BBQ sauce for an Asian twist.
What To Eat With Honey BBQ Chicken
Honey BBQ chicken tenders pair wonderfully with various sides and dips. Here are some great options:
- Classic Celery and Carrot Sticks- Provide a crunchy, cool contrast to the sweet and tangy flavor.
- Coleslaw - Adds a creamy and tangy element to balance the sweetness.
- Sweet Potato Fries - A sweet side that complements the tender’s flavor beautifully.
How Long Do They Last?
Store any leftovers in an airtight container in the refrigerator for up to 3 days. Reheat in the air fryer for a few minutes to restore the crispy texture before serving.
Can You Freeze Them?
Absolutely! Freeze the cooked and cooled chicken tenders on a baking sheet, then transfer to a freezer bag. They can be reheated directly from frozen in the air fryer, making them a convenient meal prep option.
More Simple Chicken Recipes
- Instant Pot Butter Chicken
- Air Fryer Chicken Tenders
- Gochujang Chicken
- Chipotle Chicken Tacos
- Bourbon Chicken
Honey BBQ Chicken Recipe | Honey Barbecue Chicken Tenders
Ingredients
- ▢ 6 Chicken Tenderloins
- ▢ 1/2 cup All Purpose Flour
- ▢ 1 Egg
- ▢ 1 tsp Garlic Powder
- ▢ 1 tsp Paprika
- ▢ 1/2 tsp Kosher Salt
- ▢ 1/2 tsp Ground Black Pepper
- ▢ Olive Oil Spray
For The Sauce
- ▢ 1/4 cup BBQ Sauce , a sweet variety
- ▢ 2 tbsp Honey
- ▢ 1 tbsp Butter
Instructions
- Prep the Chicken. Start by patting the chicken tenders dry with paper towels. This helps the coating stick better.
- Make the Flour Mixture. In a shallow bowl, mix the all-purpose flour, garlic powder, paprika, salt, and black pepper.
- Dip the Tenders. Dip each chicken tender first in the beaten egg, then dredge thoroughly in the flour mixture, shaking off any excess. This double coating will ensure a crispier finish.
- Air Fry. Preheat the air fryer to 375°F. Spray the chicken tenders with olive oil. Arrange the chicken tenders in a single layer in the air fryer basket. Cook for 10 minutes, then flip the tenders and cook for an additional 5-7 minutes or until the internal temperature reaches 165°F.
- Prepare the Honey BBQ Sauce. In a saucepan, combine the honey, BBQ sauce, and butter. Heat over medium heat until the butter is melted and the sauce is well combined. Stir occasionally to prevent burning.
- Toss with Sauce. Once the chicken tenders are cooked and still hot, toss them in the honey BBQ sauce until they are evenly coated.
- Serve. Serve your honey BBQ chicken tenders hot and enjoy!
