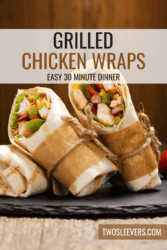
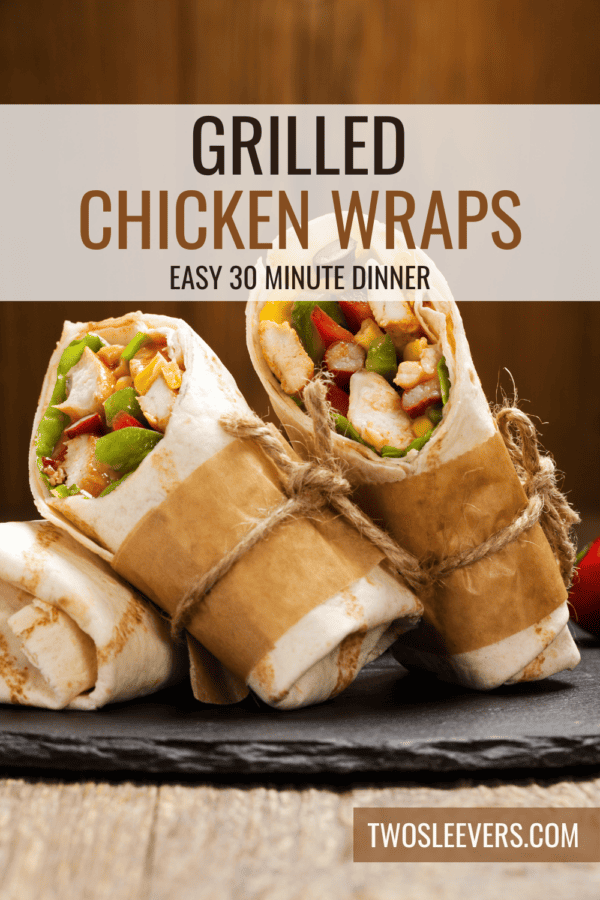
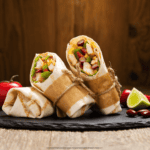
Are you craving the deliciousness of a Grilled Chicken Wrap but want to enjoy it from the comfort of your own kitchen? Look no further! With this easy-to-follow recipe, you can recreate the taste and satisfaction of your favorite fast-food treat right at home.

Why You’ll Love This Recipe?
- Delicious Flavor . Enjoy the savory combination of tender grilled chicken, fresh vegetables, and zesty sauce wrapped in a warm tortilla.
- Healthier Option . By making this recipe at home, you have control over the ingredients, allowing you to choose healthier alternatives and customize it to your taste.
- Quick and Easy . Whip up these wraps in no time for a satisfying meal that’s perfect for lunch or dinner.
- Kid-Friendly . Even the pickiest eaters will love the flavors of this homemade version of a fast-food favorite.
With this easy Grilled Chicken Wrap recipe, you can enjoy the flavors of your favorite fast-food dish anytime, anywhere. Whether you’re craving a quick lunch or a satisfying dinner, these wraps are sure to hit the spot.
Is A Grilled Chicken Wrap Healthy?
Homemade Grilled Chicken Wraps can be a healthier option compared to a fast-food version, especially when using whole wheat or spinach tortillas, lean grilled chicken, and plenty of fresh vegetables.
Just be mindful of portion sizes and any additional toppings or sauces you choose to add.
Ingredients You’ll Need
- Chicken Breasts- The grilled chicken breasts serve as the main protein component of the wrap. They provide substance, flavor, and texture, adding heartiness to the meal. Slicing the chicken ensures that it is easy to bite into and evenly distributed throughout the wrap.
- Flour Tortillas - Tortillas act as the outer shell or wrap of the dish. They encase the filling ingredients and provide a convenient and portable way to enjoy the meal.
- Shredded Lettuce- Shredded lettuce adds crispness, freshness, and a subtle crunch to the wrap. It serves as a bed for the other ingredients and provides a refreshing contrast to the savory components.
- Diced Tomatoes - Diced tomatoes contribute juiciness, sweetness, and acidity to the wrap. They add a burst of flavor and moisture, enhancing the overall taste profile.
- Black Beans and Corn- This flavorful combination adds texture to the wrap while adding ingredients to help keep you fuller for longer.
- Red Onion - It provides a zesty kick and complements the other ingredients with its distinct taste. Red onions also offer texture and crunchiness to the filling.
- Shredded Cheddar Cheese - Shredded cheddar cheese adds richness, creaminess, and a hint of tanginess to the wrap.
- Ranch Dressing - Ranch dressing serves as the creamy and tangy sauce that ties the wrap together. It adds moisture, richness, and a burst of flavor to the filling.
- Salt and Pepper- Salt and pepper are used to season the grilled chicken and other ingredients, enhancing their natural flavors.
How To Make A Grilled Chicken Wrap
- Marinate the Chicken . In a bowl, mix together the olive oil, lemon juice, garlic powder, onion powder, salt, and pepper. Place the chicken breasts in the marinade, ensuring they are evenly coated. Cover and refrigerate for at least 30 minutes.
- Grill the Chicken . Preheat your grill to medium-high heat. Remove the chicken from the marinade and discard any excess. Grill the chicken breasts for 6-8 minutes per side or until cooked through and no longer pink in the center. Once cooked, remove from the grill and let them rest for a few minutes before slicing them into strips.
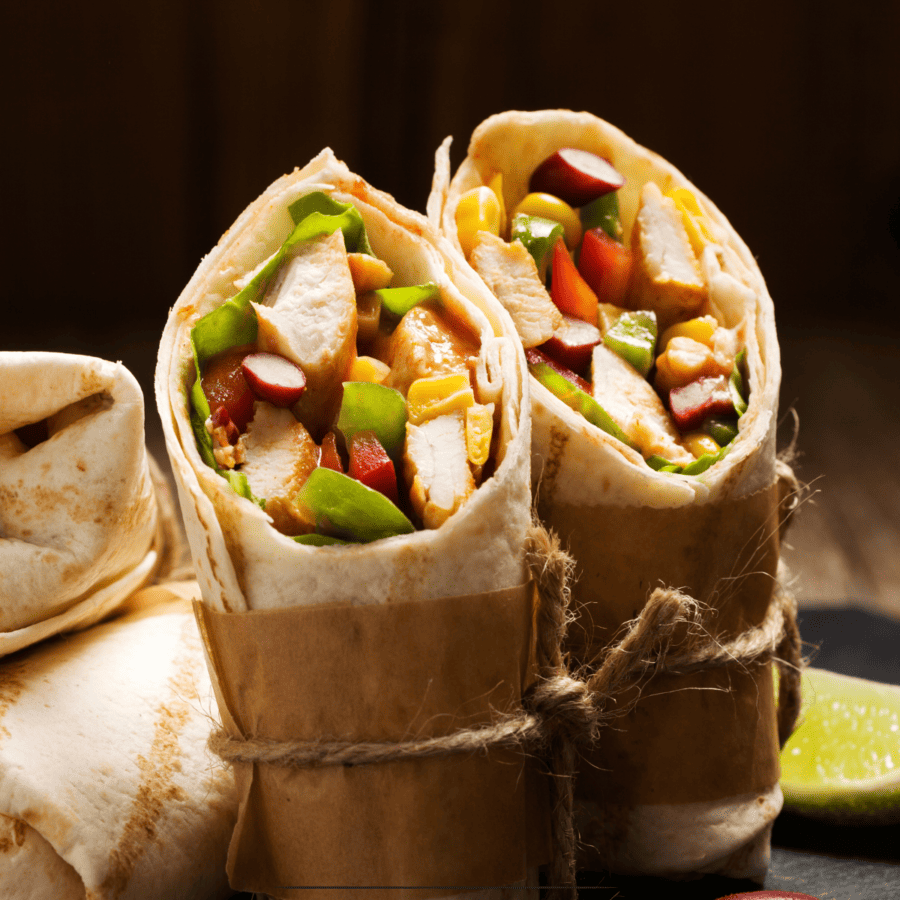
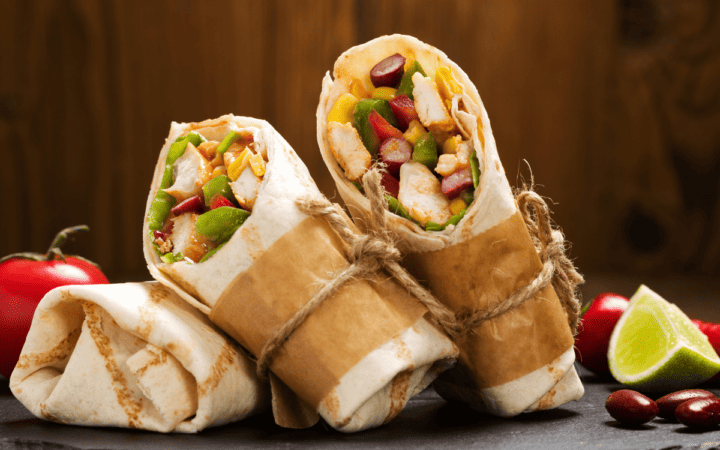
- Assemble the Wraps . Warm the tortillas slightly to make them easier to fold. Lay each tortilla flat and add a layer of shredded lettuce to the center. Top with sliced grilled chicken, corn, black beans, diced tomatoes, diced red onion, shredded cheddar cheese, and a drizzle of ranch dressing.
- Fold the Wraps. To fold the wraps, start by folding the bottom edge of the tortilla up over the filling. Then, fold in the sides, overlapping them slightly, and continue rolling until the filling is completely enclosed.
- Serve and Enjoy . Serve the wraps immediately while still warm, and enjoy the delicious flavors of your homemade Grilled Chicken Wraps!
Tips And Tricks
Making delicious grilled chicken wraps is easy with a few handy tips and tricks. Here are some suggestions to help you create perfect wraps every time:
- Marinate the Chicken . Marinating the chicken before grilling adds flavor and helps keep it moist. Use your favorite marinade or a simple mixture of olive oil, lemon juice, garlic, and herbs.
- Evenly Sized Chicken . To ensure even cooking, try to pound the chicken breasts to an even thickness or slice them into uniform pieces before grilling.
- Don’t Overcook the Chicken . Chicken breasts can dry out quickly if overcooked. Grill the chicken just until it reaches an internal temperature of 165°F. Use a meat thermometer to check for doneness.
Variations
Grilled chicken wraps offer endless possibilities for customization. Here are some delicious variations to try:
- Mediterranean Chicken Wrap - Use grilled chicken marinated in olive oil, lemon juice, garlic, and Mediterranean herbs like oregano and thyme. Add sliced cucumbers, tomatoes, red onions, feta cheese, and Kalamata olives. Drizzle with tzatziki sauce or a Greek yogurt dressing.
- Southwest Chicken Wrap- Season grilled chicken with a blend of chili powder, cumin, garlic powder, and paprika. Add black beans, corn kernels, diced avocado, shredded lettuce, and Monterey Jack cheese. Serve with salsa, sour cream, and chopped cilantro.
- Caprese Chicken Wrap -Top grilled chicken with fresh mozzarella slices, sliced tomatoes, and basil leaves. Drizzle with balsamic glaze or pesto sauce for added flavor. Wrap in a spinach tortilla for an extra dose of greens.
What Goes With A Grilled Chicken Wrap?
Grilled chicken wraps are versatile and pair well with a variety of sides and accompaniments. Here are some delicious options to serve alongside it:
- Salad - A crisp green salad with mixed greens, cherry tomatoes, cucumber slices, and your favorite dressing provides a refreshing and healthy option to complement the grilled chicken wrap.
- French Fries or Sweet Potato Fries - Crispy and golden fries, whether classic potato or sweet potato, are a popular choice to add a satisfying crunch and a touch of indulgence to the meal.
- Fresh Fruit - A selection of fresh fruit such as watermelon slices, pineapple chunks, berries, or grapes adds a natural sweetness and juiciness to balance the savory flavors of the wrap.
How Long Do They Last?
Grilled chicken wraps can typically be stored in the refrigerator for up to 3-4 days. However, you should consider the freshness of the ingredients used, especially the vegetables and any dairy-based condiments like ranch dressing.
Can You Freeze It?
While it’s possible to freeze the assembled wraps, they may become soggy upon thawing due to the moisture from the vegetables and dressing. It’s best to freeze the grilled chicken separately and assemble the wraps fresh when ready to eat.
More Easy Chicken Recipes
- Instant Pot Butter Chicken
- Sesame Chicken
- Instant Pot Chicken Enchiladas
- Creamy Chicken Salad
- Slow Cooker Chipotle Chicken
Grilled Chicken Wraps | Simple And Flavorful Chicken Wrap
Ingredients
- ▢ 4 Chicken Breasts
- ▢ 4 Flour Tortillas
- ▢ 2 cups Lettuce
- ▢ 1 cup Tomatoes , diced
- ▢ 1/2 cup Black Beans
- ▢ 1/2 cup Corn Kernels
- ▢ 1/2 cup Red Onion , sliced
- ▢ 1/2 cup Ranch Dressing
- ▢ 1/2 tsp Kosher Salt
- ▢ 1/4 tsp Black pepper
- ▢ 2 tbsp Olive Oil
Instructions
- Marinate the Chicken . In a bowl, mix together the olive oil, lemon juice, garlic powder, onion powder, salt, and pepper. Place the chicken breasts in the marinade, ensuring they are evenly coated. Cover and refrigerate for at least 30 minutes.
- Grill the Chicken . Preheat your grill to medium-high heat. Remove the chicken from the marinade and discard any excess. Grill the chicken breasts for 6-8 minutes per side or until cooked through and no longer pink in the center. Once cooked, remove from the grill and let them rest for a few minutes before slicing them into strips.
- Assemble the Wraps . Warm the tortillas slightly to make them easier to fold. Lay each tortilla flat and add a layer of shredded lettuce to the center. Top with sliced grilled chicken, diced tomatoes, diced red onion, corn, black beans, shredded cheddar cheese, and a drizzle of ranch dressing.
- Fold the Wraps. To fold the wraps, start by folding the bottom edge of the tortilla up over the filling. Then, fold in the sides, overlapping them slightly, and continue rolling until the filling is completely enclosed.
- Serve and Enjoy . Serve the wraps immediately while still warm, and enjoy the delicious flavors of your homemade Grilled Chicken Wraps!
Get support & connect with our community on Facebook!
Nutrition

If you already signed up, you should have received an email with a password to give you unlimited access to our FREE Printable Library. The password is case sensitive. Enter it below and get printing!
Password:
Grilled Chicken Wraps | Simple And Flavorful Chicken Wrap
Ingredients
- 4 Chicken Breasts
- 4 Flour Tortillas
- 2 cups Lettuce
- 1 cup Tomatoes diced
- 1/2 cup Black Beans
- 1/2 cup Corn Kernels
- 1/2 cup Red Onion sliced
- 1/2 cup Ranch Dressing
- 1/2 tsp Kosher Salt
- 1/4 tsp Black pepper
- 2 tbsp Olive Oil
Instructions
- Marinate the Chicken . In a bowl, mix together the olive oil, lemon juice, garlic powder, onion powder, salt, and pepper. Place the chicken breasts in the marinade, ensuring they are evenly coated. Cover and refrigerate for at least 30 minutes.
- Grill the Chicken . Preheat your grill to medium-high heat. Remove the chicken from the marinade and discard any excess. Grill the chicken breasts for 6-8 minutes per side or until cooked through and no longer pink in the center. Once cooked, remove from the grill and let them rest for a few minutes before slicing them into strips.
- Assemble the Wraps . Warm the tortillas slightly to make them easier to fold. Lay each tortilla flat and add a layer of shredded lettuce to the center. Top with sliced grilled chicken, diced tomatoes, diced red onion, corn, black beans, shredded cheddar cheese, and a drizzle of ranch dressing.
- Fold the Wraps. To fold the wraps, start by folding the bottom edge of the tortilla up over the filling. Then, fold in the sides, overlapping them slightly, and continue rolling until the filling is completely enclosed.
- Serve and Enjoy . Serve the wraps immediately while still warm, and enjoy the delicious flavors of your homemade Grilled Chicken Wraps!
Grilled Chicken Wraps | Simple And Flavorful Chicken Wrap https://twosleevers.com/grilled-chicken-wrap/
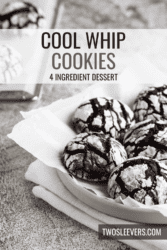
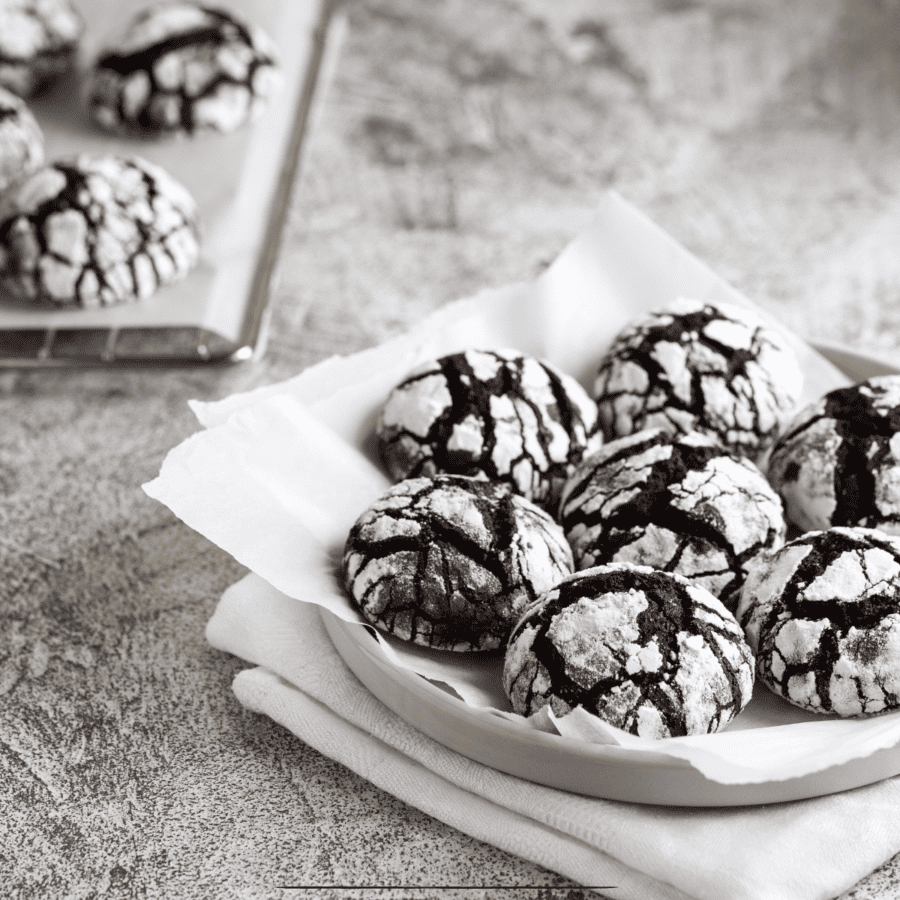
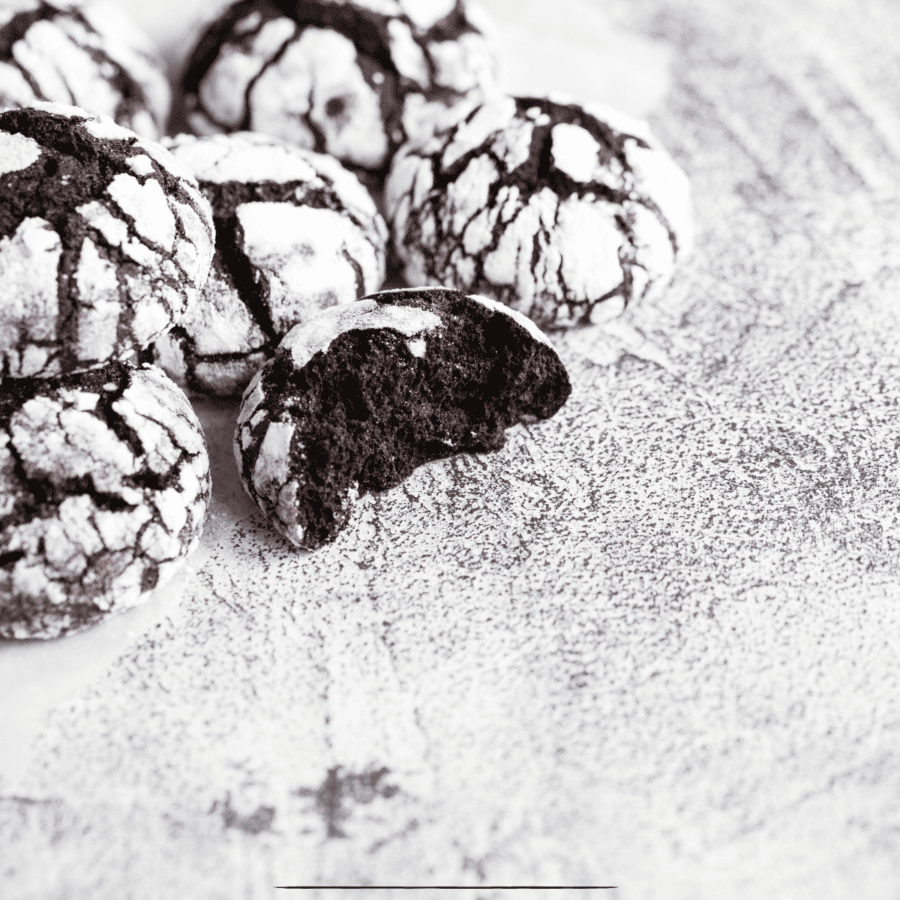
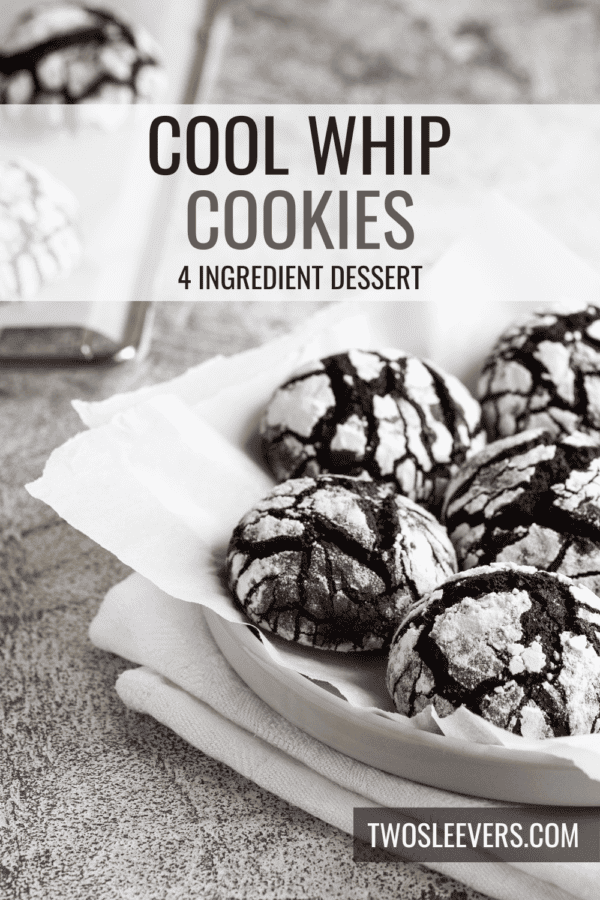
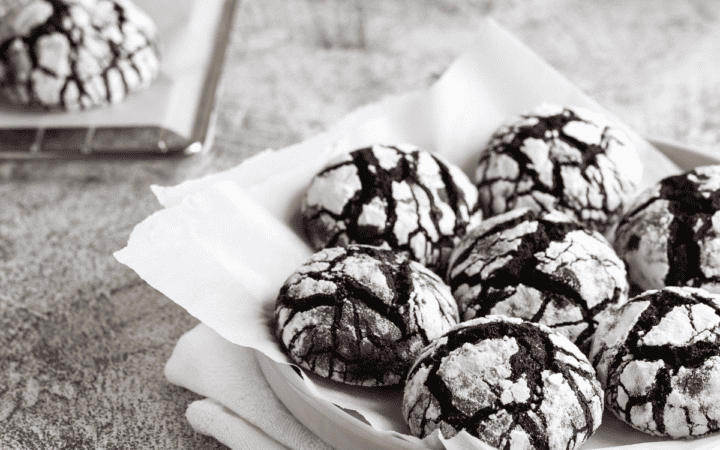
If you’re a dessert lover who can’t get enough easy-to-make treats, you’re in for a delightful surprise! Discover the joy of baking Cool Whip Cookies. They are a soft, pillowy delight that melts in your mouth with every bite. With just a handful of ingredients and a few simple steps, you’ll have a batch of these cookies ready to enjoy in no time.
Why You’ll Love This Simple Dessert
- Quick. Ready in under 30 minutes from start to finish, these cookies are perfect for satisfying your sweet tooth on short notice.
- Easy . With minimal ingredients and straightforward instructions, even novice bakers can whip up a batch of these cookies effortlessly.
- Versatile . Customize your cookies with your favorite mix-ins, from chocolate chips to sprinkles, for a personalized touch.
- Delicious . The combination of Cool Whip and cake mix creates a tender, cake-like texture that’s simply irresistible.
Whether you’re baking for a special occasion or simply craving a sweet treat, Cool Whip Cookies are sure to become a staple in your dessert repertoire.
Why Did My Cool Whip Cookies Turn Out Flat?
Cool Whip Cookies turning out flat can be attributed to several factors. Here are some potential reasons and tips to prevent this issue in the future:
- Overmixing the Dough . Overmixing the cookie dough can lead to flat cookies. When the dough is overworked, excess air is incorporated, causing the cookies to spread too much during baking. To prevent this, mix the ingredients until just combined, and avoid overmixing.
- Incorrect Ratio of Ingredients . The ratio of Cool Whip to cake mix and egg is crucial for the cookies’ texture and structure. Using too much Cool Whip relative to the cake mix or egg can result in a dough that is too wet and prone to spreading excessively.
- Baking Temperature and Time . Baking Cool Whip Cookies at too high a temperature or for too long can cause them to spread too quickly and become flat. It’s essential to bake them at the recommended temperature and duration specified in the recipe.
Is Dream Topping The Same As Cool Whip?
Dream Topping and Cool Whip are similar in that they are both non-dairy whipped toppings used in cooking and baking. However, there are some differences between the two:
- Availability - Dream Topping is primarily available in the UK and may not be as widely available in other regions. Cool Whip is more commonly found in the United States and Canada and is widely available in grocery stores in those countries.
- Taste and Texture - While both Dream Topping and Cool Whip are non-dairy whipped toppings, they may have slightly different tastes and textures due to variations in ingredients and formulations. Some people may prefer the taste or texture of one over the other.
Ingredients You’ll Need
- Cake Mix- The cake mix serves as the base for the cookie dough. It provides the dry ingredients, including flour, sugar, leavening agents, and flavorings, necessary to create the structure and flavor of the cookies. Since cake mix comes in various flavors like chocolate, vanilla, lemon, etc., you can choose your favorite flavor to customize the cookies to your taste preferences.
- Cool Whip- Its creamy texture contributes to the soft and fluffy texture of the cookies, resulting in a tender crumb. When thawed, Cool Whip becomes easy to mix into the dough, ensuring even distribution throughout.
- Egg - The egg acts as a binding agent in the cookie dough, helping to hold the ingredients together and provide structure. Additionally, the egg contributes to the texture of the cookies, making them slightly chewy and helping them rise during baking.
- Powdered Sugar- Rolling the dough balls in powdered sugar coats them with a thin layer of sweetness, adds a delicate crunch to the exterior, and enhances their appearance.
How To Make Cool Whip Cookies
- Preheat Your Oven . Start by preheating your oven to 350°F and lining a baking sheet with parchment paper or a silicone baking mat.
- Mix Ingredients . In a large mixing bowl, combine the cake mix, Cool Whip, and egg. Stir until well combined and a soft dough forms.
- Form Cookies . Using a spoon or cookie scoop, portion the dough into small balls and place them on the prepared baking sheet, leaving space between each cookie.
- Roll in Powdered Sugar . Roll each dough ball in powdered sugar to coat evenly for a sweeter finish.
- Bake . Bake the cookies in the preheated oven for 10-12 minutes, or until the edges are set and the tops are lightly golden.
- Cool and Enjoy . Allow the cookies to cool on the baking sheet for a few minutes before transferring them to a wire rack to cool completely. Enjoy your fluffy, delicious Cool Whip Cookies!
Tips And Tricks
Here are some tips and tricks for making Cool Whip cookies:
- Thaw Cool Whip Properly . Make sure to thaw the Cool Whip completely before using it in the recipe. This ensures that it mixes well with the other ingredients and helps create the desired texture in the cookies.
- Mix Gently . When combining the Cool Whip, cake mix, and egg, mix the ingredients gently until just combined. Overmixing can lead to tough cookies.
- Use a Cookie Scoop . Use a cookie scoop or spoon to portion out the dough onto the baking sheet. This ensures uniform-sized cookies, which bake evenly.
Variations
Get creative with your Cool Whip Cookies by incorporating your favorite mix-ins or flavorings:
- Chocolate Chip - Fold chocolate chips or chunks into the dough for a classic chocolatey twist.
- Sprinkle - Mix colorful sprinkles into the dough for a festive touch that’s perfect for birthday parties or holidays.
- Nutty Crunch - Stir chopped nuts such as walnuts or pecans into the dough for added texture and nutty flavor.
What To Enjoy With Cool Whip Cookies
Cool Whip Cookies are delicious on their own but can also be served alongside a variety of beverages for a delightful snack or dessert.
Pair them with a glass of cold milk, a cup of hot coffee, or a scoop of vanilla ice cream for an indulgent treat that’s sure to satisfy your sweet tooth.
How Long Do They Last?
Allow the Cool Whip cookies to cool completely before storing them. Once cooled, place them in an airtight container or resealable plastic bag. Store the container at room temperature in a cool, dry place away from direct sunlight.
If you prefer a firmer texture or if the ambient temperature is warm, you can store Cool Whip cookies in the refrigerator. Place them in an airtight container or resealable bag and refrigerate. Bring them to room temperature before serving for the best taste and texture.
Can You Freeze Them?
Cool Whip cookies can also be frozen for longer-term storage. Place the cooled cookies in a single layer on a baking sheet and freeze until firm. Once frozen, transfer them to a freezer-safe container or bag, separating layers with parchment paper to prevent sticking. Stored this way, Cool Whip cookies can last for up to 2 to 3 months in the freezer.
When ready to enjoy frozen Cool Whip cookies, simply remove them from the freezer and let them thaw at room temperature for about 20 to 30 minutes, or until they reach your desired consistency.
More Of OurBest Cookie Recipes
- Keto Cream Cheese Cookies
- Low Carb Chocolate Chip Cookies
- Keto Ginger Cookies
- Thumbprint Cookies
- Almond Flour Cookies
- Pumpkin Oatmeal Cookies
Cool Whip Cookies Recipe | 4 Ingredient Cookies
Ingredients
- ▢ 15.25 oz Chocolate Cake Mix
- ▢ 8 oz Cool Whip , thawed
- ▢ 1 Egg
- ▢ 1/2 cup Powdered Sugar
Instructions
- Preheat Your Oven . Start by preheating your oven to 350°F and lining a baking sheet with parchment paper or a silicone baking mat.
- Mix Ingredients . In a large mixing bowl, combine the cake mix, Cool Whip, and egg. Stir until well combined and a soft dough forms.
- Form Cookies . Using a spoon or cookie scoop, portion the dough into small balls and place them on the prepared baking sheet, leaving space between each cookie.
- Roll in Powdered Sugar . Roll each dough ball in powdered sugar to coat evenly for a sweeter finish.
- Bake . Bake the cookies in the preheated oven for 10-12 minutes, or until the edges are set and the tops are lightly golden.
- Cool and Enjoy . Allow the cookies to cool on the baking sheet for a few minutes before transferring them to a wire rack to cool completely. Enjoy your fluffy, delicious Cool Whip Cookies!
