
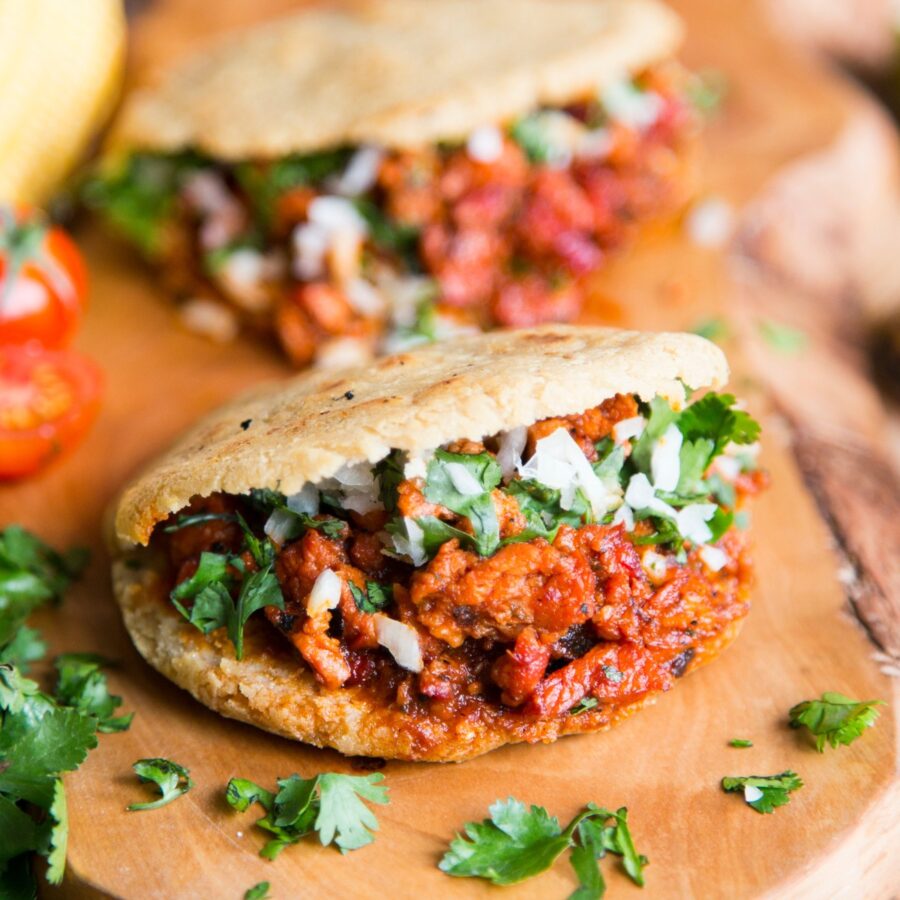
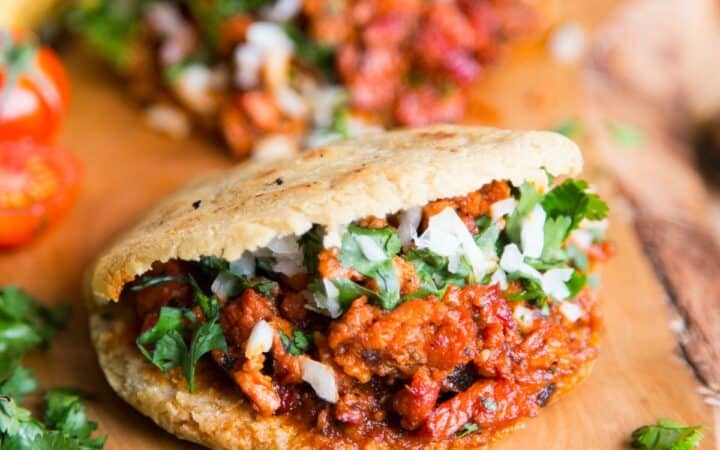
If you love authentic Mexican flavors, gorditas are a must-try. These thick, handmade corn tortillas are slightly crispy on the outside and soft inside, making them perfect for stuffing with your favorite fillings. Whether you prefer spicy meats, fresh veggies, or melted cheese, gorditas offer a delicious and versatile way to enjoy a traditional Mexican dish.
Why You’ll Love This Flavorful Recipe
- Authentic Mexican Flavor . Made with masa harina, these gorditas taste just like those from a traditional Mexican street vendor.
- Versatile . Fill them with shredded chicken, carnitas, beans, cheese, or salsa for a meal that suits your taste.
- Easy to Make . Just mix, shape, and cook. No complicated ingredients required.
Learn how to make the best homemade gorditas, from crafting the dough to filling them with savory, mouthwatering ingredients.
What Do Gorditas Taste Like?
Gorditas have a mild, slightly nutty corn flavor with a soft, yet slightly crisp texture on the outside. Because they are made with masa harina, they share a taste similar to homemade corn tortillas or tamales, but with a thicker and heartier bite.
When cooked on a griddle or skillet, gorditas develop toasty, golden-brown spots that add a subtle smokiness and depth of flavor. If fried, they become crispy on the outside while remaining tender and chewy inside, creating a more indulgent, almost crunchy bite.
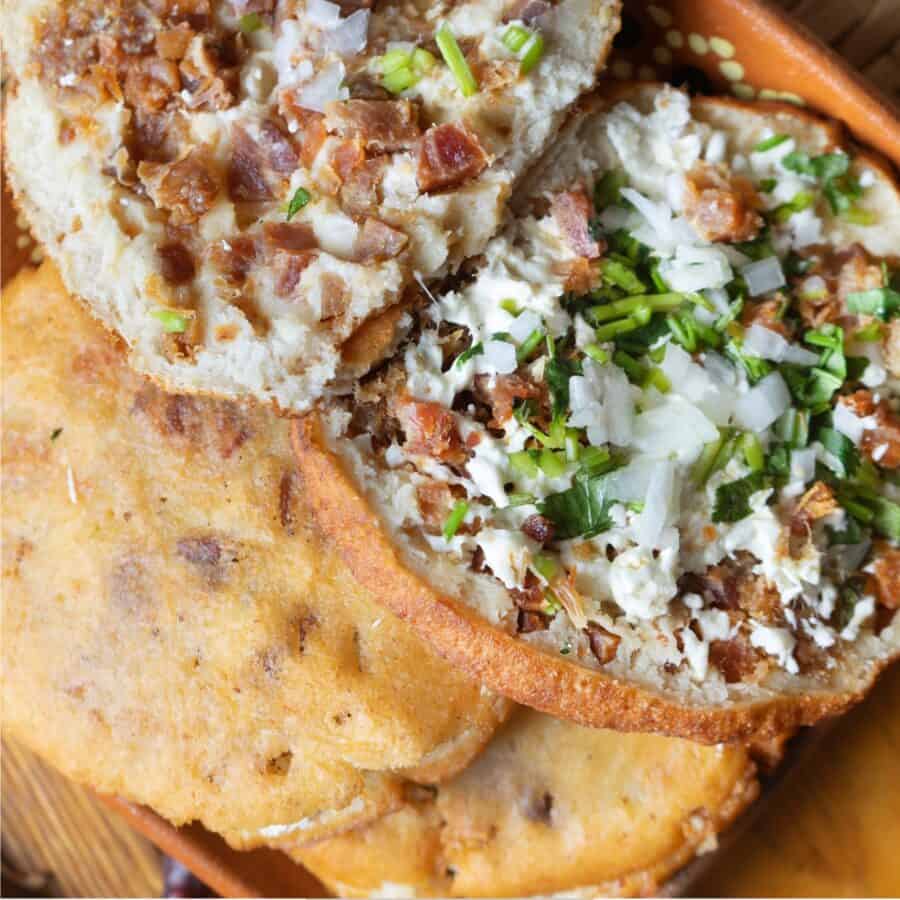
The taste of gorditas is simple and slightly savory on its own, but they truly shine when stuffed with flavorful fillings. Whether filled with spicy chorizo, juicy shredded meats, creamy beans, or melted cheese, gorditas soak up and enhance the flavors of whatever they’re paired with, making them a delicious and satisfying dish.
What Is A Gordita?
Gorditas are thicker corn tortillas that are grilled or fried and then cut open to be stuffed with delicious fillings. The name “gordita” means “little fat one” in Spanish, referring to their thicker, fluffier texture compared to regular tortillas.
Similar to pupusas from El Salvador or arepas from Venezuela, gorditas are a Mexican staple found in street markets and home kitchens alike.
Ingredients You’ll Need
For The Dough
- Masa Harina - This is the essential corn flour used in making authentic Mexican gorditas. It provides the signature mild corn flavor and soft-yet-sturdy texture that holds up to fillings.
- Warm Water - Warm water helps hydrate the masa harina, making it easier to knead and shape.
- Salt - A small but important ingredient that enhances the natural corn flavor and balances the taste of the dough.
- Lard - This adds richness and prevents the dough from drying out. Lard is traditionally used in Mexican cooking and gives gorditas a more authentic flavor and a slightly crispier texture.
Optional Fillings
- Shredded Chicken or Beef - These protein-packed fillings add hearty, savory depth to gorditas. Slow-cooked or seasoned meats work best, as they absorb flavors from spices and sauces, making each bite satisfying and delicious.
- Refried Beans & Cheese - A classic vegetarian option that’s both creamy and filling. The beans provide earthy, rich flavor, while the melted cheese adds a gooey texture and mild saltiness that pairs perfectly with masa.
- Chorizo & Potatoes - This filling offers a spicy and hearty kick. Chorizo is packed with smoky, bold seasonings, while the potatoes help soak up the flavors and add a soft, satisfying bite.
- Salsa & Guacamole - These fresh toppings bring bright acidity and a creamy contrast to the warm, toasty gorditas. Salsa provides zesty, spicy notes, while guacamole adds a smooth, rich, and slightly tangy finish.
Each of these ingredients plays a key role in creating flavorful, satisfying homemade gorditas that can be customized to suit any taste preference. Whether you keep it simple with beans and cheese or go bold with spiced meats and toppings, gorditas are a delicious, versatile dish perfect for any occasion.
How To Make Gorditas
- Prepare the Dough . In a mixing bowl, combine masa harina, salt, and warm water. Knead until the dough is soft but not sticky. If it’s too dry, add more water 1 tablespoon at a time. Let it rest for 5 minutes to fully hydrate.
- Shape the Gorditas . Divide the dough into 6-8 equal portions and roll them into balls. Flatten each ball into a 3-4 inch disc, about ½ inch thick.
- Cook the Gorditas . Heat a cast iron skillet or griddle over medium heat. Lightly oil the surface and cook the gorditas for 2-3 minutes per side until they develop golden brown spots.
- Slice & Fill . Once the gorditas cool slightly, slice them open like a pita pocket. Stuff them with your favorite meats, beans, or toppings.
Tips And Tricks
Making authentic homemade gorditas is easy, but a few expert tips can help you achieve perfectly soft, slightly crispy, and flavorful results every time. Here’s how:
- Use Fresh Masa Harina . Old masa harina can make the dough dry and crumbly. Always check the expiration date.
- Adjust Water as Needed . Different brands of masa harina absorb water differently. Add water gradually until the dough feels soft and pliable.
- Don’t Overcook . Gorditas should be golden brown but still soft inside. Overcooking will make them too dry.
- Use a Plastic Bag for Pressing . Place the dough balls between two sheets of plastic (like a Ziploc bag) before flattening them to prevent sticking.
Variations
Gorditas are incredibly versatile, and you can customize them in many ways by changing the dough, cooking method, or fillings. Whether you prefer them savory, sweet, stuffed, or topped, here are some creative variations to try:
- Fried - Instead of cooking on a skillet, fry gorditas in hot oil until crispy. These are extra delicious and crunchy.
- Cheese-Stuffed - Mix shredded cheese into the dough for a gooey, cheesy bite.
- Sweet - Add a tablespoon of sugar and cinnamon to the dough and serve with honey or condensed milk.
- Vegan - Use black beans, sautéed veggies, and guacamole for a plant-based meal.
What To Eat With Gorditas
Gorditas are incredibly versatile and pair well with a variety of sides and accompaniments. Whether you prefer something savory, fresh, or spicy, here are the best dishes to enjoy with them:
- Mexican Rice & Beans - A classic, hearty side.
- Guacamole & Pico de Gallo - Adds freshness and acidity.
- Mexican Crema or Sour Cream - For a creamy contrast.
- Elote - Sweet, smoky, and tangy flavors.
How Long Do They Last?
Gorditas are best enjoyed fresh, but they can be stored for later use with the right methods. At room temperature, cooked and unfilled gorditas can last for up to 24 hours if kept in an airtight container or wrapped in a clean kitchen towel to maintain their softness.
For longer storage, refrigerate them in an airtight container for up to 3 days.
Can You Freeze Them?
If you plan to store them for an extended period, freezing is the best option—wrap individual gorditas in plastic wrap or parchment paper, then place them in a freezer-safe bag or container. They can be frozen for up to 2 months without losing much quality.
When ready to eat, reheat gorditas on a hot skillet or griddle for 1-2 minutes per side to restore their warmth and slight crispiness.
More Mexican-Inspired Recipes
- Chile Relleno
- Carne Picada
- Elote
- Tacos de Alambre
- Mexican Shrimp Cocktail

Gorditas | Easy Homemade Gordita Recipe
Ingredients
- ▢ 2 cups Masa Harina
- ▢ 1 1/2 cups Warm Water
- ▢ 1/2 tsp Kosher Salt
- ▢ 2 tbsp Lard , softened
Instructions
- Prepare the Dough . In a mixing bowl, combine masa harina, salt, and warm water. Knead until the dough is soft but not sticky. If it’s too dry, add more water 1 tablespoon at a time. Let it rest for 5 minutes to fully hydrate.
- Shape the Gorditas . Divide the dough into 6-8 equal portions and roll them into balls. Flatten each ball into a 3-4 inch disc, about ½ inch thick.
- Cook the Gorditas . Heat a cast iron skillet or griddle over medium heat. Lightly oil the surface and cook the gorditas for 2-3 minutes per side until they develop golden brown spots.
- Slice & Fill . Once the gorditas cool slightly, slice them open like a pita pocket. Stuff them with your favorite meats, beans, or toppings.
Get support & connect with our community on Facebook!
Nutrition

If you already signed up, you should have received an email with a password to give you unlimited access to our FREE Printable Library. The password is case sensitive. Enter it below and get printing!
Password:

Gorditas | Easy Homemade Gordita Recipe
Ingredients
- 2 cups Masa Harina
- 1 1/2 cups Warm Water
- 1/2 tsp Kosher Salt
- 2 tbsp Lard softened
Instructions
- Prepare the Dough . In a mixing bowl, combine masa harina, salt, and warm water. Knead until the dough is soft but not sticky. If it’s too dry, add more water 1 tablespoon at a time. Let it rest for 5 minutes to fully hydrate.
- Shape the Gorditas . Divide the dough into 6-8 equal portions and roll them into balls. Flatten each ball into a 3-4 inch disc, about ½ inch thick.
- Cook the Gorditas . Heat a cast iron skillet or griddle over medium heat. Lightly oil the surface and cook the gorditas for 2-3 minutes per side until they develop golden brown spots.
- Slice & Fill . Once the gorditas cool slightly, slice them open like a pita pocket. Stuff them with your favorite meats, beans, or toppings.
Gorditas | Easy Homemade Gordita Recipe https://twosleevers.com/gorditas/

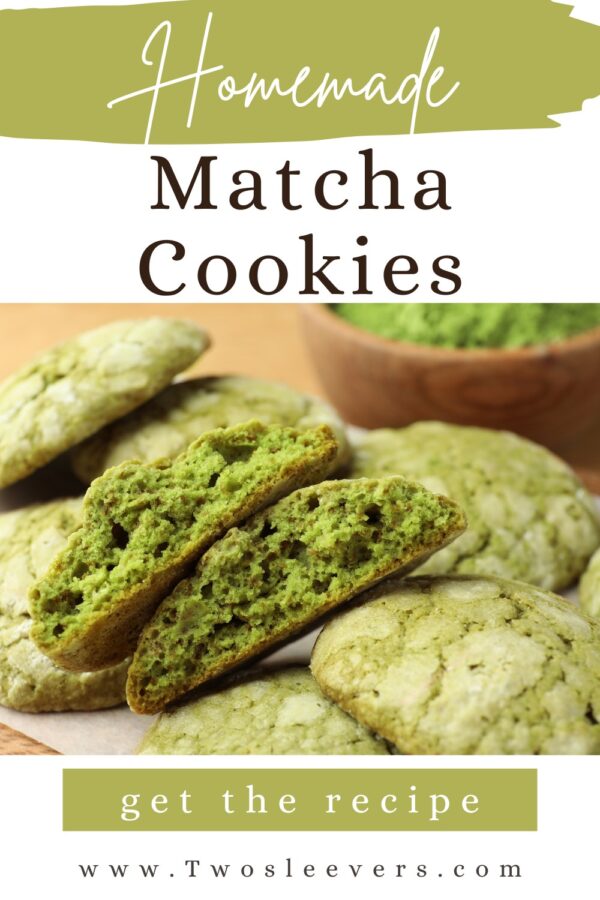
If you’re a fan of matcha and love the delicate combination of earthy flavors with sweet treats, then you’re going to adore these Matcha Cookies!
Why You’ll Love This Delicious Dessert
- Unique Flavor . Matcha adds a rich, slightly bitter flavor that contrasts perfectly with the sweet cookie dough, creating a harmoniously balanced dessert .
- Simple to Make . With a few basic ingredients, you can whip up these cookies in no time, making them an ideal treat for both beginners and seasoned bakers alike.
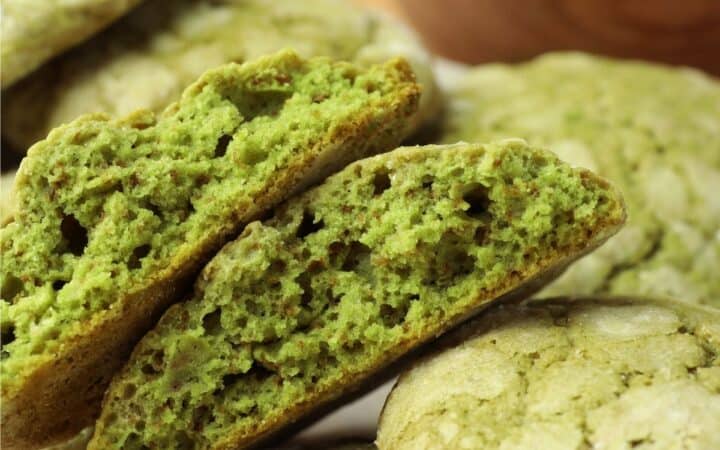
- Delicious Texture . These matcha cookies have crispy edges and chewy centers, giving you the best of both worlds when it comes to cookie texture.
- Perfect Pairing . Matcha cookies are a wonderful companion to a hot cup of tea or coffee, making them a perfect snack for any time of day.
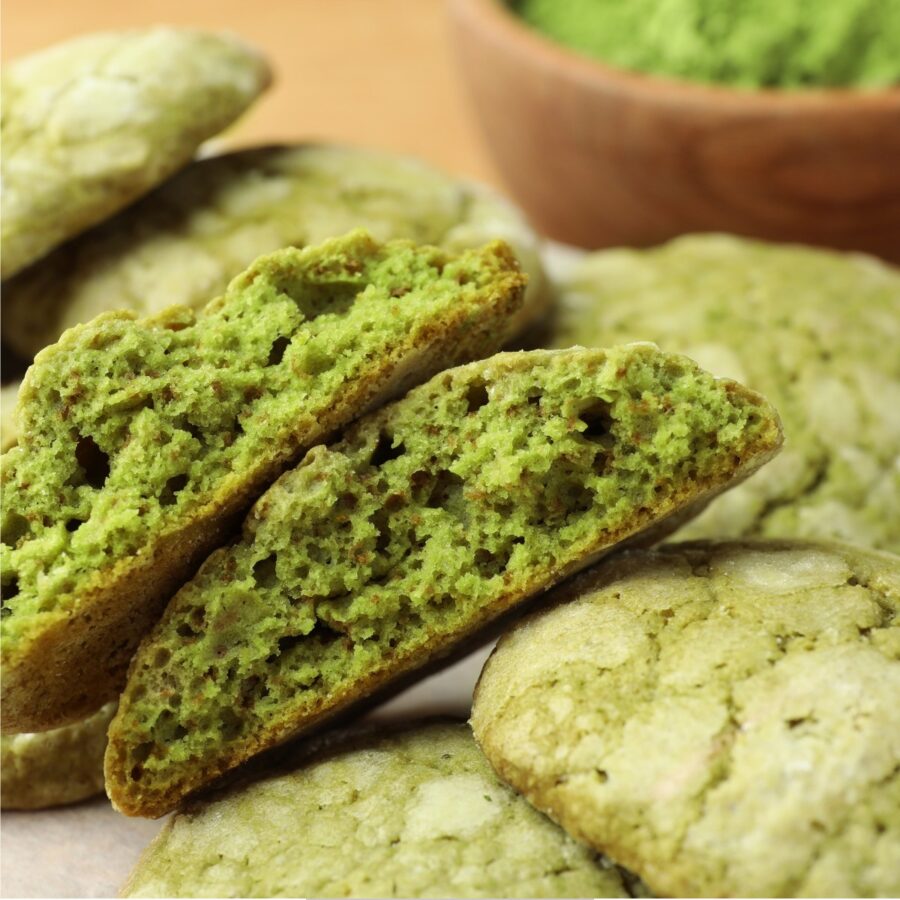
With their vibrant green color, crisp edges, and chewy centers, these cookies bring together the bold taste of matcha with the perfect amount of sweetness, making them a unique and delightful addition to your dessert collection.
What Is Matcha?
Matcha is finely ground powdered green tea leaves, traditionally used in Japanese tea ceremonies. It’s packed with antioxidants and has a distinct, earthy flavor that’s slightly bitter but very aromatic.
When added to baked goods, it lends a beautiful green color and a unique, slightly sweet yet savory taste. Matcha is often used in a variety of desserts such as cakes, lattes, and, of course, cookies.
Ingredients You’ll Need
To make these delicious Matcha Cookies , you’ll need some simple ingredients that you likely already have in your pantry. Here’s a breakdown of each one and its role in the recipe:
- All-Purpose Flour - The foundation of the dough, providing structure and texture to the cookies.
- Matcha Powder - The star ingredient. Opt for a high-quality matcha powder for the best flavor and color.
- Butter - Adds richness and moisture, contributing to the cookie’s chewy texture.
- Sugar - Both granulated sugar and brown sugar will be used to create the ideal sweetness and texture.
- Egg - Binds the ingredients together and helps the cookies rise slightly.
- Baking Powder - Helps the cookies rise and become light and fluffy.
- Vanilla Extract - Adds a touch of sweetness and depth to balance the matcha flavor.
- Salt - Enhances the sweetness and balances the overall flavor of the cookies.

How To Make Matcha Cookies
- Preheat the Oven and Prepare the Baking Sheet . Preheat your oven to 350°F. Line a baking sheet with parchment paper or a silicone baking mat to prevent sticking and ensure even baking.
- Cream the Butter and Sugars . In a large mixing bowl, beat together the softened butter, granulated sugar, and brown sugar until the mixture is light and fluffy. This should take about 2-3 minutes using an electric mixer.
- Add the Egg and Vanilla Extract . Next, add the egg and vanilla extract to the butter mixture. Beat until well combined. The egg helps bind the ingredients, and the vanilla enhances the flavor of the cookies.
- Combine Dry Ingredients . In a separate bowl, whisk together the flour, matcha powder, baking powder, and salt. Make sure the matcha powder is evenly distributed throughout the dry ingredients to avoid clumps in the dough.
- Mix Wet and Dry Ingredients . Gradually add the dry ingredients to the wet ingredients, mixing just until combined.
- Scoop the Dough . Use a cookie scoop or tablespoon to portion out the dough. Roll the dough into balls and place them on the prepared baking sheet, leaving about 2 inches of space between each cookie.
- Bake the Cookies . Bake the cookies in the preheated oven for 10-12 minutes or until the edges are golden brown. The centers will still be soft, but they will firm up as they cool.
- Cool and Enjoy . Allow the cookies to cool on the baking sheet for a few minutes before transferring them to a wire rack to cool completely.
Tips And Tricks
To ensure your matcha cookies come out perfectly every time, here are a few tips to keep in mind:
- Use High-Quality Matcha Powder . The flavor of matcha can vary greatly depending on its quality. Look for ceremonial-grade matcha powder for the best color and flavor. Culinary-grade matcha is also suitable for baking and typically comes at a more affordable price.
- Don’t Overmix the Dough . Once the flour is added, mix the dough just until it comes together. Overmixing can result in tough cookies.
- Chill the Dough (Optional) . If you have time, refrigerating the dough for 30 minutes before baking helps the cookies hold their shape and can even improve the texture. It’s especially helpful if the dough is a little too soft.
Variations
While the basic matcha cookie recipe is delicious on its own, there are plenty of fun variations you can try:
- With Chocolate Chips - Add some semisweet or dark chocolate chips to the dough for a delicious contrast to the earthy matcha flavor.
- Almond - Fold in some chopped almonds for a nutty crunch that pairs perfectly with the smoothness of the cookies.
- Shortbread - If you prefer a firmer, buttery cookie, you can shape the dough into shortbread-style cookies for a rich, crisp texture.
- Macadamia Nut - Add macadamia nuts to the dough for a tropical twist that complements the matcha beautifully.
What To Enjoy With Matcha Cookies
These matcha cookies are perfect for pairing with a variety of beverages and other treats:
- Green Tea - Enhance the matcha flavor by serving these cookies with a hot cup of green tea, making for a perfectly balanced treat.
- Coffee or Latte - The slightly bitter flavor of coffee complements the sweetness of the cookies.
- Milk - A classic pairing that works with nearly any cookie—milk and matcha cookies are a delicious duo!
- Ice Cream - Serve these cookies with a scoop of vanilla or coconut milk ice cream for an indulgent dessert experience.
How Long Do They Last?
Store your matcha cookies in an airtight container at room temperature for up to 5 days. If you’d like to keep them fresh longer, you can refrigerate them for up to a week.
For the best texture, warm them up for a few seconds in the microwave before serving.
Can You Freeze Them?
Freezing matcha cookies is a great way to enjoy them later while preserving their fresh, chewy texture!
Once your matcha cookies are baked and completely cooled, place them in a resealable freezer bag. The cookies will last in the freezer for up to 3 months. When you’re ready to enjoy them, simply thaw them at room temperature for 15–20 minutes, and they’ll be as good as fresh!
More Of OurBest Cookie Recipes
- Applesauce Cookies
- Brownie Mix Cookies
- Red Velvet Cookies
- Molasses Cookies
- Cool Whip Cookies
Matcha Cookies | Homemade Matcha Cookie Recipe
Ingredients
- ▢ 2 1/2 cups All Purpose Flour
- ▢ 2 tbsp Matcha Powder
- ▢ 1 cup Unsalted Butter , softened
- ▢ 1 cup Granulated Sugar
- ▢ 1/2 cup Brown Sugar
- ▢ 1 Egg
- ▢ 1 1/2 tsp Baking Powder
- ▢ 1 tsp Vanilla Extract
- ▢ 1/4 tsp Kosher Salt
Instructions
- Preheat the Oven and Prepare the Baking Sheet . Preheat your oven to 350°F. Line a baking sheet with parchment paper or a silicone baking mat to prevent sticking and ensure even baking.
- Cream the Butter and Sugars . In a large mixing bowl, beat together the softened butter, granulated sugar, and brown sugar until the mixture is light and fluffy. This should take about 2-3 minutes using an electric mixer.
- Add the Egg and Vanilla Extract . Next, add the egg and vanilla extract to the butter mixture. Beat until well combined. The egg helps bind the ingredients, and the vanilla enhances the flavor of the cookies.
- Combine Dry Ingredients . In a separate bowl, whisk together the flour, matcha powder, baking powder, and salt. Make sure the matcha powder is evenly distributed throughout the dry ingredients to avoid clumps in the dough.
- Mix Wet and Dry Ingredients . Gradually add the dry ingredients to the wet ingredients, mixing just until combined.
- Scoop the Dough . Use a cookie scoop or tablespoon to portion out the dough. Roll the dough into balls and place them on the prepared baking sheet, leaving about 2 inches of space between each cookie.
- Bake the Cookies . Bake the cookies in the preheated oven for 10-12 minutes or until the edges are golden brown. The centers will still be soft, but they will firm up as they cool.
- Cool and Enjoy . Allow the cookies to cool on the baking sheet for a few minutes before transferring them to a wire rack to cool completely.
