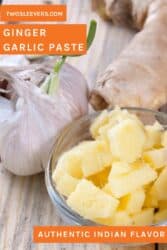
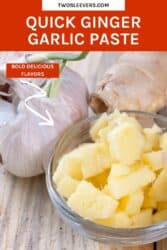
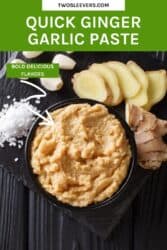
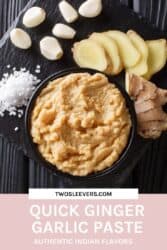
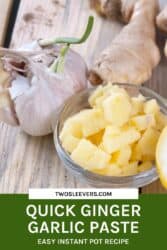
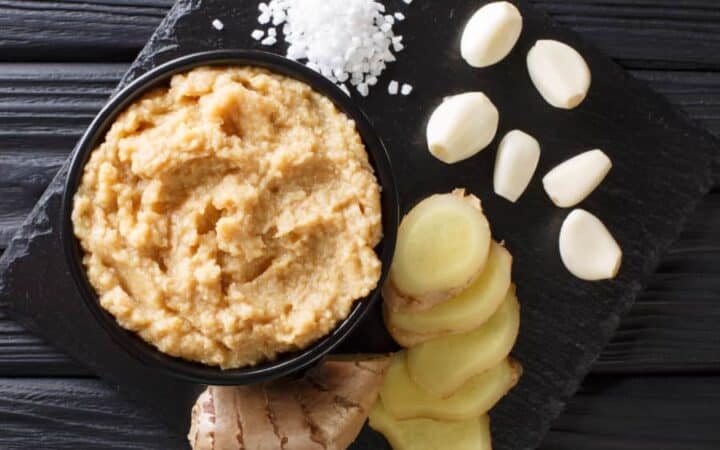
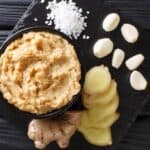
Quick Ginger Garlic Paste is a simple Indian cooking condiment/paste made with fresh ginger, garlic cloves, and water (with optional salt). It’s quick and weeknight-friendly and works well for building fast flavor in curries, marinades, and everyday Indian or Asian-inspired cooking. Unlike store-bought ginger garlic paste that often uses oil and preservatives (and can turn bitter over time), this version blends with water for a cleaner, fresher taste.
Why Should I Make This Ginger Garlic Paste Recipe?
- Long-lasting. Commercial pastes use oil. Over time, the paste tastes a little bitter. I prefer to make mine with water.
- Better Tasting. Since there’s no oil to go rancid, it tastes better long-term. But even when you first make it, if you’re like me, you’re going to use good quality ginger and fresh, healthy cloves of garlic. Better ingredients = better taste.
- Known Ingredients. No wondering about what fillers, additives, and preservatives were added into it. You make it, you own it. You choose what goes into it. This is why I have so many homemade spice blend recipes for you.
- Super Simple . Five minutes start to finish. Don’t even need to peel the ginger. Throw everything in, and go.
- Salt or not. Homemade means you get to decide whether or not you want to add salt to your ginger garlic paste. I believe it helps preserve it slightly longer, but I prefer not to use it so that I don’t have to account for the salt in it as I use it in a recipe.
What Is Ginger Garlic Paste Used For?
The more important question you may ask is what can’t you make with ginger garlic paste . It is packed with flavor and amplifies the flavors of any dish you use it in. I use it in my famous Butter Chicken .
So typically, you will have many recipes that call for a base onion tomato masala in Indian recipes . Just as Cajun Cooking has its holy trinity of onions, celery, and carrots or peppers, many easy Indian curries start with this mix of onions, tomatoes, ginger, and garlic.
But you can use this in many Asian Dishes that call for both ginger and garlic.
Other than the fact that it just tastes GREAT, there are a ton of health benefits that ginger and garlic are purported to offer. From being a great antioxidant to being helping reduce blood pressure and cholesterol, there are tons of reasons to keep this paste on hand.
The scientist in me will chime in and say there are few double-blind experiments demonstrating these long-term effects, but many ancient cultures have relied on both these ingredients for a variety of benefits.
Me, I eat them because I love ginger, and I love garlic 😀
Ingredients Needed
If you love fresh ingredients and Asian cuisine, you’ll likely already have these ingredients on hand. If you don’t your local Asian market or big box store will likely have what you need.
I try to find ingredients that are easily accessible for my recipes. This one only takes 3 items–and one of them is water.
Here’s what you’ll need:
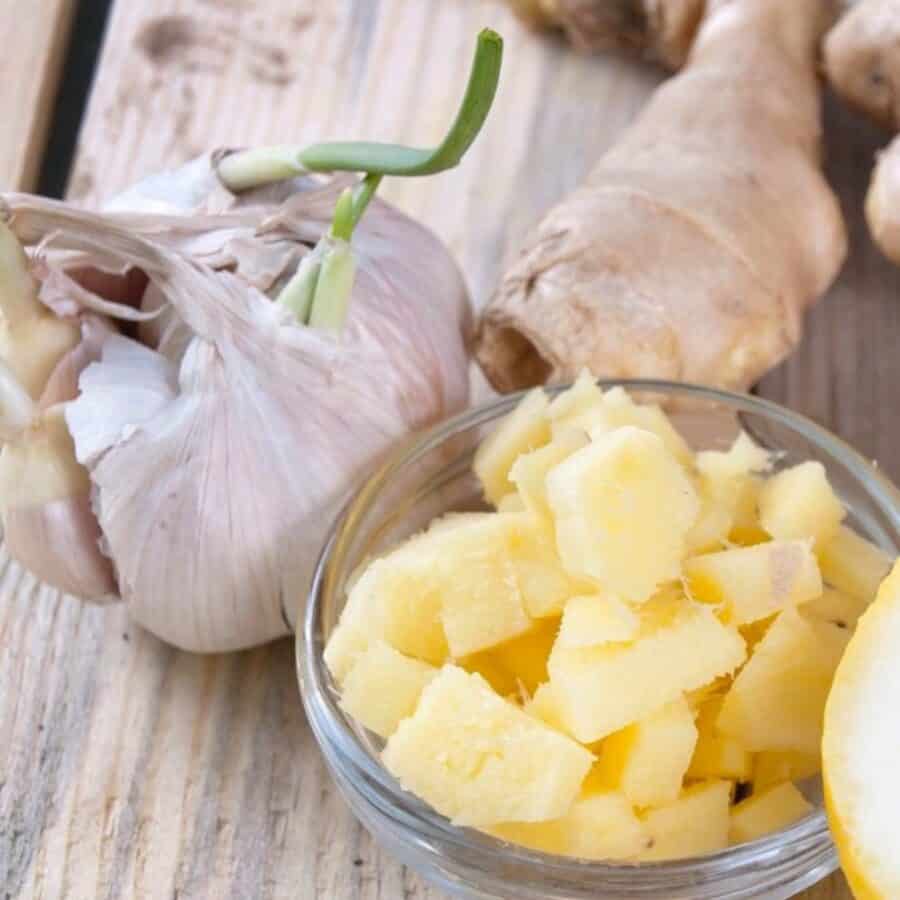
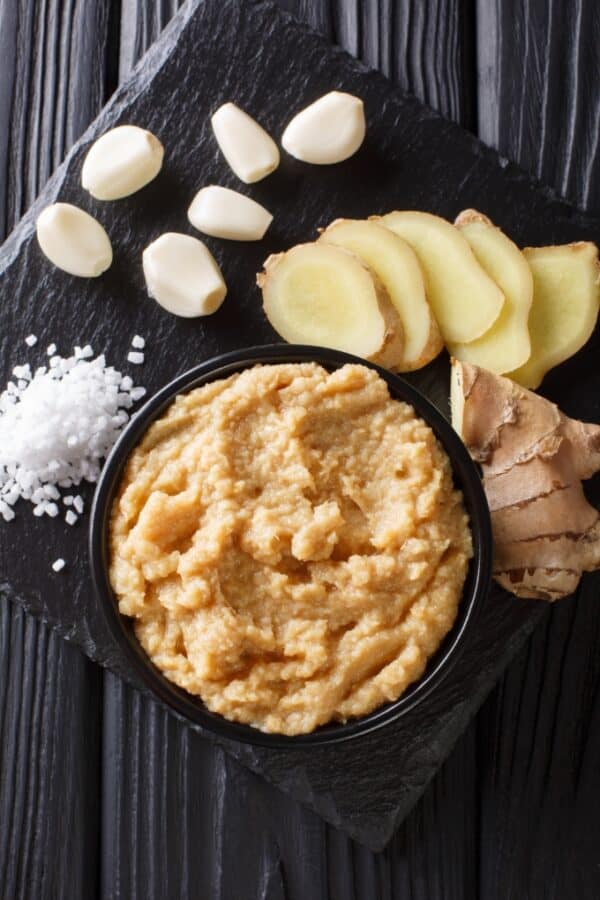
- 4 ounces garlic cloves - Garlic provides the sharp, pungent flavor that forms the backbone of the paste. It adds depth and umami to countless dishes, enhancing savory flavors and creating a strong aromatic base. In the paste, garlic balances the spiciness of the ginger and delivers that signature warmth essential in Indian, Asian, and Middle Eastern cooking.
- 4 ounces minced ginger - Ginger contributes bright, zesty, and slightly peppery notes that complement the garlic perfectly. Its natural oils and freshness bring a lively heat and subtle sweetness, making the paste more balanced and fragrant.
- 1/4 cup water - Water helps the blender or food processor break down the ginger and garlic into a smooth, cohesive paste. It ensures even blending and a spreadable consistency, making the paste easy to store and use.
How Do You Make Ginger Garlic Paste?
Who has time to add an intricately made spice, sauce, or paste when they’re in a rush?
Not me, that’s for sure. Here are the two easy steps you’ll need to take to get a tasty and flavorful addition to your next meal:
- Place water in the bottom of a blender.
- Add ginger and garlic and process until the mixture is relatively smooth.
That’s it. You’ll be amazed at how quickly this comes together and how much flavor it adds to your dishes compared to prepackaged varieties you can buy at the market.
Tips And Tricks
Making ginger garlic paste at home is an easy way to elevate your cooking, adding instant depth and aroma to curries, stir-fries, marinades, and more. With a few smart techniques, you can create a smooth, flavorful paste that stays fresh and vibrant for weeks. Here are some helpful tips and tricks:
- Use Equal Parts Ginger and Garlic . A 1:1 ratio keeps the flavor balanced. Too much garlic can make it sharp, while too much ginger can make it overly spicy.
- Peel for Smoothness . Peel both the ginger and garlic for a smoother texture and cleaner flavor. Using a spoon to scrape ginger skin works best.
- Use a High-Speed Blender . A good blender or food processor ensures a silky consistency without adding too much liquid.
Variations
Adding variations to your ginger garlic paste can make it even more versatile, allowing you to tailor it for different cuisines or dishes. Here are a few creative ways to customize it:
- Spicy- Add 2–3 green chilies while blending for a fiery kick. Perfect for curries, stir-fries, or marinades that need extra heat and flavor.
- Turmeric- Add ½ teaspoon ground turmeric or a small piece of fresh turmeric root. This variation adds a warm, earthy note and extra anti-inflammatory benefits. It’s great for Indian curries and golden rice dishes.
- Lemon - Add 1 tablespoon fresh lemon juice for brightness and a slightly tangy flavor. Ideal for seafood marinades or light chicken dishes where you want a fresh, zesty touch.
How Long Does It Last?
One of the reasons I suggest making your own is because if you make it properly and store it correctly, it can last for months.
Your ginger garlic paste will last:
- 3 weeks in the refrigerator in an air tight container.
- 6 months or more in the freezer. Place the mixture into small ice cube trays and when they are frozen, pop out the ginger and garlic and store in ziptop bags in the freezer. You can use it without defrosting.
Recipes that Use Ginger Garlic Paste
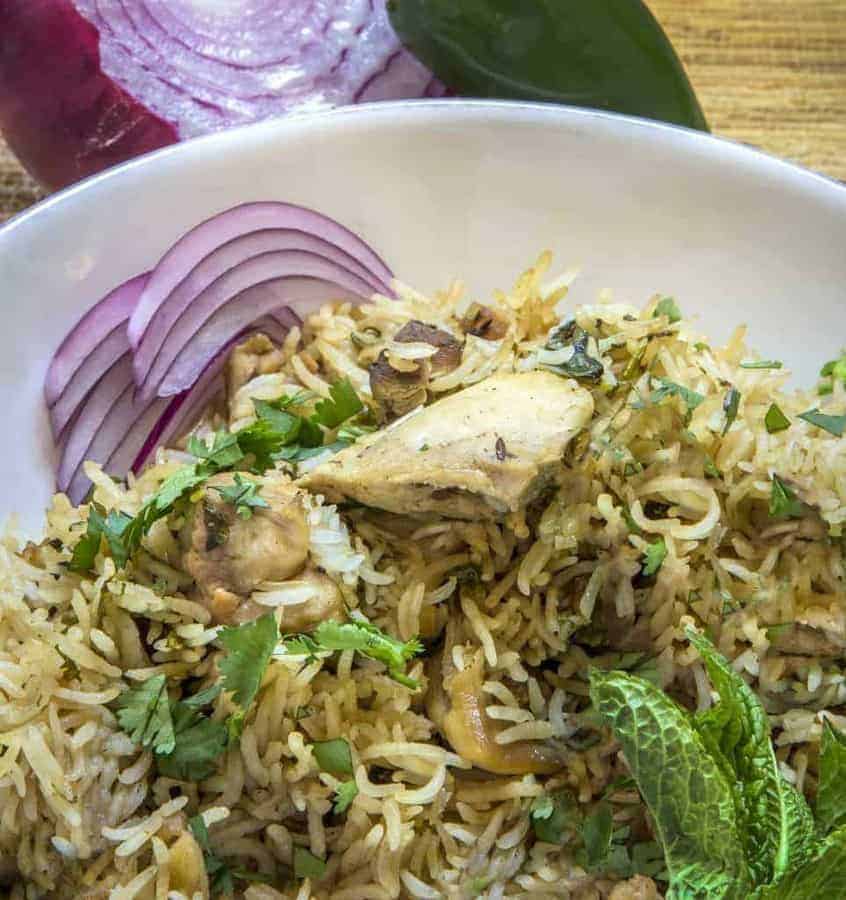
Chicken Birynai
Chicken Biryani - A delicious Indian comfort food recipe.
Chicken Curry with Spinach - Low Carb and made in your Instant Pot.
Keto Chicken Biryani - A take on one of my favorites without all of the carbs.
No, you usually don’t have to peel ginger for homemade ginger garlic paste, especially if you’re using young, thin-skinned ginger and blending it well. A good scrub under running water removes most grit, and the peel will disappear into a smooth ginger garlic paste made in a blender. Peel it only if the skin is thick, wrinkly, or dirty (older ginger can taste a bit tougher), or if you want an extra-silky Indian ginger garlic paste (adrak lehsun) texture. Either way, chopping the ginger first and blending with a little water helps you get a smooth paste without stringy bits.
Your homemade ginger garlic paste can turn green or brown mostly because of natural reactions. Oxidation (air exposure) causes browning, and garlic can sometimes shift green/blue when its sulfur compounds react with acids or certain minerals (it’s usually harmless, just weird-looking). This happens faster if the paste is warm, not stored airtight, or kept for a while in the fridge, and it can taste sharper over time. To slow discoloration, blend your ginger garlic paste with water (or a little oil if you prefer), store it in a very clean airtight jar, press plastic wrap directly on the surface to limit air contact, and for the best flavor freeze portions in ice cube trays so it stays fresh and doesn’t develop bitterness.
Homemade ginger garlic paste can taste bitter when the garlic is overprocessed, oxidized, or stored too long. Blending garlic into a super-fine puree can release more harsh compounds, and exposure to air (or an old, not-airtight jar) accelerates flavor changes. Bitter notes also show up if you used older garlic with a green sprout, very mature ginger skin, or if the paste picked up a metallic taste from certain containers. For a fresher ginger garlic paste in a blender, use fresh, de-sprouted garlic, scrub (or peel) tough ginger, blend just until smooth with a little water, store in a clean airtight container, and freeze portions in ice cube trays. Freezing is the easiest way to prevent that “bitter after a few days” problem.
Want MoreIndian Recipes?
Butter Chicken - One of my most popular recipes.
Tandoori Chicken - an easy air fryer recipe .
Pressure Cooker Rice and Dal - authentic made easy.
Indian Cabbage Slaw - a perfect low carb side dish .
Indian Seekh Kababs - delicious meaty bites.
75 Indian Instant Pot Recipes - So many great ones to choose from.
Ginger Garlic Paste Recipe | A Flavorful Addition To Indian Dishes
Equipment
- VITAMIX BLENDER
Ingredients
- ▢ 4 ounces ( 113.4 g ) Garlic Cloves
- ▢ 4 ounces ( 56.7 g ) Minced Ginger , (no need to peel)
- ▢ 1/4 cup ( 62.5 g ) Water
Instructions
Place 1/4 cup of water in the bottom of a blender or food processor to help the blades move freely.
Add ginger and garlic and process until the mixture is relatively smooth.
If I recipe calls for 1 tablespoon of minced ginger and 1 tablespoon of minced garlic, just use 2 tablespoons of the paste instead.
This freezes well so you might want to make little cubes in an ice tray and then just throw them in frozen when you’re ready to cook.
Salt or not. Homemade means you get to decide whether or not you want to add salt to your ginger garlic paste. I believe it helps preserve it slightly longer, but I prefer not to use it so that I don’t have to account for the salt in it as I use it in a recipe.
No peeling the ginger? ? Nope. Wash it well, and throw it in as is. The peel is totally edible and also a total pain to remove so thisis a great win win!
Get support & connect with our community on Facebook!
Nutrition
Don’t forget to check out my other Ketocookbooks.
Keto Instant Pot, Keto Fat Bombs, Sweets, & Treats , and Easy keto in 30 minutes.

Quick Ginger Garlic Paste is a simple Indian cooking condiment/paste made with fresh ginger, garlic cloves, and water (with optional salt). It’s quick and weeknight-friendly and works well for building fast flavor in curries, marinades, and everyday Indian or Asian-inspired cooking. Unlike store-bought ginger garlic paste that often uses oil and preservatives (and can turn bitter over time), this version blends with water for a cleaner, fresher taste.
Why Should I Make This Ginger Garlic Paste Recipe?
- Long-lasting. Commercial pastes use oil. Over time, the paste tastes a little bitter. I prefer to make mine with water.
- Better Tasting. Since there’s no oil to go rancid, it tastes better long-term. But even when you first make it, if you’re like me, you’re going to use good quality ginger and fresh, healthy cloves of garlic. Better ingredients = better taste.
- Known Ingredients. No wondering about what fillers, additives, and preservatives were added into it. You make it, you own it. You choose what goes into it. This is why I have so many homemade spice blend recipes for you.
- Super Simple . Five minutes start to finish. Don’t even need to peel the ginger. Throw everything in, and go.
- Salt or not. Homemade means you get to decide whether or not you want to add salt to your ginger garlic paste. I believe it helps preserve it slightly longer, but I prefer not to use it so that I don’t have to account for the salt in it as I use it in a recipe.
What Is Ginger Garlic Paste Used For?
The more important question you may ask is what can’t you make with ginger garlic paste . It is packed with flavor and amplifies the flavors of any dish you use it in. I use it in my famous Butter Chicken .
So typically, you will have many recipes that call for a base onion tomato masala in Indian recipes . Just as Cajun Cooking has its holy trinity of onions, celery, and carrots or peppers, many easy Indian curries start with this mix of onions, tomatoes, ginger, and garlic.
But you can use this in many Asian Dishes that call for both ginger and garlic.
Other than the fact that it just tastes GREAT, there are a ton of health benefits that ginger and garlic are purported to offer. From being a great antioxidant to being helping reduce blood pressure and cholesterol, there are tons of reasons to keep this paste on hand.
The scientist in me will chime in and say there are few double-blind experiments demonstrating these long-term effects, but many ancient cultures have relied on both these ingredients for a variety of benefits.
Me, I eat them because I love ginger, and I love garlic 😀
Ingredients Needed
If you love fresh ingredients and Asian cuisine, you’ll likely already have these ingredients on hand. If you don’t your local Asian market or big box store will likely have what you need.
I try to find ingredients that are easily accessible for my recipes. This one only takes 3 items–and one of them is water.
Here’s what you’ll need:
- 4 ounces garlic cloves - Garlic provides the sharp, pungent flavor that forms the backbone of the paste. It adds depth and umami to countless dishes, enhancing savory flavors and creating a strong aromatic base. In the paste, garlic balances the spiciness of the ginger and delivers that signature warmth essential in Indian, Asian, and Middle Eastern cooking.
- 4 ounces minced ginger - Ginger contributes bright, zesty, and slightly peppery notes that complement the garlic perfectly. Its natural oils and freshness bring a lively heat and subtle sweetness, making the paste more balanced and fragrant.
- 1/4 cup water - Water helps the blender or food processor break down the ginger and garlic into a smooth, cohesive paste. It ensures even blending and a spreadable consistency, making the paste easy to store and use.
How Do You Make Ginger Garlic Paste?
Who has time to add an intricately made spice, sauce, or paste when they’re in a rush?
Not me, that’s for sure. Here are the two easy steps you’ll need to take to get a tasty and flavorful addition to your next meal:
- Place water in the bottom of a blender.
- Add ginger and garlic and process until the mixture is relatively smooth.
That’s it. You’ll be amazed at how quickly this comes together and how much flavor it adds to your dishes compared to prepackaged varieties you can buy at the market.
Tips And Tricks
Making ginger garlic paste at home is an easy way to elevate your cooking, adding instant depth and aroma to curries, stir-fries, marinades, and more. With a few smart techniques, you can create a smooth, flavorful paste that stays fresh and vibrant for weeks. Here are some helpful tips and tricks:
- Use Equal Parts Ginger and Garlic . A 1:1 ratio keeps the flavor balanced. Too much garlic can make it sharp, while too much ginger can make it overly spicy.
- Peel for Smoothness . Peel both the ginger and garlic for a smoother texture and cleaner flavor. Using a spoon to scrape ginger skin works best.
- Use a High-Speed Blender . A good blender or food processor ensures a silky consistency without adding too much liquid.
Variations
Adding variations to your ginger garlic paste can make it even more versatile, allowing you to tailor it for different cuisines or dishes. Here are a few creative ways to customize it:
- Spicy- Add 2–3 green chilies while blending for a fiery kick. Perfect for curries, stir-fries, or marinades that need extra heat and flavor.
- Turmeric- Add ½ teaspoon ground turmeric or a small piece of fresh turmeric root. This variation adds a warm, earthy note and extra anti-inflammatory benefits. It’s great for Indian curries and golden rice dishes.
- Lemon - Add 1 tablespoon fresh lemon juice for brightness and a slightly tangy flavor. Ideal for seafood marinades or light chicken dishes where you want a fresh, zesty touch.
How Long Does It Last?
One of the reasons I suggest making your own is because if you make it properly and store it correctly, it can last for months.
Your ginger garlic paste will last:
- 3 weeks in the refrigerator in an air tight container.
- 6 months or more in the freezer. Place the mixture into small ice cube trays and when they are frozen, pop out the ginger and garlic and store in ziptop bags in the freezer. You can use it without defrosting.
Recipes that Use Ginger Garlic Paste
Chicken Birynai
Chicken Biryani - A delicious Indian comfort food recipe.
Chicken Curry with Spinach - Low Carb and made in your Instant Pot.
Keto Chicken Biryani - A take on one of my favorites without all of the carbs.
No, you usually don’t have to peel ginger for homemade ginger garlic paste, especially if you’re using young, thin-skinned ginger and blending it well. A good scrub under running water removes most grit, and the peel will disappear into a smooth ginger garlic paste made in a blender. Peel it only if the skin is thick, wrinkly, or dirty (older ginger can taste a bit tougher), or if you want an extra-silky Indian ginger garlic paste (adrak lehsun) texture. Either way, chopping the ginger first and blending with a little water helps you get a smooth paste without stringy bits.
Your homemade ginger garlic paste can turn green or brown mostly because of natural reactions. Oxidation (air exposure) causes browning, and garlic can sometimes shift green/blue when its sulfur compounds react with acids or certain minerals (it’s usually harmless, just weird-looking). This happens faster if the paste is warm, not stored airtight, or kept for a while in the fridge, and it can taste sharper over time. To slow discoloration, blend your ginger garlic paste with water (or a little oil if you prefer), store it in a very clean airtight jar, press plastic wrap directly on the surface to limit air contact, and for the best flavor freeze portions in ice cube trays so it stays fresh and doesn’t develop bitterness.
Homemade ginger garlic paste can taste bitter when the garlic is overprocessed, oxidized, or stored too long. Blending garlic into a super-fine puree can release more harsh compounds, and exposure to air (or an old, not-airtight jar) accelerates flavor changes. Bitter notes also show up if you used older garlic with a green sprout, very mature ginger skin, or if the paste picked up a metallic taste from certain containers. For a fresher ginger garlic paste in a blender, use fresh, de-sprouted garlic, scrub (or peel) tough ginger, blend just until smooth with a little water, store in a clean airtight container, and freeze portions in ice cube trays. Freezing is the easiest way to prevent that “bitter after a few days” problem.
Want MoreIndian Recipes?
Butter Chicken - One of my most popular recipes.
Tandoori Chicken - an easy air fryer recipe .
Pressure Cooker Rice and Dal - authentic made easy.
Indian Cabbage Slaw - a perfect low carb side dish .
Indian Seekh Kababs - delicious meaty bites.
75 Indian Instant Pot Recipes - So many great ones to choose from.
Ginger Garlic Paste Recipe | A Flavorful Addition To Indian Dishes
Equipment
- VITAMIX BLENDER
Ingredients
- ▢ 4 ounces ( 113.4 g ) Garlic Cloves
- ▢ 4 ounces ( 56.7 g ) Minced Ginger , (no need to peel)
- ▢ 1/4 cup ( 62.5 g ) Water
Instructions
Place 1/4 cup of water in the bottom of a blender or food processor to help the blades move freely.
Add ginger and garlic and process until the mixture is relatively smooth.
If I recipe calls for 1 tablespoon of minced ginger and 1 tablespoon of minced garlic, just use 2 tablespoons of the paste instead.
This freezes well so you might want to make little cubes in an ice tray and then just throw them in frozen when you’re ready to cook.
Salt or not. Homemade means you get to decide whether or not you want to add salt to your ginger garlic paste. I believe it helps preserve it slightly longer, but I prefer not to use it so that I don’t have to account for the salt in it as I use it in a recipe.
No peeling the ginger? ? Nope. Wash it well, and throw it in as is. The peel is totally edible and also a total pain to remove so thisis a great win win!
Get support & connect with our community on Facebook!
Nutrition
Don’t forget to check out my other Ketocookbooks.
Keto Instant Pot, Keto Fat Bombs, Sweets, & Treats , and Easy keto in 30 minutes.

If you already signed up, you should have received an email with a password to give you unlimited access to our FREE Printable Library. The password is case sensitive. Enter it below and get printing!
Password:
Ginger Garlic Paste Recipe | A Flavorful Addition To Indian Dishes
Ingredients
- 4 ounces Garlic Cloves
- 4 ounces Minced Ginger (no need to peel)
- 1/4 cup Water
Instructions
Place 1/4 cup of water in the bottom of a blender or food processor to help the blades move freely.
Add ginger and garlic and process until the mixture is relatively smooth.
If I recipe calls for 1 tablespoon of minced ginger and 1 tablespoon of minced garlic, just use 2 tablespoons of the paste instead.
This freezes well so you might want to make little cubes in an ice tray and then just throw them in frozen when you’re ready to cook.
Salt or not. Homemade means you get to decide whether or not you want to add salt to your ginger garlic paste. I believe it helps preserve it slightly longer, but I prefer not to use it so that I don’t have to account for the salt in it as I use it in a recipe.
No peeling the ginger? ? Nope. Wash it well, and throw it in as is. The peel is totally edible and also a total pain to remove so thisis a great win win!
Ginger Garlic Paste Recipe | A Flavorful Addition To Indian Dishes https://twosleevers.com/quick-ginger-garlic-paste/
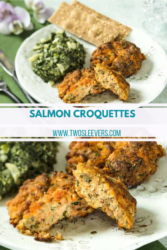
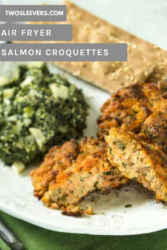
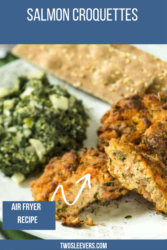
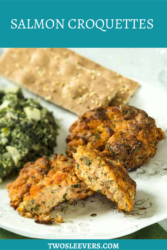
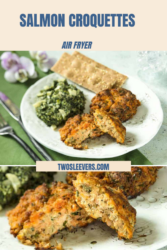
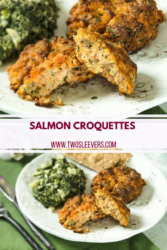
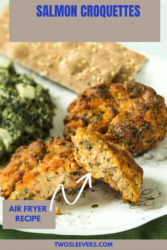
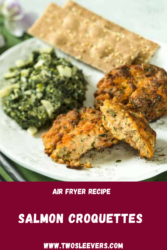
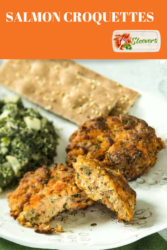
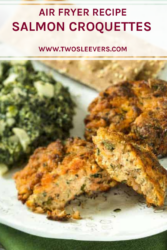

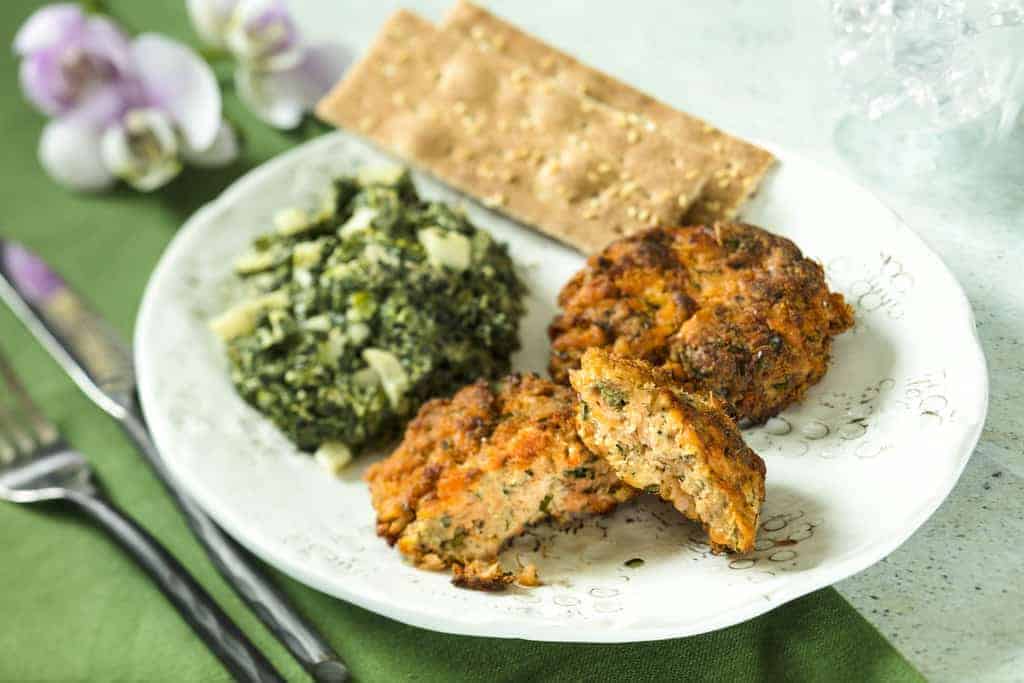
These deliciously crunchy Salmon Croquettes will be your new favorite air fryer recipe! They’re bursting with flavor and have the perfect crunch thanks to your air fryer.
What Makes These Croquettes Special?
- Fast. A seafood main course that is ready in less than 30 minutes .
- Easy. A simple pour and cook recipe made in your air fryer .
- Versatile. Use crushed up pork rinds instead of panko to make these low carb salmon croquettes.
- Delicious. Flavored with dill, scallions, and salmon with perfectly crispy edges.
Something I’m really particular about is testing my recipes over and over until they turn out perfect. Since the Air Fryer is a relatively new appliance for most people, I love taking recipes like these Salmon Croquettes and adapting them to the Air Fryer .
What Are Salmon Croquettes?
Are you unfamiliar with what a croquette is? It’s a mixture of chopped vegetables , mixed with your choice of meat, rolled in breadcrumbs, and fried to golden brown perfection.
My Salmon Croquettes are in more of a patty form, but that’s ok. Croquettes can come in rolls or even balls. However you choose to make them, they’re delicious and are great in the air fryer !
Are These Salmon Croquettes Low Carb?
They are delicious, but they’re not considered low carb or keto-friendly if you follow the recipe exactly as I have it below.
However, to make these keto/low carb, substitute crushed pork rinds for the panko breadcrumbs, and you should be good to go.
How Do I Keep My Salmon Patties From Falling Apart?
Patience is the key to flipping these salmon patties without them falling apart. Make sure you let them cook for AT LEAST half of the cooking time before you attempt to flip them.
Where Did Croquettes Originate From?
You might be surprised to find that croquettes originated in France . Originally they were made with beef as a way to use up leftovers (kind of like hush puppies), but have since turned into something so delicious we make them on purpose!
Ingredients You’ll Need
- Salmon Packets - The star of the recipe, salmon provides the protein base and rich, savory flavor for the croquettes. Using pouch salmon makes the dish quick, convenient, and perfect for weeknights.
- 1 large Egg - The egg acts as a binder, helping the salmon, panko, and seasonings hold together and form firm patties that won’t fall apart during air frying.
- 4 tablespoons Panko - Panko adds structure and lightness to the croquettes, preventing them from being too dense while helping them crisp on the outside for that classic croquette texture.
- 1 Green Scallion - Scallions bring a fresh, mild onion flavor to the mixture without overpowering the salmon. They also add subtle texture and brightness to each bite.
- 1 teaspoon Dried Dill - Dill pairs naturally with salmon, adding an herby, slightly tangy note that enhances the overall flavor of the croquettes without needing additional spices.
- 1/2 teaspoon Salt - Salt seasons the mixture and helps amplify the natural flavor of the salmon and herbs, ensuring the croquettes taste balanced and well-rounded.
- 1/2 teaspoon Ground Black Pepper - Pepper adds a gentle warmth and subtle spice that complements the salmon, giving the croquettes more depth and dimension.
- Cooking Oil Spray - A light spritz of oil promotes browning and helps the croquettes crisp in the air fryer without needing deep frying or excessive added fat.
- Lemon - Served on the side, lemon brightens the finished croquettes with a burst of acidity. A squeeze before eating cuts through the richness of the salmon and enhances flavor beautifully.
Can I Use Fresh Salmon?
I like meals that can be put together with things from your pantry, mainly because I’m a terrible pre-planner. If you keep a few pouches of salmon around, you should have almost everything else you need to make these Salmon Croquettes .
This will allow them to form a crispy edge on the bottom layer so they flip without crumbling.
How Do You Make Salmon Croquettes From Scratch
- Combine. In a large bowl, combine the salmon, egg, bread crumbs, cornmeal, scallion, dillweed, and salt and black pepper to taste. Gently mix until well-combined. Form into 4 patties.
- Spray the air fryer basket with cooking spray. Lightly mist both sides of the patties with cooking spray.
- Cook. Arrange the patties in the air fryer basket. Set the air fryer to 400°F for 15 minutes. Halfway through the cooking time, turn the patties and spray both sides with more vegetable oil spray. When done, patties should be golden-brown and crisp.
- Serve croquettes hot with lemon wedges.
Can You Make Salmon Croquettes Ahead Of Time?
You sure can. Mix all of your ingredients to form salmon patties and place them in an air-tight container with layers of parchment paper between them so they don’t stick together.
When you’re ready to eat them, just pop them in your air fryer for 15 minutes at 400F and enjoy!
Can You Freeze Salmon Patties?
Yes! These Salmon Croquettes freeze and reheat very well for a quick dinner or meal prep option. You can freeze them for up to 3 months before they start to lose some of their original texture and flavor.
What Pairs Well With Salmon Patties?
I recommend serving Salmon Croquettes with two big lemon wedges for the juice! If you’d like to make these into a meal, here are a few of my favorite things to eat with them:
- Add a tangy salad (like my Red Onion Orange Salad )
- Serve over a bed of savory rice (like my yummy Persian Herbed Rice )
- Make them family-friendly by serving with my amazingly delicious Cheesy Potatoes or Hush Puppies !
More Of Our Best Salmon Recipes
- Air Fryer Salmon
- Honey Lemon Salmon
- Honey Glazed Salmon
- Miso Salmon
- Sweet Chili Salmon

Salmon Croquettes | Air Fryer Salmon Patties
Equipment
- PHILLIPS AIR FRYER
- Silicone Tongs
Ingredients
- ▢ 2 5 ounce pouches Salmon Packets , wild-caught
- ▢ 1 large Eggs , beaten
- ▢ 4 tablespoons Panko
- ▢ 1 Chopped Green Scallions , finely chopped, white and light green parts
- ▢ 1 teaspoon Dried Dill
- ▢ 1/2 teaspoon Kosher Salt
- ▢ 1/2 teaspoon Ground Black Pepper
- ▢ Cooking Oil Spray
- ▢ Lemon , wedges
Instructions
In a large bowl, combine the salmon, egg, bread crumbs, scallion, dillweed, and salt and black pepper to taste. Gently mix until well-combined. Form into 4 patties.
Spray the air fryer basket with cooking spray. Lightly mist both sides of the patties with cooking spray.
Arrange the patties in the air fryer basket. Set the air fryer to 400°F for 15 minutes. Halfway through the cooking time, turn the patties and spray both sides with more vegetable oil spray. When done, patties should be golden-brown and crisp.
Serve croquettes hot with lemon wedges.
Make sure to flip these halfway through to ensure they’re crispy on both sides.
Don’t be afriad to liberally spray these with cooking spray. They won’t be oily, but will get nice and crunchy as they cook.
To make these low carb, switch out the Panko for crushed pork rinds.
