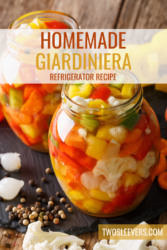
Giardiniera, the tangy and vibrant Italian condiment, has charmed taste buds for generations with its medley of colorful vegetables soaked in a zesty brine. Whether spooned onto sandwiches, tossed into salads, or enjoyed as a standalone snack, giardiniera offers a burst of flavor that elevates any dish.

Why You’ll Want These Veggies With Every Meal
- Incredibly versatile . works as a topping, condiment, side dish, or flavor booster for countless meals.
- Perfect balance of tangy, spicy, and crunchy flavors that elevate even simple dishes.
- Customizable heat level . It can be mad mild, medium, or hot depending on the peppers you use.
Crafting your own refrigerator giardiniera is a rewarding experience that brings the flavors of Italy right to your kitchen. With its versatility and zesty profile, this homemade condiment is bound to become a staple in your culinary repertoire.
What Does Giardiniera Taste Like?
Giardiniera offers a unique and robust flavor profile that combines tanginess, crunchiness, and a delightful medley of vegetable flavors.
Here’s a general overview of what you can expect from your refrigerator pickled vegetables:
- Tangy - The pickling brine gives giardiniera a signature tangy taste. This tanginess balances the richness of the vegetables and adds a zesty kick to each bite.
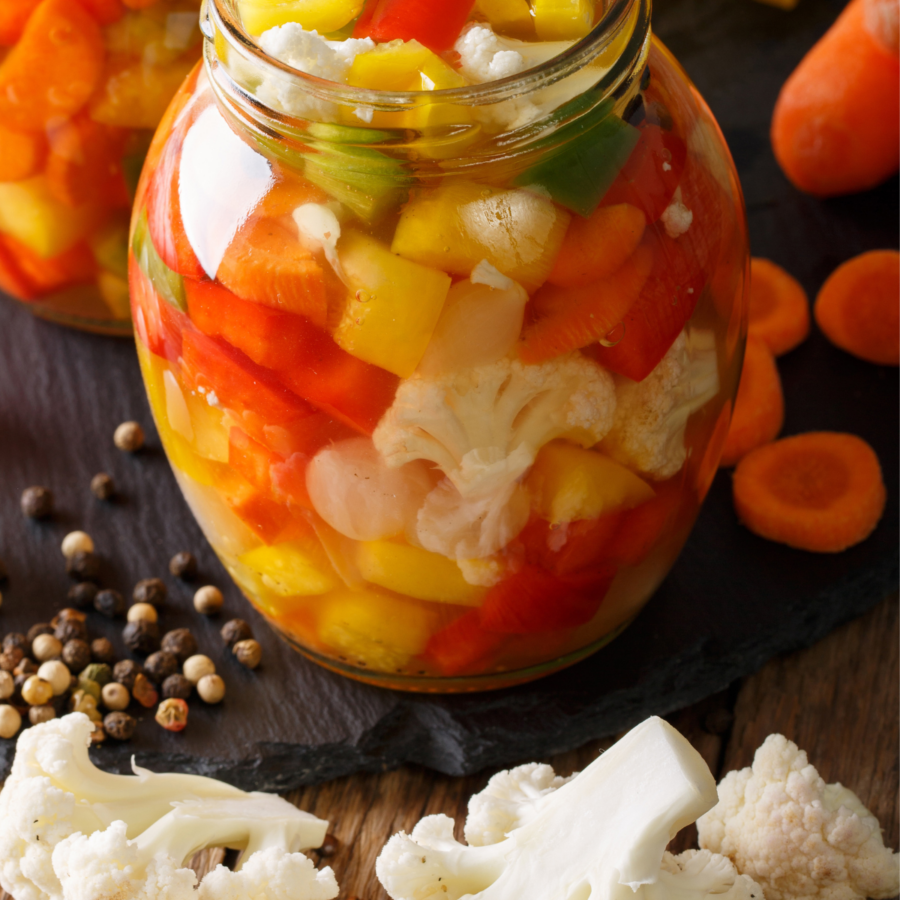
- Crunchy Vegetables- The combination of cauliflower, carrots, celery, and bell peppers provides a satisfying crunch to the giardiniera. The vegetables are typically brined just enough to retain their texture while absorbing the flavors of the brine.
- Umami and Sweetness- Some recipes might incorporate ingredients like garlic and onions, which add layers of umami and subtle sweetness to the mix.
What Is Giardiniera Made Of?
- 1 cup Cauliflower florets - Cauliflower adds a hearty crunch and absorbs the brine beautifully.
- 1 cup Carrots - Carrots provide sweetness, vibrant color, and a firm texture that holds up well in the pickling process.
- 1 cup Celery - Celery adds a fresh, crisp snap and a mild herbal flavor that complements the stronger vegetables. It also helps maintain a refreshing, crunchy texture throughout the mix.
- 1 cup Bell Peppers - Bell peppers contribute sweetness, color, and juiciness.
- 1/2 cup Banana Peppers - Banana peppers add mild, tangy heat and that classic giardiniera “zing.”
- 1/2 cup Pearl Onions - Pearl onions add a subtle sweetness and pungency. They pickle beautifully and provide little bursts of flavor in every bite.
- 4 cloves Garlic - Minced garlic infuses the brine with bold, savory depth. It enhances the overall complexity and adds that unmistakable garlicky kick.
- 1 tablespoon Oregano - Oregano delivers earthy, herbaceous notes that are a hallmark of Italian-style giardiniera.It ties together the vegetables and helps create the signature flavor.
- 1 teaspoon Red Pepper Flakes - Red pepper flakes add heat and spice. They can be adjusted up or down depending on how hot you’d like your giardiniera to be.
- 2 cups White Wine Vinegar - White wine vinegar forms the acidic backbone of the pickling brine. It preserves the vegetables, provides tanginess, and creates the classic giardiniera taste.
- 1 cup Water - Water helps dilute the vinegar so the acidity is balanced but still strong enough to pickle the vegetables effectively.
- 1 tablespoon Salt - Salt enhances all the vegetable flavors and helps with the pickling process. It draws out moisture and ensures the brine is well-seasoned.
- 3 tablespoons Olive Oil - Olive oil adds richness and body to the giardiniera.
How To Make Giardiniera
- Prepare the Vegetables . Wash and clean all the vegetables thoroughly. Cut the cauliflower into small florets. Slice the carrots, celery, bell peppers, garlic, and peppers into appropriate sizes.
- Create the Brine . In a medium saucepan, combine the vinegar, water, and kosher salt. Bring the mixture to a boil, stirring until the salt is fully dissolved. Remove the saucepan from the heat and let the brine cool slightly.
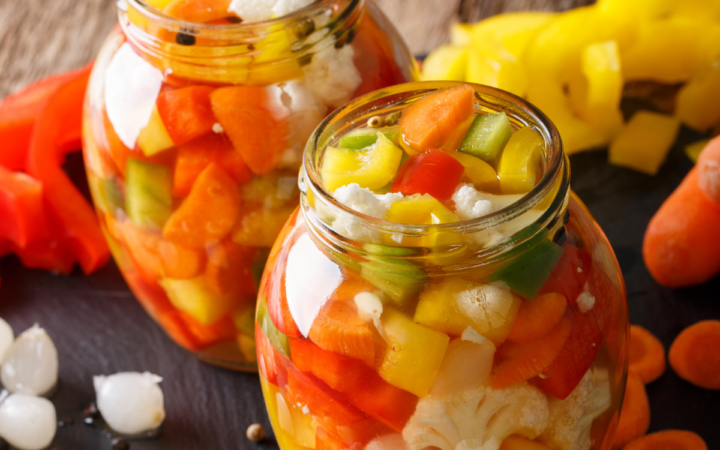
- Assemble the Giardiniera . In a large glass jar or multiple smaller jars, layer the prepared vegetables, starting with the cauliflower. Sprinkle dried oregano and red pepper flakes over the vegetables for added flavor and color. Tuck the garlic and onion in between the layers of vegetables.
- Pour the Brine . Carefully pour the slightly cooled brine over the vegetables in the jars, ensuring that the vegetables are fully covered. Leave about half an inch of space at the top of the jars.
- Seal and Refrigerate . Using a clean utensil, gently press down on the vegetables to release any air bubbles. Drizzle a thin layer of olive oil on top of the brine. This helps create an additional seal and prevents oxidation. Seal the jars tightly with the lids. Place the jars in the refrigerator.
- Flavor Development . Allow the giardiniera to marinate in the refrigerator for at least 48 hours before enjoying it. The flavors will continue to develop over time.
- Serve and Enjoy! Once the giardiniera has marinated to your liking, it’s ready to enjoy! Store any leftovers in the refrigerator and continue to enjoy the giardiniera’s bold flavors.
Tips And Tricks
Crafting delicious giardiniera requires a bit of attention to detail and a love for pickled flavors. Here are some tips and tricks to ensure your homemade giardiniera turns out flavorful and satisfying:
- Choose Fresh Vegetables. Opt for fresh, high-quality vegetables for the best taste and texture. Look for vibrant colors and avoid vegetables that are overly wilted or bruised.
- Adjust Heat Level . The heat of your giardiniera depends on the type of peppers you use. If you prefer milder flavors, remove the seeds and membranes from hot peppers. Experiment with different pepper varieties to find your preferred level of heat.
- Let Flavors Develop . Allow the giardiniera to marinate in the refrigerator for at least 48 hours before consuming. This gives the flavors time to meld and intensify.
Variations
Giardiniera is a versatile condiment that can be customized to suit your taste preferences and creative culinary ideas. Here are some variations to consider when making it:
- Mild or Spicy - Adjust the heat level by choosing mild or hot pepper varieties. For a milder version, opt for banana peppers or sweet bell peppers. If you’re a fan of heat, include jalapenos, serranos, or even habaneros for an extra kick.
- Colorful Blend - Play with the colors of your vegetables to create a visually appealing giardiniera. Include a mix of red, yellow, and orange bell peppers along with the traditional green ones. This adds vibrancy to your pickled creation.
- Greek-Inspired - Incorporate Mediterranean flavors by using Greek olives and capers along with your pickled vegetables. This adds a briny and savory twist.
What Is Giardiniera Used For?
You can use these delicious Italian pickled vegetables in a variety of ways.
Spoon the pickled vegetables onto sandwiches, pizzas, antipasto platters, or salads to add a delightful crunch and tangy flavor. You can even pair the giardiniera with your favorite cheeses and cured meats for a delicious appetizer.
How Long Does It Last?
Refrigerator giardiniera, due to its fresh and pickled nature, has a relatively shorter shelf life compared to canned giardiniera. When properly stored in the refrigerator, homemade refrigerator giardiniera can last for about 2-3 weeks.
More Easy Vegetable Recipes
- Roasted Pearl Onions
- Air Fryer Brussels Sprouts
- Cauliflower Mac and Cheese
- Instant Pot Green Beans and Bacon
- Keto Broccoli Salad
- Sheet Pan Bhindi
- Swiss Chard With Bacon
- Instant Pot Beet Salad
- Oven Roasted Veggies

Giardiniera Recipe | Refrigerator Italian Pickled Vegetables
Ingredients
- ▢ 1 cup Cauliflower florets
- ▢ 1 cup Carrots
- ▢ 1 cup Celery
- ▢ 1 cup Bell Peppers
- ▢ 1/2 cup Banana Peppers
- ▢ 1/2 cup Pearl Onions
- ▢ 4 cloves Garlic , Minced
- ▢ 1 tbsp Oregano
- ▢ 1 tsp Red Pepper Flakes
- ▢ 2 cups White Wine Vinegar
- ▢ 1 cup Water
- ▢ 1 tbsp Salt
- ▢ 3 tbsp Olive Oil
Instructions
- Prepare the Vegetables . Wash and clean all the vegetables thoroughly. Cut the cauliflower into small florets. Slice the carrots, celery, bell peppers, garlic, and peppers into appropriate sizes.
- Create the Brine . In a medium saucepan, combine the vinegar, water, and kosher salt. Bring the mixture to a boil, stirring until the salt is fully dissolved. Remove the saucepan from the heat and let the brine cool slightly.
- Assemble the Giardiniera . In a large glass jar or multiple smaller jars, layer the prepared vegetables, starting with the cauliflower. Sprinkle dried oregano and red pepper flakes over the vegetables for added flavor and color. Tuck the garlic and onion in between the layers of vegetables.
- Pour the Brine . Carefully pour the slightly cooled brine over the vegetables in the jars, ensuring that the vegetables are fully covered. Leave about half an inch of space at the top of the jars.
- Seal and Refrigerate . Using a clean utensil, gently press down on the vegetables to release any air bubbles. Drizzle a thin layer of olive oil on top of the brine. This helps create an additional seal and prevents oxidation. Seal the jars tightly with the lids. Place the jars in the refrigerator.
- Flavor Development . Allow the giardiniera to marinate in the refrigerator for at least 48 hours before enjoying it. The flavors will continue to develop over time.
- Serve and Enjoy! Once the giardiniera has marinated to your liking, it’s ready to enjoy! Store any leftovers in the refrigerator and continue to enjoy the giardiniera’s bold flavors.
Get support & connect with our community on Facebook!
Nutrition
Don’t forget to check out my other Ketocookbooks.
Keto Instant Pot, Keto Fat Bombs, Sweets, & Treats , and Easy keto in 30 minutes.


If you already signed up, you should have received an email with a password to give you unlimited access to our FREE Printable Library. The password is case sensitive. Enter it below and get printing!
Password:
Giardiniera Recipe | Refrigerator Italian Pickled Vegetables
Ingredients
- 1 cup Cauliflower florets
- 1 cup Carrots
- 1 cup Celery
- 1 cup Bell Peppers
- 1/2 cup Banana Peppers
- 1/2 cup Pearl Onions
- 4 cloves Garlic Minced
- 1 tbsp Oregano
- 1 tsp Red Pepper Flakes
- 2 cups White Wine Vinegar
- 1 cup Water
- 1 tbsp Salt
- 3 tbsp Olive Oil
Instructions
- Prepare the Vegetables . Wash and clean all the vegetables thoroughly. Cut the cauliflower into small florets. Slice the carrots, celery, bell peppers, garlic, and peppers into appropriate sizes.
- Create the Brine . In a medium saucepan, combine the vinegar, water, and kosher salt. Bring the mixture to a boil, stirring until the salt is fully dissolved. Remove the saucepan from the heat and let the brine cool slightly.
- Assemble the Giardiniera . In a large glass jar or multiple smaller jars, layer the prepared vegetables, starting with the cauliflower. Sprinkle dried oregano and red pepper flakes over the vegetables for added flavor and color. Tuck the garlic and onion in between the layers of vegetables.
- Pour the Brine . Carefully pour the slightly cooled brine over the vegetables in the jars, ensuring that the vegetables are fully covered. Leave about half an inch of space at the top of the jars.
- Seal and Refrigerate . Using a clean utensil, gently press down on the vegetables to release any air bubbles. Drizzle a thin layer of olive oil on top of the brine. This helps create an additional seal and prevents oxidation. Seal the jars tightly with the lids. Place the jars in the refrigerator.
- Flavor Development . Allow the giardiniera to marinate in the refrigerator for at least 48 hours before enjoying it. The flavors will continue to develop over time.
- Serve and Enjoy! Once the giardiniera has marinated to your liking, it’s ready to enjoy! Store any leftovers in the refrigerator and continue to enjoy the giardiniera’s bold flavors.
Giardiniera Recipe | Refrigerator Italian Pickled Vegetables https://twosleevers.com/giardiniera-recipe/

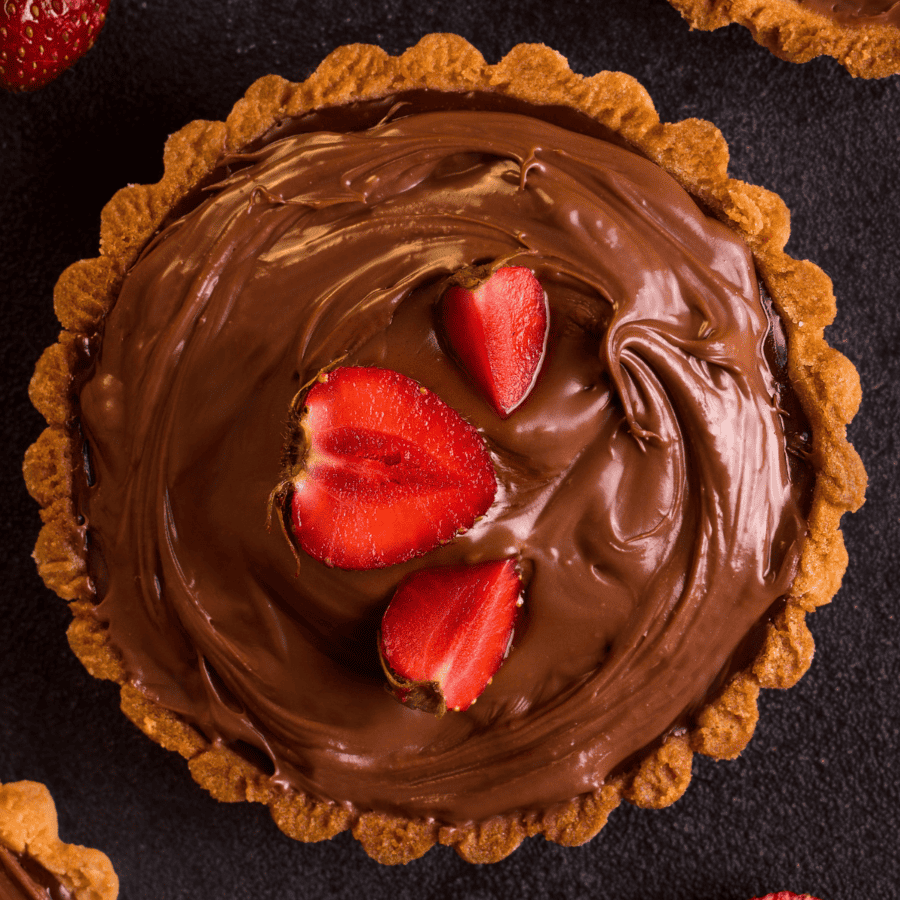
Craving a luscious dessert without derailing your low-carb lifestyle? Look no further than our recipe for a mouthwatering low carb Chocolate Pudding Pie. This rich and creamy dessert is the perfect way to satisfy your sweet tooth while staying on track with your dietary goals.
Why You’ll Love This Low Carb Dessert
- Easy.
- Delicious.
- Low Carb.
- Versatile.
Indulging in a luscious slice of chocolate pudding pie doesn’t have to derail your low-carb journey. With our easy-to-follow recipe, you can create a sumptuous low carb chocolate pudding pie that satisfies your sweet cravings while keeping your carb intake in check.
How Do You Make Pudding Thicker For Pie Filling?
There are a variety of ways you can choose to thicken your pie filling, unfortunately, not all of them are low in carbs.
For this low carb Chocolate Pudding Pie recipe, I created a custard-like chocolatey filling that I thickened even more with the addition of Xanthan Gum. It is naturally low in carbs and works just as well as cornstarch or flour to thicken pie filling.
Ingredients You’ll Need
For TheKeto Pie Crust
- Superfine Almond Flour
- Powdered Swerve
- Coconut Oil
For The Filling
- Heavy Cream
- Cocoa Powder
- Low Carb Sweetener
- Vanilla Extract
- Salt
- Egg Yolks
How To Make Chocolate Pudding Pie
- Prepare The Crust. Preheat your oven to 375F. In a mixing bowl, combine almond flour, coconut oil, and powdered swerve. Mix until it resembles coarse crumbs. Press the mixture firmly into a pie dish, covering the bottom and sides evenly.
- Bake The Pie Dough. Bake the crust for about 10 minutes or until it’s lightly golden. Allow it to cool completely.
- Begin The Filling . In a saucepan, combine heavy cream, cocoa powder, sweetener, vanilla extract, and salt.
- Cook The Filling . Heat the mixture over medium heat, stirring constantly until it’s well combined and heated through. Be careful not to let it boil. Whisk together the egg yolks and slowly pour the warm cream mixture over the top of them. Return the mixture to the saucepan and cook on low to medium heat until thickened.
- Thicken It Up. Allow to cool and add in the Xanthan gum. Remove the saucepan from the heat and let the mixture cool.
- Assemble the Pie . Pour the chocolate filling into the cooled pie crust. Gently tap the pie dish to remove any air bubbles. Place the pie in the refrigerator and let it set for at least 2-3 hours or until the filling is firm.
- Serve and Enjoy ! Once the pie is set, slice it into pieces and serve.

Why Is My Chocolate Pudding Pie Runny?
A runny chocolate pudding pie can be disappointing, but there are a few common reasons why this might happen. Here are some of the potential causes and solutions:
- Insufficient Thickening Agent - Pudding relies on a thickening agent to achieve the desired consistency. If you didn’t use enough of the Xanthan gum, the pudding may not have thickened adequately. To fix this, you can try adding a bit more and whisk until it is fully incorporated and thickened.
- Not Chilled Long Enough - Pudding pies need time to set and firm up in the refrigerator. If you didn’t allow the pie enough time to chill and set, it might still be runny when you try to slice it. Make sure to follow the recommended chilling time in your recipe, usually a few hours or more.
- Recipe Ratios - The ratios of liquid to thickening agent in your recipe might be off, leading to a runny filling. Make sure to follow the recommended measurements and proportions accurately.
Variations
Creating variations of your low-carb chocolate pudding pie can be a fun way to experiment with flavors and textures while still staying within your dietary goals. Here are some creative variations to consider:
- Peanut Butter- Swirl natural peanut butter into the chocolate pudding before pouring it into the crust. Top with a layer of whipped cream and chopped peanuts for added crunch.
- Mint- Add a few drops of peppermint extract to the pudding mixture for a refreshing minty twist. Top with whipped cream and a sprinkle of chopped sugar-free chocolate or cacao nibs.
- Raspberry- Layer fresh raspberries on the bottom of the crust before adding the chocolate pudding. The tartness of the raspberries complements the sweetness of the chocolate.
What To Serve With It
Pairing your low carb chocolate pudding pie with complementary accompaniments can enhance your dessert experience. Here are some ideas for what to serve with it:
- Whipped Cream- A classic choice, a dollop of freshly whipped heavy cream adds a creamy and luxurious element that balances the richness of the chocolate pudding pie.
- Berries - Fresh berries like strawberries, raspberries, or blueberries are excellent low-carb options that add a burst of natural sweetness and a refreshing contrast to the richness of the pie.
- Nuts - A handful of chopped nuts, such as almonds, pecans, or walnuts, provides a satisfying crunch and texture that complements the smooth pudding.
- Keto Ice Cream - If you’re looking to indulge further, consider serving a small scoop of low-carb vanilla or chocolate ice cream alongside the pie for a delightful combination of flavors and textures.
Does Chocolate Pudding Pie Need To Be Refrigerated?
Yes, chocolate pudding pie needs to be refrigerated. Because chocolate pudding pie contains dairy and other perishable ingredients, it is important to store it in the refrigerator to prevent bacterial growth and maintain its freshness and safety.
This delicious low carb pie recipe can last for 2-3 days when stored in the refrigerator in an air-tight container.
Can You Freeze It?
If you have leftovers or want to store the pie for a longer period, you can freeze it.
Wrap the pie tightly in plastic wrap and then aluminum foil to prevent freezer burn. Label it with the date to keep track of its freshness. Frozen chocolate pudding pie can be stored for several weeks.
More Chocolatey Desserts
- Keto Chocolate Chip Cookies
- No Bake Peanut Butter Chocolate Bars
- Gluten Free Chocolate Cake
- Keto Brownies
- Keto Hot Chocolate


Chocolate Pudding Pie | Low Carb Pudding Pie Recipe
Ingredients
For The Keto Pie Crust
- ▢ 1 cup Almond Flour
- ▢ 2 tbsp Powdered Swerve
- ▢ 1/4 cup Coconut Oil , melted
For The Chocolate Pudding Pie Filling
- ▢ 1 cup Heavy Cream
- ▢ 5 Egg Yolks
- ▢ 1/2 cup Cocoa Powder
- ▢ 1/2 cup Swerve
- ▢ 1 tsp Vanilla
- ▢ 1/4 tsp Salt
- ▢ 1 tsp Xanthan Gum
Instructions
- Prepare The Crust. Preheat your oven to 375F. In a mixing bowl, combine almond flour, coconut oil, and powdered swerve. Mix until it resembles coarse crumbs. Press the mixture firmly into a pie dish, covering the bottom and sides evenly.
- Bake The Pie Dough. Bake the crust for about 10 minutes or until it’s lightly golden. Allow it to cool completely.
- Begin The Filling . In a saucepan, combine heavy cream, cocoa powder, sweetener, vanilla extract, and salt.
- Cook The Filling . Heat the mixture over medium heat, stirring constantly until it’s well combined and heated through. Be careful not to let it boil. Whisk together the egg yolks and slowly pour the warm cream mixture over the top of them. Return the mixture to the saucepan and cook on low to medium heat until thickened.
- Thicken It Up. Allow to cool and add in the Xanthan gum. Remove the saucepan from the heat and let the mixture cool.
- Assemble the Pie . Pour the chocolate filling into the cooled pie crust. Gently tap the pie dish to remove any air bubbles. Place the pie in the refrigerator and let it set for at least 2-3 hours or until the filling is firm.
- Serve and Enjoy ! Once the pie is set, slice it into pieces and serve.
Get support & connect with our community on Facebook!
Nutrition
Don’t forget to check out my other Ketocookbooks.
Keto Instant Pot, Keto Fat Bombs, Sweets, & Treats , and Easy keto in 30 minutes.
