
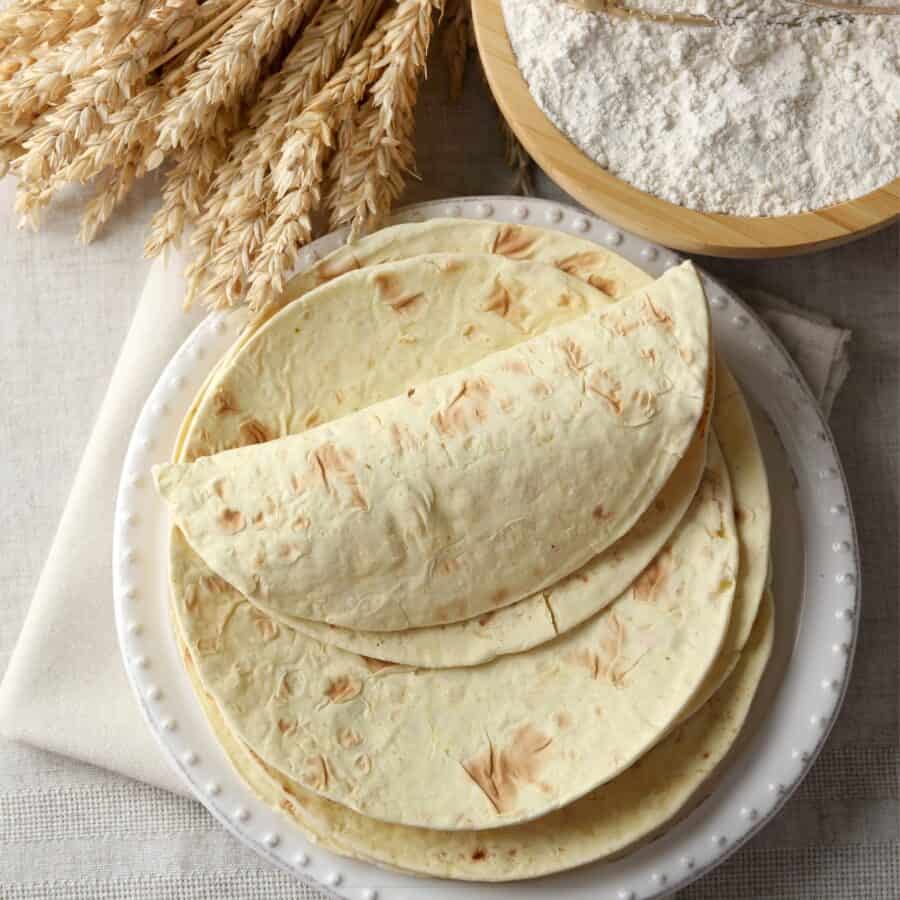
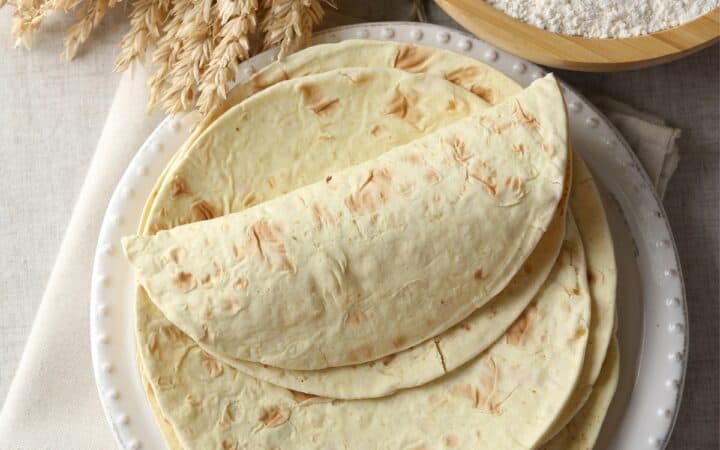
Unlock the secret to making the most delicious homemade flour tortillas with this easy-to-follow recipe. Delight your taste buds with the authentic flavor and soft texture of these tortillas that will elevate any meal.
Why You’ll Love This Homemade Version
- Authentic Flavor . Experience the true taste of Mexican cuisine with these homemade flour tortillas. Made with simple ingredients, they capture the essence of traditional tortillas found in the heart of Mexico.
- Versatility . Whether you’re wrapping them around savory fillings for tacos or using them as a base for quesadillas, these flour tortillas are incredibly versatile and can complement a wide range of dishes.
- Soft and Tender . Unlike store-bought tortillas that can sometimes be dry and brittle, these homemade tortillas are soft, tender, and perfect for folding or rolling without cracking.
- Easy to Make . With just a few basic ingredients and a simple cooking process, you can whip up a batch of these homemade tortillas in no time.
With this easy homemade flour tortilla recipe, you can enjoy the authentic flavor and soft texture of traditional tortillas right in your own kitchen. Whether you’re making tacos, quesadillas, or wraps, these versatile tortillas are sure to impress.
Why Won’t My Tortillas Puff Up?
If your flour tortillas aren’t puffing up properly, here are a few common reasons why:
- Incorrect Dough Consistency . The dough should be soft and pliable but not too sticky. If it’s too dry, the tortillas may not puff up during cooking. Add a little more water to the dough to achieve the right consistency.
- Inadequate Resting Time . Allowing the dough to rest before rolling it out is crucial for gluten development, which helps the tortillas puff up when cooked. Make sure to let the dough rest for at least 30 minutes before rolling it out.
- Cooking Temperature . Cooking the tortillas on too low or too high heat can prevent them from puffing up properly. Aim for a medium-high heat and make sure the skillet or griddle is well-heated before cooking each tortilla.
Are Flour Tortillas Healthy?
While flour tortillas can fit into a healthy diet when consumed in moderation and paired with nutritious fillings, it’s essential to consider factors such as portion size, ingredient quality, and overall meal composition.
What Are Flour Tortillas Made Of?
- All-Purpose Flour - Provides the base for the tortilla dough, giving it structure and texture.
- Salt - Enhances the flavor of the tortillas and helps strengthen the gluten in the dough.
- Baking Powder - Adds a slight leavening effect, helping the tortillas puff up when cooked.
- Vegetable Shortening - Contributes to the tenderness and flakiness of the tortillas.
- Warm Water - Binds the dough together and hydrates the flour, creating a smooth and elastic texture.
How To Make Flour Tortillas
- Prepare the Dough . In a large mixing bowl, combine the flour, salt, and baking powder. Add the vegetable shortening and mix until the mixture resembles coarse crumbs. Gradually add the warm water, mixing until a soft dough forms.
- Knead the Dough . Turn the dough out onto a lightly floured surface and knead it for a few minutes until it becomes smooth and elastic. Divide the dough into equal-sized balls and let them rest for about 30 minutes, covered with a clean kitchen towel.
- Roll Out the Tortillas . On a floured surface, roll out each dough ball into a thin, round tortilla using a rolling pin. Aim for a thickness of about 1/8 inch.
- Cook the Tortillas . Heat a skillet or griddle over medium-high heat. Cook each tortilla for about 30 seconds to 1 minute on each side, or until lightly browned and puffed up. Keep cooked tortillas warm in a clean kitchen towel while you cook the remaining ones.
- Serve and Enjoy . Once all the tortillas are cooked, serve them warm with your favorite fillings or dishes. Enjoy the authentic flavor and soft texture of these homemade flour tortillas!

Tips And Tricks
Making homemade flour tortillas can be a rewarding and delicious experience. Here are some tips and tricks to help you achieve the best results:
- Rest the Dough . After kneading, allow the dough to rest for about 30 minutes. This resting period allows the gluten to relax, making the dough easier to roll out and shaping the tortillas.
- Divide the Dough Evenly . Divide the dough into equal-sized portions to ensure that your tortillas are uniform in size and thickness. This will help them cook evenly and look more professional.
- Roll the Tortillas Thinly . Roll out the dough as thinly as possible for soft and pliable tortillas. Aim for a thickness of about 1/8 inch (3 mm) for the best results.
Variations
Homemade flour tortillas are versatile and can be customized in various ways to suit different tastes and preferences. Here are some delicious variations to try:
- Whole Wheat- Substitute part or all of the all-purpose flour with whole wheat flour for a nuttier flavor and added fiber. Start by replacing about half of the flour and adjust based on your preference.
- Herb and Garlic- Add chopped fresh herbs, such as cilantro, parsley, or basil, and minced garlic to the dough for an aromatic twist. These flavorful tortillas pair well with Mexican-inspired dishes or as a base for wraps and sandwiches.
- Spicy- Add a kick of heat to your tortillas by incorporating finely chopped jalapenos, green chilies, or chipotle peppers in adobo sauce into the dough. Adjust the amount of spice to your liking for a bold and flavorful tortilla.
- Cheesy- Mix shredded cheese, such as cheddar, Monterey Jack, or pepper jack, into the dough for cheesy tortillas that are perfect for quesadillas, burritos, or as a side dish. The cheese adds richness and flavor to the tortillas.
What To Use Flour Tortillas For
Flour tortillas are incredibly versatile and can be used in various ways to create delicious and satisfying meals. Here are some popular uses for them:
- Tacos - Flour tortillas are a classic choice for making tacos. Fill them with your favorite protein and add toppings for a flavorful and customizable meal.
- Quesadillas - Quesadillas are quick and easy to make, perfect for a simple lunch or dinner.
- Burritos - Wrap up your favorite fillings in a large flour tortilla to make a hearty and portable meal.
- Wraps - Flour tortillas make excellent wraps for creating sandwiches and wraps for on-the-go meals.
How Long Do They Last?
Store homemade flour tortillas in an airtight container or resealable plastic bag in the refrigerator for up to 3 days. This helps to keep them fresh and prevents them from drying out too quickly.
Place a piece of parchment paper or wax paper between each tortilla to prevent them from sticking together. This makes it easier to separate them when you’re ready to use them.
Can You Freeze Them?
If you’re not planning to use the tortillas within a few days, you can freeze them for longer-term storage. Wrap them tightly in plastic wrap or aluminum foil, or place them in a freezer-safe bag, and store them in the freezer for up to 2-3 months.
Thaw them in the refrigerator or at room temperature before reheating.
More Homemade Breads
- Keto Bread
- Nut and Seed Bread
- Star Bread
- Keto Zucchini Bread
- Boston Brown Bread

Flour Tortillas | Easy Homemade Flour Tortilla Recipe
Ingredients
- ▢ 2 cups All Purpose Flour
- ▢ 1 tsp Kosher Salt
- ▢ 1 tsp Baking Powder
- ▢ 3 tbsp Vegetable Shortening
- ▢ 3/4 cup Warm Water
Instructions
- Prepare the Dough . In a large mixing bowl, combine the flour, salt, and baking powder. Add the vegetable shortening and mix until the mixture resembles coarse crumbs. Gradually add the warm water, mixing until a soft dough forms.
- Knead the Dough . Turn the dough out onto a lightly floured surface and knead it for a few minutes until it becomes smooth and elastic. Divide the dough into equal-sized balls and let them rest for about 30 minutes, covered with a clean kitchen towel.
- Roll Out the Tortillas . On a floured surface, roll out each dough ball into a thin, round tortilla using a rolling pin. Aim for a thickness of about 1/8 inch.
- Cook the Tortillas . Heat a skillet or griddle over medium-high heat. Cook each tortilla for about 30 seconds to 1 minute on each side, or until lightly browned and puffed up. Keep cooked tortillas warm in a clean kitchen towel while you cook the remaining ones.
- Serve and Enjoy . Once all the tortillas are cooked, serve them warm with your favorite fillings or dishes. Enjoy the authentic flavor and soft texture of these homemade flour tortillas!
Get support & connect with our community on Facebook!

If you already signed up, you should have received an email with a password to give you unlimited access to our FREE Printable Library. The password is case sensitive. Enter it below and get printing!
Password:

Flour Tortillas | Easy Homemade Flour Tortilla Recipe
Ingredients
- 2 cups All Purpose Flour
- 1 tsp Kosher Salt
- 1 tsp Baking Powder
- 3 tbsp Vegetable Shortening
- 3/4 cup Warm Water
Instructions
- Prepare the Dough . In a large mixing bowl, combine the flour, salt, and baking powder. Add the vegetable shortening and mix until the mixture resembles coarse crumbs. Gradually add the warm water, mixing until a soft dough forms.
- Knead the Dough . Turn the dough out onto a lightly floured surface and knead it for a few minutes until it becomes smooth and elastic. Divide the dough into equal-sized balls and let them rest for about 30 minutes, covered with a clean kitchen towel.
- Roll Out the Tortillas . On a floured surface, roll out each dough ball into a thin, round tortilla using a rolling pin. Aim for a thickness of about 1/8 inch.
- Cook the Tortillas . Heat a skillet or griddle over medium-high heat. Cook each tortilla for about 30 seconds to 1 minute on each side, or until lightly browned and puffed up. Keep cooked tortillas warm in a clean kitchen towel while you cook the remaining ones.
- Serve and Enjoy . Once all the tortillas are cooked, serve them warm with your favorite fillings or dishes. Enjoy the authentic flavor and soft texture of these homemade flour tortillas!
Flour Tortillas | Easy Homemade Flour Tortilla Recipe https://twosleevers.com/flour-tortillas/

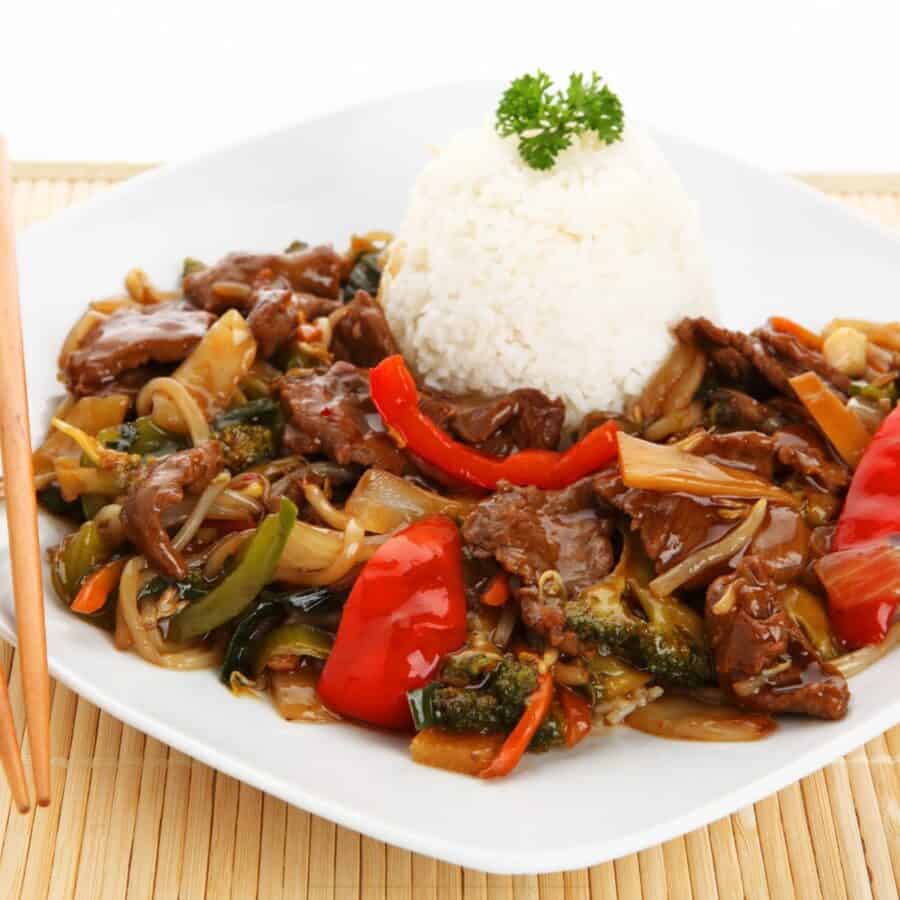
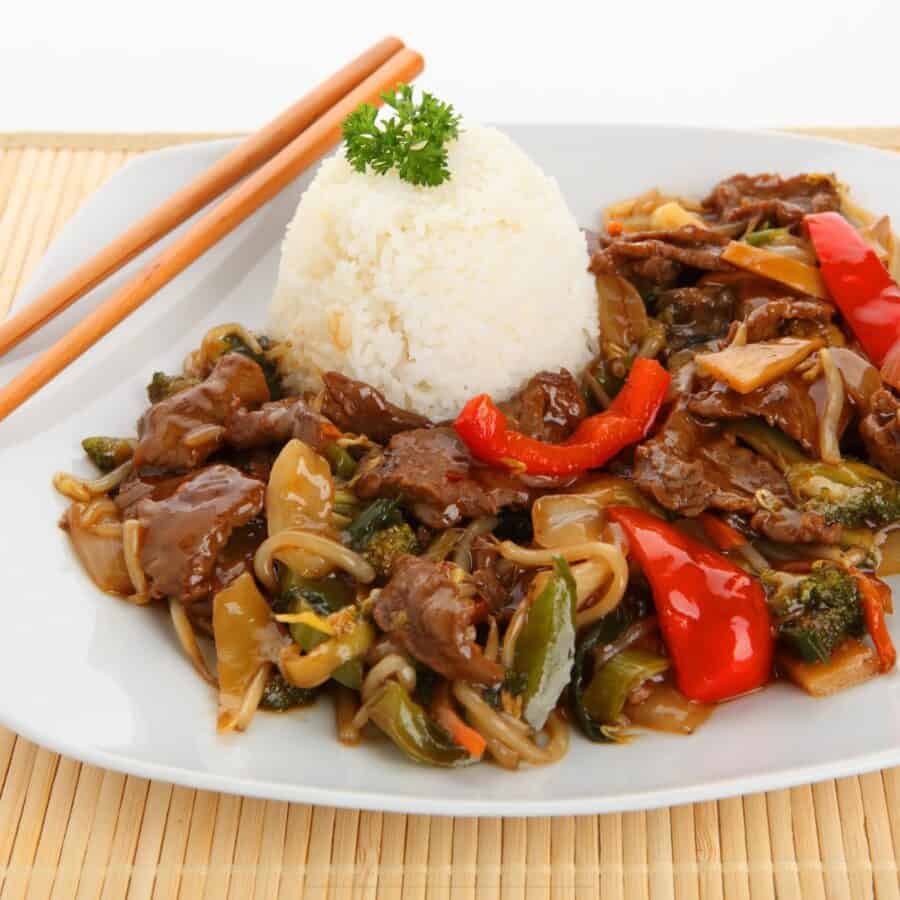
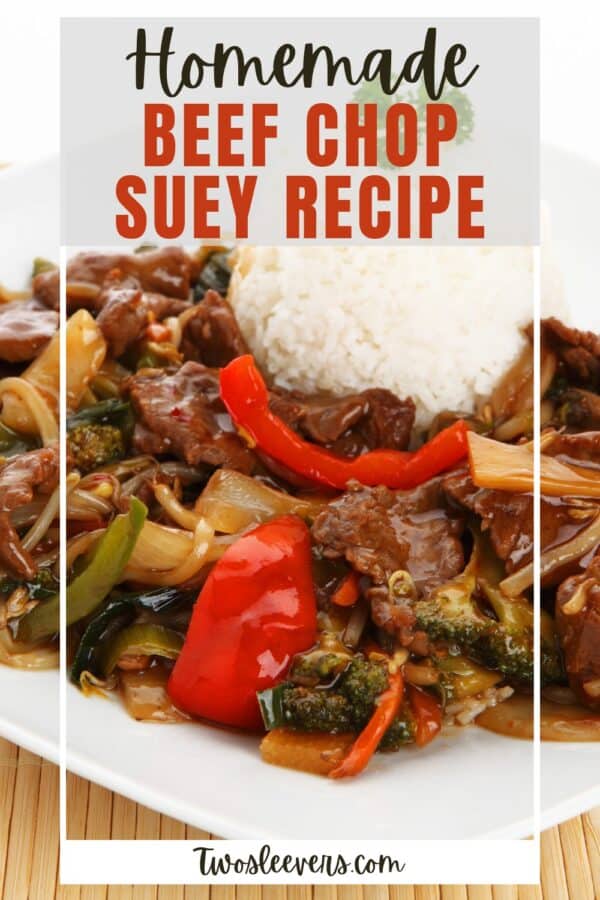
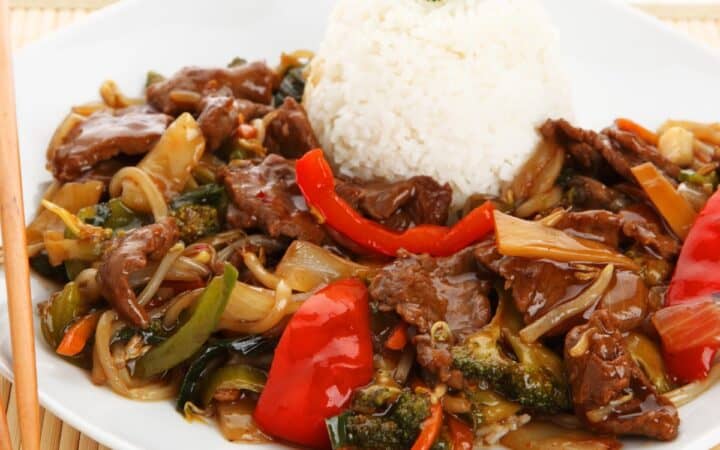
If you’re a fan of savory stir-fries packed with fresh vegetables and tender beef, you’re in for a treat! Learn how to make the easiest Beef Chop Suey. You’ll achieve that perfect balance between crisp veggies and succulent beef, all coated in a delicious sauce.
Why You’ll Love This Awesome Asian-Inspired Dish
- Quick and Easy . Ready in under 30 minutes with simple ingredients.
- Nutritious . Packed with a variety of vegetables.
- Delicious . The perfect blend of savory flavors that everyone will love.
- Versatile . Serve it over rice or noodles for a complete meal.
With this easy recipe, you can enjoy a restaurant-quality dish right at home. Perfect for busy weeknights or a special weekend meal, this Beef Chop Suey is guaranteed to be a hit.
What’s The Difference Between Beef Chop Suey And Chow Mein?
Beef Chop Suey and Beef Chow Mein are both stir-fried dishes with beef and vegetables but differ mainly in their base (rice vs. noodles), texture, and the richness of their sauces.
Each dish offers a unique dining experience, reflecting different aspects of Chinese culinary traditions.
Key Differences
- Base - Chop Suey is served with rice, making it more of a rice-based dish, whereas Chow Mein is a noodle-based dish.
- Texture - Chop Suey has a softer texture with a mix of saucy vegetables and meat. Chow Mein has a varied texture with chewy or crispy noodles.
- Sauce - Chop Suey has a lighter sauce, whereas Chow Mein typically has a richer, more robust sauce.
Ingredients You’ll Need
- Beef - Thinly sliced sirloin or flank steak.
- Vegetables - Celery, bell peppers, broccoli, bok choy, bean sprouts, carrots, and mushrooms.
- Sauce - Soy sauce, oyster sauce, cornstarch, and chicken broth.
- Aromatics - Garlic and ginger for a depth of flavor.
How To Make Beef Chop Suey
- Slice the Beef . Thinly slice the beef against the grain to ensure tenderness.
- Chop the Vegetables . Prepare all the vegetables by slicing them into bite-sized pieces.
- Make the Sauce . In a small bowl, whisk together soy sauce, oyster sauce, cornstarch, and chicken broth.
- Heat the Wok . Heat a large wok or skillet over high heat and add a bit of oil.
- Cook the Beef . Add the sliced beef and stir-fry until browned and cooked through. Remove from the wok and set aside.
- Stir-Fry the Aromatics . Add more oil to the wok if needed, then add garlic and ginger, cooking until fragrant.
- Add the Vegetables . Toss in the celery, bell peppers, bok choy, bean sprouts, carrots, and mushrooms. Stir-fry until the vegetables are tender-crisp.
- Return the Beef . Add the beef back to the wok.
- Add the Sauce . Pour the sauce over the beef and vegetables, stirring until everything is well coated and the sauce has thickened.
- Serve . Serve the Beef Chop Suey and enjoy.
Tips And Tricks
Making Beef Chop Suey is a delightful process, and a few tips and tricks can help you achieve the best possible results. Here are some pointers to ensure your dish turns out crispy, flavorful, and utterly irresistible:
- High Heat . Stir-fry over high heat to ensure the beef and vegetables cook quickly and retain their crispness.
- Prep Ahead . Have all your ingredients prepped and ready to go before you start cooking.
- Cornstarch Slurry . If the sauce is too thick, add a bit more chicken broth. If too thin, add a cornstarch slurry to thicken.
Variations
If you love Beef Chop Suey and want to try some creative variations, here are a few delicious ideas to explore:
- Chicken- Substitute the beef with thinly sliced chicken breast.
- Vegetarian- Omit the beef and add more vegetables like mushrooms, snow peas, and broccoli.
- Spicy- Add a kick of heat with some sliced chili peppers or a dash of chili oil.
- Shrimp- Substitute the beef with shrimp for a seafood twist.
What To Eat With Beef Chop Suey
Beef Chop Suey is a flavorful and savory dish that pairs well with a variety of sides and accompaniments. Here are some delicious options to consider serving alongside it:
- Spring Rolls - Crisp and light, they make a great appetizer.
- Egg Drop Soup - A light and soothing soup that complements the rich flavors of the chow mein.
- Steamed Dumplings - A delicious and filling side dish.
- Asian Slaw - A refreshing salad with a tangy dressing to balance the richness of the noodles.
How Long Does It Last?
Cooked Beef Chop Suey can be stored in the refrigerator in an airtight container for up to 3 to 4 days. The flavors may intensify over time, so for the best bite, they are best enjoyed as soon as possible.
Can You Freeze It?
Yes, you can freeze Beef Chop Suey to extend its shelf life and enjoy it at a later time. Freezing is a great way to preserve the flavors and texture of the beef for 2-3 months.
More Of Our Best Beef Recipes
- Beef Curry
- Instant Pot Beef Stroganoff
- Beef Bulgogi
- Beef Satay
- Ground Beef and Broccoli
Beef Chop Suey Recipe | Easy Chop Suey With Beef
Ingredients
- ▢ 1 pound Beef Sirloin , thinly sliced
- ▢ 2 tbsp Soy Sauce
- ▢ 1 tsp Cornstarch
- ▢ 1 tsp Sesame Oil
- ▢ 1 cup Celery , sliced
- ▢ 1 cup Bell Peppers , sliced
- ▢ 1 cup Broccoli Florets
- ▢ 1 cup Bok Choy , chopped
- ▢ 1 cup Bean Sprouts
- ▢ 1 cup Carrots , julienned
- ▢ 1 cup Mushrooms , sliced
Instructions
- Slice the Beef . Thinly slice the beef against the grain to ensure tenderness.
- Chop the Vegetables . Prepare all the vegetables by slicing them into bite-sized pieces.
- Make the Sauce . In a small bowl, whisk together soy sauce, oyster sauce, cornstarch, and chicken broth.
- Heat the Wok . Heat a large wok or skillet over high heat and add a bit of oil.
- Cook the Beef . Add the sliced beef and stir-fry until browned and cooked through. This should take 3-4 minutes. Remove from the wok and set aside.
- Stir-Fry the Aromatics . Add more oil to the wok if needed, then add garlic and ginger, cooking until fragrant.
- Add the Vegetables . Toss in the celery, bell peppers, bok choy, bean sprouts, carrots, and mushrooms. Stir-fry until the vegetables are tender-crisp, 8-10 minutes.
- Return the Beef . Add the beef back to the wok.
- Add the Sauce . Pour the sauce over the beef and vegetables, stirring until everything is well coated and the sauce has thickened.
- Serve . Serve the Beef Chop Suey and enjoy.
