
If you’re a brownie lover who sneaks spoonfuls of batter before baking, this Edible Brownie Batter recipe is your new best friend! Rich, fudgy, and perfectly safe to eat, this no-bake dessert is made with heat-treated flour and no eggs, so you can indulge worry-free.

Why You’ll Love This Tasty Treat
- Quick & Easy. Ready in just 10 minutes with pantry staples.
- No Baking Needed: Satisfy your brownie cravings without turning on the oven.
- Customizable. Add mix-ins like chocolate chips, nuts, or caramel for endless variations.
- Safe to Eat. Made with heat-treated flour and no raw eggs for worry-free enjoyment.
- Perfect for Sharing. Serve it as a dip, use it as a dessert topping, or eat it straight with a spoon!
This edible brownie batter is the perfect treat for movie nights, parties, or when you need a little something sweet. It’s the ultimate chocolate lover’s dream.
What Does Edible Brownie Batter Taste Like?
Imagine the rich, chocolatey goodness of brownie batter, but even more indulgent and creamy. This treat is smooth, decadent, and bursting with deep cocoa flavor.
It has the same fudgy texture and sweet satisfaction as a traditional batter but is perfectly safe to eat raw.
Can You Eat Raw Brownie Batter?
Traditional brownie batter often contains raw eggs and untreated flour, which pose food safety risks.
By using an edible brownie batter recipe, you can safely enjoy the decadent taste of raw brownie batter without worrying about foodborne illnesses. It’s a perfect snack or dessert for when those chocolate cravings hit!
Ingredients You’ll Need
- All-Purpose Flour - Heat-treated to eliminate any bacteria, ensuring it’s safe to eat raw.
- Cocoa Powder - Unsweetened cocoa adds the deep, chocolatey flavor we all love.
- Butter - Melted butter gives the batter its creamy, fudgy consistency.
- Brown Sugar - Adds sweetness and a touch of molasses for richness.
- Granulated Sugar - Balances the sweetness and creates a smooth texture.
- Milk - Use whole milk or any milk alternative for a creamy consistency.
- Vanilla Extract - Enhances the chocolate flavor. Salt: A pinch of salt balances the sweetness.
- Chocolate Chips (Optional) - Stir in for extra bursts of chocolatey goodness.
How To Make Edible Brownie Batter
- Heat-Treat the Flour. Spread the flour evenly on a baking sheet and bake at 350°F for 5 minutes. Let it cool completely before using to eliminate any potential bacteria.
- Mix the Wet Ingredients. In a medium bowl, whisk together melted butter, brown sugar, granulated sugar, milk, and vanilla extract until smooth and creamy.
- Add the Dry Ingredients. Sift the heat-treated flour, cocoa powder, and salt into the wet mixture. Stir until fully combined. The batter should be smooth and thick.
- Customize. Fold in chocolate chips, nuts, or any mix-ins of your choice for added texture and flavor.
- Serve & Enjoy. Scoop the edible brownie batter into a serving bowl, garnish with extra chocolate chips or a sprinkle of cocoa powder, and dig in with a spoon!

Tips And Tricks
Edible brownie batter is a deliciously indulgent treat, but getting the perfect texture and flavor takes a little know-how. Here are some essential tips and tricks to ensure your brownie batter turns out rich, smooth, and irresistible every time:
- Heat-Treat the Flour . This step is crucial for safety. Baking the flour kills any bacteria that could be present.
- Adjust Consistency . If the batter is too thick, add a splash of milk. For a firmer texture, chill it in the fridge for 10 minutes.
- Double the Recipe . This recipe is so good you’ll want to make extra—just double the ingredients for a larger batch.
- Use Quality Cocoa Powder . Opt for high-quality cocoa powder for the best flavor. Dutch-processed cocoa works beautifully for a richer taste.
Variations
Edible brownie batter is already a decadent treat, but with a few tweaks and add-ins, you can create exciting new flavors and textures to suit any craving. Here are some creative variations to try:
- Peanut Butter Swirl - Add a swirl of creamy peanut butter for a nutty twist.
- Mint Chocolate - Mix in crushed peppermint candies or a splash of mint extract.
- S’mores Batter - Add mini marshmallows, graham cracker crumbs, and chocolate chunks.
- Salted Caramel - Drizzle salted caramel sauce over the top for an indulgent treat.
- Cookie Dough Combo - Stir in chunks of edible cookie dough for a double-dose of decadence.
What To Enjoy With Edible Brownie Batter
Edible brownie batter is a versatile treat that pairs wonderfully with a variety of sides and dippers. Here are some ideas to elevate your dessert game:
- Fresh Fruit - Strawberries, bananas, or apple slices pair beautifully with the rich chocolate flavor.
- Cookies - Use shortbread or graham crackers for scooping.
- Ice Cream - Dollop it on top of vanilla ice cream for a decadent sundae.
- Whipped Cream - A light and fluffy topping adds the perfect finishing touch.
How Long Does It Last?
Store any leftovers in an airtight container in the refrigerator for up to 5 days. The batter will firm up when chilled but can be brought back to its creamy consistency by letting it sit at room temperature for a few minutes.
Can You Freeze It?
Yes! Freeze the batter in a freezer-safe container for up to 3 months. Thaw it in the refrigerator overnight and stir before serving.
More Of Our Best Brownie Recipes
- Strawberry Brownies
- Keto Brownies
- Brownie In A Mug
- Air Fryer Brownies
- Zucchini Brownies


Edible Brownie Batter Recipe | Quick And Easy Dessert
Ingredients
- ▢ 1 cup All Purpose Flour
- ▢ 1/2 cup Unsweetened Cocoa Powder
- ▢ 1/2 cup Unsalted Butter , melted
- ▢ 1/2 cup Brown Sugar
- ▢ 1/4 cup Granulated Sugar
- ▢ 1/4 cup Milk
- ▢ 1 tsp Vanilla Extract
- ▢ 1/4 tsp Kosher Salt
- ▢ 1/2 cup Chocolate Chips , optional
Instructions
- Heat-Treat the Flour. Spread the flour evenly on a baking sheet and bake at 350°F for 5 minutes. Let it cool completely before using to eliminate any potential bacteria.
- Mix the Wet Ingredients. In a medium bowl, whisk together melted butter, brown sugar, granulated sugar, milk, and vanilla extract until smooth and creamy.
- Add the Dry Ingredients. Sift the heat-treated flour, cocoa powder, and salt into the wet mixture. Stir until fully combined. The batter should be smooth and thick.
- Customize. Fold in chocolate chips, nuts, or any mix-ins of your choice for added texture and flavor.
- Serve & Enjoy. Scoop the edible brownie batter into a serving bowl, garnish with extra chocolate chips or a sprinkle of cocoa powder, and dig in with a spoon!
Get support & connect with our community on Facebook!

If you already signed up, you should have received an email with a password to give you unlimited access to our FREE Printable Library. The password is case sensitive. Enter it below and get printing!
Password:

Edible Brownie Batter Recipe | Quick And Easy Dessert
Ingredients
- 1 cup All Purpose Flour
- 1/2 cup Unsweetened Cocoa Powder
- 1/2 cup Unsalted Butter melted
- 1/2 cup Brown Sugar
- 1/4 cup Granulated Sugar
- 1/4 cup Milk
- 1 tsp Vanilla Extract
- 1/4 tsp Kosher Salt
- 1/2 cup Chocolate Chips optional
Instructions
- Heat-Treat the Flour. Spread the flour evenly on a baking sheet and bake at 350°F for 5 minutes. Let it cool completely before using to eliminate any potential bacteria.
- Mix the Wet Ingredients. In a medium bowl, whisk together melted butter, brown sugar, granulated sugar, milk, and vanilla extract until smooth and creamy.
- Add the Dry Ingredients. Sift the heat-treated flour, cocoa powder, and salt into the wet mixture. Stir until fully combined. The batter should be smooth and thick.
- Customize. Fold in chocolate chips, nuts, or any mix-ins of your choice for added texture and flavor.
- Serve & Enjoy. Scoop the edible brownie batter into a serving bowl, garnish with extra chocolate chips or a sprinkle of cocoa powder, and dig in with a spoon!
Edible Brownie Batter Recipe | Quick And Easy Dessert https://twosleevers.com/edible-brownie-batter-recipe/

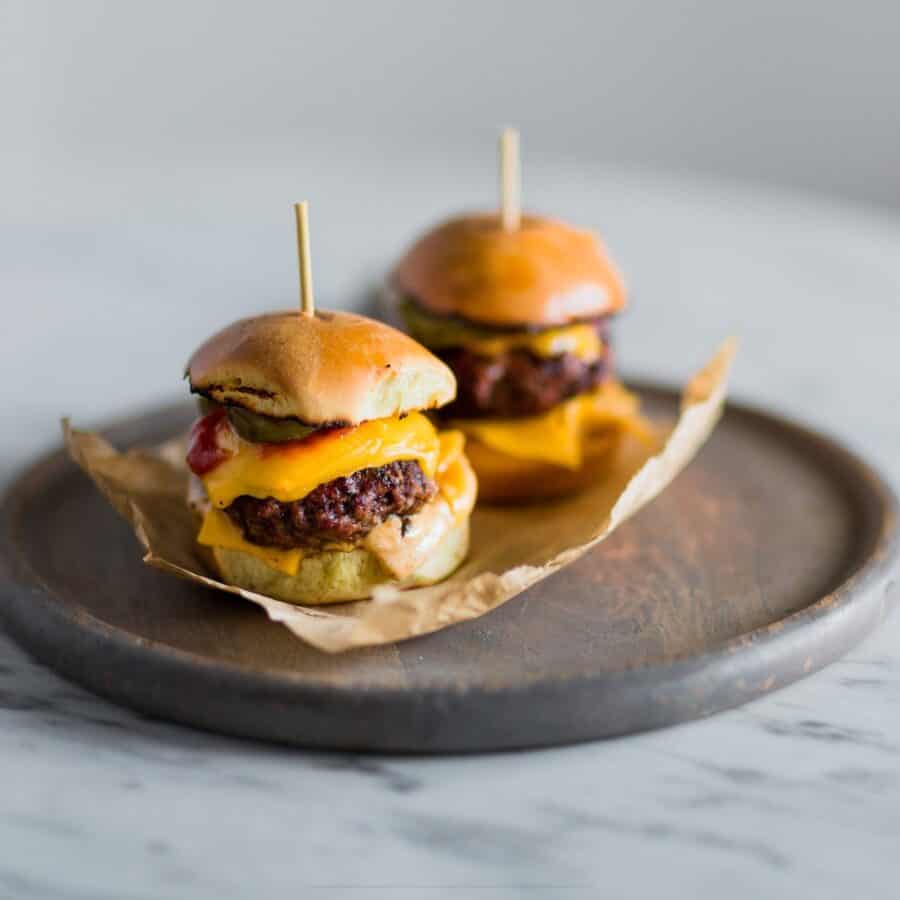
If you’re a fan of classic cheeseburgers but want something a bit more bite-sized and perfect for sharing, you’re going to love these Cheeseburger Sliders! These mini burgers are packed with flavor, easy to make, and guaranteed to be a hit at any gathering. Whether you’re hosting a backyard barbecue or simply craving a delicious snack, these sliders are sure to satisfy.

Why You’ll Love This Easy Family Meal
- Quick & Easy . Ready in under 30 minutes, these sliders are perfect for a quick weeknight meal or weekend gathering.
- Versatile . Customize your sliders with your favorite toppings and condiments for a personalized touch.
- Perfectly Sized . These mini burgers are just the right size for snacking or serving as appetizers at parties.
With their juicy beef patties, melted cheese, and soft slider buns, these Cheeseburger Sliders are a mouthwatering treat that will leave everyone coming back for more.
What Makes A Burger A Slider?
A slider is a type of small, bite-sized burger typically served on a mini hamburger bun. What distinguishes a slider from a regular-sized burger is its smaller size and typically simpler toppings. Here are some key characteristics that make a burger a slider:
- Size - Sliders are much smaller in size compared to traditional burgers. They are typically around 2 to 3 inches in diameter, making them easy to eat in just a few bites.
- Bun - Sliders are served on small Hawaiian rolls or mini hamburger buns. These buns are smaller and lighter than regular hamburger buns, perfectly proportioned to the size of the slider patty.
- Patty - Slider patties are smaller and thinner than those used in traditional burgers.
Ingredients You’ll Need
- Ground Beef - Opt for lean ground beef for juicy and flavorful sliders.
- Slider Buns - Use mini slider buns or Hawaiian rolls for the perfect bite-sized sandwiches.
- Cheese Slices - Choose your favorite cheese slices for melting over the beef patties. Cheddar, American, or Swiss are all great options.
- Onion - Thinly slice a fresh onion for adding crunch and flavor to your sliders.
- Pickles - Top each slider with a slice of tangy pickle for a burst of flavor.
- Ketchup & Mustard - Classic condiments that add sweetness and tanginess to the sliders.
- Salt & Pepper - Season the beef patties with salt and pepper for a perfect balance of flavors.
How To Make Cheeseburger Sliders
- Preheat the Oven. Preheat your oven to 350°F. Lightly grease a 9x13-inch baking dish and set aside.
- Combine the Meat Mixture. In a large mixing bowl, combine the ground beef, onion, and garlic mixture, Worcestershire sauce, salt, and pepper. Mix until well combined.
- Make the Patties. Press the seasoned ground beef mixture into small cookie-sized patties.
- Cook the Cheeseburger Meat. Bake in the preheated oven for 15-20 minutes, or until the beef is cooked through and no longer pink.
- Add Cheese. While the beef is still hot, place the halved slices of cheddar cheese evenly over the top. Return the baking dish to the oven for an additional 2-3 minutes, or until the cheese is melted and bubbly.
- Portion the Cheeseburger Slider Patties. Remove from the oven and let cool slightly.
- Assemble the Sliders. Assemble the sliders by placing each slider patty on the bottom half of a slider bun. Top with your favorite burger toppings, such as lettuce, tomato, and pickles, then cover with the top half of the bun.
- Serve and Enjoy! Serve immediately and enjoy the cheesy goodness of these delectable Cheeseburger Sliders!
Tips And Tricks
Making cheeseburger sliders is a fun and delicious way to enjoy bite-sized burgers packed with flavor. Here are some tips and tricks to help you make them perfect every time:
- Choose the Right Meat . Use ground beef with a higher fat content, such as 80/20 (80% lean meat and 20% fat). The fat adds moisture and flavor to the sliders as they cook, resulting in juicier burgers.
- Season the Meat . Season the ground beef generously with salt and pepper before forming it into patties. You can also add other seasonings like garlic powder, onion powder, or Worcestershire sauce for extra flavor.
- Make Ahead . If you’re hosting a party or gathering, you can prepare the patties in advance and refrigerate them until ready to cook. This allows you to spend more time with your guests and ensures that the sliders are fresh and hot when served.
Variations
There are countless variations you can try when making cheeseburger sliders to suit your taste preferences or to add some creative flair to your meal. Here are some ideas for delicious variations:
- Bacon Cheeseburger Sliders - Add crispy bacon strips to your sliders for extra flavor and texture. You can either cook the bacon separately and place it on top of the patties or mix chopped bacon into the ground beef before forming the patties.
- Mushroom Swiss Sliders - Top each slider patty with sautéed mushrooms and Swiss cheese for a gourmet twist on the classic cheeseburger. You can also add a dollop of Dijon mustard for extra flavor.
- BBQ Bacon Cheddar Sliders - Brush barbecue sauce onto the slider patties during the last minute of cooking and top with crispy bacon strips and cheddar cheese. Serve with extra barbecue sauce for dipping.
What Goes Good With Cheeseburger Sliders?
Cheeseburger sliders are a versatile and satisfying dish that pairs well with a variety of sides and accompaniments. Here are some delicious options to consider serving alongside them:
- Sweet Potato Fries - Crispy fries are a classic pairing with cheeseburgers and sliders. Serve them alongside your sliders for a comforting and indulgent meal.
- Onion Rings - Crispy, golden onion rings make a delicious side dish for cheeseburger sliders. Their crunchy texture and savory flavor complement the juicy burgers perfectly.
- Coleslaw - Creamy coleslaw adds a refreshing contrast to the rich and savory flavors of cheeseburger sliders. The crunchy cabbage and tangy dressing help balance out the meal.
- Potato Salad - Creamy potato salad is a classic barbecue side dish that pairs well with cheeseburger sliders. Its creamy texture and savory flavor make it a satisfying accompaniment.
How Long Do They Last?
Cheeseburger Sliders are best enjoyed fresh but can be stored in the refrigerator for up to 2 days. Reheat them in the oven or microwave until warmed through before serving.
Can You Freeze Them?
To freeze, wrap the assembled sliders tightly in plastic wrap or aluminum foil and place them in an airtight container. They can be stored in the freezer for up to 1 month.
Thaw them in the refrigerator overnight before reheating.
More Family-Friendly Recipes
- Pizza Pinwheels
- Slow Cooker Beef Stroganoff
- Cheesy Potatoes
- Keto Chicken Tenders
- Big Mac Salad


Cheeseburger Sliders Recipe | Hawaiian Roll Burger Sliders
Ingredients
- ▢ 2 pounds Ground Beef
- ▢ 12 Slider Buns
- ▢ 12 slices American Cheese
- ▢ 1 Onion , diced
- ▢ 12 Pickle Slices
- ▢ Ketchup , to taste
- ▢ Mustard , to taste
- ▢ 1/2 tsp Kosher Salt
- ▢ 1/4 tsp Ground Black Pepper
Instructions
- Preheat the Oven. Preheat your oven to 350°F. Lightly grease a 9x13-inch baking dish and set aside.
- Combine the Meat Mixture. In a large mixing bowl, combine the ground beef, onion, and garlic mixture, Worcestershire sauce, salt, and pepper. Mix until well combined.
- Make the Patties. Press the seasoned ground beef mixture into small cookie-sized patties.
- Cook the Cheeseburger Meat. Bake in the preheated oven for 15-20 minutes, or until the beef is cooked through and no longer pink.
- Add Cheese. While the beef is still hot, place the halved slices of cheddar cheese evenly over the top. Return the baking dish to the oven for an additional 2-3 minutes, or until the cheese is melted and bubbly.
- Portion the Cheeseburger Slider Patties. Remove from the oven and let cool slightly.
- Assemble the Sliders. Assemble the sliders by placing each slider patty on the bottom half of a slider bun. Top with your favorite burger toppings, such as lettuce, tomato, and pickles, then cover with the top half of the bun.
- Serve and Enjoy! Serve immediately and enjoy the cheesy goodness of these delectable Cheeseburger Sliders!
