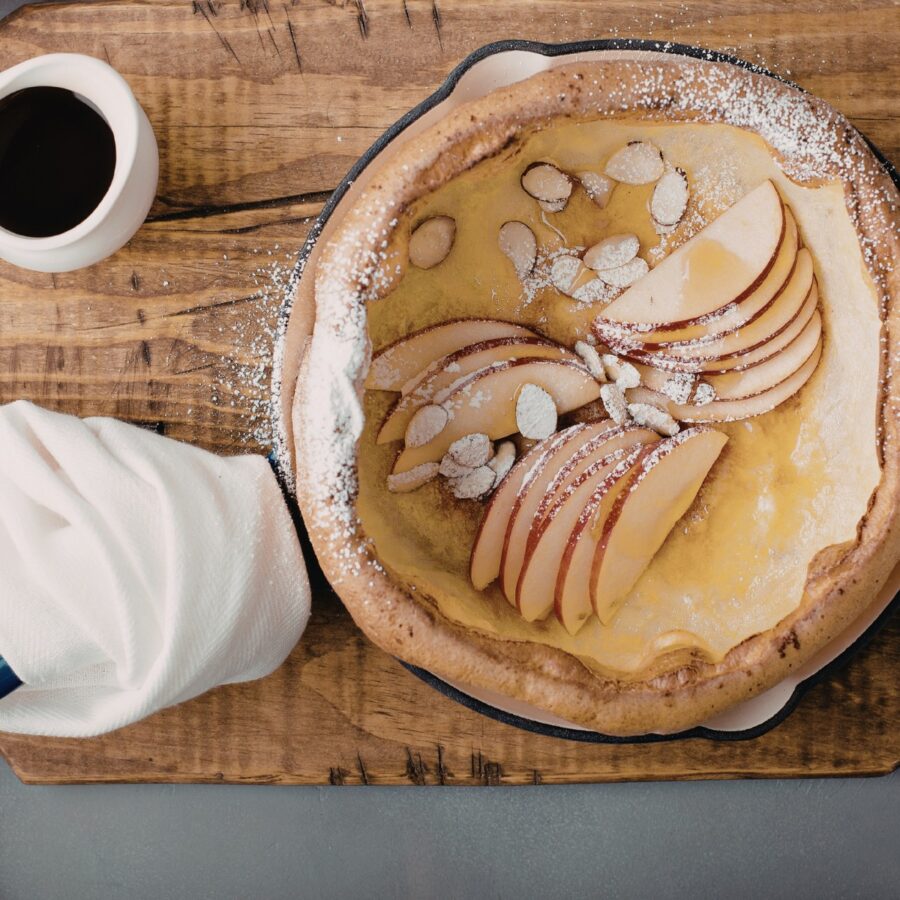
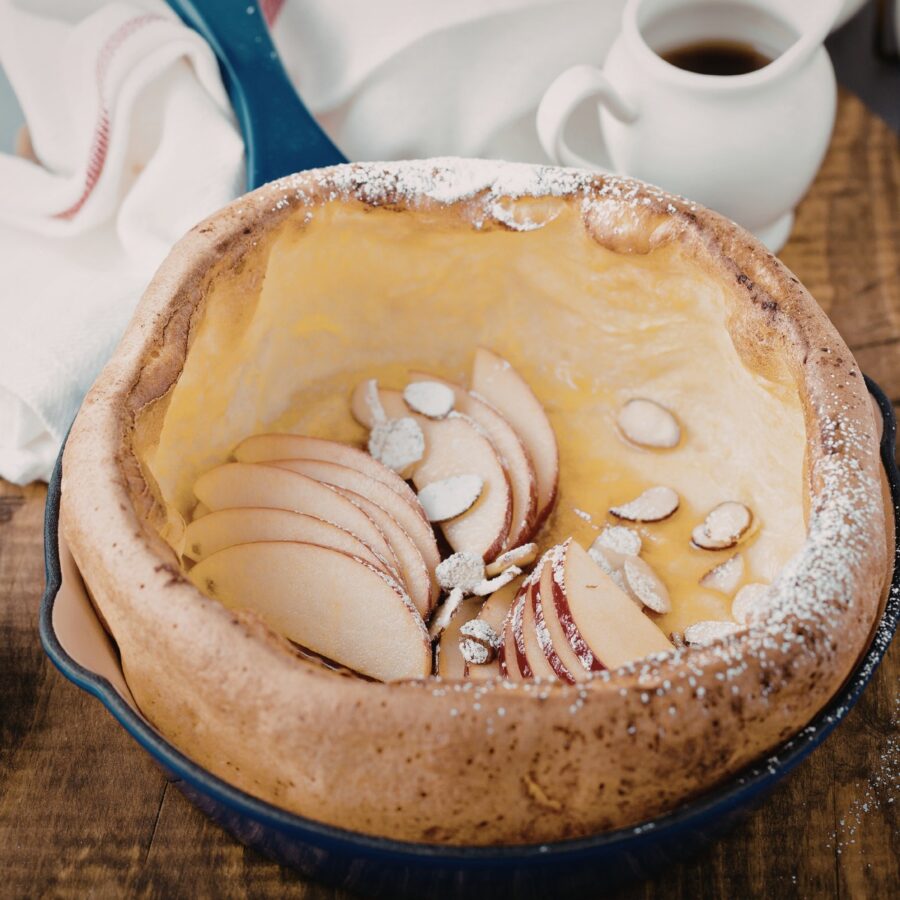
If you’ve never had a Dutch Baby before, you’re in for a treat. This puffy, golden oven pancake is the kind of thing that looks fancy but takes less effort than flipping traditional pancakes. Just blend, bake, and watch the magic happen.
Why You’ll Love This Tasty Breakfast
- No flipping required . Just blend, pour, and bake for a hands-off pancake experience.
- Pantry-friendly ingredients . You likely already have everything you need on hand.
- Ready in under 30 minutes . Fast enough for weekdays, impressive enough for brunch.
- Customizable . Go sweet or savory with endless topping and mix-in options.
- Light and airy texture . Crisp, golden edges with a custardy center that’s pure comfort.
Whether you’re feeding a crowd or just want something special on a lazy Sunday morning, this Dutch Baby recipe delivers fluffy edges, a custardy center, and endless topping possibilities. Best of all? It uses basic pantry ingredients and comes together in under 30 minutes.
What Is The Difference Between A Dutch Baby And A German Pancake?
A Dutch Baby and a German Pancake are actually the same dish, just known by different names. Both refer to a large, puffy oven-baked pancake made from a simple batter of eggs, flour, and milk, typically baked in a hot cast iron skillet.
The name “Dutch Baby” is more commonly used in the U.S., while “German Pancake” reflects its supposed roots in German-American cuisine.
Regardless of what you call it, the recipe and preparation are identical, featuring crisp, golden edges and a custardy center that’s perfect for sweet or savory toppings.
What Makes A Dutch Baby Puff Up?
A Dutch Baby puffs up in the oven thanks to the steam created from its high-moisture batter and the sudden exposure to intense heat.
When the batter hits the hot skillet and oven, the trapped moisture rapidly turns to steam, causing the pancake to rise dramatically. The eggs provide structure and elasticity, allowing the batter to expand and hold its shape as it bakes.
This combination of hot pan, steam, and protein is what gives a Dutch Baby its signature airy puff and crisp edges.
What Is A Dutch Baby Made Of?
This recipe keeps it simple. No obscure ingredients, just everyday staples that come together to create something special.
- 3 large eggs - Room temperature works best for maximum puff.
- 1/2 cup all-purpose flour - Provides structure and helps the pancake hold its shape.
- 1/2 cup whole milk - Adds richness and helps create that custard-like interior.
- 1 tablespoon granulated sugar - Just enough to balance the egginess.
- 1/2 teaspoon vanilla extract - Optional, but adds warmth and depth.
- 1/4 teaspoon salt - Balances out the sweetness.
- 2 tablespoons unsalted butter - For the hot skillet to prevent sticking and promote rise.
How To Make A Dutch Baby
- Preheat Your Oven and Skillet. Place a 10-inch cast iron skillet in the oven and preheat to 425°F. The hot pan is key to that big puff.
- Make the Batter. In a blender (or bowl with a whisk), combine the eggs, flour, milk, sugar, vanilla, and salt. Blend until smooth. This should take about 30 seconds. Let the batter rest while the oven finishes heating.
- Add Butter and Bake. Once the oven is hot, carefully remove the skillet and add the butter. Swirl to coat, then pour the batter directly into the hot pan. Immediately return it to the oven.
- Bake and Watch It Puff. Bake for 18–20 minutes, or until the edges are golden brown and puffed up dramatically. Don’t open the oven door too early, or you’ll lose the rise!
- Serve Immediately. Dutch Babies deflate quickly after baking. This is totally normal. Serve right away with your favorite toppings.
Tips And Tricks
Making a Dutch Baby is simple, but a few smart techniques can help you get that perfect puff and golden finish every time. Here are some tried-and-true tips to make your Dutch Baby a success:
- Use room temperature ingredients . Cold eggs and milk can cause a flat pancake. Let them sit out for 15–20 minutes before mixing.
- Preheat the skillet in the oven . A hot pan is essential for getting that dramatic rise and crispy edges.
- Blend the batter well . Use a blender or whisk until the mixture is completely smooth. This adds air and helps it puff up.
- Rest the batter for 10–15 minutes . It allows the flour to hydrate, which improves texture.
- Don’t open the oven door early . Let it bake undisturbed, or you’ll risk deflating the puff.
Variations
Dutch Babies are wonderfully adaptable, so once you’ve mastered the classic version, try these creative variations to keep things interesting:
- Savory Herb & Cheese - Add chopped fresh herbs (like chives or thyme) and a handful of shredded Gruyère or cheddar to the batter.
- Apple Cinnamon - Layer thinly sliced apples in the skillet before pouring in the batter and sprinkle with cinnamon and a touch of brown sugar.
- Berry Almond - Add fresh or frozen berries to the batter and top with sliced almonds before baking.
- Lemon Poppy Seed - Stir in lemon zest and poppy seeds for a bright, citrusy twist.
- Pumpkin Spice - Mix in a tablespoon of pumpkin purée and a dash of pumpkin pie spice for a cozy seasonal flavor.
- Chocolate Dutch Baby - Add 1 tablespoon of cocoa powder and a handful of chocolate chips for a dessert-worthy version.
What To Serve With A Dutch Baby
A Dutch Baby is a beautifully versatile dish that pairs well with both sweet and savory sides. Here are some delicious ideas to enjoy alongside or on top of your Dutch Baby:
- Fresh berries - Strawberries, blueberries, or raspberries add a burst of color and natural sweetness.
- Powdered sugar and lemon juice - A classic combo that adds brightness and balance.
- Maple syrup or honey - Drizzle over the top for extra indulgence.
- Sautéed apples with cinnamon - Warm, spiced fruit adds cozy fall flavor.
- Whipped cream or Greek yogurt - For a creamy, tangy contrast to the warm pancake.
- Crispy bacon or breakfast sausage - For a salty bite that complements the custardy texture.
- Toasted nuts or granola - Adds crunch and a nutty flavor to balance the softness.
How Long Does It Last?
Dutch Babies are best enjoyed fresh, but leftovers can be stored in the fridge for up to 2 days. Reheat in a toaster oven or 350°F oven for 5–7 minutes until warmed through.
The texture won’t be quite as airy, but it’s still delicious.
Can You Freeze It?
Yes, you can freeze a Dutch Baby, although the texture won’t be exactly the same as when it’s freshly baked.
To freeze, allow the Dutch Baby to cool completely, then wrap it tightly in plastic wrap, followed by foil, or place it in an airtight freezer-safe container. Make sure you freeze it without any additional toppings.
It can be frozen for up to 2 months. When ready to eat, reheat it in a 350°F oven for about 10–15 minutes, or until warmed through.
More Breakfast Recipes
- Breakfast Quiche
- Keto Pancakes
- Buttermilk Waffles
- Ham And Cheese Frittata
- Strata Recipe

If you love recipes that look impressive but require almost no effort, this Dutch Baby Pancake is about to become your new favorite. With just a blender, a hot skillet, and a handful of ingredients, you get a show-stopping breakfast or brunch that’s equal parts comfort food and breakfast magic.

Dutch Baby Recipe | Easy Dutch Baby Pancake
Ingredients
- ▢ 3 Eggs
- ▢ 1/2 cup All Purpose Flour
- ▢ 1/2 cup Whole Milk
- ▢ 1 tbsp Granulated Sugar
- ▢ 1/2 tsp Vanilla Extract
- ▢ 1/4 tsp Kosher Salt
- ▢ 2 tbsp Unsalted Butter
Instructions
- Preheat Your Oven and Skillet. Place a 10-inch cast iron skillet in the oven and preheat to 425°F. The hot pan is key to that big puff.
- Make the Batter. In a blender (or bowl with a whisk), combine the eggs, flour, milk, sugar, vanilla, and salt. Blend until smooth. This should take about 30 seconds. Let the batter rest while the oven finishes heating.
- Add Butter and Bake. Once the oven is hot, carefully remove the skillet and add the butter. Swirl to coat, then pour the batter directly into the hot pan. Immediately return it to the oven.
- Bake and Watch It Puff. Bake for 18–20 minutes, or until the edges are golden brown and puffed up dramatically. Don’t open the oven door too early, or you’ll lose the rise!
- Serve Immediately. Dutch Babies deflate quickly after baking. This is totally normal. Serve right away with your favorite toppings.
Get support & connect with our community on Facebook!
Nutrition

If you already signed up, you should have received an email with a password to give you unlimited access to our FREE Printable Library. The password is case sensitive. Enter it below and get printing!
Password:

Dutch Baby Recipe | Easy Dutch Baby Pancake
Ingredients
- 3 Eggs
- 1/2 cup All Purpose Flour
- 1/2 cup Whole Milk
- 1 tbsp Granulated Sugar
- 1/2 tsp Vanilla Extract
- 1/4 tsp Kosher Salt
- 2 tbsp Unsalted Butter
Instructions
- Preheat Your Oven and Skillet. Place a 10-inch cast iron skillet in the oven and preheat to 425°F. The hot pan is key to that big puff.
- Make the Batter. In a blender (or bowl with a whisk), combine the eggs, flour, milk, sugar, vanilla, and salt. Blend until smooth. This should take about 30 seconds. Let the batter rest while the oven finishes heating.
- Add Butter and Bake. Once the oven is hot, carefully remove the skillet and add the butter. Swirl to coat, then pour the batter directly into the hot pan. Immediately return it to the oven.
- Bake and Watch It Puff. Bake for 18–20 minutes, or until the edges are golden brown and puffed up dramatically. Don’t open the oven door too early, or you’ll lose the rise!
- Serve Immediately. Dutch Babies deflate quickly after baking. This is totally normal. Serve right away with your favorite toppings.
Dutch Baby Recipe | Easy Dutch Baby Pancake https://twosleevers.com/dutch-baby-recipe/

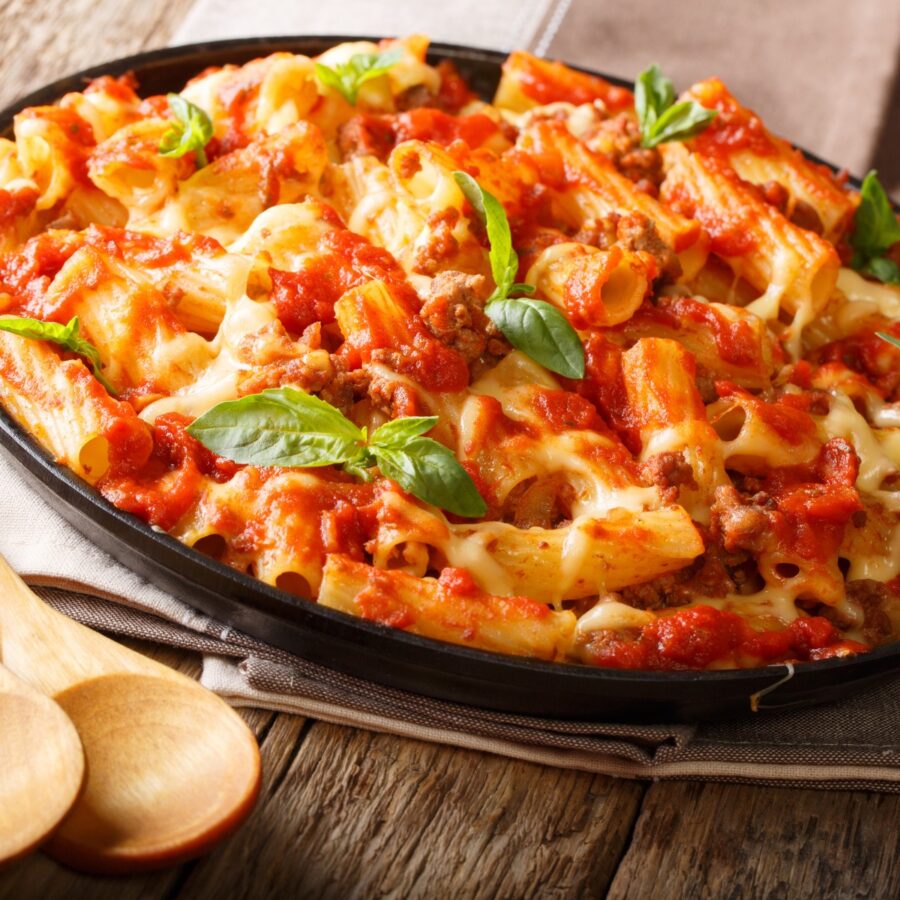
If you love classic Italian comfort food but want a faster, hands-free cooking method, this Instant Pot Baked Ziti is a game-changer. With rich tomato sauce, perfectly cooked pasta, and layers of gooey melted cheese, this one-pot recipe is the easiest way to make baked ziti without turning on the oven. It’s ready in under 30 minutes, making it perfect for busy weeknights.

Why You’ll Love This Perfect Pasta
- Quick and Easy . The Instant Pot cooks everything in one pot, eliminating extra dishes.
- Flavorful and Cheesy . A rich tomato-based sauce and layers of cheese create the perfect bite.
- No Boiling Required . The pasta cooks directly in the sauce, absorbing all the flavors.
- Customizable . Easily adjust with different meats, veggies, or spice levels.
With minimal effort, you get a delicious, hearty meal that tastes like it came straight from an Italian restaurant.
What Does Instant Pot Baked Ziti Taste Like?
Baked ziti is a classic Italian-American dish made with pasta, tomato sauce, and cheese, often baked until golden and bubbly. This Instant Pot version skips the baking step while delivering the same comforting flavors in a fraction of the time.
The Instant Pot’s pressure cooking function locks in moisture, ensuring perfectly cooked pasta every time. The result? A creamy, cheesy, and satisfying dish that feels like it took hours to make.
Ingredients You’ll Need
- Ziti or Penne Pasta - The base of the dish, these pasta shapes hold up well to pressure cooking, absorbing the sauce while maintaining a firm texture.
- Ground Beef or Sausage - Provides a hearty, savory element that enhances the richness of the sauce. Sausage adds extra seasoning and depth of flavor.
- Olive Oil - Used to sauté the meat and aromatics, developing a deeper, more complex taste in the sauce.
- Onion & Garlic - The aromatic foundation that builds flavor, adding sweetness and a savory depth to the sauce.
- Crushed Tomatoes & Tomato Sauce - Form the rich, tangy base of the dish, giving the baked ziti its signature saucy consistency.
- Italian Seasoning - A classic blend of basil, oregano, and thyme that infuses the sauce with authentic Italian flavors.
- Salt & Black Pepper - Essential seasonings that bring out the natural flavors of the dish.
- Red Pepper Flakes (Optional) - Adds a subtle heat for those who enjoy a little spice.
- Ricotta Cheese - Brings creaminess to the dish, creating a smooth and slightly tangy contrast to the rich tomato sauce.
- Mozzarella Cheese - The ultimate gooey, melty topping that makes baked ziti so irresistible.
- Parmesan Cheese - Adds a salty, nutty bite that enhances the overall flavor and provides a slightly crispy texture when melted.
- Water or Broth - Necessary for cooking the pasta under pressure, ensuring even cooking and preventing sticking or burning.
These ingredients come together effortlessly, creating a comforting, cheesy, and flavorful Instant Pot Baked Ziti that’s perfect for a quick and satisfying meal.
How To Make Instant Pot Baked Ziti
- Sauté the Meat and Aromatics . Turn the Instant Pot to “Sauté” mode and heat the olive oil. Add ground beef or sausage and cook until browned, breaking it apart with a spoon. Stir in onions and garlic , cooking until fragrant.
- Add the Sauce and Pasta . Pour in crushed tomatoes, tomato sauce, Italian seasoning, salt, black pepper, and red pepper flakes (if using). Stir well. Add the pasta and water (or broth), ensuring the pasta is fully submerged but not stirred.
- Pressure Cook . Close the lid and set the Instant Pot to “Pressure Cook” or “Manual” mode on high pressure for 4 minutes. Once the time is up, do a quick release to prevent overcooking the pasta.
- Stir and Add Cheese . Remove the lid and stir the pasta. Dollop in ricotta cheese and mix slightly for a creamy texture. Sprinkle mozzarella and Parmesan cheese over the top, then close the lid for 2-3 minutes to let the cheese melt.
- Serve and Enjoy . Garnish with fresh basil or parsley, serve warm, and enjoy your homemade Instant Pot Baked Ziti.
Tips And Tricks
Mastering Instant Pot Baked Ziti is easy with the right techniques. These tips will help ensure a perfectly cooked, flavorful, and satisfying dish every time:
- Do Not Stir the Pasta . Layering the pasta over the sauce prevents a burn warning.
- Use Broth Instead of Water . This boosts the flavor of the pasta while cooking.
- Let the Cheese Melt Naturally . No need to broil; the residual heat will do the work.
- Quick Release is Key . Overcooking leads to mushy pasta, so be sure to release pressure immediately.
- For a Thicker Sauce . Let the pasta sit for a few minutes after cooking to absorb extra liquid.
Variations
Instant Pot Baked Ziti is a versatile dish that can be customized to suit different tastes, dietary preferences, and ingredient availability. Here are some creative variations to try:
- Vegetarian- Skip the meat and add mushrooms, bell peppers, or spinach.
- Spicy- Use hot Italian sausage and extra red pepper flakes for heat.
- Creamy Alfredo- Mix in heavy cream and extra Parmesan for a rich, creamy twist.
- Protein-Packed - Add grilled chicken or even shrimp for extra protein.
What To Eat With Instant Pot Baked Ziti
Instant Pot Baked Ziti is a rich, cheesy, and comforting dish that pairs well with a variety of sides and accompaniments. Whether you’re looking for something light and refreshing or more indulgent, here are some delicious options to complete your meal:
- Garlic Bread - Perfect for scooping up the extra sauce.
- Caesar Salad - A fresh and crisp contrast to the creamy pasta.
- Steamed Broccoli - A simple, healthy side that complements the dish.
- Roasted Vegetables - Adds extra nutrition and flavor.
- Red Wine or Sparkling Water - Complements the richness of the pasta.
How Long Does It Last?
Instant Pot Baked Ziti stays fresh in the refrigerator for up to 4 days when stored in an airtight container. The flavors tend to develop over time, making leftovers even more delicious.
To reheat, simply microwave individual portions with a splash of water or broth to keep the pasta from drying out. If you’re reheating a larger batch, warm it on the stovetop over low heat, stirring occasionally.
Can You Freeze It?
For longer storage, you can freeze baked ziti for up to 3 months in a freezer-safe container.
When you’re ready to eat your leftovers, thaw them overnight in the refrigerator and reheat them in the oven or microwave until warmed through.
More Of Our Best Pasta Recipes
- Baked Feta Pasta
- Marry Me Chicken Pasta
- Chicken Penne Pasta
- Baked Mostaccioli
- Creamy Cajun Chicken Pasta


Instant Pot Baked Ziti Recipe | Easy Pour And Cook Pasta
Ingredients
- ▢ 1 tbsp Olive Oil
- ▢ 1 pound Ground Beef
- ▢ 1 Onion , diced
- ▢ 4 cloves Garlic , minced
- ▢ 1 tsp Italian Seasoning
- ▢ 1 tsp Kosher Salt
- ▢ 1/2 tsp Ground Black Pepper
- ▢ 1/4 tsp Red Pepper Flakes
- ▢ 12 ounces Ziti
- ▢ 28 ounces Crushed Tomatoes
- ▢ 15 ounces Tomato Sauce
- ▢ 2 1/2 cups Water
- ▢ 1/2 cup Ricotta Cheese
- ▢ 2 cups Mozzarella Cheese
- ▢ 1/2 cup Parmesan Cheese
- ▢ Basil , for garnish
Instructions
- Sauté the Meat and Aromatics . Turn the Instant Pot to “Sauté” mode and heat the olive oil. Add ground beef or sausage and cook until browned, breaking it apart with a spoon. Stir in onions and garlic, cooking until fragrant.
- Add the Sauce and Pasta . Pour in crushed tomatoes, tomato sauce, Italian seasoning, salt, black pepper, and red pepper flakes (if using). Stir well. Add the pasta and water (or broth), ensuring the pasta is fully submerged but not stirred.
- Pressure Cook . Close the lid and set the Instant Pot to “Pressure Cook” or “Manual” mode on high pressure for 4 minutes. Once the time is up, do a quick release to prevent overcooking the pasta.
- Stir and Add Cheese . Remove the lid and stir the pasta. Dollop in ricotta cheese and mix slightly for a creamy texture. Sprinkle mozzarella and Parmesan cheese over the top, then close the lid for 2-3 minutes to let the cheese melt.
- Serve and Enjoy . Garnish with fresh basil or parsley, serve warm, and enjoy your homemade Instant Pot Baked Ziti.
