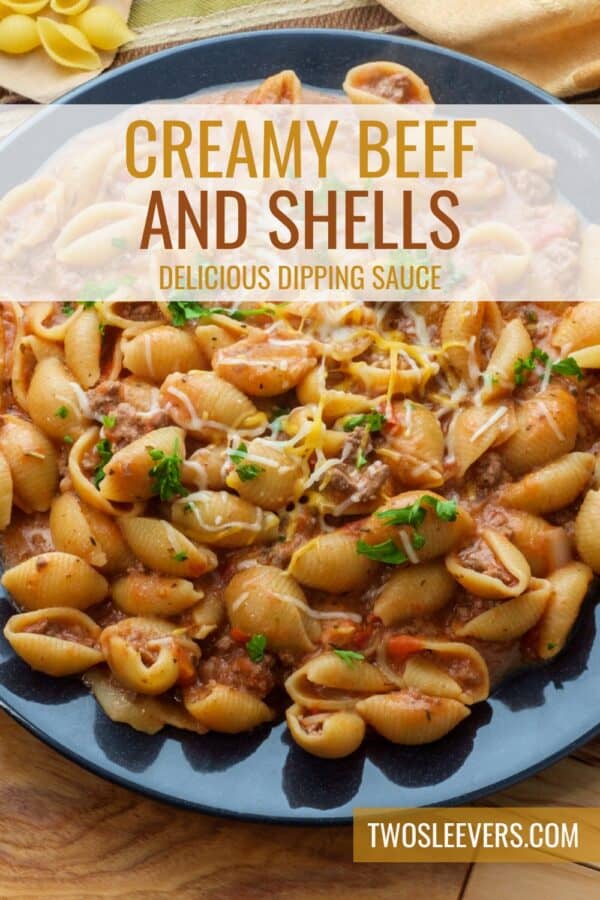
If you’re craving a comforting and hearty meal that’s both creamy and satisfying, look no further! This Instant Pot Creamy Beef and Shells recipe is the ultimate solution for busy weeknights. With tender ground beef, perfectly cooked pasta shells, and a luscious tomato cream sauce, you’ll have a delicious dinner on the table in no time.

Why You’ll Love This Perfect Pasta Dish
- Fast. Ready in under 30 minutes thanks to the Instant Pot.
- Easy. Just sauté, cook, and stir for a hassle-free dinner.
- Comforting. Robust, creamy, cheesy, and absolutely indulgent.
- Family-Friendly. A crowd-pleaser that everyone will love.
With the Instant Pot’s magic, this dish combines the richness of a creamy beef sauce with the satisfaction of pasta shells, making it a go-to meal for busy families and cozy nights in.
What Does Creamy Beef And Shells Taste Like?
Instant Pot Creamy Beef and Shells is a delightful meal that marries the savory flavors of ground beef with the creamy texture of a cheese sauce and tender pasta.
The result is a dish that is not only comforting and delicious but also quick to prepare, making it perfect for any night of the week.
Ingredients You’ll Need
- Ground Beef - Use lean ground beef to keep the dish lighter while still providing rich flavor.
- Shell Pasta - Medium shell pasta holds the creamy sauce beautifully.
- Onion and Garlic - Essential for building flavor.
- Beef Broth - Adds depth and moisture to the dish.
- Heavy Cream - Creates a rich, velvety sauce.
- Tomato Sauce - Works as the base of the sauce.
- Diced Tomatoes - Adds texture and a burst of flavor.
- Shredded Cheddar Cheese - For a cheesy, comforting finish.
- Salt and Pepper - To taste, for seasoning.
- Olive Oil - Used for sautéing the beef and vegetables.
How To Make Creamy Beef And Shells
- Sauté the Beef. Turn the Instant Pot to the sauté function and add olive oil. Once hot, add ground beef, onion, and garlic. Cook until the beef is browned and the onion is translucent, breaking up the beef as it cooks.
- Add Pasta and Broth. Stir in the shell pasta, tomato sauce, diced tomatoes, and beef broth. Ensure the pasta is submerged in the liquid. Close the lid and set the Instant Pot to manual high pressure for 4 minutes.
- Prepare the Creamy Sauce. After the cooking time is up, perform a quick release. Open the lid and stir in heavy cream until the sauce is smooth. Add shredded cheddar cheese and stir until melted and well combined.
- Season and Serve. Taste and adjust seasoning with salt and pepper if needed. Serve hot, garnished with chopped parsley or additional cheese if desired.

Tips And Tricks
Making Creamy Beef and Shells in the Instant Pot can be straightforward, but a few tips and tricks can help you achieve the best possible results:
- Flavor Boost . Browning the ground beef well before adding the other ingredients enhances the flavor of the entire dish. Be sure to break up the beef into small crumbles as it cooks, and allow it to brown rather than just steam.
- Fresh Cheese . For the creamiest sauce, use freshly grated cheddar cheese rather than pre-shredded. Pre-shredded cheese often contains anti-caking agents that can make the sauce less smooth.
- Creamy Sauce . After pressure cooking, turn off the Instant Pot before adding the cream cheese and shredded cheese. Stir them in gradually to ensure they melt smoothly into the sauce without curdling.
Variations
Here are some delicious variations to try with your Creamy Beef and Shells recipe:
- Kick It Up - Add a teaspoon of crushed red pepper flakes or a dash of hot sauce to the beef while browning for a spicy kick. You can also stir in some diced jalapeños for an extra level of heat.
- White Sauce - Omit the can of diced tomatoes and tomato sauce to make it a twist on Alfredo. You can also stir in fresh basil or oregano at the end.
- Bacon Makes It Better - Cook and crumble some bacon, then stir it into the dish after pressure cooking. The smoky, crispy bacon adds a delightful crunch and extra flavor.
What To Eat With Creamy Beef And Shells
This creamy dish pairs wonderfully with a variety of sides:
- Garlic Bread - Perfect for soaking up any extra sauce.
- Steamed Vegetables - Add a healthy, crunchy contrast.
- Salad - Fresh and light to balance the richness of the meal.
How Long Does It Last?
Leftovers can be stored in an airtight container in the refrigerator for up to 3-4 days. The pasta may absorb some of the sauce as it sits, so you might need to add a splash of milk or broth when reheating.
Can You Freeze It?
Yes, you can freeze creamy beef and shells! Place the cooled leftovers in an airtight container or resealable freezer bag. It can be frozen for up to 2-3 months.
Reheat the pasta in the microwave or on the stovetop, adding a bit of extra cream or broth to restore the sauce’s creamy texture.
More Incredible Instant Pot Recipes
- Instant Pot Butter Chicken
- Beef Barbacoa
- Instant Pot Chicken And Rice
- Caldo de Res
- Creamy Garlic Chicken
- Indian Rice Pudding

Creamy Beef And Shells Recipe | Instant Pot Beef And Pasta
Ingredients
- ▢ 1 pound Ground Beef
- ▢ 8 ounces Medium Shell Pasta
- ▢ 2 cloves Garlic , minced
- ▢ 1 Onion , finely chopped
- ▢ 1 tbsp Olive Oil
- ▢ 2 cups Beef Broth
- ▢ 1/4 cup Heavy Cream
- ▢ 1 cup Tomato Sauce
- ▢ 1/2 cup Diced Tomatoes
- ▢ 1 cup Cheddar Cheese , shredded
- ▢ 1/2 tsp Kosher Salt
- ▢ 1/4 tsp Black Pepper
Instructions
- Sauté the Beef. Turn the Instant Pot to the sauté function and add olive oil. Once hot, add ground beef, onion, and garlic. Cook until the beef is browned and the onion is translucent, breaking up the beef as it cooks.
- Add Pasta and Broth. Stir in the shell pasta, tomato sauce, diced tomatoes, and beef broth. Ensure the pasta is submerged in the liquid. Close the lid and set the Instant Pot to manual high pressure for 4 minutes.
- Prepare the Creamy Sauce. After the cooking time is up, perform a quick release. Open the lid and stir in heavy cream until the sauce is smooth. Add shredded cheddar cheese and stir until melted and well combined.
- Season and Serve. Taste and adjust seasoning with salt and pepper if needed. Serve hot, garnished with chopped parsley or additional cheese if desired.
Get support & connect with our community on Facebook!
Nutrition
Don’t forget to check out my otherBest-selling Instant Pot Cookbooks!
Indian Instant Pot , Keto Instant Pot, Instant Pot Fast and Easy , Healthy Instant Pot & Vegetarian Instant Pot .


If you already signed up, you should have received an email with a password to give you unlimited access to our FREE Printable Library. The password is case sensitive. Enter it below and get printing!
Password:

Creamy Beef And Shells Recipe | Instant Pot Beef And Pasta
Ingredients
- 1 pound Ground Beef
- 8 ounces Medium Shell Pasta
- 2 cloves Garlic minced
- 1 Onion finely chopped
- 1 tbsp Olive Oil
- 2 cups Beef Broth
- 1/4 cup Heavy Cream
- 1 cup Tomato Sauce
- 1/2 cup Diced Tomatoes
- 1 cup Cheddar Cheese shredded
- 1/2 tsp Kosher Salt
- 1/4 tsp Black Pepper
Instructions
- Sauté the Beef. Turn the Instant Pot to the sauté function and add olive oil. Once hot, add ground beef, onion, and garlic. Cook until the beef is browned and the onion is translucent, breaking up the beef as it cooks.
- Add Pasta and Broth. Stir in the shell pasta, tomato sauce, diced tomatoes, and beef broth. Ensure the pasta is submerged in the liquid. Close the lid and set the Instant Pot to manual high pressure for 4 minutes.
- Prepare the Creamy Sauce. After the cooking time is up, perform a quick release. Open the lid and stir in heavy cream until the sauce is smooth. Add shredded cheddar cheese and stir until melted and well combined.
- Season and Serve. Taste and adjust seasoning with salt and pepper if needed. Serve hot, garnished with chopped parsley or additional cheese if desired.
Creamy Beef And Shells Recipe | Instant Pot Beef And Pasta https://twosleevers.com/creamy-beef-and-shells-recipe/

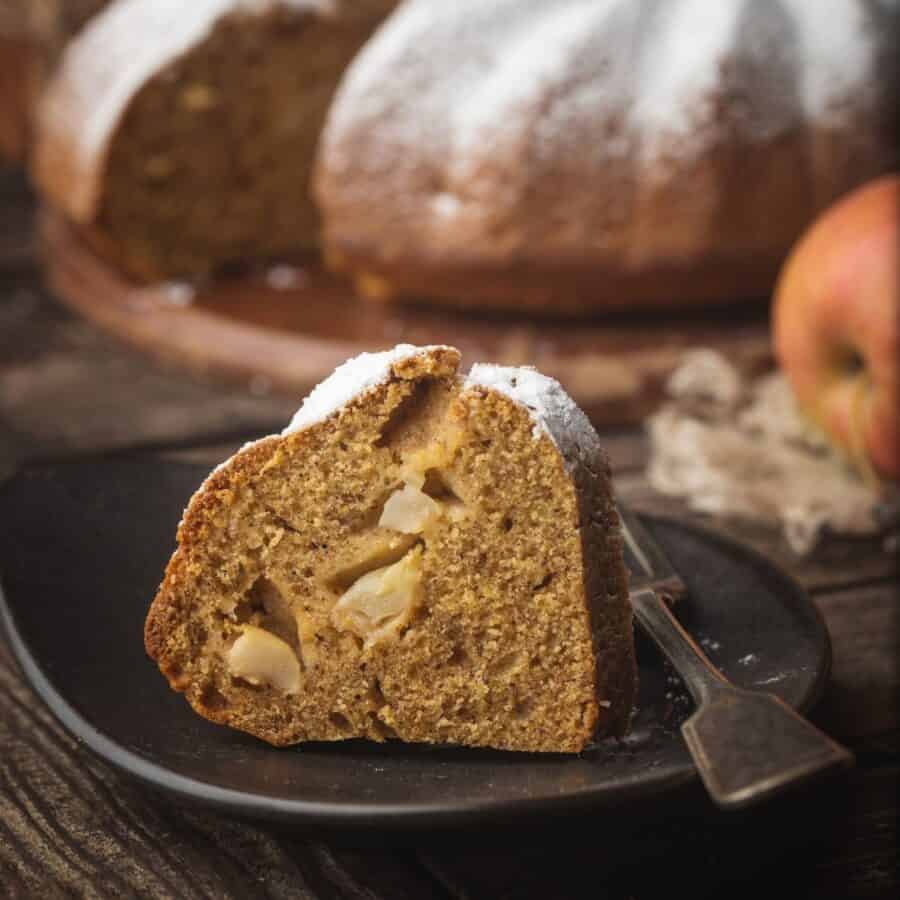
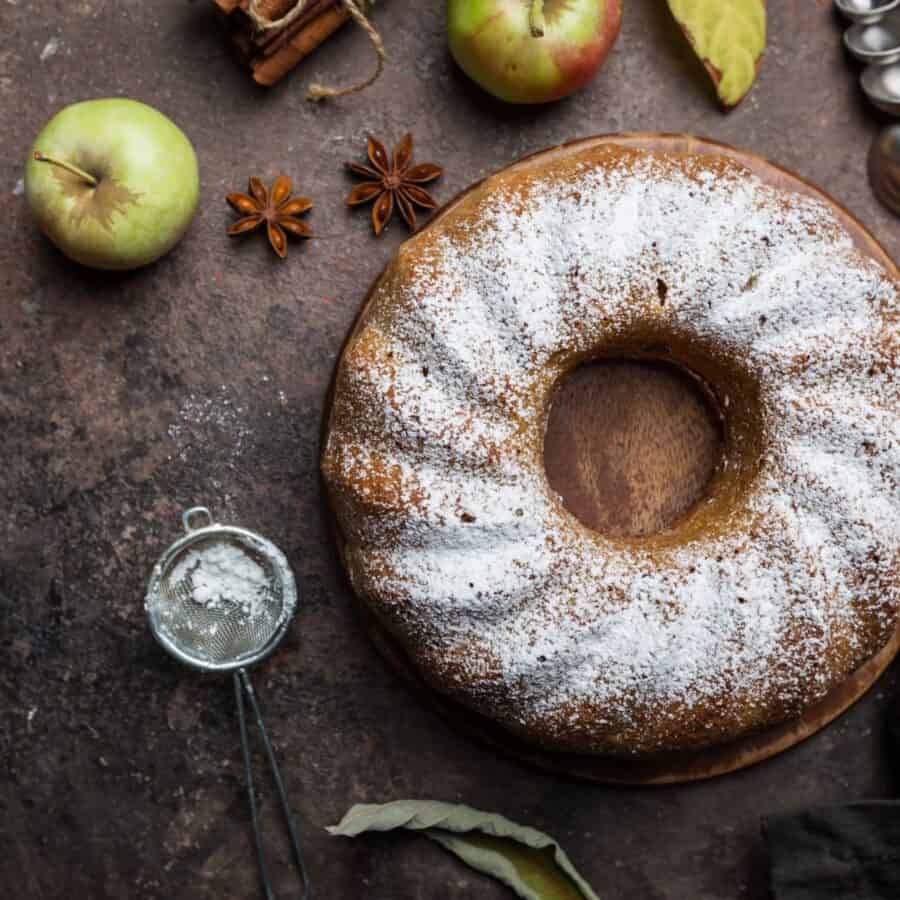
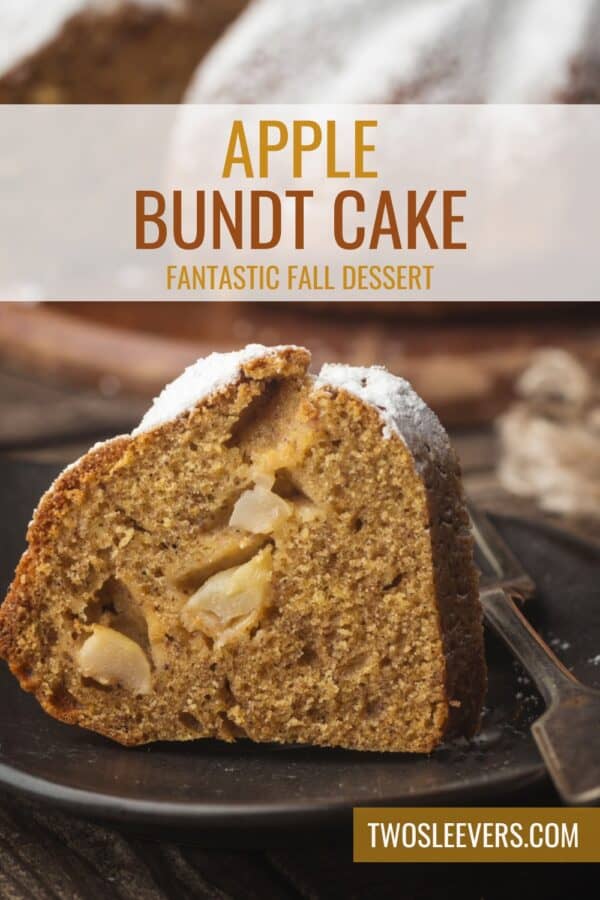
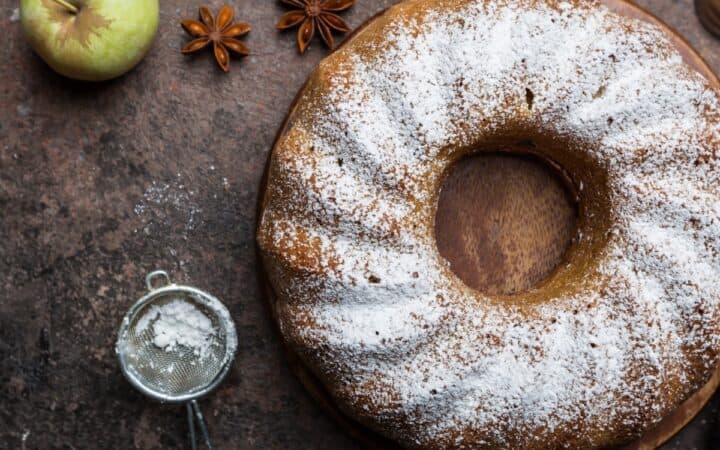
If you’re craving a warm, comforting dessert that embodies the flavors of fall, you’re in for a treat! This Apple Bundt Cake is everything you love about autumn in one deliciously moist and tender cake. With its rich cinnamon flavor, chunks of fresh apples, and a delightful glaze, this cake is perfect for any occasion—from family gatherings to cozy weekends at home.
Why You’ll Love This Amazing Apple Recipe
- Moist and Tender . Thanks to the juicy apples and sour cream, every bite of this cake is melt-in-your-mouth perfection.
- Easy to Make . Just a few simple steps and you’ll have a show-stopping dessert that looks as good as it tastes.
- Perfect for Fall . The warm spices and fresh apples make this cake a quintessential autumn treat.
- Versatile . This cake can be enjoyed as a dessert, a breakfast treat, or even a sweet afternoon snack.
With its gorgeous presentation and irresistible flavor, this Apple Bundt Cake is sure to become a favorite in your home. Whether you’re serving it to guests or enjoying it yourself, it’s a delightful way to celebrate the season.
What Does Apple Bundt Cake Taste Like?
The combination of cinnamon, apples, and a hint of nutmeg creates a warming, aromatic cake that’s perfect for cooler weather. The cake is delicious on its own, but adding a glaze or powdered sugar dusting takes it to the next level.
What Is The Difference Between Bundt Cake And Tube Cake?
The primary difference between a Bundt cake and a tube cake lies in the type of pan used for baking and the resulting cake’s shape and texture:
Bundt Cake: Denser, baked in a decorative fluted pan, often with a crispier crust.
Tube Cake: Lighter, baked in a smooth-sided pan with a central tube, often with a lighter, airy texture.
Ingredients You’ll Need
- All-Purpose Flour - Forms the base of the cake, providing structure.
- Baking Soda & Baking Powder - Helps the cake rise to a perfect fluffy texture.
- Ground Cinnamon & Nutmeg - These spices bring warmth and depth of flavor to the cake.
- Salt- Enhances the flavor of all the ingredients.
- Unsalted Butter - Adds richness and moisture to the cake.
- Granulated Sugar & Brown Sugar - Provides sweetness and a slight caramel flavor.
- Eggs - Bind the ingredients together and contribute to the cake’s texture.
- Vanilla Extract - Adds a subtle sweetness and enhances the overall flavor.
- Sour Cream - Keeps the cake incredibly moist.
- Apples - Use tart apples like Granny Smith for a nice contrast to the sweetness of the cake.
- Powdered Sugar - Adds a beautiful finish to the cake.
How To Make Apple Bundt Cake
- Mix the Dry Ingredients . In a medium bowl, whisk together the flour, baking soda, baking powder, cinnamon, nutmeg, and salt.
- Cream the Butter and Sugars . In a large mixing bowl, beat the butter, granulated sugar, and brown sugar until light and fluffy. This step is crucial for achieving a tender crumb.
- Add the Eggs and Vanilla . Mix in the eggs one at a time, followed by the vanilla extract. Ensure everything is well combined.
- Incorporate the Dry Ingredients . Gradually add the flour mixture to the wet ingredients, alternating with the sour cream. Begin and end with the flour mixture. Mix until just combined.
- Fold in the Apples . Gently fold in the diced apples, being careful not to overmix.
- Preheat Your Oven . Preheat your oven to 350°F. Grease and flour a Bundt pan to prevent sticking.
- Fill the Pan . Pour the batter into the prepared Bundt pan, spreading it evenly.
- Bake the Cake . Place the pan in the preheated oven and bake for 50-60 minutes, or until a toothpick inserted into the center comes out clean.
- Cool the Cake . Allow the cake to cool in the pan for about 15 minutes, then carefully invert it onto a wire rack to cool completely.
- Garnish the Cake . Once the cake is completely cool sprinkle powdered sugar over the top for a beautiful finish.
Tips And Tricks
Baking the perfect Apple Bundt Cake is simple with a few helpful tips. Here’s how to make sure your cake turns out perfectly every time:
- Choose the Right Apples . Use firm, tart apples like Granny Smith or Honeycrisp. These varieties hold up well during baking and balance the sweetness of the cake.
- Measure Flour Correctly . Too much flour can make your cake dense. Spoon the flour into your measuring cup and level it off with a knife.
- Avoid Overmixing . Once you add the flour, mix just until combined. Overmixing can result in a tough cake.
- Cool Completely Before Glazing . Make sure your cake is completely cool before adding the glaze to prevent it from melting off.
Variations
Want to put your own spin on this classic Apple Bundt Cake? Here are a few delicious variations to try:
- Caramel Apple- Drizzle warm caramel sauce over the cake instead of the glaze for an extra decadent treat.
- Apple Pecan- Add chopped pecans to the batter for a nutty crunch in every bite.
- Spiced- Increase the cinnamon and nutmeg, and add a pinch of cloves for a spicier version.
- Gluten-Free- Substitute the all-purpose flour with a gluten-free baking mix for a delicious gluten-free option.
What To Enjoy With Apple Bundt Cake
This Apple Bundt Cake pairs beautifully with a variety of accompaniments:
- Vanilla Ice Cream - A scoop of vanilla ice cream adds a creamy contrast to the warm spices of the cake.
- Whipped Cream - Lightly sweetened whipped cream makes a perfect topping for this moist cake.
- Hot Apple Cider - Enjoy a slice of cake with a warm mug of apple cider for the ultimate fall experience.
- Coffee or Tea - A cup of hot coffee or tea complements the flavors of the cake, making it a perfect afternoon treat.
How Long Does It Last?
This Apple Bundt Cake can be stored at room temperature in an airtight container for up to 3 days.
For longer storage, refrigerate the cake for up to a week, but let it come to room temperature before serving to enjoy the full flavor and texture.
Can You Freeze It?
Yes, you can freeze this Apple Bundt Cake to enjoy later. To freeze, wrap the cake tightly in plastic wrap, then place it in a resealable freezer-safe bag or airtight container. It will keep in the freezer for up to 3 months.
Thaw the cake in the refrigerator overnight before serving, and glaze it once thawed if desired.
More Amazing Apple Recipes
- Instant Pot Apple Butter
- Air Fryer Baked Apples
- German Apple Pancakes
- Apple Galette
- Applesauce Bread
- Apple Cinnamon Rolls
Apple Bundt Cake Recipe | Apple Cake Recipe With Glaze
Ingredients
- ▢ 2 1/2 cups All Purpose Flour
- ▢ 1 tsp Baking Soda
- ▢ 1 tsp Baking Powder
- ▢ 2 tsp Ground Cinnamon
- ▢ 1/2 tsp Ground Nutmeg
- ▢ 1/2 tsp Kosher Salt
- ▢ 1 cup Unsalted Butter , softened
- ▢ 1 cup Granulated Sugar
- ▢ 1/2 cup Brown Sugar
- ▢ 3 Eggs
- ▢ 1 tsp Vanilla Extract
- ▢ 1 cup Sour Cream
- ▢ 2 cups Apples , diced, Granny Smith or other tart apple
- ▢ Powdered Sugar , for dusting
Instructions
- Mix the Dry Ingredients. In a medium bowl, whisk together the flour, baking soda, baking powder, cinnamon, nutmeg, and salt.
- Cream the Butter and Sugars . In a large mixing bowl, beat the butter, granulated sugar, and brown sugar until light and fluffy. This step is crucial for achieving a tender crumb.
- Add the Eggs and Vanilla . Mix in the eggs one at a time, followed by the vanilla extract. Ensure everything is well combined.
- Incorporate the Dry Ingredients . Gradually add the flour mixture to the wet ingredients, alternating with the sour cream. Begin and end with the flour mixture. Mix until just combined.
- Fold in the Apples . Gently fold in the diced apples, being careful not to overmix.
- Preheat Your Oven . Preheat your oven to 350°F. Grease and flour a Bundt pan to prevent sticking.
- Fill the Pan . Pour the batter into the prepared Bundt pan, spreading it evenly.
- Bake the Cake . Place the pan in the preheated oven and bake for 50-60 minutes, or until a toothpick inserted into the center comes out clean.
- Cool the Cake . Allow the cake to cool in the pan for about 15 minutes, then carefully invert it onto a wire rack to cool completely.
- Garnish the Cake . Once the cake is completely cool sprinkle powdered sugar over the top for a beautiful finish.
