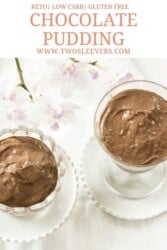

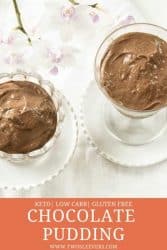

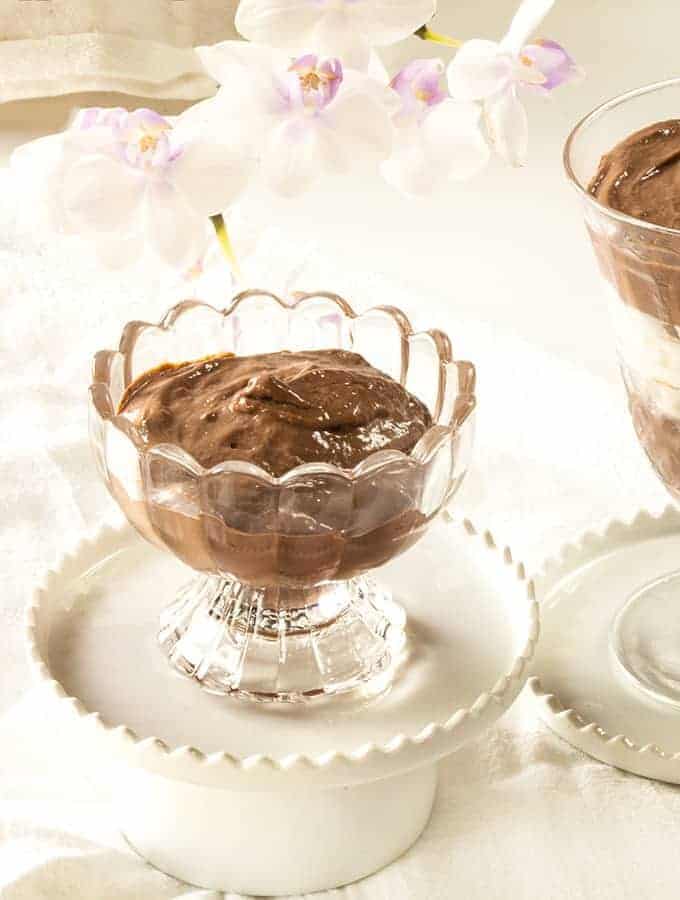
Add some chocolate to your keto diet with this delightful Chocolate Keto Pudding! It’s silky smooth, chocolatey, vegetarian , gluten free and keto - which is the perfect combination if you ask me!

What Makes This Chocolate Pudding So Great?
- Low Carb . Only 3 net carbs per serving.
- Rich. Tastes indulgently chocolatey without the guilt.
- Creamy. A smooth texture you’ll want to
- Easy. Just pour and cook , then chill for the perfect keto pudding.
- Delicious. So good you’ll have to share it with the rest of the family.
Keto comfort foods really help you stay on your eating plan, so it’s a good idea to have a few tried and true keto desserts that you can rely on.
How I Came Up With This Ketp Pudding Recipe
I admit I really struggled with how to make a good Chocolate Keto Pudding . When you consider that the main ingredient in most chocolate puddings is flour or cornstarch, you can appreciate my dilemma! It took me ENTIRELY too long to realize that really all I needed was some way to thicken the pudding. It didn’t have to be flour.
Enter the egg.
As I said, it took me way too long to figure out this simple hack. But, luckily for all of us, I did, and it worked. Now we can all now enjoy a great Keto pudding that tastes like real pudding!
What’s The Difference Between Chocolate Mousse vs. Chocolate Pudding?
While they are both smooth, creamy, and delicious, the main difference is the texture.
Keto Chocolate Mousse
Keto Mousse tends to be light and airy. It has a lot of air beaten into it, and is often made with a cooked concoction that cooks egg yolks, but then uses raw beaten egg whites. I don’t like eating raw eggs, so here is my Chocolate Mousse Recipe .
Keto Chocolate Pudding
In contrast, a pudding is usually cooked with a thickener such as flour, cornstarch, etc., and then chilled.
Puddings can also be thickened with rice, tapioca, or chia seeds. IF you’re looking for some of those, check out these recipes:
- Indian Rice Pudding
- Chia Pandan Pudding
- Cinnamon Horchata Pudding
Does Sugar Free Pudding Have Carbs?
If you buy pre-made pudding, the fake sweetener in it is usually the worst kind for you. Not to mention, it’s often overly processed which is also not something you want, in general, when eating healthy.
The boxed variety has an average of 3 net carbs per serving. Which happens to be the same as this delicious low carb pudding recipe of mine.
When looking for a good keto pudding , it’s best to make your own. It’s truly not hard to whip up an easy pudding. Plus, you can make extra to have multiple servings.
How To Make Keto Pudding
- In saucepan, combine the heavy cream, almond milk, Truvia, cocoa, egg, and xanthan gum and whisk until combined. Cook over medium-low heat, whisking frequently.
- Cook and whisk until the pudding is thick enough to coat the back of a spoon.
- Remove from heat and whisk in the vanilla extract.
- Pour into a container, cover, and refrigerate.
- Serve with whipped cream.
Tips and Tricks For Making Chocolate Sugar Free Pudding
- Use the best quality cocoa you can get for the keto pudding recipe. I use dark cocoa but you can try a lighter version if you like. I like this one HERE .
- The egg is not optional in this recipe. Without the cornflour to thicken it as you would use in a traditional cooked pudding, the egg acts as a thickener. Otherwise, you’d have only xantham gum providing the thickening and too much of that as a mucilaginous texture that is not great.
- I used Truvia but you can use Swerve or Monkfruit extract for this, and of course sugar is an option.
- The key is to cook over medium-low heat and to stir frequently so that the pudding doesn’t scorch. You also want to ensure you cook it long enough, otherwise, you will get a runny keto pudding . If the mixture coats the back of a spoon as you run a spoon through it, it’s a good sign that it is ready to be chilled.
- You should make this in advance so that you can chill the pudding. If you are doing this, place a plastic wrap on the bowl and press it down so that it covers the top of the pudding. This will prevent it from forming that dreaded “skin” on top.
- If you need this quickly, pour into four small ramekins and chill, rather than in one large dish.
- Although I have not tested this, you could try this with one additional egg and no cocoa powder, and vanilla extract added, for a keto vanilla pudding .
How Long Does It Last?
Since this recipe calls for tofu, you will want to use the storage guidelines for it, and not traditional chocolate pudding. So instead of the usual 5-7 days for pudding, you will want to enjoy this Keto Chocolate Pudding using tofu within 3-5 days of making it for the best results.
What To Serve With It
This Low Carb Chocolate Pudding is truly a treat alone, but sometimes for the most satisfying dish, you want to combine textures and flavors.
Here are some of my favorite things to serve with this Keto Pudding:
- Air Fryer Churros- if you’re not counting carbs
- Keto Ice Cream- Adds a tasty chocolate touch
- Low Carb Chocolate Chip Cookies- Use it as a tasty chooclate frosting to take your cookies up a notch!
What Can You Have For Dessert On Keto?
If you can crave it, you can almost always make it keto. I have a whole Keto Dessert Cookbook because I love making them so much.
Here are a few of my favorites.
- French Silk Pudding
- No-Cook Chocolate Pudding
- Keto Chocolate Cake
- Low Carb Chocolate Chips
- Flourless Chocolate Brownies
- Keto Truffles
- Keto Chocolate Cheesecake Brownies
- Gluten Free Chocolate Cake
- Keto Pound Cake
Let me tell you what, this Chocolate Keto Pudding has quickly become a favorite for me and many others. If you love it as much as I do make sure you share the recipe with your friends on Facebook and Pinterest so they can try it too.

Chocolate Keto Pudding
Equipment
- NON STICK SAUCEPANS
- Silicone Whisk
- PYREX MEASURING CUP SET
- OVAL MEASURING SPOONS
Ingredients
- ▢ 1 cup ( 238 g ) Heavy Cream
- ▢ 1 cup ( 250 g ) Unsweetened Almond Milk
- ▢ 1/3 cup ( 0.33 g ) Truvia
- ▢ 1/4 cup ( 21.5 g ) Unsweetened Cocoa Powder
- ▢ 1 extra large ( 1 ) Eggs
- ▢ 1 teaspoon ( 1 teaspoon ) Xanthan Gum
- ▢ 1 teaspoon ( 1 teaspoon ) Vanilla extract
Instructions
In a medium saucepan, combine the heavy cream, almond milk, Truvia, cocoa, egg, and xanthan gum and whisk well. Cook over medium-low heat, whisking frequently,. Do not let the pudding come to a rolling boil. You want to cook it gently and slowly.
Continue to heat and whisk until the pudding is thick enough to coat the back of a spoon. You may need to add a little extra xanthan gum at this point.
Remove from heat, then whisk in the vanilla extract.
Pour into a container, cover, and refrigerate for 2-4 hours.
Serve with whipped cream.
Use the best quality cocoa you can get for the recipe. I use dark cocoa but you can try a lighter version if you like. I like this one HERE .
The egg is not optional in this recipe. Without the cornflour to thicken it as you would use in a traditional cooked pudding, the egg acts as a thickener. Otherwise, you’d have only xantham gum providing the thickening and too much of that as a mucilaginous texture that is not great.
I used Truvia but you can use Swerve or Monkfruit extract for this, and of course sugar is an option.
The key is to cook over a medium-low heat and to stir frequently so that the pudding doesn’t scorch. You also want to ensure you cook it long enough, otherwise, you will get a runny pudding. If the mixture coats the back of a spoon as you run a spoon through it, it’s a good sign that it is ready to be chilled.
You should make this in advance so that you can chill the pudding. If you are doing this, place a plastic clingfilm on the bowl and press it down so that it covers the top of the pudding. This will prevent it from forming that dreaded “skin” on top.
If you need this quickly, pour into four small ramekins and chill, rather than in one large dish.
Although I have not tested this, you could try this with one additional egg and no cocoa powder, and vanilla extract added, for a keto vanilla pudding. If you do this, be sure and post in the Twosleevers Facebook group so we can all see how your dessert turned out!
Get support & connect with our community on Facebook!
Nutrition
Originally Published December 10, 2018
Don’t forget to check out my other Ketocookbooks.
Keto Instant Pot, Keto Fat Bombs, Sweets, & Treats , and Easy keto in 30 minutes.

Add some chocolate to your keto diet with this delightful Chocolate Keto Pudding! It’s silky smooth, chocolatey, vegetarian , gluten free and keto - which is the perfect combination if you ask me!
What Makes This Chocolate Pudding So Great?
- Low Carb . Only 3 net carbs per serving.
- Rich. Tastes indulgently chocolatey without the guilt.
- Creamy. A smooth texture you’ll want to
- Easy. Just pour and cook , then chill for the perfect keto pudding.
- Delicious. So good you’ll have to share it with the rest of the family.
Keto comfort foods really help you stay on your eating plan, so it’s a good idea to have a few tried and true keto desserts that you can rely on.
How I Came Up With This Ketp Pudding Recipe
I admit I really struggled with how to make a good Chocolate Keto Pudding . When you consider that the main ingredient in most chocolate puddings is flour or cornstarch, you can appreciate my dilemma! It took me ENTIRELY too long to realize that really all I needed was some way to thicken the pudding. It didn’t have to be flour.
Enter the egg.
As I said, it took me way too long to figure out this simple hack. But, luckily for all of us, I did, and it worked. Now we can all now enjoy a great Keto pudding that tastes like real pudding!
What’s The Difference Between Chocolate Mousse vs. Chocolate Pudding?
While they are both smooth, creamy, and delicious, the main difference is the texture.
Keto Chocolate Mousse
Keto Mousse tends to be light and airy. It has a lot of air beaten into it, and is often made with a cooked concoction that cooks egg yolks, but then uses raw beaten egg whites. I don’t like eating raw eggs, so here is my Chocolate Mousse Recipe .
Keto Chocolate Pudding
In contrast, a pudding is usually cooked with a thickener such as flour, cornstarch, etc., and then chilled.
Puddings can also be thickened with rice, tapioca, or chia seeds. IF you’re looking for some of those, check out these recipes:
- Indian Rice Pudding
- Chia Pandan Pudding
- Cinnamon Horchata Pudding
Does Sugar Free Pudding Have Carbs?
If you buy pre-made pudding, the fake sweetener in it is usually the worst kind for you. Not to mention, it’s often overly processed which is also not something you want, in general, when eating healthy.
The boxed variety has an average of 3 net carbs per serving. Which happens to be the same as this delicious low carb pudding recipe of mine.
When looking for a good keto pudding , it’s best to make your own. It’s truly not hard to whip up an easy pudding. Plus, you can make extra to have multiple servings.
How To Make Keto Pudding
- In saucepan, combine the heavy cream, almond milk, Truvia, cocoa, egg, and xanthan gum and whisk until combined. Cook over medium-low heat, whisking frequently.
- Cook and whisk until the pudding is thick enough to coat the back of a spoon.
- Remove from heat and whisk in the vanilla extract.
- Pour into a container, cover, and refrigerate.
- Serve with whipped cream.
Tips and Tricks For Making Chocolate Sugar Free Pudding
- Use the best quality cocoa you can get for the keto pudding recipe. I use dark cocoa but you can try a lighter version if you like. I like this one HERE .
- The egg is not optional in this recipe. Without the cornflour to thicken it as you would use in a traditional cooked pudding, the egg acts as a thickener. Otherwise, you’d have only xantham gum providing the thickening and too much of that as a mucilaginous texture that is not great.
- I used Truvia but you can use Swerve or Monkfruit extract for this, and of course sugar is an option.
- The key is to cook over medium-low heat and to stir frequently so that the pudding doesn’t scorch. You also want to ensure you cook it long enough, otherwise, you will get a runny keto pudding . If the mixture coats the back of a spoon as you run a spoon through it, it’s a good sign that it is ready to be chilled.
- You should make this in advance so that you can chill the pudding. If you are doing this, place a plastic wrap on the bowl and press it down so that it covers the top of the pudding. This will prevent it from forming that dreaded “skin” on top.
- If you need this quickly, pour into four small ramekins and chill, rather than in one large dish.
- Although I have not tested this, you could try this with one additional egg and no cocoa powder, and vanilla extract added, for a keto vanilla pudding .
How Long Does It Last?
Since this recipe calls for tofu, you will want to use the storage guidelines for it, and not traditional chocolate pudding. So instead of the usual 5-7 days for pudding, you will want to enjoy this Keto Chocolate Pudding using tofu within 3-5 days of making it for the best results.
What To Serve With It
This Low Carb Chocolate Pudding is truly a treat alone, but sometimes for the most satisfying dish, you want to combine textures and flavors.
Here are some of my favorite things to serve with this Keto Pudding:
- Air Fryer Churros- if you’re not counting carbs
- Keto Ice Cream- Adds a tasty chocolate touch
- Low Carb Chocolate Chip Cookies- Use it as a tasty chooclate frosting to take your cookies up a notch!
What Can You Have For Dessert On Keto?
If you can crave it, you can almost always make it keto. I have a whole Keto Dessert Cookbook because I love making them so much.
Here are a few of my favorites.
- French Silk Pudding
- No-Cook Chocolate Pudding
- Keto Chocolate Cake
- Low Carb Chocolate Chips
- Flourless Chocolate Brownies
- Keto Truffles
- Keto Chocolate Cheesecake Brownies
- Gluten Free Chocolate Cake
- Keto Pound Cake
Let me tell you what, this Chocolate Keto Pudding has quickly become a favorite for me and many others. If you love it as much as I do make sure you share the recipe with your friends on Facebook and Pinterest so they can try it too.
Chocolate Keto Pudding
Equipment
- NON STICK SAUCEPANS
- Silicone Whisk
- PYREX MEASURING CUP SET
- OVAL MEASURING SPOONS
Ingredients
- ▢ 1 cup ( 238 g ) Heavy Cream
- ▢ 1 cup ( 250 g ) Unsweetened Almond Milk
- ▢ 1/3 cup ( 0.33 g ) Truvia
- ▢ 1/4 cup ( 21.5 g ) Unsweetened Cocoa Powder
- ▢ 1 extra large ( 1 ) Eggs
- ▢ 1 teaspoon ( 1 teaspoon ) Xanthan Gum
- ▢ 1 teaspoon ( 1 teaspoon ) Vanilla extract
Instructions
In a medium saucepan, combine the heavy cream, almond milk, Truvia, cocoa, egg, and xanthan gum and whisk well. Cook over medium-low heat, whisking frequently,. Do not let the pudding come to a rolling boil. You want to cook it gently and slowly.
Continue to heat and whisk until the pudding is thick enough to coat the back of a spoon. You may need to add a little extra xanthan gum at this point.
Remove from heat, then whisk in the vanilla extract.
Pour into a container, cover, and refrigerate for 2-4 hours.
Serve with whipped cream.
Use the best quality cocoa you can get for the recipe. I use dark cocoa but you can try a lighter version if you like. I like this one HERE .
The egg is not optional in this recipe. Without the cornflour to thicken it as you would use in a traditional cooked pudding, the egg acts as a thickener. Otherwise, you’d have only xantham gum providing the thickening and too much of that as a mucilaginous texture that is not great.
I used Truvia but you can use Swerve or Monkfruit extract for this, and of course sugar is an option.
The key is to cook over a medium-low heat and to stir frequently so that the pudding doesn’t scorch. You also want to ensure you cook it long enough, otherwise, you will get a runny pudding. If the mixture coats the back of a spoon as you run a spoon through it, it’s a good sign that it is ready to be chilled.
You should make this in advance so that you can chill the pudding. If you are doing this, place a plastic clingfilm on the bowl and press it down so that it covers the top of the pudding. This will prevent it from forming that dreaded “skin” on top.
If you need this quickly, pour into four small ramekins and chill, rather than in one large dish.
Although I have not tested this, you could try this with one additional egg and no cocoa powder, and vanilla extract added, for a keto vanilla pudding. If you do this, be sure and post in the Twosleevers Facebook group so we can all see how your dessert turned out!
Get support & connect with our community on Facebook!
Nutrition
Originally Published December 10, 2018
Don’t forget to check out my other Ketocookbooks.
Keto Instant Pot, Keto Fat Bombs, Sweets, & Treats , and Easy keto in 30 minutes.

If you already signed up, you should have received an email with a password to give you unlimited access to our FREE Printable Library. The password is case sensitive. Enter it below and get printing!
Password:

Chocolate Keto Pudding
Ingredients
- 1 cup Heavy Cream
- 1 cup Unsweetened Almond Milk
- 1/3 cup Truvia
- 1/4 cup Unsweetened Cocoa Powder
- 1 extra large Eggs
- 1 teaspoon Xanthan Gum
- 1 teaspoon Vanilla extract
Instructions
In a medium saucepan, combine the heavy cream, almond milk, Truvia, cocoa, egg, and xanthan gum and whisk well. Cook over medium-low heat, whisking frequently,. Do not let the pudding come to a rolling boil. You want to cook it gently and slowly.
Continue to heat and whisk until the pudding is thick enough to coat the back of a spoon. You may need to add a little extra xanthan gum at this point.
Remove from heat, then whisk in the vanilla extract.
Pour into a container, cover, and refrigerate for 2-4 hours.
Serve with whipped cream.
Use the best quality cocoa you can get for the recipe. I use dark cocoa but you can try a lighter version if you like. I like this one HERE .
The egg is not optional in this recipe. Without the cornflour to thicken it as you would use in a traditional cooked pudding, the egg acts as a thickener. Otherwise, you’d have only xantham gum providing the thickening and too much of that as a mucilaginous texture that is not great.
I used Truvia but you can use Swerve or Monkfruit extract for this, and of course sugar is an option.
The key is to cook over a medium-low heat and to stir frequently so that the pudding doesn’t scorch. You also want to ensure you cook it long enough, otherwise, you will get a runny pudding. If the mixture coats the back of a spoon as you run a spoon through it, it’s a good sign that it is ready to be chilled.
You should make this in advance so that you can chill the pudding. If you are doing this, place a plastic clingfilm on the bowl and press it down so that it covers the top of the pudding. This will prevent it from forming that dreaded “skin” on top.
If you need this quickly, pour into four small ramekins and chill, rather than in one large dish.
Although I have not tested this, you could try this with one additional egg and no cocoa powder, and vanilla extract added, for a keto vanilla pudding. If you do this, be sure and post in the Twosleevers Facebook group so we can all see how your dessert turned out!
Chocolate Keto Pudding https://twosleevers.com/keto-chocolate-pudding/

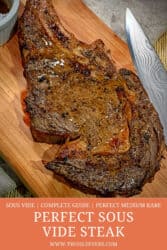

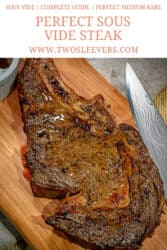
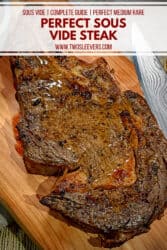
If you’re looking for the best way to cook steak, look no further than this Sous Vide Steak Recipe. You can learn how to make the perfect steak in a sous vide machine with my easy-to-follow steps.
If you’re looking to cook the perfect steak, put away that grill or skillet and reach for the sous vide machine. No, I’m completely serious! You haven’t truly experienced steak at its best until you’ve tried this delicious Sous Vide Steak Recipe .
What Is Sous Vide Steak?
Before we can talk about why you should be making this Sous Vide Steak recipe, let’s get into what exactly sous vide is . You sous vide food by placing it in a plastic pouch that is submerged in a water bath. The water bath is then heated to a very specific temperature by using a sous vide machine. The sous vide machine circulates the water and keeps it at the exact temperature you set it to.
Why Sous Vide?
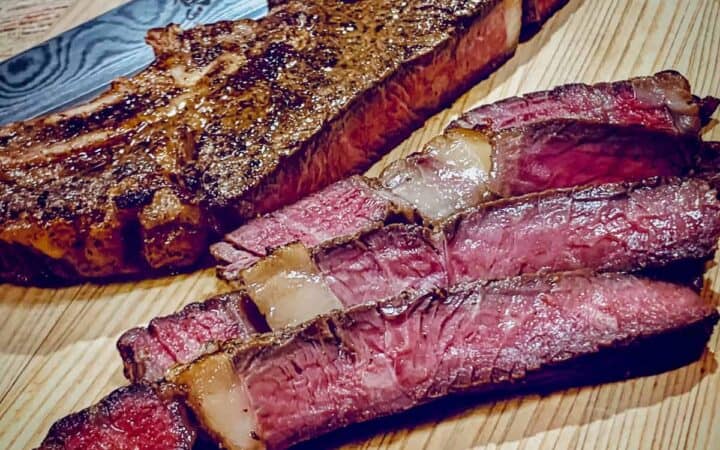
- Evenly Cooked. You’ll find the biggest advantage of sous vide is evenly cooked food. When you cook on the stovetop or grill , the outer surface of the food gets cooked hard and fast–but the center of the steak takes longer to cook. So what you end up with is a steak that’s too well done on the outside, and done just right only on the inside. In contrast, when you sous vide a steak, ALL of the steak is at the same temperature.
- No Guesswork. Sous vide takes all the guesswork out of how to cook steak to perfection. Just set your sous vide machine to the appropriate temperature and let it do all the work for you! No wondering if it’s cooked to the appropriate doneness. No having to babysit the grill , oven or stovetop to make sure you don’t overcook your steak. Just perfect steak every time.
- Cook Ahead . You can make the steak 1-2 hours in advance, and just let it hang out while YOU hang out doing something else. Just sear it when ready and it’s freshly done.
- Meal Prep . You can make this steak days ahead of time. Then, when you’re ready, just bring it back up to the temperature you started with—and it will just heat but not overcook.
- Longer-lasting . Your first cook killed all the bacteria in the meat, so it lasts longer in your fridge, but as I mentioned above, it won’t overcook or dry out when you’re ready to cook.
- Moist Food. Since you’re cooking in a contained, closed environment, any moisture that the steak releases gets saved in the bag rather than evaporating. Not only does this make for a more flavorful sauce, but it’s also less likely to dry the steak.
- Safer Cooking. Apart from the searing part, there aren’t hot surfaces and high temperatures involved. So your kids could start dinner before you get home, without you worrying about them.
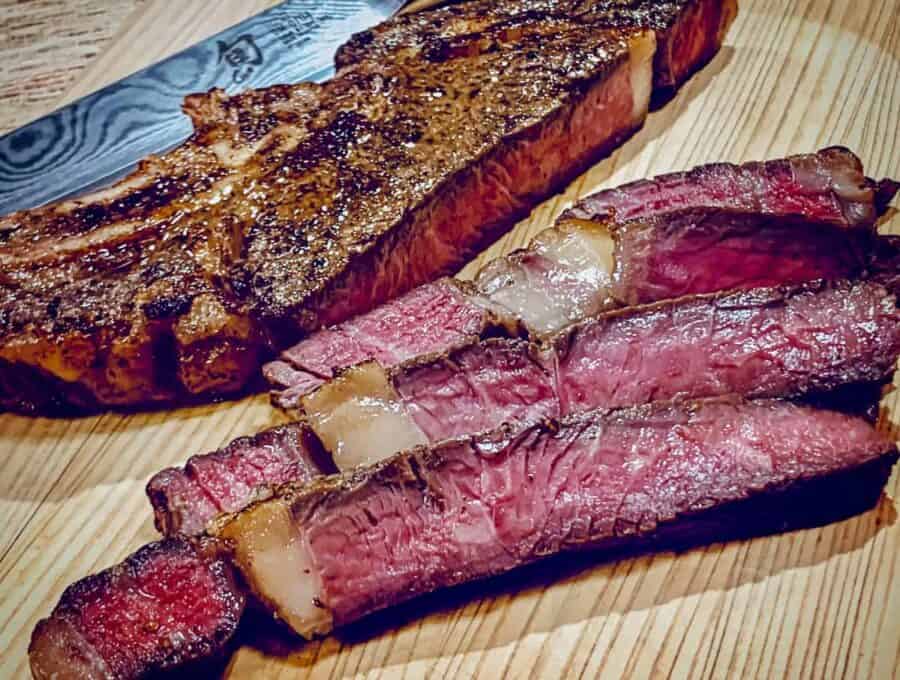
- Taste . Really guys, even if NONE of the things above I said were true? You’d sous vide steak for one reason only–it will be the BEST tasting steak you’ve ever had. That alone is reason enough to sous vide at home.
Seriously, if I haven’t convinced you yet, just one bite of this Sous Vide Steak recipe and you’re sure to become a believer.
How To Sous Vide Steak
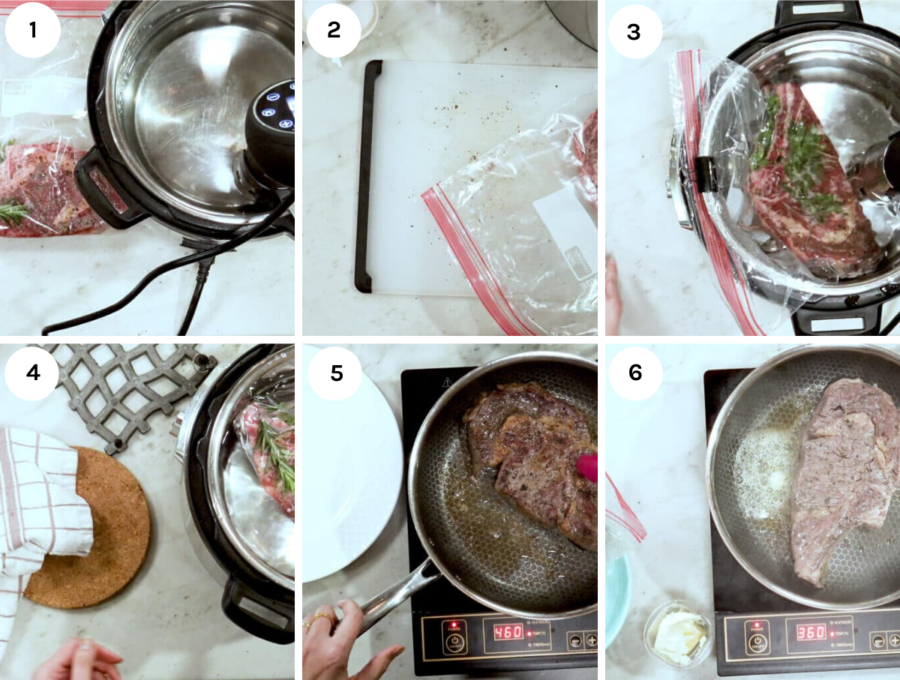
Preheat your sous-vide machine to the desired temperature (see the doneness chart below).
Generously season both sides of the steak with salt and pepper. Place the steak in a heavy-duty 1-gallon resealable plastic bag. Drizzle the olive oil over the steak. Add the bay leaf to the bag.
Press out as much of the air as possible and seal the bag. Submerge the bag in the preheated water. Clip the top of the bag to the pot with a binder clip.
Cook the steak to the desired temperature. For a 1.5 inch – 2 inch steak, allow 2 hours for the steak to cook to 133F. (Once the steak has reached the desired temperature, it can sit in the bag in the water with the machine on for up to 1 hour before finishing, if desired.)
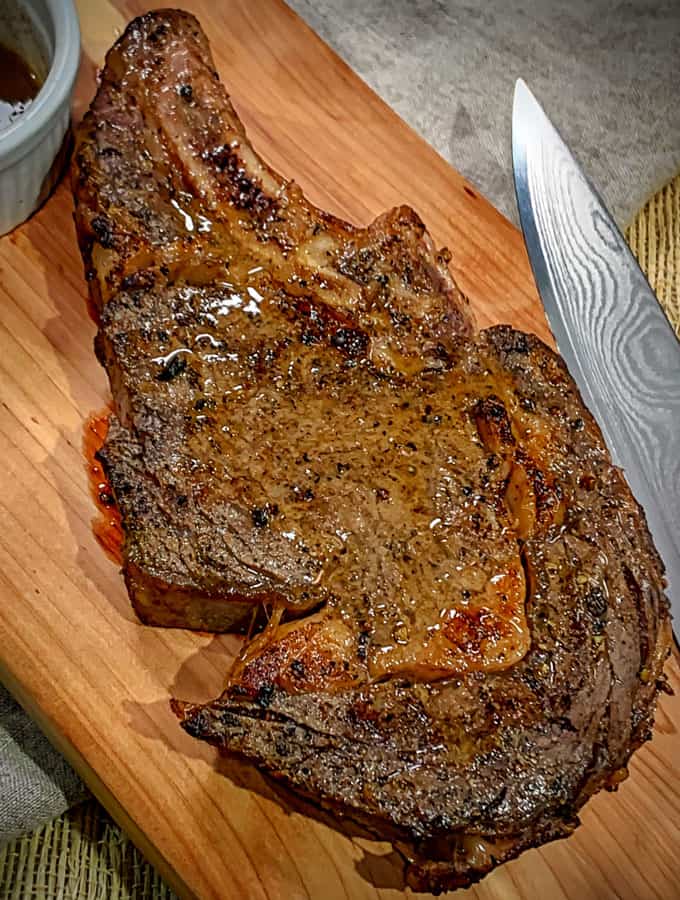
To finish the steak, heat the butter in a heavy-bottomed skillet over high heat. When the butter has stopped bubbling, add the steak from the bag, reserving the cooking juices to make the optional pan sauce).
Add the thyme, rosemary, and garlic . Swirl the steak in the pan for 1 to 2 minutes per side, until both sides have a well-browned crust.
For the Pan Sauce: Remove the steak from the pan. Add the reserved cooking juices to the pan. Bring it to a simmer. Add the butter. Whisk until the liquid reduces and thickens slightly. Remove the pan from the heat. Season to taste with salt and pepper.
Slice the steak or cut it into two pieces. Serve with the pan sauce, if desired.
How Do You Seal The Bags?
Before you do anything, watch this video for more information on how to remove the air from the bag using the water displacement method.
What Temperature Do You Cook A Steak In A Sous Vide?
The temperature you sous vide steak at is dependent on how you like your steak. Make this Sous Vide Steak recipe to your preferred doneness by using this simple beef steak doneness temperatures chart:
Sous Vide Steak Time Temp Chart
- Rare Steak : 120°F
- Medium Rare Steak : 134°F
- Medium Well Steak : 150°F
- Well Done Steak : 160°F and up
Why Is Sous Vide Best?
Now that we know what sous vide is, let’s get into why you should sous vide your steak. Traditional cooking methods cook the steak by applying heat to the steak from the surface it is on (grill grate, pan, etc) and from the air surrounding it. This issue with this is that the surface and air surrounding the steak has to be higher than the target steak’s internal temp in order to cook the steak all the way through.
This means that you have to remove the steak from the heat source early and allow it to cook from the residual heat. This makes hitting the perfect doneness almost impossible.
Since the sous vide machine only heats the water surrounding the steak to the exact temperature you set it at, the steak reaches your desired doneness without you having to remove the steak from the heat source early. This also means that the entire steak will be cooked to your desired doneness without fear of the outside or edges of the steak becoming more cooked than the middle.
What Types Of Steak Can You Sous Vide?
Honestly, any cut of steak is sous vide-able if you cook it at the proper time and temperature. These are some of my personal favorite steaks to cook with this method:
- Ribeye. Sous vide ribeye steak is my personal favorite to make because it can be a little thicker and trickier to get the perfect cook on the grill or in a skillet.
- Sous Vide Flank Steak. This cut is extremely versatile and great for a variety of recipes like flank steak fajitas or chipotle steak tacos .
- Skirt Steak. Sous vide skirt steak is also very versatile, and because of the thin cut of the meat, it can easily be overcooked. This is a great way to ensure it stays the perfect medium rare.
- Sous Vide Frozen Steak. Yes, I said frozen steak. Since the water surrounding the steak is held at a constant temperature while it cooks, it will safely and naturally defrost your steak and cook it evenly just as it would a fresh steak.
Can You Overcook Steak Sous Vide?
This is quite possibly the best part of making this Sous Vide Steak recipe : You absolutely can’t overcook your steak when you sous vide it.
The sous vide machine regulates the temperature of the water surrounding the steak to the exact temp to set it to, so no matter how long you sous vide your steak, the steak’s internal temperature will never surpass the temp you set it to. This means no overcooking and no need to pull your steak from the heat at the perfect time.
I just love food science, don’t you?
Should I Sear My Steak?
I love to sear my steaks after I sous vide them. When it comes to meat, color equals flavor. Adding a quick 45-second sear in a cast iron pan with lots of butter and herbs can add not only a little extra texture to your bite but also loads of extra tasty caramelization to the meat.
What To Serve With It
The great thing about a perfectly seasoned steak is that it’s not only a fantastic meal alone but it pairs well with nearly any other side dish you can think of!
Here are some of my favorite things to eat sous vide steak with:
- Air Fryer Carrots
- Cheesy Potatoes
- Stuffed Tomatoes
- Instant Pot Mashed Potatoes
- Keto Broccoli Salad
How Long Does It Last?
A sous vide steak lasts as long as a steak cooked any other way. It is best enjoyed immediately after it is cooked since it can be tricky to reheat a steak after it is completely cooked without overcooking it.
However, if you do have leftovers, try to eat them within 3-4 days of the initial cook for the best flavor and texture.
Looking For More Great Steak Recipes? Check These Out!
- Italian Stuffed Steak Rolls - Stuffed with green spinach, red peppers, gooey Mozzarella cheese!
- Air Fryer Chicken Fried Steak - Make a traditional Southern dinner in your air fryer !
- Flank Steak with Zhoug - Enjoy steak covered in a delicious Middle Eastern sauce.
- Flank Steak Fajitas - Super easy to make and oh-so-delicious!
- Air Fryer Philly Cheesesteak - Made easily and quickly with the help of your air fryer!
- Spicy Lamb Sirloin Steak - Get the taste of Tandoori Raan in your air fryer.
- Air Fryer Montreal Steak Burgers - The taste of a Montreal steak in a burger.
- Keto Air Fryer Steak - The best way to cook a ribeye ever!
Sous Vide Steak Recipe
Equipment
- Sous Vide Machine
- 1-Gallon Resealable Plastic Bag
Ingredients
- ▢ 12 ounces Ribeye Steak , about 1.5 inches thick
- ▢ Kosher Salt
- ▢ Ground Black Pepper
- ▢ 2 tablespoons Olive Oil , extra virgin
- ▢ 1 Dried Bay Leaf
- ▢ 1 tablespoon Butter
For The Pan Sauce
- ▢ 1 sprig Fresh Thyme
- ▢ 1 sprig Fresh Rosemary
- ▢ 1 clove Garlic , chopped
- ▢ 2 tablespoons Butter , cubed
Instructions
- Preheat your sous-vide machine to the desired temperature (see the doneness chart below).
- Generously season both sides of the steak with salt and pepper. Place the steak in a heavy-duty 1-gallon resealable plastic bag. Drizzle the olive oil over the steak. Add the bay leaf to the bag.
- Press out as much of the air as possible and seal the bag. Submerge the bag in the preheated water. Clip the top of the bag to the pot with a binder clip.
- Cook the steak to the desired temperature. For a 1.5 inch – 2 inch steak, allow 2 hours for the steak to cook to 133F. (Once the steak has reached the desired temperature, it can sit in the bag in the water with the machine on for up to 1 hour before finishing, if desired.)
- To finish the steak, heat the butter in a heavy-bottomed skillet over high heat. When the butter has stopped bubbling, add the steak from the bag, reserving the cooking juices to make the optional pan sauce).
- Add the thyme, rosemary, and garlic. Swirl the steak in the pan for 1 to 2 minutes per side, until both sides have a well-browned crust.
For The Sauce
- Remove the steak from the pan. Add the reserved cooking juices to the pan. Bring to a simmer. Add the butter. Whisk until the liquid reduces and thickens slightly. Remove the pan from the heat. Season to taste with salt and pepper.
- Slice the steak or cut it into two pieces. Serve with the pan sauce, if desired.
Watch The Video
Doneness Temperatures forBeefSteak
- Rare Steak: 120°F
- Medium Rare Steak: 134°F
- Medium Well Steak: 150°F
- Well Done Steak: 160°F and up
Get support & connect with our community on Facebook!
Nutrition
Originally Published July 16, 2019
Don’t forget to check out my other Ketocookbooks.
Keto Instant Pot, Keto Fat Bombs, Sweets, & Treats , and Easy keto in 30 minutes.
