
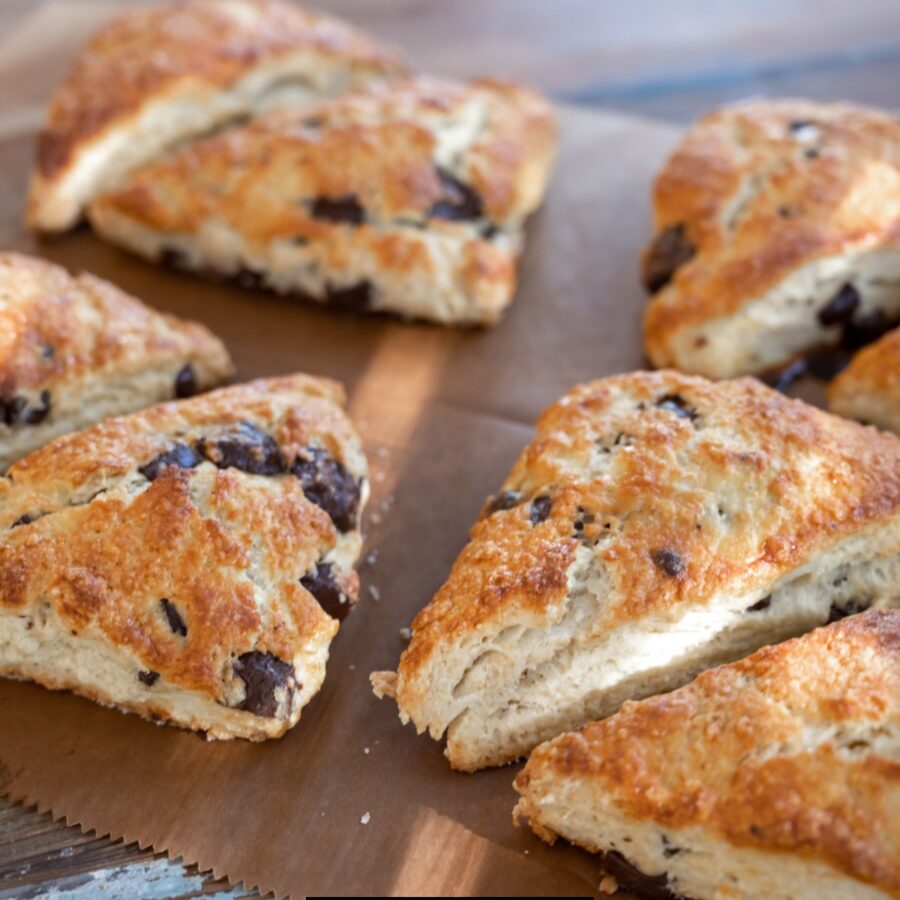
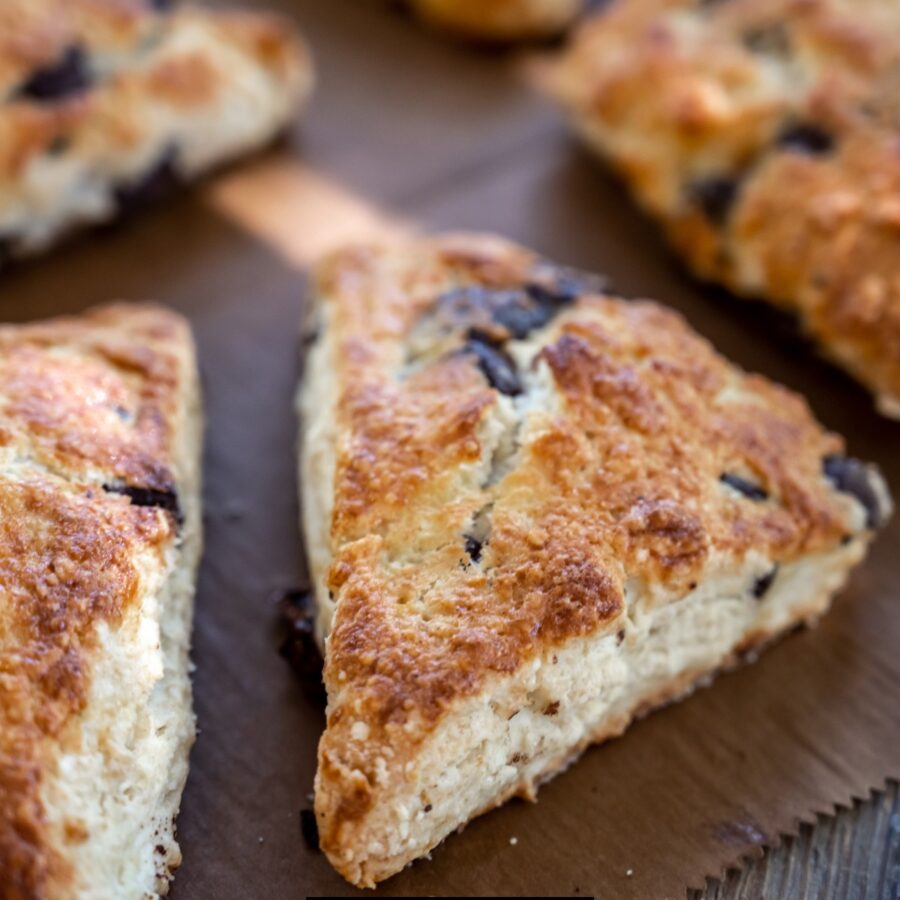
If you love buttery, flaky scones with just the right amount of chocolate, these Chocolate Chip Scones will be your new favorite treat. Perfect for breakfast, brunch, or an afternoon snack, these scones strike the perfect balance between crumbly and tender with pockets of melty chocolate in every bite. Whether you enjoy them with a cup of coffee or tea, they are guaranteed to be a hit.
Why You’ll Love This Sweet Treat
- Perfectly Tender and Flaky . The combination of cold butter and heavy cream creates a light, delicate texture.
- Easy to Make . No special tools required, just mix, shape, and bake.
- Rich Chocolate Flavor . Chocolate chips are evenly distributed for a sweet, indulgent taste.
- Customizable . Add nuts, drizzle with glaze, or use different chocolate varieties to make them your own.
- Make-Ahead Friendly . These scones can be made ahead and frozen for later.
Once you try these homemade chocolate chip scones, you will never go back to store-bought again.
What Do Chocolate Chip Scones Taste Like?
Chocolate chip scones are deliciously rich, buttery, and slightly crumbly. They are not overly sweet, making them the perfect morning pastry or afternoon treat.
The chocolate chips add just the right amount of sweetness, while the flaky, golden-brown crust provides a perfect contrast.
Ingredients You’ll Need
- All-Purpose Flour - The foundation of the scones, providing structure and stability while keeping the texture light and tender.
- Granulated Sugar - Adds just the right amount of sweetness to balance the flavors without overpowering the richness of the scones.
- Baking Powder - The leavening agent that helps the scones rise, creating a flaky, slightly airy texture instead of being dense.
- Salt - Enhances the overall flavor by balancing the sweetness and bringing out the richness of the butter and chocolate.
- Unsalted Butter – Cold butter is essential for achieving a tender, flaky texture. When the butter melts during baking, it creates small air pockets that give the scones a light and crumbly consistency.
- Heavy Cream - Adds moisture and richness, resulting in soft, tender scones with a slightly creamy texture. It also helps bind the dry ingredients together.
- Egg - Provides structure and stability, helping the scones hold their shape while adding a slight richness to the dough.
- Vanilla Extract - Enhances the warm, sweet aroma of the scones, complementing the butter and chocolate flavors.
- Chocolate Chips - The star ingredient, adding melty, rich chocolate pockets throughout the scones for a perfect balance of sweetness and indulgence.
When combined, these ingredients create buttery, tender, and chocolate-filled scones that are perfect for breakfast, brunch, or an afternoon treat.
How To Make Chocolate Chip Scones
- Mix the Dry Ingredients . In a large mixing bowl, whisk together the flour, sugar, baking powder, and salt.
- Cut in the Butter . Add the cold, cubed butter to the dry ingredients. Using a pastry cutter or your fingertips, work the butter into the flour until the mixture resembles coarse crumbs.
- Add the Wet Ingredients . In a separate bowl, whisk together the heavy cream, egg, and vanilla extract. Pour the wet ingredients into the dry ingredients and gently mix until the dough just comes together.
- Fold in the Chocolate Chips . Gently fold in the chocolate chips, being careful not to overwork the dough.
- Shape and Cut the Dough . Turn the dough onto a lightly floured surface and pat it into a 1-inch thick circle. Cut into 8 wedges and place them on a parchment-lined baking sheet.
- Chill the Dough (Optional but recommended) . For flakier scones, chill the shaped scones in the refrigerator for 15-20 minutes before baking.
- Bake to Perfection . Preheat the oven to 400°F. Brush the tops of the scones with a little extra heavy cream for a golden finish. Bake for 18-22 minutes, or until the scones are golden brown.
- Cool and Serve . Let the scones cool slightly before serving. Enjoy them warm with butter, jam, or an extra drizzle of chocolate.
Tips And Tricks
Making Chocolate Chip Scones is simple, but a few key techniques will ensure they turn out flaky, buttery, and perfectly textured every time. Follow these expert tips for bakery-quality scones at home:
- Use Cold Butter . Cold butter creates pockets of steam while baking, leading to a light and flaky texture.
- Do Not Overmix the Dough . Overmixing can make the scones dense and tough. Mix just until the dough comes together.
- Chill the Dough Before Baking . Chilling the dough for 15-20 minutes helps keep the butter cold and results in a better rise.
- Use Heavy Cream Instead of Milk . Heavy cream provides a richer, more tender scone.
- Make Them Extra Buttery . Brush the tops with heavy cream or melted butter before baking for a golden, crisp exterior.
Variations
Chocolate Chip Scones are already a delicious treat, but you can easily customize them to suit your taste. Whether you want to add extra flavors, mix up the textures, or create a healthier version, here are some creative variations to try:
- Dark Chocolate - Swap milk chocolate chips for dark chocolate for a deeper, richer flavor.
- Nutty - Add ½ cup of chopped pecans or walnuts for extra crunch.
- Coconut Chocolate Chip Scones – Stir in ¼ cup of shredded coconut for a tropical twist.
- Double Chocolate - Add ¼ cup of cocoa powder to the dry ingredients for a chocolate-infused scone.
- Glazed - Drizzle with vanilla or chocolate glaze for a bakery-style finish.
- Vegan - Use coconut oil instead of butter, almond milk instead of cream, and a flax egg substitute.
What To Enjoy With Chocolate Chip Scones
Chocolate Chip Scones are a delightful treat on their own, but pairing them with the right accompaniments can make them even more enjoyable. Whether you’re serving them for breakfast, brunch, or dessert, here are some delicious ways to enjoy them:
- Coffee or Tea - A warm cup of coffee or Earl Grey tea is a classic pairing.
- Whipped Cream or Clotted Cream - A rich, creamy topping makes them extra indulgent.
- Fruit Preserves - Raspberry, strawberry, or orange marmalade adds a fruity contrast.
- Greek Yogurt - A protein-packed side that balances the sweetness.
- Warm Milk - A comforting pairing, especially for kids.
How Long Do They Last?
Chocolate Chip Scones can be stored at room temperature for up to 2 days in an airtight container to maintain their freshness.
If you want to keep them longer, they can be refrigerated for up to 5 days, though it’s best to warm them slightly before serving to restore their soft, flaky texture.
Can You Freeze Them?
For longer storage, scones can be frozen for up to 3 months. To freeze, wrap each scone individually in plastic wrap and place them in a freezer-safe bag.
When you’re ready to eat them, thaw the scones at room temperature or warm them in a 350°F oven for 5-7 minutes to bring back their buttery crispness.
More Chocolate Flavored Bites
- Chocolate Pancakes
- Chocolate Covered Pretzels
- White Hot Chocolate
- Chocolate Cobbler
- Chocolate Overnight Oats
- Homemade Crunch Bar
- Chocolate Chip Mug Cake


Chocolate Chip Scones | The Best Chocolate Chip Scone Recipe
Ingredients
- ▢ 2 cups All Purpose Flour
- ▢ 1/4 cup Granulated Sugar
- ▢ 1 tbsp Baking Powder
- ▢ 1/2 tsp Kosher Salt
- ▢ 1/2 cup Unsalted Butter
- ▢ 1/2 cup Heavy Cream , Add Two tbsp for brushing the tops
- ▢ 1 Egg
- ▢ 1 tsp Vanilla Extract
- ▢ 3/4 cup Chocolate Chips
Instructions
- Mix the Dry Ingredients . In a large mixing bowl, whisk together the flour, sugar, baking powder, and salt.
- Cut in the Butter . Add the cold, cubed butter to the dry ingredients. Using a pastry cutter or your fingertips, work the butter into the flour until the mixture resembles coarse crumbs.
- Add the Wet Ingredients . In a separate bowl, whisk together the heavy cream, egg, and vanilla extract. Pour the wet ingredients into the dry ingredients and gently mix until the dough just comes together.
- Fold in the Chocolate Chips . Gently fold in the chocolate chips, being careful not to overwork the dough.
- Shape and Cut the Dough . Turn the dough onto a lightly floured surface and pat it into a 1-inch thick circle. Cut into 8 wedges and place them on a parchment-lined baking sheet.
- Chill the Dough (Optional but recommended) . For flakier scones, chill the shaped scones in the refrigerator for 15-20 minutes before baking.
- Bake to Perfection . Preheat the oven to 400°F. Brush the tops of the scones with a little extra heavy cream for a golden finish. Bake for 18-22 minutes, or until the scones are golden brown.
- Cool and Serve . Let the scones cool slightly before serving. Enjoy them warm with butter, jam, or an extra drizzle of chocolate.
Get support & connect with our community on Facebook!
Nutrition

If you already signed up, you should have received an email with a password to give you unlimited access to our FREE Printable Library. The password is case sensitive. Enter it below and get printing!
Password:

Chocolate Chip Scones | The Best Chocolate Chip Scone Recipe
Ingredients
- 2 cups All Purpose Flour
- 1/4 cup Granulated Sugar
- 1 tbsp Baking Powder
- 1/2 tsp Kosher Salt
- 1/2 cup Unsalted Butter
- 1/2 cup Heavy Cream Add Two tbsp for brushing the tops
- 1 Egg
- 1 tsp Vanilla Extract
- 3/4 cup Chocolate Chips
Instructions
- Mix the Dry Ingredients . In a large mixing bowl, whisk together the flour, sugar, baking powder, and salt.
- Cut in the Butter . Add the cold, cubed butter to the dry ingredients. Using a pastry cutter or your fingertips, work the butter into the flour until the mixture resembles coarse crumbs.
- Add the Wet Ingredients . In a separate bowl, whisk together the heavy cream, egg, and vanilla extract. Pour the wet ingredients into the dry ingredients and gently mix until the dough just comes together.
- Fold in the Chocolate Chips . Gently fold in the chocolate chips, being careful not to overwork the dough.
- Shape and Cut the Dough . Turn the dough onto a lightly floured surface and pat it into a 1-inch thick circle. Cut into 8 wedges and place them on a parchment-lined baking sheet.
- Chill the Dough (Optional but recommended) . For flakier scones, chill the shaped scones in the refrigerator for 15-20 minutes before baking.
- Bake to Perfection . Preheat the oven to 400°F. Brush the tops of the scones with a little extra heavy cream for a golden finish. Bake for 18-22 minutes, or until the scones are golden brown.
- Cool and Serve . Let the scones cool slightly before serving. Enjoy them warm with butter, jam, or an extra drizzle of chocolate.
Chocolate Chip Scones | The Best Chocolate Chip Scone Recipe https://twosleevers.com/chocolate-chip-scones/

If you’re craving a savory dish that’s as versatile as it is delicious, look no further than this Bacon Quiche recipe! With its buttery crust, creamy filling, and smoky bacon, this quiche is perfect for breakfast, brunch, or even dinner.

Why You’ll Love This Brilliant Breakfast Recipe
- Fast and Easy . With simple ingredients and straightforward steps, this recipe comes together in just under an hour.
- Make-Ahead Friendly. Prep it ahead of time and enjoy it throughout the week.
- Customizable. Swap or add your favorite ingredients for a personalized dish.
- Perfectly Savory. The bacon adds a smoky, salty flavor that complements the creamy filling beautifully.
It’s simple to make, customizable, and guaranteed to be a crowd-pleaser.
What Does Bacon Quiche Taste Like?
Bacon quiche is a savory pie made with a rich custard filling of eggs, cream, and cheese, poured over crispy bacon and baked to perfection in a flaky pie crust.
It’s a classic French-inspired dish that’s both hearty and elegant, making it ideal for any occasion.
Do I Need To Prebake The Pie Crust For Quiche?
Yes, prebaking the pie crust, a process known as blind baking, is highly recommended when making a quiche. This step ensures that the crust stays crisp and doesn’t become soggy from the moisture in the custard filling.
Ingredients You’ll Need
- Bacon - The key ingredient that provides a savory, crispy, and smoky flavor. It’s the highlight of the dish, adding both texture and taste.
- Eggs - These form the base of the custard filling, binding all the ingredients together and adding a rich, creamy consistency.
- Heavy Cream and Milk - Together, these create a smooth and velvety custard, balancing the richness of the bacon and cheese while giving the quiche its signature creamy texture.
- Cheddar Cheese - Offers a bold, sharp flavor that enhances the savory notes of the bacon while adding a gooey, cheesy layer to the filling.
- Onion - Sautéed to bring out its natural sweetness, onion adds depth and a mild sweetness that complements the smoky bacon and rich custard.
- Salt and Pepper - Essential for seasoning, these simple ingredients bring out the natural flavors of the filling without overpowering the dish.
- Pie Crust - The foundation of the quiche, providing structure and a buttery, flaky texture that perfectly contrasts the creamy filling. Whether store-bought or homemade, it ensures a sturdy base for slicing and serving.
How To Make Bacon Quiche
- Prepare the Crust . Roll out the pie crust into a 9-inch pie pan, trimming any excess. Pre-bake the crust at 375°F for about 10 minutes.
- Cook the Bacon . Fry the bacon in a skillet over medium heat until crispy. Remove and let it drain on paper towels. Crumble into bite-sized pieces.
- Sauté the Onion . In the same skillet, sauté the onion in the bacon drippings until soft and translucent.
- Mix the Custard . Whisk together the eggs, heavy cream, milk, salt, and pepper in a large bowl until smooth.
- Assemble the Quiche . Layer the crumbled bacon, sautéed onion, and shredded cheddar cheese evenly in the pre-baked crust. Pour the custard mixture over the top.
- Bake to Perfection . Bake the quiche at 375°F for 35–40 minutes, or until the filling is set and the top is golden.
- Cool and Serve . Let the quiche cool for 10 minutes before slicing. Serve warm or at room temperature.

Tips And Tricks
Making a bacon quiche that’s rich, creamy, and full of flavor doesn’t have to be intimidating. Follow these tips and tricks to ensure it is a success every time:
- Pre-Bake the Crust . This prevents a soggy bottom and ensures a crisp, golden crust.
- Don’t Overfill . Leave a little space at the top of the crust to prevent spilling.
- Check for Doneness . The quiche is ready when the center is slightly jiggly but set.
- Cool Before Slicing . Allowing the quiche to rest ensures clean slices.
Variations
Bacon quiche is a versatile dish that can be customized to suit your taste or make the most of the ingredients you have on hand. Here are some creative variations to try:
- Vegetarian Quiche - Swap the bacon for sautéed spinach, mushrooms, or roasted red peppers.
- Cheese Swap - Try Gruyère, Swiss, or feta for a new flavor profile.
- Meaty Upgrade - Add cooked sausage or diced ham along with the bacon.
- Herb-Infused - Sprinkle fresh herbs like thyme, parsley, or chives into the custard.
What To Eat With Bacon Quiche
Bacon quiche is a versatile dish that pairs beautifully with a variety of sides, whether you’re serving it for breakfast, brunch, lunch, or dinner. Here are some delicious options to round out your meal:
- Salad - A light, tangy vinaigrette complements the richness of the quiche.
- Fresh Fruit Salad - Adds a refreshing, sweet contrast.
- Roasted Potatoes - Perfect for a hearty brunch spread.
How Long Does It Last?
Properly stored in an airtight container, your bacon quiche will remain delicious for 3-4 days. This makes it a great make-ahead dish for busy mornings or easy lunches!
Can You Freeze It?
Yes, bacon quiche freezes beautifully! Cool completely before wrapping and freezing. To reheat, bake in a 350°F oven until warmed through.
More Of Our Best Breakfast Recipes
- Keto Blueberry Muffins
- Cinnamon French Toast
- Swedish Pancakes
- Chocolate Cinnamon Rolls
- Mini Muffins


Bacon Quiche Recipe | Easy Bacon And Cheddar Quiche
Ingredients
- ▢ 1 Refrigerated Pie Crust
- ▢ 6 slices Bacon
- ▢ 1 Onion , chopped
- ▢ 4 Eggs
- ▢ 1 cup Heavy Cream
- ▢ 1/2 cup Milk
- ▢ 1 cup Cheddar Cheese , shredded
- ▢ 1/2 tsp Kosher salt
- ▢ 1/4 tsp Ground Black Pepper
Instructions
- Prepare the Crust . Roll out the pie crust into a 9-inch pie pan, trimming any excess. Pre-bake the crust at 375°F for about 10 minutes.
- Cook the Bacon . Fry the bacon in a skillet over medium heat until crispy. Remove and let it drain on paper towels. Crumble into bite-sized pieces.
- Sauté the Onion . In the same skillet, sauté the onion in the bacon drippings until soft and translucent.
- Mix the Custard . Whisk together the eggs, heavy cream, milk, salt, and pepper in a large bowl until smooth.
- Assemble the Quiche . Layer the crumbled bacon, sautéed onion, and shredded cheddar cheese evenly in the pre-baked crust. Pour the custard mixture over the top.
- Bake to Perfection . Bake the quiche at 375°F for 35–40 minutes, or until the filling is set and the top is golden.
- Cool and Serve . Let the quiche cool for 10 minutes before slicing. Serve warm or at room temperature.
