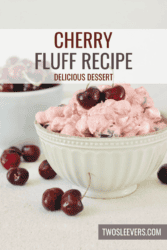
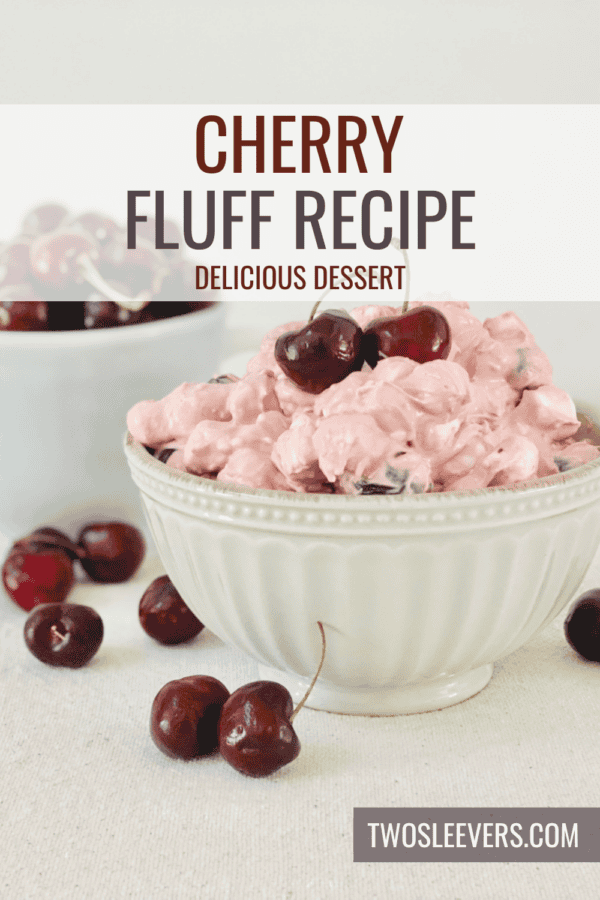
Indulge in a delightful dessert with this easy and delicious Cherry Fluff recipe! This no-bake treat is perfect for summer gatherings or as a quick sweet fix. Dive into the perfect combination of creamy, fruity, and fluffy goodness with this foolproof method.

Why You’ll Love This Sweet Treat
- Quick. Ready in just 10 minutes from start to finish.
- Effortless. Minimal preparation for a no-fuss cooking experience.
- Incredibly Tasty. The blend of cherries, cream, and marshmallows creates a mouth-watering dessert.
- Versatile. Perfect for parties, potlucks, or a simple family dessert.
What Is Cherry Fluff?
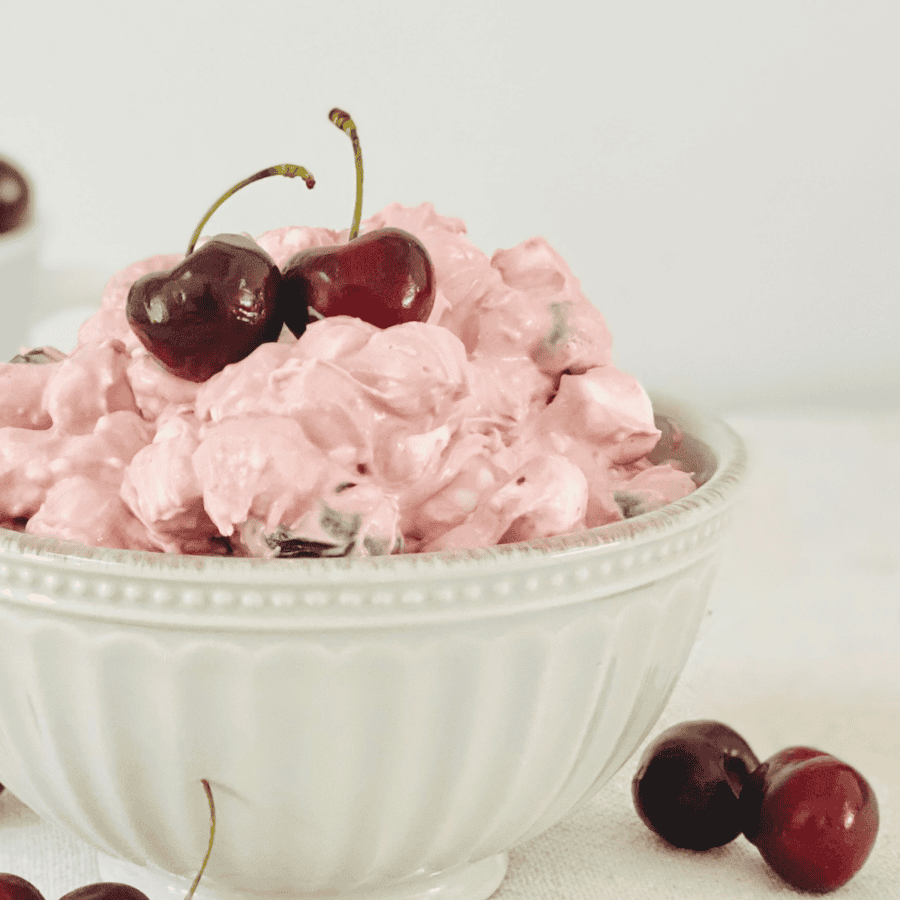
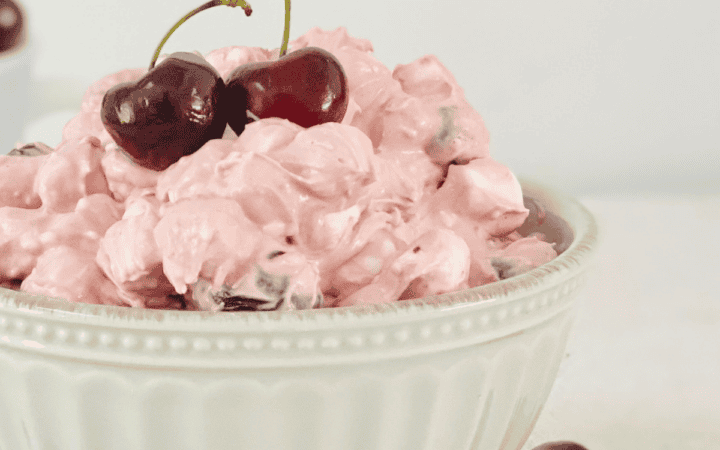
Cherry Fluff is a classic no-bake dessert made with cherry pie filling, crushed pineapple, whipped topping, mini marshmallows, and sweetened condensed milk. It’s a light and fluffy treat that’s sweet, fruity, and oh-so-easy to make.
What Does Cherry Fluff Taste Like?
Overall, cherry fluff is a harmonious blend of sweet, tart, creamy, and chewy elements, making it a refreshing and satisfying treat for any occasion.
Ingredients You’ll Need
- Cherry Pie Filling - The main ingredient, providing a sweet and tart cherry flavor.
- Crushed Pineapple - Adds a juicy, tropical sweetness to the fluff.
- Whipped Topping - Creates the fluffy texture and adds creaminess.
- Sweetened Condensed Milk - Adds richness and sweetness to the dessert.
- Mini Marshmallows - Adds a fun, chewy texture.
- Chopped Nuts - Adds a crunchy texture and a nutty flavor.
How To Make Cherry Fluff
- Drain the Pineapple. Drain the crushed pineapple to remove excess juice. This prevents the fluff from becoming too runny.
- Chop the Nuts. If using, chop the nuts into small pieces.
- Combine the Cherry Pie Filling and Pineapple. In a large bowl, mix together the cherry pie filling and drained crushed pineapple.
- Add the Sweetened Condensed Milk. Stir in the sweetened condensed milk until well combined.
- Fold in the Whipped Topping. Gently fold in the whipped topping until fully incorporated.
- Add the Marshmallows and Nuts. Fold in the mini marshmallows and chopped nuts (if using).
- Chill the Fluff. Cover the bowl with plastic wrap and refrigerate for at least 2 hours to allow the flavors to meld and the fluff to firm up.
- Serve. Serve chilled, garnished with extra cherries or nuts if desired.
Tips And Tricks
Making delicious Cherry Fluff involves more than just the right ingredients; it’s about technique and a few kitchen tricks to ensure it turns out flavorful and satisfying. Here’s how to perfect it:
- Drain the Pineapple Well. Make sure to drain the crushed pineapple thoroughly to prevent the fluff from becoming too runny.
- Fold Gently. When folding in the whipped topping and marshmallows, be gentle to keep the fluff light and airy.
- Chill for Best Results. Allowing the fluff to chill for a couple of hours helps the flavors to meld and the texture to set.
Variations
Cherry Fluff is a versatile dish that can be adapted to suit a variety of tastes and dietary needs. Here are some creative variations on the classic:
- Strawberry Fluff - Use strawberry pie filling instead of cherry for a different fruity flavor.
- Pistachio Fluff - Add a package of pistachio pudding mix and use crushed pineapple for a nutty twist.
- Coconut Fluff - Add shredded coconut for a tropical flavor.
- Chocolate Cherry Fluff - Add mini chocolate chips for a chocolatey twist.
What To Eat With Cherry Fluff
Cherry Fluff pairs wonderfully with various dishes and can be served in different ways. Here are some great options:
- As a Side Dish - Serve alongside a summer BBQ or picnic.
- As a Dessert - Enjoy it on its own or with a scoop of vanilla ice cream.
- With Fresh Fruit - Serve with a side of fresh berries for added flavor and texture.
- On a Graham Cracker - Scoop some fluff onto a graham cracker for a fun twist.
How Long Does It Last?
Store any leftovers in an airtight container in the refrigerator for up to 3 days. The flavors will continue to meld and it will remain delicious.
Can You Freeze It?
Cherry Fluff is best enjoyed fresh, but you can freeze it if needed. Freeze in an airtight container for up to 1 month. Thaw in the refrigerator before serving.
More Delicious Desserts
- Gluten Free Chocolate Cake
- Strawberry Rhubarb Pie
- Fudgesicles
- No Bake Peanut Butter Bars
- Mango Cheesecake
- Grape Salad
Cherry Fluff Recipe | Easy Cherry Fluff Salad
Ingredients
- ▢ 21 oz Cherry Pie Filling
- ▢ 20 oz Crushed Pineapple , drained
- ▢ 8 oz Whipped Topping
- ▢ 14 oz Sweetened Condensed Milk
- ▢ 2 cups Mini Marshamallows
- ▢ 1/2 cup Chopped Walnuts
Instructions
- Drain the Pineapple. Drain the crushed pineapple to remove excess juice. This prevents the fluff from becoming too runny.
- Chop the Nuts. If using, chop the nuts into small pieces.
- Combine the Cherry Pie Filling and Pineapple. In a large bowl, mix together the cherry pie filling and drained crushed pineapple.
- Add the Sweetened Condensed Milk. Stir in the sweetened condensed milk until well combined.
- Fold in the Whipped Topping. Gently fold in the whipped topping until fully incorporated.
- Add the Marshmallows and Nuts. Fold in the mini marshmallows and chopped nuts (if using).
- Chill the Fluff. Cover the bowl with plastic wrap and refrigerate for at least 2 hours to allow the flavors to meld and the fluff to firm up.
- Serve. Serve chilled, garnished with extra cherries or nuts if desired.
Get support & connect with our community on Facebook!
Nutrition

If you already signed up, you should have received an email with a password to give you unlimited access to our FREE Printable Library. The password is case sensitive. Enter it below and get printing!
Password:

Cherry Fluff Recipe | Easy Cherry Fluff Salad
Ingredients
- 21 oz Cherry Pie Filling
- 20 oz Crushed Pineapple drained
- 8 oz Whipped Topping
- 14 oz Sweetened Condensed Milk
- 2 cups Mini Marshamallows
- 1/2 cup Chopped Walnuts
Instructions
- Drain the Pineapple. Drain the crushed pineapple to remove excess juice. This prevents the fluff from becoming too runny.
- Chop the Nuts. If using, chop the nuts into small pieces.
- Combine the Cherry Pie Filling and Pineapple. In a large bowl, mix together the cherry pie filling and drained crushed pineapple.
- Add the Sweetened Condensed Milk. Stir in the sweetened condensed milk until well combined.
- Fold in the Whipped Topping. Gently fold in the whipped topping until fully incorporated.
- Add the Marshmallows and Nuts. Fold in the mini marshmallows and chopped nuts (if using).
- Chill the Fluff. Cover the bowl with plastic wrap and refrigerate for at least 2 hours to allow the flavors to meld and the fluff to firm up.
- Serve. Serve chilled, garnished with extra cherries or nuts if desired.
Cherry Fluff Recipe | Easy Cherry Fluff Salad https://twosleevers.com/cherry-fluff-recipe/

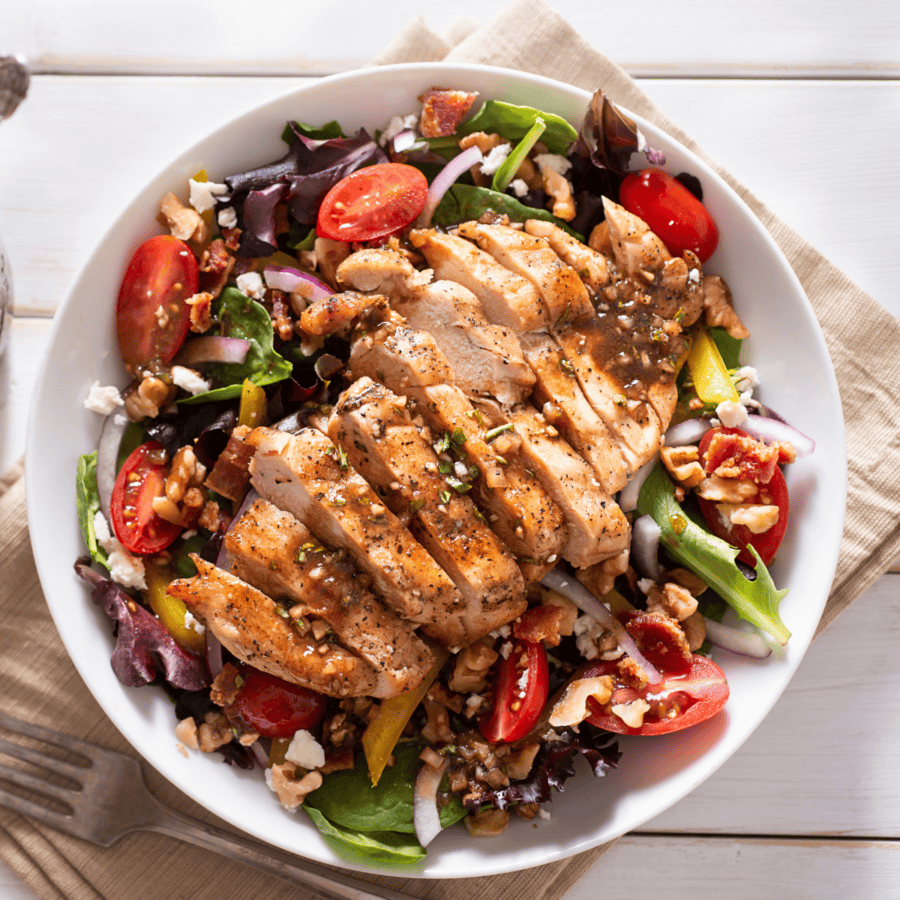
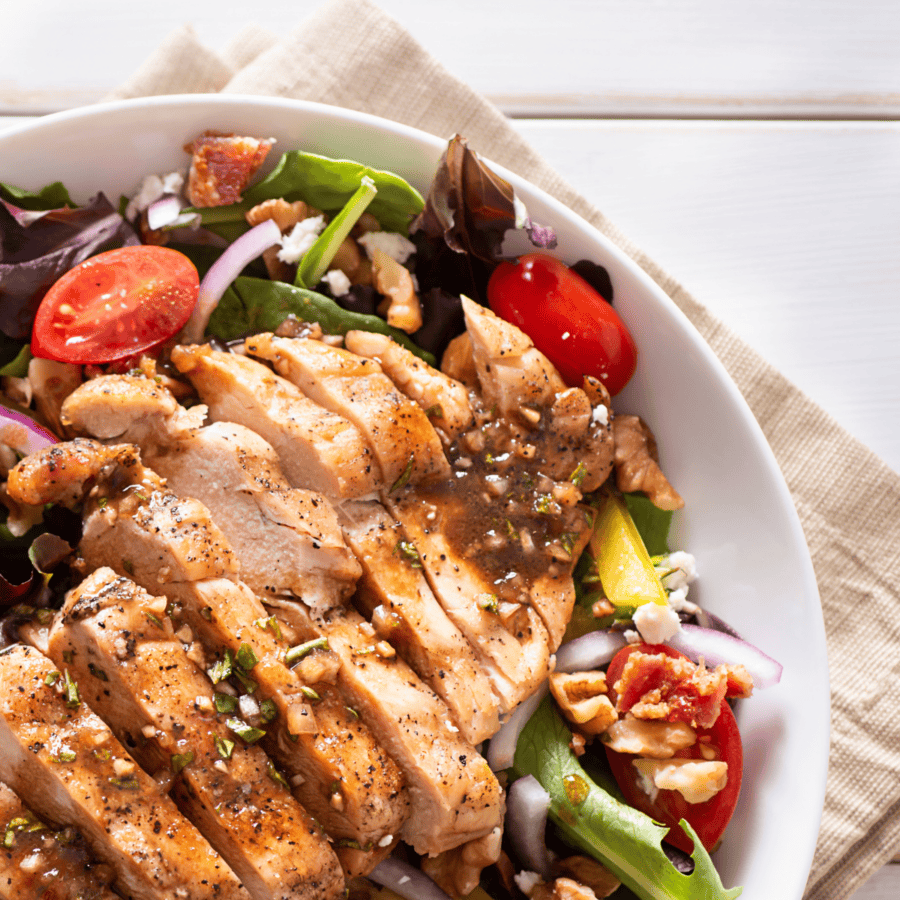
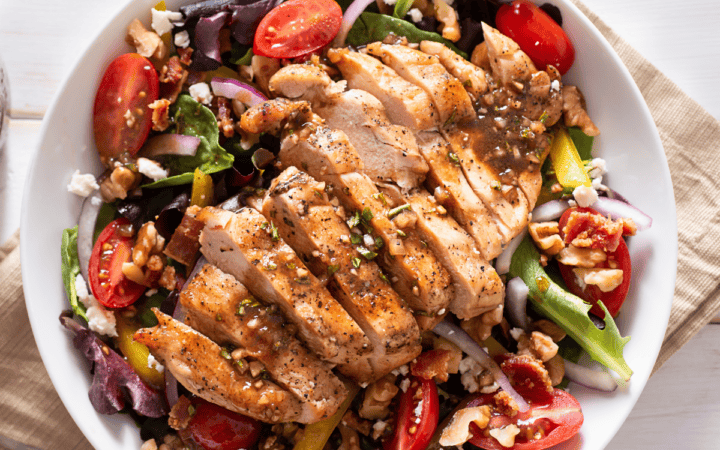
Unleash the incredible flavors of Honey Balsamic Chicken with this easy and irresistible recipe. Perfectly blending the sweet and tangy richness of balsamic vinegar with the subtle sweetness of honey, this chicken dish offers a mouthwatering experience that’s bound to make it a weeknight favorite.
Why You’ll Love This Simple Chicken Recipe
- Quick and Convenient. Ready in just 30 minutes, this dish is your go-to for a fast yet fabulous meal.
- Flavorful and Juicy. The honey balsamic marinade ensures every bite is infused with deliciousness, keeping the chicken moist and flavorful.
- Healthier Choice. Made with wholesome ingredients, it’s a delightful way to serve up something that feels indulgent yet is packed with goodness.
- Perfect for Any Occasion. Whether it’s a family dinner, a special occasion, or meal prep for the week, this chicken dish is versatile and sure to impress.
This recipe is not only about the sumptuous taste but also the ease and versatility it brings to your kitchen. The marinade does double duty as a glaze, caramelizing on the chicken for a glossy, appealing finish that promises to tantalize your taste buds.
What Does Honey Balsamic Chicken Taste Like?
Overall, honey balsamic chicken is both comforting and sophisticated, making it suitable for a simple family dinner or a special occasion meal.
The flavors are robust yet balanced, ensuring that each bite is packed with a delightful interplay of sweet and tangy with underlying savory tones.
Ingredients You’ll Need
- Chicken Breasts - Boneless and skinless, perfect for soaking up the marinade.
- Balsamic Vinegar - For that deep, rich flavor.
- Honey - Adds a natural sweetness that balances the tanginess of the vinegar.
- Garlic - Minced, for a punch of flavor.
- Olive Oil - Helps in marinating and cooking.
- Rosemary - Fresh or dried for an aromatic touch.
- Salt and Pepper - To taste.
How To Make Honey Balsamic Chicken
- Marinate the Chicken . In a large bowl, whisk together balsamic vinegar, honey, minced garlic, olive oil, rosemary, salt, and pepper. Add chicken breasts, ensuring they are fully coated. Marinate for at least 15 minutes, or for a more robust flavor, up to 4 hours in the refrigerator.
- Prepare for Cooking . Preheat your air fryer to 375°F. Remove chicken from the marinade and reserve the liquid.
- Air Fry to Perfection . Place chicken in a single layer in the air fryer basket. Cook for 10 minutes, flip, then brush with reserved marinade and cook for an additional 10 minutes or until the internal temperature reaches 165°F.
- Reduce the Marinade . While the chicken cooks, pour the reserved marinade into a small saucepan. Bring to a boil, then reduce to a simmer and let it thicken slightly to form a glaze.
- Serve and Enjoy . Drizzle the reduced balsamic glaze over the cooked chicken. Garnish with fresh rosemary sprigs or a sprinkle of parsley for a fresh, herby finish.
Tips And Tricks
Making Honey Balsamic Chicken is a delicious way to enjoy a savory and slightly sweet meal. Here are some tips and tricks to ensure that your chicken comes out perfectly every time:
- Thickening the Sauce . After cooking the chicken, you can thicken the remaining marinade to create a rich sauce. Mix a teaspoon of cornstarch with a little cold water and stir it into the cooking juices, then simmer until it thickens.
- Don’t Overcook . Chicken breasts can dry out quickly, so use a meat thermometer to check for doneness. Chicken is safe to eat when the internal temperature reaches 165°F. Remove it from the oven just as it reaches temperature because it will continue to cook in its residual heat.
- Rest Before Serving . Let the chicken rest for a few minutes after baking. This allows the juices to redistribute throughout the meat, making it juicier and more flavorful.
Variations
Honey balsamic chicken is a versatile dish that can be tailored in various delicious ways to suit different tastes and occasions. Here are some creative variations to keep this dish exciting every time you make it:
- Spicy- Add a spicy kick to the marinade by including chili flakes, cayenne pepper, or a splash of hot sauce. This adds a nice heat that contrasts beautifully with the sweetness of the honey.
- Herb-Infused - Incorporate fresh herbs like rosemary, thyme, or sage into the marinade. These herbs complement the sweetness of the honey and the depth of the balsamic vinegar, adding a fragrant touch to the dish.
- Garlic Lover’s Version - Add several cloves of minced garlic to the marinade for a robust garlic flavor. Garlic pairs well with the sweet and tangy profile of the honey and balsamic.
What To Serve With Honey Balsamic Chicken
Honey Balsamic Chicken, with its rich, tangy-sweet flavors, pairs beautifully with a variety of sides that complement its depth and help create a balanced meal. Here are some great options to serve with it:
- Garlicky Green Beans - Sautéed green beans with a touch of garlic make a crunchy, fresh companion to the rich flavors of the chicken.
- Roasted Vegetables - Mix vegetables like carrots, bell peppers, and zucchini, toss them in olive oil and herbs, and roast until caramelized. The natural sweetness of roasted veggies complements the balsamic glaze wonderfully.
- Couscous or Quinoa Salad - These grains make for a light and fluffy side, and adding fresh herbs, lemon zest, and cherry tomatoes can brighten the whole meal.
How Long Does It Last?
Honey Balsamic Chicken can last in the refrigerator for about 3 to 4 days when stored properly. Make sure to keep the chicken in an airtight container to maintain its freshness and prevent it from absorbing other flavors and odors from the fridge.
Can You Freeze It?
If you need to keep the chicken for a longer period, you can freeze it. Properly stored in airtight containers or heavy-duty freezer bags, Honey Balsamic Chicken can last for up to 3 months in the freezer.
Thaw it in the refrigerator overnight when ready to use, and reheat it gently, adding a splash of water or extra balsamic vinegar to refresh the sauce if needed.
More Delicious Chicken Recipes
- Instant Pot Butter Chicken
- Instant Pot Chicken Tacos
- Chicken Cordon Bleu Casserole
- Chicken Vindaloo
- Instant Pot Chicken Biryani
- Tandoori Chicken
- Jamaican Curry Chicken
- Pollo Asado
- Peruvian Chicken

Honey Balsamic Chicken Recipe
Ingredients
- ▢ 4 Boneless Skinless Chicken Breasts
- ▢ 1/3 cup Balsamic Vinegar
- ▢ 1/4 cup Honey
- ▢ 3 cloves Garlic , minced
- ▢ 2 tbsp Olive Oil
- ▢ 1 tsp Rosemary
- ▢ 1/2 tsp Kosher Salt
- ▢ 1/4 tsp Black Pepper
Instructions
- Marinate the Chicken . In a large bowl, whisk together balsamic vinegar, honey, minced garlic, olive oil, rosemary, salt, and pepper. Add chicken breasts, ensuring they are fully coated. Marinate for at least 15 minutes, or for a more robust flavor, up to 4 hours in the refrigerator.
- Prepare for Cooking . Preheat your air fryer to 375°F. Remove chicken from the marinade and reserve the liquid.
- Air Fry to Perfection . Place chicken in a single layer in the air fryer basket. Cook for 10 minutes, flip, then brush with reserved marinade and cook for an additional 10 minutes or until the internal temperature reaches 165°F.
- Reduce the Marinade . While the chicken cooks, pour the reserved marinade into a small saucepan. Bring to a boil, then reduce to a simmer and let it thicken slightly to form a glaze.
- Serve and Enjoy . Drizzle the reduced balsamic glaze over the cooked chicken. Garnish with fresh rosemary sprigs or a sprinkle of parsley for a fresh, herby finish.
