
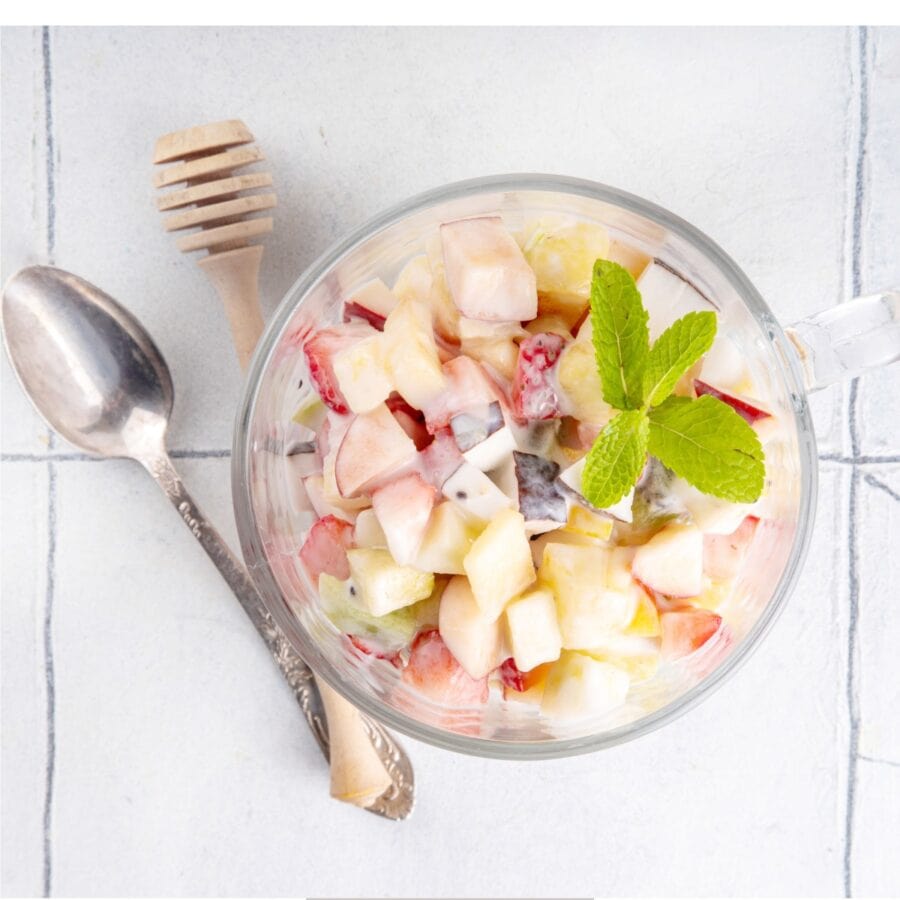
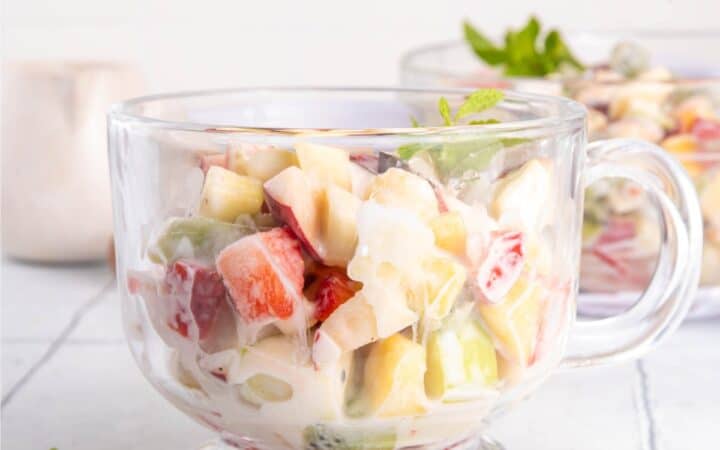
If you’re looking for a refreshing, sweet, and creamy dessert that’s sure to be a crowd-pleaser, this Cheesecake Fruit Salad is for you! Imagine all of your favorite fruits mixed with a smooth and velvety cheesecake-inspired dressing. Delicious, right?
Why You’ll Love This Delicious Dessert
- Super Easy to Make . With just a few ingredients and a quick mix, you’ll have this cheesecake fruit salad ready in no time.
- Perfectly Creamy . The cheesecake-flavored dressing gives this fruit salad a rich, smooth texture that everyone will love.
- Versatile . You can use any fruits you like, from berries to tropical fruits. It’s a great way to use up what you have in the fridge!
- Great for Any Occasion . Whether you’re hosting a spring BBQ, a summer picnic, or a holiday dinner, this fruit salad will steal the show!
This easy-to-make fruit salad has everything you need: sweetness, creaminess, and a burst of fruity freshness. It’s perfect for any occasion, from picnics to potlucks and holiday gatherings.
What Does Cheesecake Fruit Salad Taste Like?
This cheesecake fruit salad is a delightful balance of sweetness and tanginess. The fruits add a burst of freshness, while the cheesecake dressing is indulgent and creamy, creating a rich yet refreshing taste.
The soft, smooth texture of the dressing pairs beautifully with the crispness of the fruit, making every bite a perfect combination of flavors. With its creamy, slightly sweet, and fruity layers, this dessert will remind you of a classic cheesecake but in fruit salad form!
Ingredients You’ll Need
- Cream Cheese - Cream cheese serves as the base for the creamy cheesecake-like dressing. It adds richness and tanginess, which balances the sweetness of the fruits.
- Whipped Topping - This lightens the creamy dressing, making it fluffy and airy while keeping the texture smooth and creamy.
- Greek Yogurt - Greek yogurt provides an extra layer of tanginess and helps thicken the dressing without adding too much sweetness.
- Granulated Sugar - A touch of sugar sweetens the dressing to complement the natural sweetness of the fruit.
- Vanilla Extract - Vanilla adds a comforting, aromatic flavor that elevates the richness of the cheesecake dressing.
- Mixed Fresh Fruit - The star of the show! Choose fruits like strawberries, blueberries, pineapple, grapes, and peaches. You can customize based on what’s in season or your personal preferences.
- Honey (optional) - For extra sweetness, a drizzle of honey can be added to the dressing or over the fruit.
How To Make Cheesecake Fruit Salad
- Prepare the Cheesecake Dressing . Start by placing the softened cream cheese in a mixing bowl. Add the Greek yogurt, granulated sugar, and vanilla extract. Using a hand mixer or stand mixer, beat everything together until the mixture is smooth and creamy. Slowly fold in the whipped topping and mix until combined. This is the creamy cheesecake filling for your fruit salad!
- Prepare the Fruit . While the cheesecake dressing is coming together, wash and chop your fresh fruit into bite-sized pieces. You can mix and match any fruits you like, but we recommend a combination of berries, grapes, and tropical fruits like pineapple for a refreshing twist. Once the fruit is prepped, set it aside.
- Combine the Fruit and Dressing . In a large bowl, gently fold the prepared fruit into the cheesecake dressing. Be careful not to mash the fruit. Just mix until everything is coated with the creamy dressing.
- Chill the Salad . Once everything is combined, cover the bowl and refrigerate the fruit salad for at least 1 hour to allow the flavors to meld together. This also allows the cheesecake dressing to thicken slightly, making it even creamier.
- Serve and Enjoy . Once chilled, your cheesecake fruit salad is ready to serve! You can garnish it with extra fresh fruit on top or a sprinkle of cinnamon if desired. This dessert is best enjoyed cold, so keep it in the fridge until ready to serve.

Tips And Tricks
- Use Fresh Fruit . Fresh fruit works best in this salad, but if you’re in a pinch, you can use frozen fruit. Just make sure to thaw and drain it well to avoid excess liquid in the salad.
- Adjust Sweetness . If you prefer a sweeter dressing, add a little extra sugar or honey. On the flip side, you can also adjust the tanginess by adding more yogurt or cream cheese.
- Don’t Overmix . When combining the fruit and the dressing, mix gently so the fruit doesn’t get mashed or squished.
Variations
Here are some delicious variations you can try when making Cheesecake Fruit Salad to customize the flavor profile and texture to your liking:
- Berry - Focus on berries like strawberries, blueberries, raspberries, and blackberries for a tangy, sweet dessert.
- Tropical - Use tropical fruits such as pineapple, mango, and kiwi for a fun, vacation-inspired twist.
- Add Marshmallows - For a fluffier texture and more sweetness, stir in some mini marshmallows. They’re a classic addition to fruit salads.
- Coconut - Add shredded coconut to the fruit and dressing to bring a tropical flair to your salad.
What To Enjoy With Cheesecake Fruit Salad
This creamy fruit salad is perfect on its own, but if you want to make it even more decadent, serve it with:
- Whipped Cream - A dollop of whipped cream on top will make the dessert even more indulgent.
- Fresh Baked Biscuits or Scones - Serve with some warm, flaky biscuits or scones for a brunch-worthy pairing.
- Ice Cream - For a truly indulgent treat, serve your fruit salad with a scoop of vanilla or coconut ice cream.
How Long Does It Last?
This fruit salad can be stored in the refrigerator in an airtight container for up to 3 days. The fruit will start to release some liquid, so it’s best enjoyed within that time frame for the best texture.
Can You Freeze It?
While you can technically freeze the cheesecake fruit salad, the texture of the fruit will change once thawed, and the dressing may separate. It’s best served fresh or stored in the fridge for a few days.
More Sweet Treats
- Chocolate Chip Scones
- Texas Sheet Cake
- Lemonade Pie
- Peach Crisp
- Mini Cheesecakes
- Zucchini Cake
- Blackberry Crisp
Cheesecake Fruit Salad Recipe | Creamy Fruit Salad
Ingredients
- ▢ 4 ounces Cream Cheese
- ▢ 1/2 cup Whipped Topping
- ▢ 1/4 cup Greek Yogurt
- ▢ 2 tbsp Granulated Sugar
- ▢ 1/2 tsp Vanilla Extract
- ▢ 1 cup Strawberries
- ▢ 1 cup Blueberries
- ▢ 1 cup Pineapple , diced
- ▢ 1 cup Grapes
- ▢ 1 cup Apples , diced
- ▢ 1 cup Peaches , diced
- ▢ 1 tbsp Honey
Instructions
- Prepare the Cheesecake Dressing . Start by placing the softened cream cheese in a mixing bowl. Add the Greek yogurt, granulated sugar, and vanilla extract. Using a hand mixer or stand mixer, beat everything together until the mixture is smooth and creamy. Slowly fold in the whipped topping and mix until combined. This is the creamy cheesecake filling for your fruit salad!
- Prepare the Fruit . While the cheesecake dressing is coming together, wash and chop your fresh fruit into bite-sized pieces. You can mix and match any fruits you like, but we recommend a combination of berries, grapes, and tropical fruits like pineapple for a refreshing twist. Once the fruit is prepped, set it aside.
- Combine the Fruit and Dressing . In a large bowl, gently fold the prepared fruit into the cheesecake dressing. Be careful not to mash the fruit. Just mix until everything is coated with the creamy dressing.
- Chill the Salad . Once everything is combined, cover the bowl and refrigerate the fruit salad for at least 1 hour to allow the flavors to meld together. This also allows the cheesecake dressing to thicken slightly, making it even creamier.
- Serve and Enjoy . Once chilled, your cheesecake fruit salad is ready to serve! You can garnish it with extra fresh fruit on top or a sprinkle of cinnamon if desired. This dessert is best enjoyed cold, so keep it in the fridge until ready to serve.
Get support & connect with our community on Facebook!
Nutrition

If you already signed up, you should have received an email with a password to give you unlimited access to our FREE Printable Library. The password is case sensitive. Enter it below and get printing!
Password:

Cheesecake Fruit Salad Recipe | Creamy Fruit Salad
Ingredients
- 4 ounces Cream Cheese
- 1/2 cup Whipped Topping
- 1/4 cup Greek Yogurt
- 2 tbsp Granulated Sugar
- 1/2 tsp Vanilla Extract
- 1 cup Strawberries
- 1 cup Blueberries
- 1 cup Pineapple diced
- 1 cup Grapes
- 1 cup Apples diced
- 1 cup Peaches diced
- 1 tbsp Honey
Instructions
- Prepare the Cheesecake Dressing . Start by placing the softened cream cheese in a mixing bowl. Add the Greek yogurt, granulated sugar, and vanilla extract. Using a hand mixer or stand mixer, beat everything together until the mixture is smooth and creamy. Slowly fold in the whipped topping and mix until combined. This is the creamy cheesecake filling for your fruit salad!
- Prepare the Fruit . While the cheesecake dressing is coming together, wash and chop your fresh fruit into bite-sized pieces. You can mix and match any fruits you like, but we recommend a combination of berries, grapes, and tropical fruits like pineapple for a refreshing twist. Once the fruit is prepped, set it aside.
- Combine the Fruit and Dressing . In a large bowl, gently fold the prepared fruit into the cheesecake dressing. Be careful not to mash the fruit. Just mix until everything is coated with the creamy dressing.
- Chill the Salad . Once everything is combined, cover the bowl and refrigerate the fruit salad for at least 1 hour to allow the flavors to meld together. This also allows the cheesecake dressing to thicken slightly, making it even creamier.
- Serve and Enjoy . Once chilled, your cheesecake fruit salad is ready to serve! You can garnish it with extra fresh fruit on top or a sprinkle of cinnamon if desired. This dessert is best enjoyed cold, so keep it in the fridge until ready to serve.
Cheesecake Fruit Salad Recipe | Creamy Fruit Salad https://twosleevers.com/cheesecake-fruit-salad-recipe/

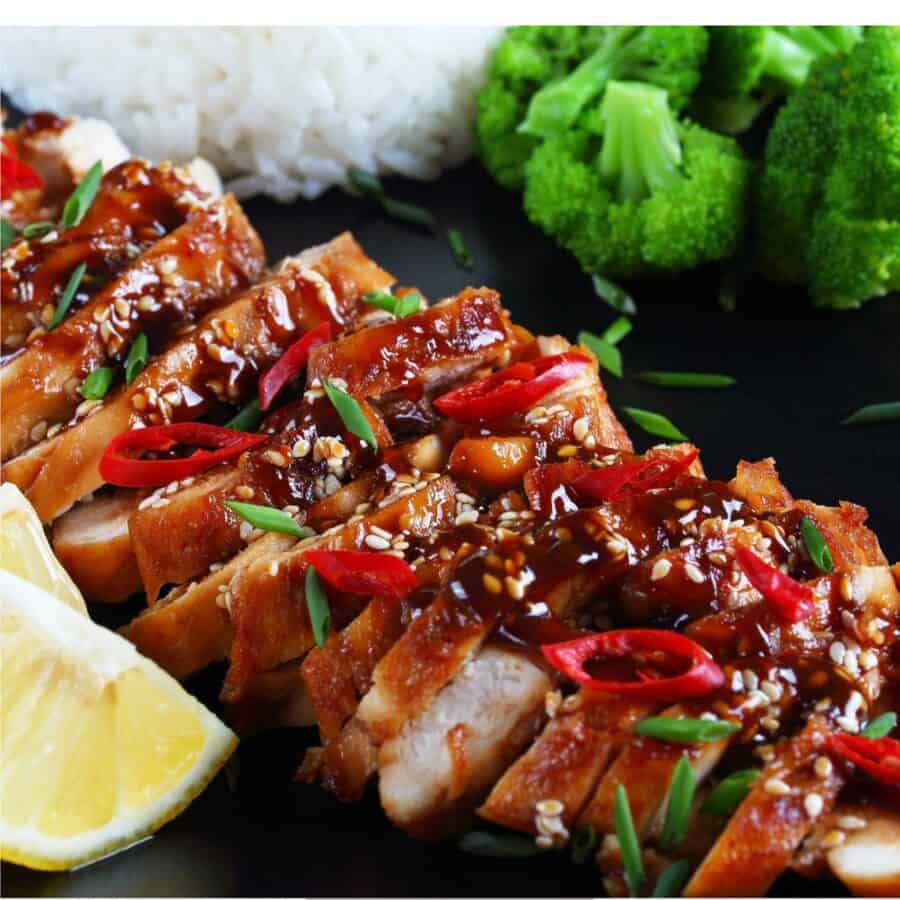
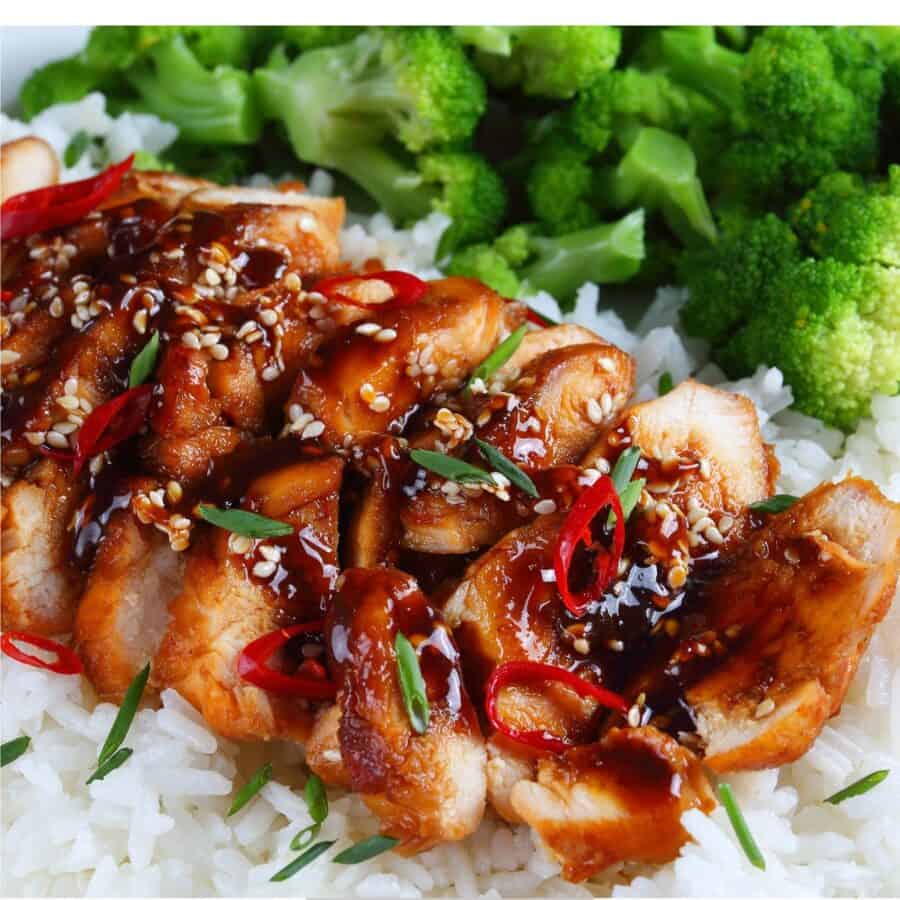
If you’re a fan of tender, juicy chicken marinated in a rich, sweet, and savory teriyaki glaze, this Grilled Teriyaki Chicken recipe is a must-try. It’s the perfect blend of smoky, charred goodness and bold flavors, making it an ideal dish for weeknight dinners, summer barbecues, or meal prep. With just a few simple steps, you’ll have a restaurant-quality dish that’s bound to impress.
Why You’ll Love This Great Grill Recipe
- Flavorful . The marinade infuses the chicken with an irresistible combination of sweet, tangy, and savory flavors.
- Easy . A simple marinade and quick grilling make this recipe a breeze.
- Versatile . Serve it with rice, noodles, or vegetables for a complete meal.
- Family-Friendly . A crowd-pleaser that’s sure to be a hit with both kids and adults.
Whether you’re a grilling enthusiast or a beginner, this recipe will quickly become a favorite.
What Does Grilled Teriyaki Chicken Taste Like?
Grilled Teriyaki Chicken is a classic for a reason. The smoky char from the grill complements the sweet and tangy teriyaki glaze, creating a harmonious blend of flavors that’s hard to resist.
It’s the kind of dish that feels both indulgent and healthy, perfect for any occasion.
Is It Healthy?
When made with a mindful balance of ingredients, Grilled Chicken Teriyaki is a healthy and delicious choice, offering a mix of protein, nutrients, and satisfying flavors without excessive calories or unhealthy fats.
Ingredients You’ll Need
Here’s what each ingredient contributes when making Grilled Teriyaki Chicken:
- Chicken Thighs - The star of the dish. Thighs are juicier and more forgiving on the grill, while breasts provide a leaner option. Both absorb the marinade beautifully for maximum flavor.
- Soy Sauce - The cornerstone of the teriyaki marinade, delivering a salty, umami-rich base that enhances the overall savory profile.
- Brown Sugar - Adds a touch of sweetness, balancing the saltiness of the soy sauce, while helping the chicken caramelize as it grills for a delectable crust.
- Garlic & Ginger - These aromatics provide depth and complexity, infusing the chicken with savory warmth and a hint of spice that complements the other ingredients.
- Rice Vinegar - Balances the sweetness with a subtle tangy note, adding a bright contrast to the richer flavors in the marinade.
- Sesame Oil - Introduces a nutty, toasty flavor that enhances the Asian-inspired taste of the dish.
- Cornstarch & Water - Used to create a slurry, this thickens the reserved marinade into a luscious, glossy glaze to coat the grilled chicken perfectly.
How To Make Grilled Teriyaki Chicken
- Prepare the Marinade . In a mixing bowl, whisk together soy sauce, brown sugar, garlic, ginger, rice vinegar, and sesame oil until combined. Reserve half of the mixture for basting and glaze.
- Marinate the Chicken . Place the chicken in a large zip-top bag or shallow dish. Pour the remaining marinade over the chicken, ensuring it’s fully coated. Seal and refrigerate for 30 minutes to 8 hours.
- Preheat the Grill . Preheat your grill to medium-high heat (about 375–400°F). Lightly oil the grates to prevent sticking.
- Grill the Chicken . Remove the chicken from the marinade, letting any excess drip off. Grill the chicken for 5–7 minutes per side, basting with the reserved marinade during the last few minutes of cooking. Use a meat thermometer to ensure the internal temperature reaches 165°F.
- Thicken the Glaze . While the chicken grills, bring the reserved marinade to a boil in a small saucepan. Stir in a cornstarch slurry (1 tablespoon cornstarch mixed with 1 tablespoon water) and simmer until thickened.
- Serve and Garnish . Transfer the grilled chicken to a serving platter. Drizzle with the thickened teriyaki glaze and garnish with sesame seeds and chopped green onions.
Tips And Tricks
Grilled Teriyaki Chicken is a delicious and flavorful dish that can be perfected with a few helpful tips and tricks. Follow these suggestions to ensure your chicken turns out tender, juicy, and bursting with flavor:
- Don’t Over-Marinate . While marinating enhances flavor, leaving the chicken too long in the marinade can cause the meat to become mushy.
- Oil the Grill Grates . Prevent sticking by brushing the grates with oil before grilling.
- Use a Meat Thermometer . This ensures perfectly cooked chicken every time.
- Double the Sauce . Make extra teriyaki glaze to drizzle over rice or veggies.
Variations
Grilled Teriyaki Chicken is a versatile dish that can be adapted to suit different tastes, dietary needs, and cooking styles. Here are some creative and delicious variations to try:
- Spicy- Add a teaspoon of red pepper flakes or Sriracha to the marinade for a kick.
- Pineapple- Grill pineapple rings alongside the chicken for a tropical twist.
- Low-Sodium- Use low-sodium soy sauce to reduce the saltiness.
- Gluten-Free - Substitute tamari for soy sauce.
What To Eat With Grilled Teriyaki Chicken
Grilled Teriyaki Chicken pairs beautifully with a variety of sides that complement its savory, sweet, and tangy flavors. Here are some delicious options to round out your meal:
- Steamed Jasmine Rice - A classic pairing to soak up the flavorful sauce.
- Stir-Fried Vegetables - Add a colorful medley of bell peppers, broccoli, and snap peas.
- Asian Slaw - A tangy, crunchy side dish that complements the sweetness of the chicken.
- Noodles - Toss soba or udon noodles in sesame oil and soy sauce for a quick side.
How Long Does It Last?
Grilled Teriyaki Chicken can be stored in an airtight container in the refrigerator for up to 3–4 days.
Reheat your leftovers gently in a skillet or microwave to maintain its tenderness.
Can You Freeze It?
Yes! Freeze the cooked chicken in a sealed container for up to 2 months.
Thaw it overnight in the refrigerator and reheat it according to the instructions listed above before serving.
More Simple Chicken Recipes
- Instant Pot Butter Chicken
- Buffalo Chicken Tacos
- Sheet Pan Chicken And Veggies
- Chicken Cobb Salad
- Chicken And Peppers


Grilled Teriyaki Chicken Recipe | Hawaiian Grilled Teriyaki Chicken
Ingredients
- ▢ 1 1/2 pounds Boneless Chicken Thighs
- ▢ 1/2 cup Soy Sauce
- ▢ 1/4 cup Brown Sugar
- ▢ 3 cloves Garlic , minced
- ▢ 1 tbsp Ginger , grated
- ▢ 2 tbsp Rice Vinegar
- ▢ 1 tbsp Sesame Oil
- ▢ 1 tbsp Cornstarch
- ▢ 2 tbsp Water
Instructions
- Prepare the Marinade . In a mixing bowl, whisk together soy sauce, brown sugar, garlic, ginger, rice vinegar, and sesame oil until combined. Reserve half of the mixture for basting and glaze.
- Marinate the Chicken . Place the chicken in a large zip-top bag or shallow dish. Pour the remaining marinade over the chicken, ensuring it’s fully coated. Seal and refrigerate for 30 minutes to 8 hours.
- Preheat the Grill . Preheat your grill to medium-high heat (about 375–400°F). Lightly oil the grates to prevent sticking.
- Grill the Chicken . Remove the chicken from the marinade, letting any excess drip off. Grill the chicken for 5–7 minutes per side, basting with the reserved marinade during the last few minutes of cooking. Use a meat thermometer to ensure the internal temperature reaches 165°F.
- Thicken the Glaze . While the chicken grills, bring the reserved marinade to a boil in a small saucepan. Stir in a cornstarch slurry (1 tablespoon cornstarch mixed with 1 tablespoon water) and simmer until thickened.
- Serve and Garnish . Transfer the grilled chicken to a serving platter. Drizzle with the thickened teriyaki glaze and garnish with sesame seeds and chopped green onions.
