
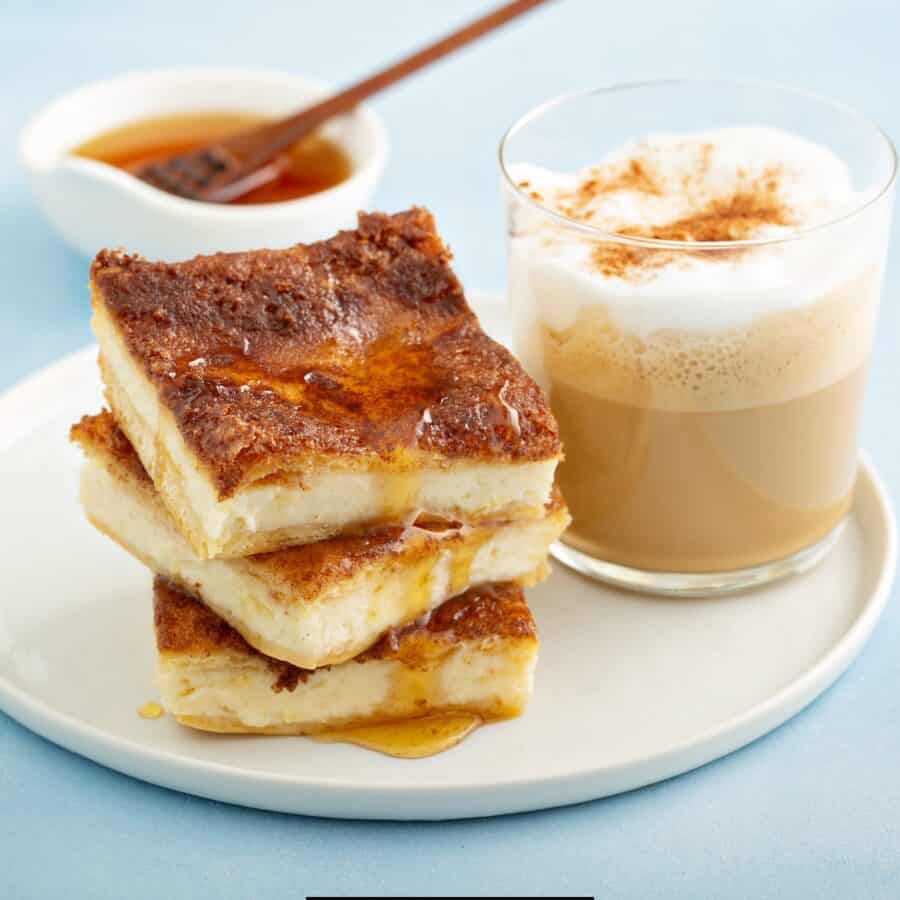
If you’re a fan of creamy, luscious cheesecake but want something more portable, these Cheesecake Bars are the perfect dessert! With a buttery graham cracker crust and velvety smooth filling, these bars are ideal for parties, picnics, or just an indulgent treat.

Why You’ll Love This Delicious Dessert
- Simple to Make . No water bath required—just straightforward ingredients and a simple process.
- Perfect Portions . Bars are easy to slice and serve, making them great for sharing.
- Versatile . Enjoy them plain, or customize with your favorite toppings.
- Creamy & Decadent . The perfect balance of tangy cheesecake and sweet crust.
These Cheesecake Bars are the ideal solution when you’re craving classic cheesecake without the hassle of a full-sized dessert.
What Do Cheesecake Bars Taste Like?
Cheesecake Bars pack all the creamy richness of traditional cheesecake into bite-sized, shareable squares. The graham cracker crust adds a sweet, buttery crunch, perfectly complementing the smooth cheesecake layer.
Ingredients You’ll Need
- Graham Cracker Crumbs - Forms the buttery base for the crust.
- Butter - Holds the crust together and adds richness.
- Granulated Sugar - Sweetens both the crust and filling.
- Cream Cheese - The star of the show—use full-fat for the creamiest texture.
- Eggs - Provide structure and help the cheesecake set.
- Sour Cream - Adds tanginess and enhances the creamy texture.
- Vanilla Extract - Elevates the flavor of the filling.
- Optional Toppings - Honey drizzle, fresh berries, chocolate drizzle, or caramel sauce.
How To Make Cheesecake Bars
- Prepare the Crust . Preheat your oven to 325°F. Line a 9x13-inch baking pan with parchment paper. In a bowl, mix graham cracker crumbs, melted butter, and sugar until combined. Press the mixture firmly into the bottom of the prepared pan. Bake the crust for 10 minutes, then let it cool.
- Make the Filling . In a large bowl, beat softened cream cheese and sugar until smooth and creamy. Add eggs, one at a time, mixing well after each addition. Stir in the sour cream and vanilla extract until fully combined.
- Assemble and Bake . Pour the cheesecake filling over the cooled crust, spreading it evenly. Drizzle the top with honey. Bake for 35-40 minutes, or until the edges are set and the center has a slight jiggle. Turn off the oven and let the bars cool inside for 15 minutes with the door slightly ajar.
- Chill and Slice . Transfer the pan to the refrigerator and chill for at least 4 hours, or overnight, before slicing into bars.
Tips And Tricks
Follow these tips for perfect Cheesecake Bars every time:
- Room Temperature Ingredients . Allow cream cheese, eggs, and sour cream to come to room temperature for a smoother filling.
- Don’t Overmix . Overmixing can incorporate too much air, causing cracks.
- Use Parchment Paper . Line the pan for easy removal and clean slicing.
- Cool Gradually . Let the bars cool slowly to prevent cracking.
Variations
Customize your Cheesecake Bars with these delicious twists:
- Chocolate Chip - Fold mini chocolate chips into the filling.
- Berry Swirl - Swirl in raspberry or strawberry jam before baking.
- Salted Caramel - Drizzle with salted caramel sauce and sprinkle with flaky sea salt.
- Oreo - Substitute crushed Oreos for the graham cracker crust.
What To Enjoy With Cheesecake Bars
Cheesecake Bars are perfect on their own but pair beautifully with these accompaniments:
- Whipped Cream - Light and fluffy topping for extra decadence.
- Fresh Fruit - Add a burst of freshness with strawberries, blueberries, or raspberries.
- Coffee or Tea - A warm beverage complements the creamy dessert.
How Do You Cut Cheesecake Bars Cleanly?
Cutting cheesecake bars cleanly can elevate their presentation and make them look professional. Follow these tips and techniques for perfectly sliced bars every time:
- Chill Thoroughly . Ensure your cheesecake bars are well-chilled—at least 4 hours or overnight. This helps them set and prevents the filling from smearing.
- Use a Sharp Knife . A straight-edged knife works best for clean cuts. Avoid serrated knives, as they can create crumbs or uneven edges.
- Heat the Knife . Dip the knife blade into a glass of hot water for a few seconds. The heat helps the blade glide through the creamy cheesecake layer.
- Wipe Between Cuts . After each cut, wipe the knife blade clean with a paper towel or kitchen towel. This prevents buildup on the knife, which can cause smearing.
- Cut with Precision . Position the knife above the bars and press straight down in one smooth motion. Avoid using a sawing motion, which can tear the crust.
Do You Need To Refrigerate Cheesecake Bars After Baking?
Yes, cheesecake bars need to be refrigerated after baking. Cheesecake bars contain perishable ingredients like cream cheese, eggs, and sour cream, which can spoil if left at room temperature for too long.
Can You Freeze Them?
Yes, you can absolutely freeze cheesecake bars! Freezing is a great way to extend their shelf life and enjoy them later without sacrificing flavor or texture. Here’s how to freeze and thaw them properly:
- Cool Completely . Allow the cheesecake bars to cool completely after baking and chilling in the refrigerator. This ensures they set properly and prevents condensation during freezing.
- Pre-Slice the Bars . Slice the cheesecake into individual bars for easy serving later.
- Wrap Individually . Wrap each bar tightly in plastic wrap to prevent freezer burn and protect the creamy texture.
- Use a Freezer-Safe Container . Place the wrapped bars in a freezer-safe airtight container or resealable freezer bag. This adds an extra layer of protection and keeps them organized.
- Label and Freeze . Label the container or bag with the date so you know when they were frozen. Cheesecake bars can be stored in the freezer for up to 3 months.
More Craveworty Cheesecake Recipes
- Mini Cheesecakes
- Instant Pot Mango Cheesecake
- Oreo Cheesecake
- Cheesecake Brownies
- Pumpkin Cheesecake


Cheesecake Bars | Easy And Creamy Cheesecake Bar Recipe
Ingredients
For The Crust
- ▢ 1 1/2 cups Graham Cracker Crumbs
- ▢ 4 tbsp Butter , melted
- ▢ 2 tbsp Granulated Sugar
Cheesecake Bar Filing
- ▢ 16 ounces Cream Cheese , softened
- ▢ 1/2 cup Granulated Sugar
- ▢ 2 Eggs
- ▢ 1/2 cup Sour Cream
- ▢ 1 tsp Vanilla Extract
- ▢ 1/4 cup Honey
Instructions
- Prepare the Crust . Preheat your oven to 325°F. Line a 9x13-inch baking pan with parchment paper. In a bowl, mix graham cracker crumbs, melted butter, and sugar until combined. Press the mixture firmly into the bottom of the prepared pan. Bake the crust for 10 minutes, then let it cool.
- Make the Filling . In a large bowl, beat softened cream cheese and sugar until smooth and creamy. Add eggs, one at a time, mixing well after each addition. Stir in the sour cream and vanilla extract until fully combined.
- Assemble and Bake . Pour the cheesecake filling over the cooled crust, spreading it evenly. Drizzle the top with honey. Bake for 35-40 minutes, or until the edges are set and the center has a slight jiggle. Turn off the oven and let the bars cool inside for 15 minutes with the door slightly ajar.
- Chill and Slice . Transfer the pan to the refrigerator and chill for at least 4 hours, or overnight, before slicing into bars.
Get support & connect with our community on Facebook!
Nutrition

If you already signed up, you should have received an email with a password to give you unlimited access to our FREE Printable Library. The password is case sensitive. Enter it below and get printing!
Password:

Cheesecake Bars | Easy And Creamy Cheesecake Bar Recipe
Ingredients
For The Crust
- 1 1/2 cups Graham Cracker Crumbs
- 4 tbsp Butter melted
- 2 tbsp Granulated Sugar
Cheesecake Bar Filing
- 16 ounces Cream Cheese softened
- 1/2 cup Granulated Sugar
- 2 Eggs
- 1/2 cup Sour Cream
- 1 tsp Vanilla Extract
- 1/4 cup Honey
Instructions
- Prepare the Crust . Preheat your oven to 325°F. Line a 9x13-inch baking pan with parchment paper. In a bowl, mix graham cracker crumbs, melted butter, and sugar until combined. Press the mixture firmly into the bottom of the prepared pan. Bake the crust for 10 minutes, then let it cool.
- Make the Filling . In a large bowl, beat softened cream cheese and sugar until smooth and creamy. Add eggs, one at a time, mixing well after each addition. Stir in the sour cream and vanilla extract until fully combined.
- Assemble and Bake . Pour the cheesecake filling over the cooled crust, spreading it evenly. Drizzle the top with honey. Bake for 35-40 minutes, or until the edges are set and the center has a slight jiggle. Turn off the oven and let the bars cool inside for 15 minutes with the door slightly ajar.
- Chill and Slice . Transfer the pan to the refrigerator and chill for at least 4 hours, or overnight, before slicing into bars.
Cheesecake Bars | Easy And Creamy Cheesecake Bar Recipe https://twosleevers.com/cheesecake-bars/

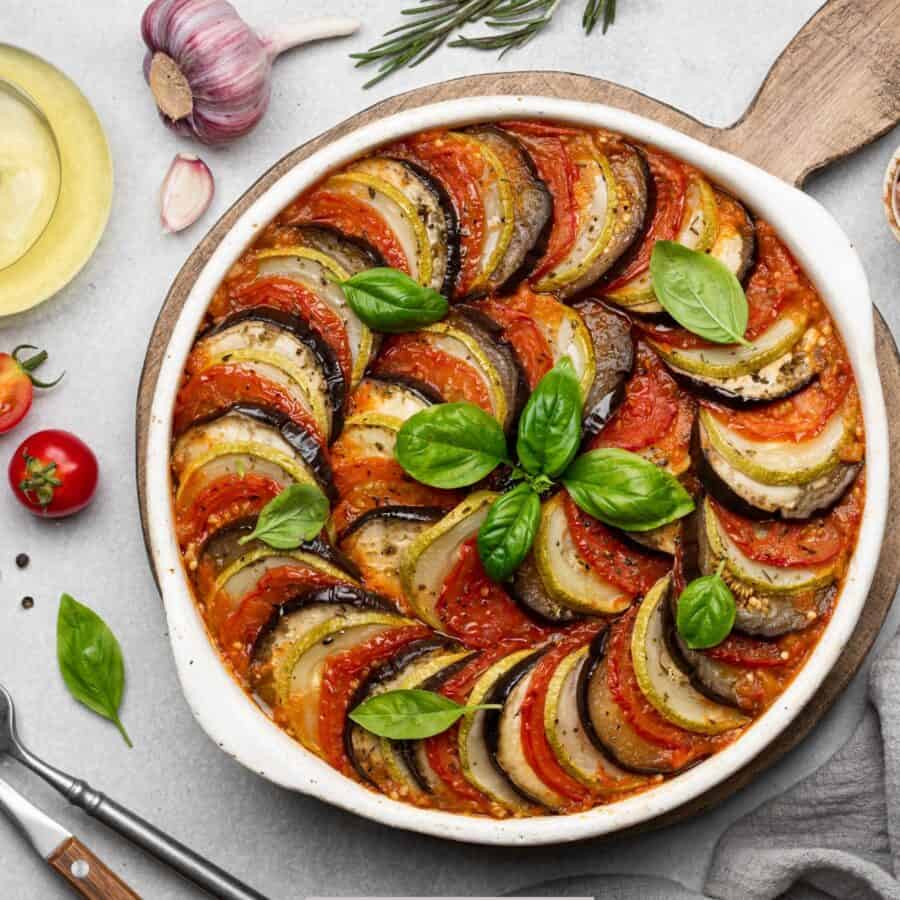
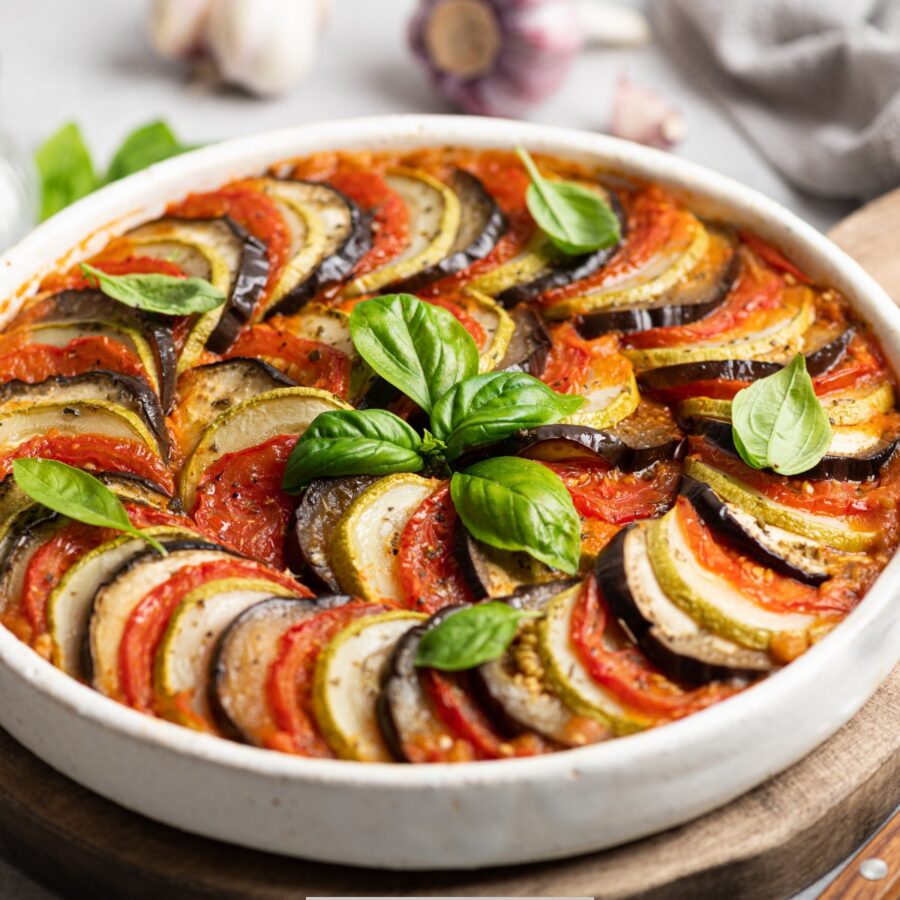
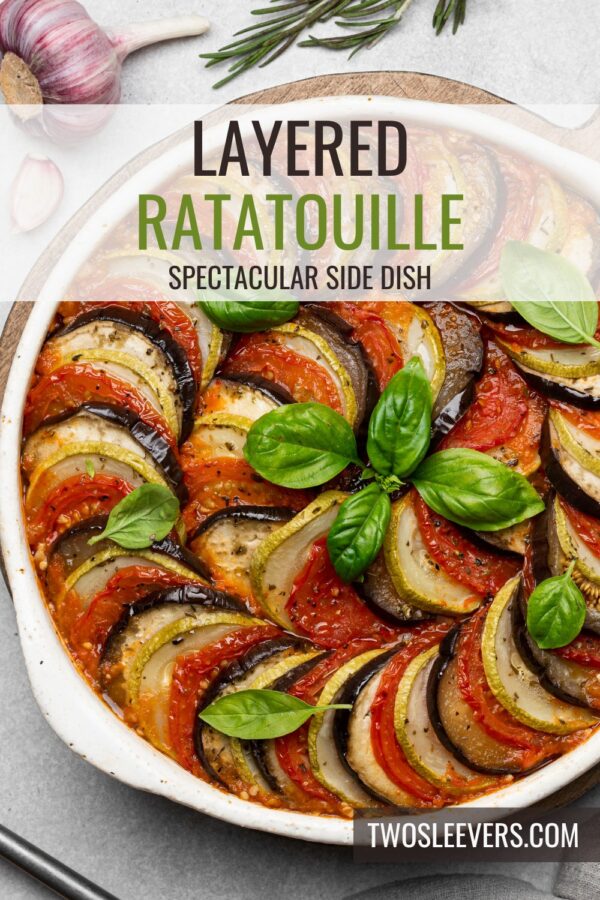
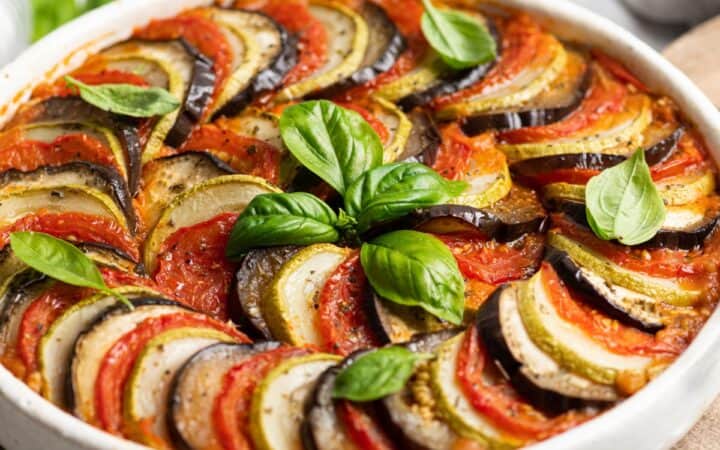
If you’re a fan of vibrant, fresh vegetables and bold Mediterranean flavors, you’re going to love this Layered Ratatouille Recipe! This dish combines thinly sliced zucchini, eggplant, bell peppers, and tomatoes, all arranged in a beautiful layered pattern and baked to perfection in a rich, herb-infused tomato sauce.
Why You’ll Love This Spectacular Side Dish
- Healthy & Nutritious – Packed with fresh vegetables, fiber, and antioxidants.
- Visually Stunning – The layered pattern makes this dish an eye-catching side dish masterpiece.
- Easy to Customize – Adapt the flavors to your liking with different herbs and spices.
- Great for Meal Prep – Ratatouille tastes even better the next day, making it perfect for leftovers.
Ratatouille is a classic French dish that originated in Provence and has become a favorite among home cooks and food lovers worldwide. Whether you’re looking for a delicious plant-based meal or a stunning side dish, this baked ratatouille will impress everyone at the table.
What Is Ratatouille?
Ratatouille is a French Provençal vegetable stew that has been adapted into many versions, including this layered baked variation. Traditionally, it’s made by sautéing or stewing vegetables, but this recipe takes inspiration from the movie “Ratatouille” with a beautifully arranged spiral of sliced vegetables.
This method enhances the presentation while allowing the flavors to meld together as they bake in a garlicky tomato sauce. The result? A dish that is just as delicious as it is gorgeous!
Is It Healthy?
Layered Ratatouille is one of the healthiest vegetable-based dishes you can enjoy! It’s low in calories, low carb , rich in vitamins and fiber, and bursting with fresh, natural flavors.
Whether you’re following a plant-based diet, looking for a low-carb meal, or just want to eat more veggies, this dish is a delicious and nutritious choice.
Ingredients You’ll Need
- Olive Oil - Used to sauté the onions and garlic, adding depth and richness to the sauce.
- Garlic - Enhances the sauce with a bold, aromatic flavor that complements the vegetables.
- Onion - Adds a natural sweetness and depth to the sauce as it caramelizes.
- Crushed Tomatoes - Forms the base of the sauce, giving it a slightly tangy, umami-rich taste.
- Balsamic Vinegar - Provides a slight acidity and a hint of sweetness, balancing the flavors.
- Dried Oregano & Basil - Classic Mediterranean herbs that add earthy and slightly peppery notes.
- Salt & Black Pepper - Enhances the overall flavor, ensuring the sauce is well-seasoned.
- Zucchini - Mild and slightly sweet, zucchini absorbs the flavors of the sauce while adding a tender bite.
- Yellow Squash - Similar to zucchini but with a slightly firmer texture and a hint of nuttiness.
- Eggplant - Softens beautifully as it bakes, absorbing the flavors of the sauce and adding a meaty texture.
- Roma Tomatoes - Their natural acidity and juiciness enhance the overall richness of the dish.
- Fresh Basil or Parsley - Adds a fresh, herbaceous aroma and a pop of green color.
- Grated Parmesan or Feta (Optional) - If added, cheese brings a savory, slightly salty contrast to the sweet and tangy vegetables.
Each ingredient plays a crucial role in building the layers of flavor and texture in this beautifully baked ratatouille!
How To Make Layered Ratatouille
- Prepare the Tomato Sauce . Heat olive oil in a pan over medium heat. Add the chopped onion and cook for 3-4 minutes until softened. Stir in the minced garlic and cook for 1 more minute. Add the crushed tomatoes, balsamic vinegar, oregano, basil, salt, and black pepper. Let simmer for 10 minutes, then spread the sauce evenly in the bottom of a baking dish.
- Slice & Arrange the Vegetables . Using a sharp knife or mandoline, thinly slice the zucchini, squash, eggplant, and tomatoes into uniform rounds. Start arranging the slices in an alternating pattern (zucchini, eggplant, tomato, etc.) in a spiral or neat rows over the sauce.
- Bake to Perfection . Drizzle a little olive oil over the vegetables and sprinkle with a pinch of salt and pepper. Cover the dish with foil and bake in a 375°F oven for 30 minutes. Remove the foil and bake for another 15-20 minutes until the vegetables are tender and slightly caramelized.
- Garnish & Serve . Sprinkle fresh basil or parsley on top before serving. For an extra flavor boost, add grated Parmesan or crumbled feta before serving.
Tips And Tricks
- Use a Mandoline Slicer . This helps achieve uniformly thin slices , ensuring even cooking.
- Choose Fresh, Firm Vegetables . Avoid overly ripe eggplant or tomatoes, as they can become mushy.
- Let It Rest Before Serving . This allows the flavors to develop and makes slicing easier.
- Add Fresh Herbs . Enhance the flavor with thyme, rosemary, or basil for a more fragrant dish.
Variations
Layered Ratatouille is a versatile dish that can be customized in many ways to suit different tastes, diets, and occasions. Here are some delicious variations to try:
- Cheesy Ratatouille - Add shredded mozzarella or goat cheese on top before baking.
- Spicy Kick - Sprinkle red pepper flakes into the tomato sauce for a little heat.
- Rustic Stew Style - Instead of layering, chop the vegetables and sauté them in the sauce for a traditional ratatouille texture.
- Mediterranean Twist - Add olives and capers for a salty, tangy twist.
What To Eat With Layered Ratatouille
Layered Ratatouille is a versatile dish that pairs well with a variety of sides, proteins, and grains. Whether you’re looking for a light vegetarian meal or a more substantial pairing, here are the best foods to serve with it:
- Bread - Perfect for soaking up the flavorful tomato sauce.
- Rice or Quinoa - A hearty, gluten-free option to serve alongside.
- Grilled Chicken or Fish - A great protein pairing for a well-balanced meal.
- Goat Cheese Crostini - Add a creamy contrast to the rich flavors.
How Long Does It Last?
Layered Ratatouille is a dish that stores well, allowing you to enjoy its flavors for several days. When stored in an airtight container in the refrigerator, ratatouille lasts for about 3 to 4 days.
As it sits, the flavors continue to develop, making it even more delicious the next day. To reheat, simply warm it in the oven at 350°F for about 15 minutes, or heat individual portions in the microwave.
Can You Freeze It?
If you’d like to store it for longer, ratatouille can be frozen for up to 3 months. To freeze, let the dish cool completely, then transfer it to a freezer-safe container.
When ready to eat, thaw it in the refrigerator overnight before reheating.
More Of Our Best Zucchini Recipes
- Roasted Zucchini
- Zucchini Casserole
- Zucchini Roll Ups
- Poblano Zucchini
- Instant Pot Lasagna
Layered Ratatouille Recipe | Homemade Baked Ratatouille
Ingredients
For The Tomato Sauce
- ▢ 2 tbsp Olive Oil
- ▢ 3 cloves Garlic , minced
- ▢ 1 Onion , chopped
- ▢ 14 ounces Crushed Tomatoes
- ▢ 1 tsp Balsamic Vinegar
- ▢ 1 tsp Dried Oregano
- ▢ 1 tsp Dried Basil
- ▢ 1/2 tsp Kosher Salt
- ▢ 1/4 tsp Ground Black Pepper
For the Veggies
- ▢ 1 Zucchini , thinly sliced
- ▢ 1 Yellow Squash , thinly sliced
- ▢ 1 Eggplant , thinly sliced
- ▢ 3 Roma Tomatoes , thinly slcied
- ▢ Fresh Basil , for garnish
- ▢ 1/4 cup Feta Cheese , optional, for garnish
Instructions
- Prepare the Tomato Sauce . Heat olive oil in a pan over medium heat. Add the chopped onion and cook for 3-4 minutes until softened. Stir in the minced garlic and cook for 1 more minute. Add the crushed tomatoes, balsamic vinegar, oregano, basil, salt, and black pepper. Let simmer for 10 minutes, then spread the sauce evenly in the bottom of a baking dish.
- Slice & Arrange the Vegetables . Using a sharp knife or mandoline, thinly slice the zucchini, squash, eggplant, and tomatoes into uniform rounds. Start arranging the slices in an alternating pattern (zucchini, eggplant, tomato, etc.) in a spiral or neat rows over the sauce.
- Bake to Perfection . Drizzle a little olive oil over the vegetables and sprinkle with a pinch of salt and pepper. Cover the dish with foil and bake in a 375°F oven for 30 minutes. Remove the foil and bake for another 15-20 minutes until the vegetables are tender and slightly caramelized.
- Garnish & Serve . Sprinkle fresh basil or parsley on top before serving. For an extra flavor boost, add grated Parmesan or crumbled feta before serving.
