
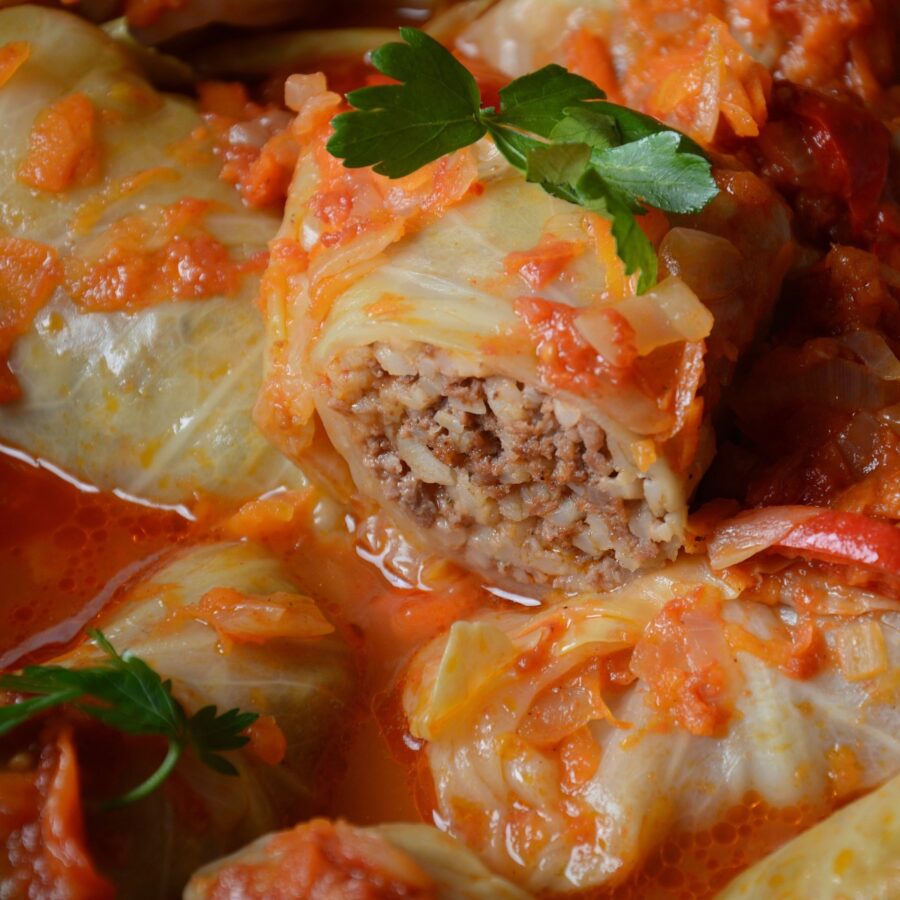
If you’re in the mood for a comforting and flavorful dish, look no further! These Stuffed Cabbage Rolls are a culinary delight, bringing together a perfect blend of savory ground meat and tender cabbage, all enveloped in a rich tomato sauce. Learn how to create this classic and satisfying recipe that’s perfect for family dinners or special occasions.

Why You’ll Love This Flavorful Dish
- Comfort Food Classic . Stuffed Cabbage Rolls are the epitome of comfort food. The combination of seasoned ground meat, rice, and cabbage creates a filling and satisfying main course that warms the soul.
- Savory and Flavorful . The savory filling, combined with the tangy tomato sauce, results in a burst of flavors with every bite. The spices and herbs used in this recipe add depth and richness to the dish.
- Family-Friendly . Loved by both kids and adults, Stuffed Cabbage Rolls are a family-friendly option that makes for a wholesome and delicious dinner.
- Make-Ahead Convenience . These rolls can be prepared in advance, making them a convenient option for busy days or entertaining guests.
These Stuffed Cabbage Rolls are sure to become a family favorite. The hearty filling and flavorful tomato sauce make them a standout dish that’s perfect for any occasion. Enjoy these rolls as a comforting meal that brings people together.
What Cabbage Is Best For Cabbage Rolls?
When making cabbage rolls, it’s common to use a type of cabbage that has large, flexible leaves that are easy to separate and roll. The most commonly used cabbage for cabbage rolls is green cabbage. Its leaves are generally large and pliable, making them suitable for enclosing the filling.
How Do You Cut Large Cabbage Leaves For Cabbage Rolls?
Cutting large cabbage leaves for cabbage rolls involves a process of removing the leaves from the cabbage head without tearing them. Here’s a step-by-step guide:
- Select a Large Cabbage Head . Choose a fresh and large cabbage head. A larger head will provide more and larger leaves for rolling.
- Core the Cabbage . Cut a cone-shaped core from the bottom of the cabbage head. This makes it easier to separate the leaves.
- Boiling Method . Immerse the cored cabbage head in boiling water for a few minutes. This helps to loosen the leaves, making them easier to peel off without tearing.
- Remove Outer Leaves . Peel off the outer leaves one by one. These leaves are often tougher and may need a bit more cooking time, so you can set them aside.
- Continue Peeling . Peel the leaves, layer by layer, toward the center of the cabbage. Aim for leaves that are at least 4-6 inches in diameter for easier rolling.
- Trim the Tough Stem . Once you have a leaf, trim the tough stem at the base. This makes the leaf more pliable for rolling.
- Repeat the Process . Repeat the process until you have enough large, pliable leaves for your cabbage rolls.
What Is The Difference Between Polish And Ukrainian Cabbage Rolls?
Polish and Ukrainian cabbage rolls, known as “Golabki” and “Holubtsi” respectively, share some similarities, but there are also distinct differences in their preparation and flavor profiles. Here are some general differences between Polish and Ukrainian cabbage rolls:
Filling
- Polish Golabki - The filling typically consists of ground pork or a combination of pork and beef. It may include rice, onions, and various seasonings.
- Ukrainian Holubtsi - The filling often includes a mixture of ground beef and rice. Onions, garlic, and sometimes other seasonings are added for flavor.
Sauce
- Polish Golabki - Golabki are often cooked in a tomato-based sauce that can include tomatoes, tomato sauce, or tomato soup.
- Ukrainian Holubtsi - Holubtsi are also cooked in a tomato-based sauce, but variations may include a sweet and sour element, often achieved by adding sugar or sour ingredients like sauerkraut juice.
Ingredients You’ll Need
- Cabbage- They serve as the outer layer or wrapper for the stuffing. They are softened by boiling, making them pliable for rolling.
- Ground Beef- Forms the base of the filling. It provides protein and contributes to the hearty and savory flavor of the cabbage rolls.
- Cooked Rice- Adds texture to the filling and helps absorb excess moisture. It contributes to the overall heartiness of the cabbage rolls.
- Onion- Bring a sweet and savory flavor to the filling. They add depth and enhance the overall taste of the dish.
- Garlic- Adds aromatic and savory notes to the filling, enhancing the overall flavor profile of the cabbage rolls.
- Egg - Acts as a binder, helping to hold the filling together. It contributes to the texture and cohesiveness of the stuffing.
- Salt - Enhances the natural flavors of the ingredients, ensuring a well-seasoned and balanced taste in the cabbage rolls.
- Black Pepper - Adds a bit of heat and complements the other spices, contributing to the overall savory profile of the dish.
- Paprika - Provides a subtle smokiness and a hint of sweetness to the filling.
- Thyme - Contributes an earthy and herby flavor, enhancing the overall aroma and taste.
- Tomato Sauce - Adds a rich and tangy flavor to the dish. It also helps to create a flavorful base for the rolls.
- Crushed Tomatoes- Contribute to the sauce, providing a robust and thick texture. They add a natural sweetness and acidity to the dish.
- Beef Broth - Enhances the overall savory profile of the cabbage rolls and keeps them moist during baking.
- Olive Oil - Used for drizzling over the top of the cabbage rolls before baking. It adds richness and helps prevent drying during baking.
- Parsley- Used as a garnish to add a pop of color and a fresh, herbaceous flavor to the finished cabbage rolls.
By combining these ingredients, you create a well-balanced, savory, and comforting dish with layers of flavor in each bite.
How To Make Cabbage Rolls
- Preheat and Prepare . Preheat your oven to 350°F. Remove the core from the cabbage and place it in a pot of boiling water. Carefully peel off the cabbage leaves as they soften. Set aside.
- Filling Mixture . In a large bowl, combine the ground beef, cooked rice, chopped onion, minced garlic, egg, salt, black pepper, paprika, and dried thyme. Mix until well combined.
- Tomato Sauce . In a separate bowl, mix together the tomato sauce, crushed tomatoes, and beef or vegetable broth.
- Assembling the Rolls . Place a cabbage leaf on a flat surface and add a portion of the filling mixture. Roll the leaf, tucking in the sides, to form a secure roll. Repeat with the remaining leaves and filling.
- Layering in the Pan . In a baking dish, spread a layer of the tomato sauce mixture. Arrange the cabbage rolls on top. Repeat the process, layering sauce and rolls.
- Baking. Drizzle olive oil over the top and cover the baking dish with aluminum foil. Bake in the preheated oven for approximately 1.5 to 2 hours, or until the cabbage rolls are tender.
- Garnish and Serve . Once baked, garnish the rolls with fresh parsley. Serve the Stuffed Cabbage Rolls with additional tomato sauce if desired.
Tips And Tricks
Making stuffed cabbage rolls can be a delightful culinary venture, but it requires a bit of finesse. Here are some tips and tricks to help you make them delicious:
- Select a Large Cabbage . Choose a large cabbage with large, flexible leaves. This makes it easier to roll and fold the leaves around the filling.
- Roll Tightly . Roll the cabbage leaves tightly around the filling to prevent them from unraveling during cooking.
- Secure Ends . Tuck in the sides of the cabbage leaves as you roll to secure the ends and keep the filling intact.
Variations
Stuffed cabbage rolls, known by various names in different cuisines, offer a versatile canvas for culinary creativity. Here are some variations you can explore:
- Vegetarian/Vegan Cabbage Rolls - Replace the meat with a mix of vegetables, such as mushrooms, carrots, bell peppers, and quinoa or lentils for protein. Opt for a tomato or mushroom-based sauce.
- Grain Alternatives - Use different types of rice like brown rice, wild rice, or even cauliflower rice for a low-carb option. Experiment with other grains like bulgur, farro, or barley.
- Mini Rolls or Casserole - Make smaller rolls for appetizers or party snacks. Layer cabbage leaves, filling, and sauce in a baking dish for a deconstructed version.
What To Serve With Cabbage Rolls
Stuffed Cabbage Rolls can be served on their own or with complementary sides. Here are some ideas:
- Mashed Potatoes - Creamy mashed potatoes pair well with the savory cabbage rolls.
- Crusty Bread - Serve with a side of crusty bread to soak up the delicious tomato sauce.
- Steamed Vegetables - Lighten the meal with a side of steamed vegetables like green beans or carrots.
How Long Do They Last?
If stored in an airtight container or wrapped tightly in plastic wrap, cabbage rolls can last in the refrigerator for about 3 to 4 days. Beyond this time, they may start to lose their freshness and flavor.
Can You Freeze It?
For longer-term storage, cabbage rolls can be frozen. Properly wrapped in plastic wrap, aluminum foil, or placed in an airtight container, they can maintain their quality for up to 2 to 3 months. Freezing helps to preserve the texture and flavor of the cabbage rolls.
More Cabbage Recipes
- Cabbage Steaks
- Colcannon
- Pan-Fried Pork Chops And Cabbage
- Keto Coleslaw
- Szechuan Cabbage
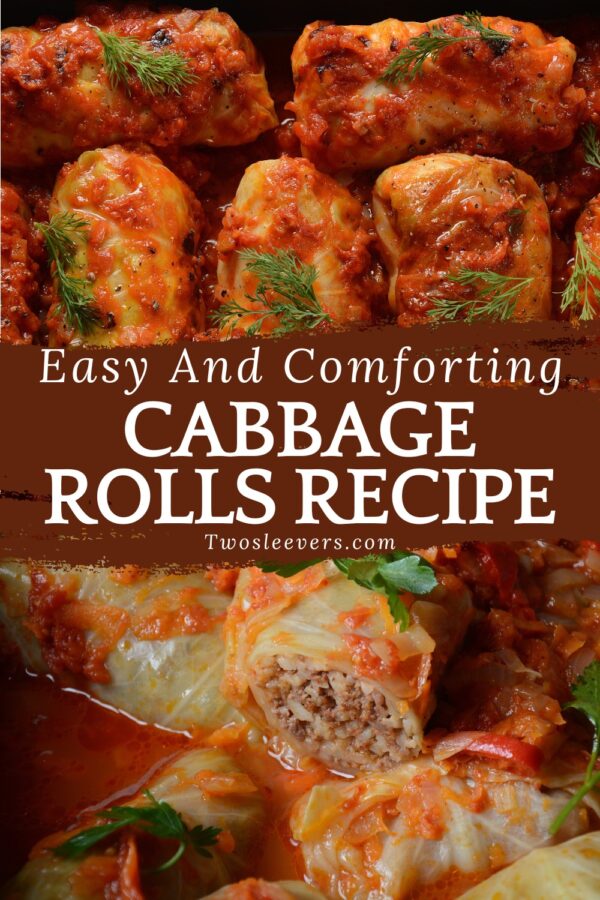
Cabbage Rolls | Stuffed Cabbage Rolls Recipe
Ingredients
- ▢ 12 Green Cabbage Leaves , large
- ▢ 1 pound Ground Beef
- ▢ 1 cup Cooked White Rice
- ▢ 2 Garlic , minced
- ▢ 1 Egg
- ▢ 1 tsp Kosher Salt
- ▢ 1/2 tsp Ground Black Pepper
- ▢ 1 tsp Paprika
- ▢ 1 tsp Dried Thyme
- ▢ cups Tomato Sauce
- ▢ 1 1/2 cups Diced Tomatoes
- ▢ 1 cup Beef Broth
- ▢ 1 tbsp Olive Oil
- ▢ Parsley , chopped, for garnish
Instructions
- Preheat and Prepare . Preheat your oven to 350°F. Remove the core from the cabbage and place it in a pot of boiling water. Carefully peel off the cabbage leaves as they soften. Set aside.
- Filling Mixture . In a large bowl, combine the ground beef, cooked rice, chopped onion, minced garlic, egg, salt, black pepper, paprika, and dried thyme. Mix until well combined.
- Tomato Sauce . In a separate bowl, mix together the tomato sauce, crushed tomatoes, and beef or vegetable broth.
- Assembling the Rolls . Place a cabbage leaf on a flat surface and add a portion of the filling mixture. Roll the leaf, tucking in the sides, to form a secure roll. Repeat with the remaining leaves and filling.
- Layering in the Pan . In a baking dish, spread a layer of the tomato sauce mixture. Arrange the cabbage rolls on top. Repeat the process, layering sauce and rolls.
- Baking. Drizzle olive oil over the top and cover the baking dish with aluminum foil. Bake in the preheated oven for approximately 1.5 to 2 hours, or until the cabbage rolls are tender.
- Garnish and Serve . Once baked, garnish the rolls with fresh parsley. Serve the Stuffed Cabbage Rolls with additional tomato sauce if desired.
Get support & connect with our community on Facebook!

If you already signed up, you should have received an email with a password to give you unlimited access to our FREE Printable Library. The password is case sensitive. Enter it below and get printing!
Password:

Cabbage Rolls | Stuffed Cabbage Rolls Recipe
Ingredients
- 12 Green Cabbage Leaves large
- 1 pound Ground Beef
- 1 cup Cooked White Rice
- 2 Garlic minced
- 1 Egg
- 1 tsp Kosher Salt
- 1/2 tsp Ground Black Pepper
- 1 tsp Paprika
- 1 tsp Dried Thyme
- cups Tomato Sauce
- 1 1/2 cups Diced Tomatoes
- 1 cup Beef Broth
- 1 tbsp Olive Oil
- Parsley chopped, for garnish
Instructions
- Preheat and Prepare . Preheat your oven to 350°F. Remove the core from the cabbage and place it in a pot of boiling water. Carefully peel off the cabbage leaves as they soften. Set aside.
- Filling Mixture . In a large bowl, combine the ground beef, cooked rice, chopped onion, minced garlic, egg, salt, black pepper, paprika, and dried thyme. Mix until well combined.
- Tomato Sauce . In a separate bowl, mix together the tomato sauce, crushed tomatoes, and beef or vegetable broth.
- Assembling the Rolls . Place a cabbage leaf on a flat surface and add a portion of the filling mixture. Roll the leaf, tucking in the sides, to form a secure roll. Repeat with the remaining leaves and filling.
- Layering in the Pan . In a baking dish, spread a layer of the tomato sauce mixture. Arrange the cabbage rolls on top. Repeat the process, layering sauce and rolls.
- Baking. Drizzle olive oil over the top and cover the baking dish with aluminum foil. Bake in the preheated oven for approximately 1.5 to 2 hours, or until the cabbage rolls are tender.
- Garnish and Serve . Once baked, garnish the rolls with fresh parsley. Serve the Stuffed Cabbage Rolls with additional tomato sauce if desired.
Cabbage Rolls | Stuffed Cabbage Rolls Recipe https://twosleevers.com/cabbage-rolls/

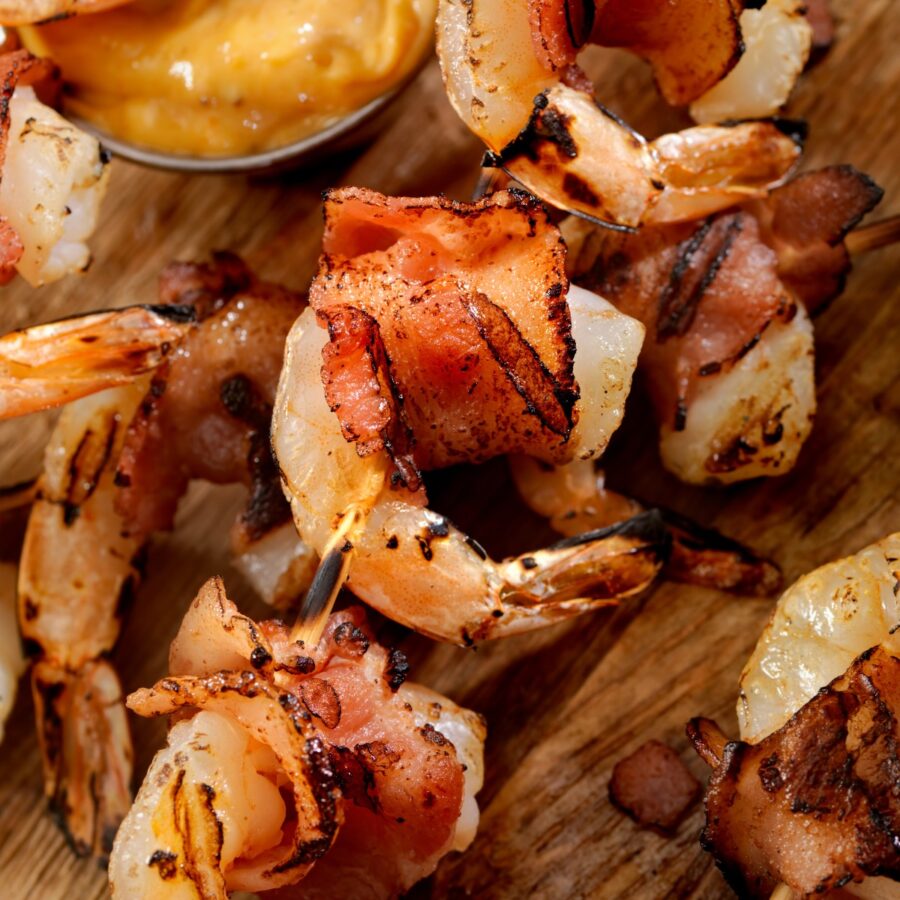
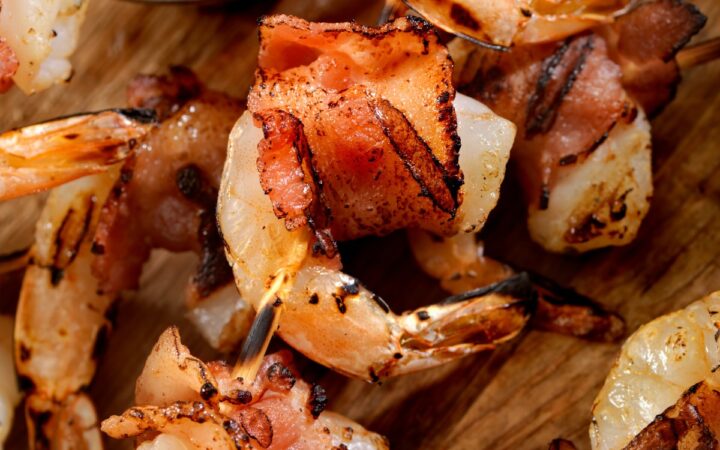
Delight your taste buds with our irresistible Air Fryer Bacon Wrapped Shrimp recipe. This savory yet succulent appetizer combines the crispy goodness of bacon with the juicy tenderness of shrimp, creating a flavor explosion that will leave you craving more.
Why You’ll Love This Flavorful Appetizer
- Quick and Easy. With just a few simple ingredients and the convenience of an air fryer, you can whip up this crowd-pleasing appetizer in no time. Perfect for entertaining or a delicious snack anytime.
- Minimal Ingredients. You only need shrimp, bacon, and a few seasonings to create this delectable dish. It’s a straightforward recipe that delivers maximum flavor with minimal effort.
With these mouthwatering side dish options, you can create a memorable and satisfying meal featuring delicious bacon wrapped shrimp. Whether you’re entertaining guests or enjoying a cozy night in, these pairings are sure to delight your taste buds.
What Does Air Fryer Bacon Wrapped Shrimp Taste Like?
Air Fryer Bacon Wrapped Shrimp is a tantalizing combination of smoky, salty bacon and tender, succulent shrimp. The bacon crisps up beautifully in the air fryer, while the shrimp remains juicy and flavorful, creating a perfect balance of textures and flavors.
Ingredients You’ll Need
- Large Shrimp - Choose large, deveined shrimp for this recipe. The size ensures that the shrimp cooks evenly and remains juicy.
- Bacon - Opt for thinly sliced bacon to ensure it cooks thoroughly and becomes crispy in the air fryer.
- Seasonings - A simple combination of salt, pepper, and garlic powder adds just the right amount of flavor to the shrimp and bacon.
How To Make Bacon Wrapped Shrimp
- Prepare the Shrimp . Pat the shrimp dry with paper towels and season lightly with salt, pepper, and garlic powder.
- Wrap with Bacon . Wrap each shrimp with a slice of bacon, ensuring it’s tightly wrapped around the shrimp.
- Air Fry . Preheat the air fryer to 400°F. Place the bacon-wrapped shrimp in a single layer in the air fryer basket, making sure they’re not touching.
- Cook Until Crispy . Air fry the shrimp for 8-10 minutes, flipping halfway through, until the bacon is crispy and the shrimp are cooked through.
- Serve and Enjoy . Remove the bacon-wrapped shrimp from the air fryer and let them cool slightly before serving. Enjoy them hot with your favorite dipping sauce.

Tips And Tricks
Mastering the art of making bacon-wrapped shrimp requires attention to detail and a few handy tips and tricks. Here’s how to ensure they turn out perfectly every time:
- Select the Right Shrimp . Opt for large shrimp that are peeled and deveined, with the tails left on for easy handling. Larger shrimp provide a better ratio of shrimp to bacon and are less likely to overcook.
- Use Thinly Sliced Bacon . Thinly sliced bacon works best for wrapping around shrimp as it cooks more quickly and crisps up nicely. Thick-cut bacon may not cook through properly by the time the shrimp is done.
- Secure with Toothpicks . To prevent the bacon from unraveling during cooking, use toothpicks to secure the ends of the bacon to the shrimp. Insert the toothpick through the end of the bacon and into the shrimp, making sure it holds everything in place securely.
Variations
Air fryer bacon wrapped shrimp are incredibly versatile, making them easy to customize with different flavors and seasonings. These variations let you switch things up while keeping that irresistible combo of crispy bacon and juicy shrimp.
- Garlic Butter - Brushed with melted butter, minced garlic, and a sprinkle of parsley for rich, classic flavor.
- Sweet Chili - Glazed with sweet chili sauce for a perfect balance of sweet heat and savory bacon.
- Cajun - Tossed in Cajun seasoning for a bold, slightly spicy Southern-style kick.
- Brown Sugar - Coated with brown sugar and a pinch of paprika for a sweet-and-smoky finish.
What To Serve With Bacon Wrapped Shrimp
Bacon wrapped shrimp are a mouthwatering appetizer that pairs perfectly with a variety of side dishes and accompaniments. Here are some delicious options to serve alongside them:
- Dipping Sauces - Provide an array of dipping sauces to complement the savory flavors. Some popular options include cocktail sauce , garlic aioli, sweet chili sauce, or tangy barbecue sauce.
- Salad - Balance the richness of the bacon wrapped shrimp with a crisp and refreshing side salad.
- Roasted Vegetables - Choose your favorite vegetables such as asparagus, Brussels sprouts, bell peppers, or zucchini, toss them in olive oil, season with salt and pepper, and roast until tender and caramelized.
How Long Do They Last?
Air Fryer Bacon Wrapped Shrimp are best enjoyed fresh and hot from the air fryer. However, if you have leftovers, store them in an airtight container in the refrigerator for up to 2 days.
Reheat them in the air fryer for a few minutes until heated through before serving.
Can You Freeze Them?
While it’s possible to freeze cooked bacon-wrapped shrimp, the texture may change slightly upon thawing and reheating.
To freeze, place the cooked shrimp in a single layer on a baking sheet and freeze until solid. Once frozen, transfer them to a freezer bag or container and store them for up to 1 month.
Reheat from frozen in the air fryer until warmed through.
More Amazing Appetizers
- Pretzel Bites
- Cocktail Meatballs
- Whipped Feta Dip
- Pizza Pinwheels
- Cheeseball Recipe

Bacon Wrapped Shrimp | Air Fryer Wrapped Shrimp
Ingredients
- ▢ 12 Large Shrimp , peeled and deveined
- ▢ 4 strips Bacon , cut into thirds
- ▢ 1/2 tsp Kosher Salt
- ▢ 1/4 tsp Ground Black Pepper
- ▢ 1/2 tsp Garlic Powder
Instructions
- Prepare the Shrimp . Pat the shrimp dry with paper towels and season lightly with salt, pepper, and garlic powder.
- Wrap with Bacon . Wrap each shrimp with a slice of bacon, ensuring it’s tightly wrapped around the shrimp.
- Air Fry . Preheat the air fryer to 400°F. Place the bacon-wrapped shrimp in a single layer in the air fryer basket, making sure they’re not touching.
- Cook Until Crispy . Air fry the shrimp for 8-10 minutes, flipping halfway through, until the bacon is crispy and the shrimp are cooked through.
- Serve and Enjoy . Remove the bacon-wrapped shrimp from the air fryer and let them cool slightly before serving. Enjoy them hot with your favorite dipping sauce.
