If you’re a fan of indulging in rich and flavorful spreads, you’re in for a treat! Discover the art of crafting the perfect Butter Board, a delightful and versatile addition to your culinary repertoire. You’ll create a symphony of tastes and textures, ranging from creamy to savory, with a touch of sweetness and a sprinkle of spice.
Why You’ll Love This Simple Appetizer
- Rich and Creamy . Butter forms the luscious and creamy centerpiece, offering a sumptuous base for an array of toppings.
- Versatile . This Butter Board allows for endless creativity, allowing you to customize your spread with a variety of flavors and textures.
- Balanced . With a combination of savory, sweet, and spicy elements, the Butter Board achieves a perfect balance that caters to a range of taste preferences.
- Simple and Elegant . Whether you’re hosting a brunch, afternoon tea, or simply treating yourself, the Butter Board adds a touch of sophistication to any occasion.
What Is The Point Of A Butter Board?
A Butter Board serves as a creative and visually appealing way to present a variety of butter and accompanying toppings. The point of a Butter Board is to provide a versatile and customizable spread that caters to different tastes and occasions. Here are some key points:
- Versatility - A Butter Board allows for endless customization. You can choose from various types of butter, both traditional and flavored, and pair them with a diverse selection of toppings to create a spread that suits your preferences.
- Balanced Flavors - The board typically includes a balance of savory, sweet, and spicy elements. This creates a harmonious tasting experience, as the richness of the butter is complemented by a variety of textures and flavors.
- Aesthetic Appeal - The artful arrangement of butter and toppings on a serving board or platter adds a visual appeal to the dining experience. It’s a beautiful and inviting way to present a spread, making it suitable for special occasions and gatherings.
- Interactive Dining - A Butter Board encourages interactive and social dining. Guests can explore different combinations of butter and toppings, creating their own personalized bites. This interactive element adds a fun and engaging aspect to the dining experience.
Are Butter Boards Sanitary?
The sanitary aspect of a Butter Board depends on how it is prepared, handled, and served. Here are some considerations to ensure sanitary practices:
- Presentation Surface - Use a clean and sanitized serving board or platter for the presentation. If the board is made of porous material, consider using a food-safe liner or parchment paper to create a barrier between the ingredients and the surface.
- Temperature Control - Keep perishable items, such as cheeses and cured meats, at appropriate temperatures to prevent bacterial growth. If the Butter Board is served at room temperature, ensure that it is not left out for an extended period, especially in warm conditions.
- Guest Awareness - If serving the Butter Board at a gathering, make guests aware of any ingredients that may require special consideration, such as items containing nuts, dairy, or gluten.
How Do You Soften Butter For A Butter Board?
Softening butter for a Butter Board is a simple process. Here are a few methods you can use:
- Room Temperature - Place the butter on the counter at room temperature for about 30 minutes to an hour, depending on the ambient temperature. This allows the butter to soften naturally.
- Microwave Method -Cut the desired amount of butter into smaller chunks. Place the butter on a microwave-safe plate. Microwave at low power (10-20%) in short increments (10-15 seconds at a time). Check the butter after each increment until it reaches the desired softness. Be cautious not to melt it.
- Grating Method - Use a cheese grater to grate cold butter into smaller pieces. Allow the grated butter to sit at room temperature for a few minutes. The increased surface area helps it soften faster.
- Pounding Method - Place the cold butter between sheets of parchment paper or plastic wrap. Use a rolling pin or meat mallet to gently pound the butter. This helps to soften it evenly without melting.
- Warm Water Bath - Submerge the sealed butter in a watertight bag in warm water for a few minutes. Be careful not to use hot water to avoid melting.
Remember to check the softness of the butter regularly to prevent it from becoming too soft or melting. Once the butter reaches the desired consistency, you can present it on the Butter Board alongside your chosen toppings and accompaniments.
What Is The Best Surface Of A Butter Board?
The best surface for a Butter Board depends on personal preference and the overall aesthetic you want to achieve. Here are some popular options:
- Wooden Board Pros - Wooden boards, such as those made from hardwoods like oak or maple, are classic and provide a rustic or elegant appearance. They are also gentle on knives and create a warm presentation. Cons - Wooden boards may require more maintenance to prevent odors or stains. They can also be porous, so using a food-safe liner or parchment paper can be a good idea.
- Marble or Stone Board Pros - Marble or stone boards offer a sleek and sophisticated look. They can help keep butter cool, which is beneficial for serving in warmer environments. Cons - They can be heavy and may require careful handling to prevent breakage. Some types of stone may react with acidic ingredients.
- Ceramic or Porcelain Board Pros - Ceramic or porcelain boards are versatile and come in various shapes and designs. They are easy to clean and can complement different table settings. Cons - Some may be more prone to chipping or breaking, so handle with care.
Ingredients You’ll Need
- Your Choice of Butter - Opt for high-quality butter, whether it’s salted or unsalted, traditional or flavored. The butter forms the foundation of your board, so choose one that suits your taste.
- Savory Toppings - Select an assortment of savory toppings such as cured meats, cheeses, or savory spreads. These add depth and complexity to the creamy butter.
- A Sprinkle of Spice - Introduce a touch of heat or warmth with spices like red pepper flakes, smoked paprika, or a zesty mustard. Spice enhances the overall flavor profile.
- A Touch of Sweetness - Include sweet elements like fresh fruits, honey, or fruit preserves. The sweetness provides a delightful contrast to the savory and spicy components.
How To Make A Butter Board
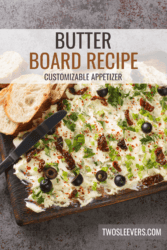
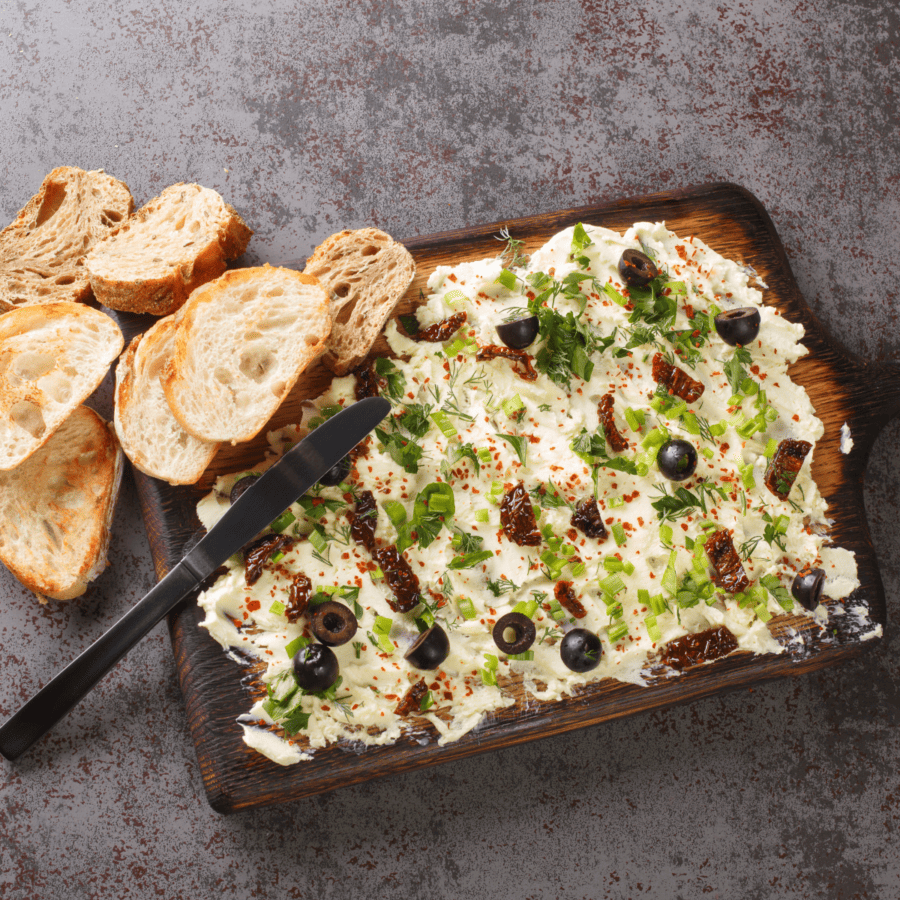
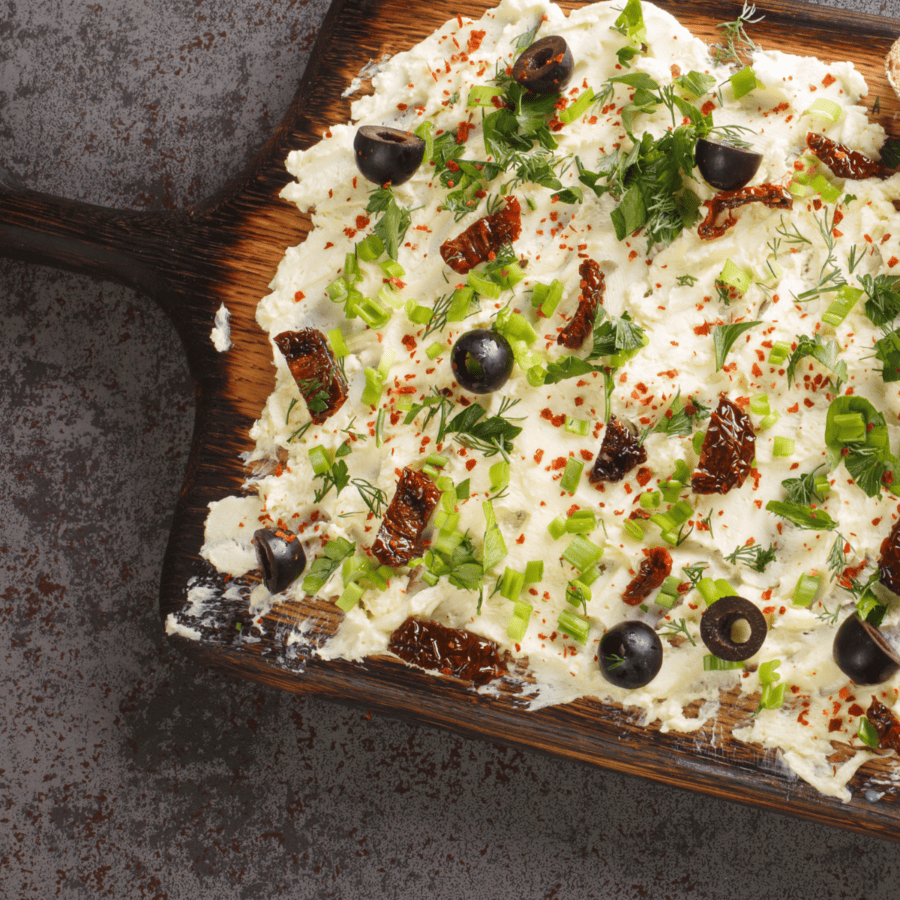
- Prepare the Butter . Allow the butter to come to room temperature for easy spreading. Arrange it in a central location on your serving board or platter.
- Add Savory Toppings . Surround the butter with an array of savory toppings. Consider cured meats, a selection of cheeses, and savory spreads. Arrange them in small clusters for easy serving.
- Sprinkle of Spice . Introduce a sprinkle of spice by adding condiments like spicy mustard, red pepper flakes, or any preferred spicy element. Place these strategically around the board for variety.
- Touch of Sweetness . Complete your Butter Board with a touch of sweetness. Add fresh fruits, honey, or fruit preserves to provide a sweet contrast to the savory and spicy elements.
- Garnish and Serve . Garnish the board with fresh herbs for a burst of color and added freshness. Serve the Butter Board with a selection of bread, crackers, or baguette slices.
Variations
The beauty of a Butter Board lies in its adaptability. Customize your board based on personal preferences or the occasion:
- Seasonal Variations - Tailor your Butter Board to the seasons by incorporating seasonal fruits, cheeses, and spreads.
- Cultural Influences - Infuse cultural influences by including toppings inspired by specific cuisines, such as Mediterranean, French, or Middle Eastern.
- Herb-infused Butter - Elevate the butter itself by infusing it with herbs like rosemary, thyme, or basil. This adds an extra layer of flavor.
- Sweet and Savory Combinations - Experiment with sweet and savory pairings, such as pairing honey with blue cheese or fig preserves with prosciutto.
Tips And Tricks
- Temperature Matters - Ensure your butter is at room temperature for easy spreading. Cold butter can be challenging to spread and may not incorporate flavors as well.
- Varied Textures - Include a variety of textures, from creamy butter to crunchy crackers and crisp fresh fruits. This variety enhances the overall eating experience.
- Artful Arrangement - Arrange your toppings in an artful and inviting manner. Consider color, shape, and placement for an aesthetically pleasing presentation.
- Labeling - If you have a diverse selection of toppings, consider labeling each element on the board. This adds a personalized touch and helps guests navigate the spread.
What To Serve With A Butter Board
A Butter Board is a versatile and standalone delight, but you can enhance the experience by serving it with:
- Assorted Breads - Offer a selection of bread, baguette slices, or crackers for spreading and layering.
- Wine or Champagne - Pair your Butter Board with a crisp white wine or champagne for a sophisticated touch.
- Fresh Vegetables - Include fresh vegetable sticks for a refreshing and crunchy contrast.
- Nuts - Add a bowl of mixed nuts for an additional texture and flavor element.
How Long Does It Last?
A Butter Board is best enjoyed fresh, ideally on the day of preparation. However, you can store any unused portions of butter and certain toppings in the refrigerator for a day or two.
Keep in mind that the textures and flavors may change over time.
More Awesome Appetizers
- Korean Chicken Wings
- Air Fryer Ravioli
- Pinwheel Sandwiches
- Queso Fundido
- Reuben Dip
- Cheese Board

Butter Board | Easy Butter Board Ideas
Ingredients
- ▢ 16 tbsp Unsalted Butter
- ▢ 1 cup Black Olives , sliced
- ▢ 1/4 cup Sun Dried Tomatoes
- ▢ 1/4 cup Green Onion
- ▢ 1 tsp Paprika
- ▢ 2 cloves Garlic , minced
- ▢ 1/4 tsp Cayenne
Instructions
- Prepare the Butter . Allow the butter to come to room temperature for easy spreading. Arrange it in a central location on your serving board or platter.
- Add Savory Toppings . Surround the butter with an array of savory toppings. Consider cured meats, a selection of cheeses, and savory spreads. Arrange them in small clusters for easy serving.
- Sprinkle of Spice . Introduce a sprinkle of spice by adding condiments like spicy mustard, red pepper flakes, or any preferred spicy element. Place these strategically around the board for variety.
- Touch of Sweetness . Complete your Butter Board with a touch of sweetness. Add fresh fruits, honey, or fruit preserves to provide a sweet contrast to the savory and spicy elements.
- Garnish and Serve . Garnish the board with fresh herbs for a burst of color and added freshness. Serve the Butter Board with a selection of bread, crackers, or baguette slices.
Get support & connect with our community on Facebook!
Don’t forget to check out my other Ketocookbooks.
Keto Instant Pot, Keto Fat Bombs, Sweets, & Treats , and Easy keto in 30 minutes.


If you already signed up, you should have received an email with a password to give you unlimited access to our FREE Printable Library. The password is case sensitive. Enter it below and get printing!
Password:

Butter Board | Easy Butter Board Ideas
Ingredients
- 16 tbsp Unsalted Butter
- 1 cup Black Olives sliced
- 1/4 cup Sun Dried Tomatoes
- 1/4 cup Green Onion
- 1 tsp Paprika
- 2 cloves Garlic minced
- 1/4 tsp Cayenne
Instructions
- Prepare the Butter . Allow the butter to come to room temperature for easy spreading. Arrange it in a central location on your serving board or platter.
- Add Savory Toppings . Surround the butter with an array of savory toppings. Consider cured meats, a selection of cheeses, and savory spreads. Arrange them in small clusters for easy serving.
- Sprinkle of Spice . Introduce a sprinkle of spice by adding condiments like spicy mustard, red pepper flakes, or any preferred spicy element. Place these strategically around the board for variety.
- Touch of Sweetness . Complete your Butter Board with a touch of sweetness. Add fresh fruits, honey, or fruit preserves to provide a sweet contrast to the savory and spicy elements.
- Garnish and Serve . Garnish the board with fresh herbs for a burst of color and added freshness. Serve the Butter Board with a selection of bread, crackers, or baguette slices.
Butter Board | Easy Butter Board Ideas https://twosleevers.com/butter-board/
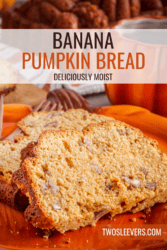
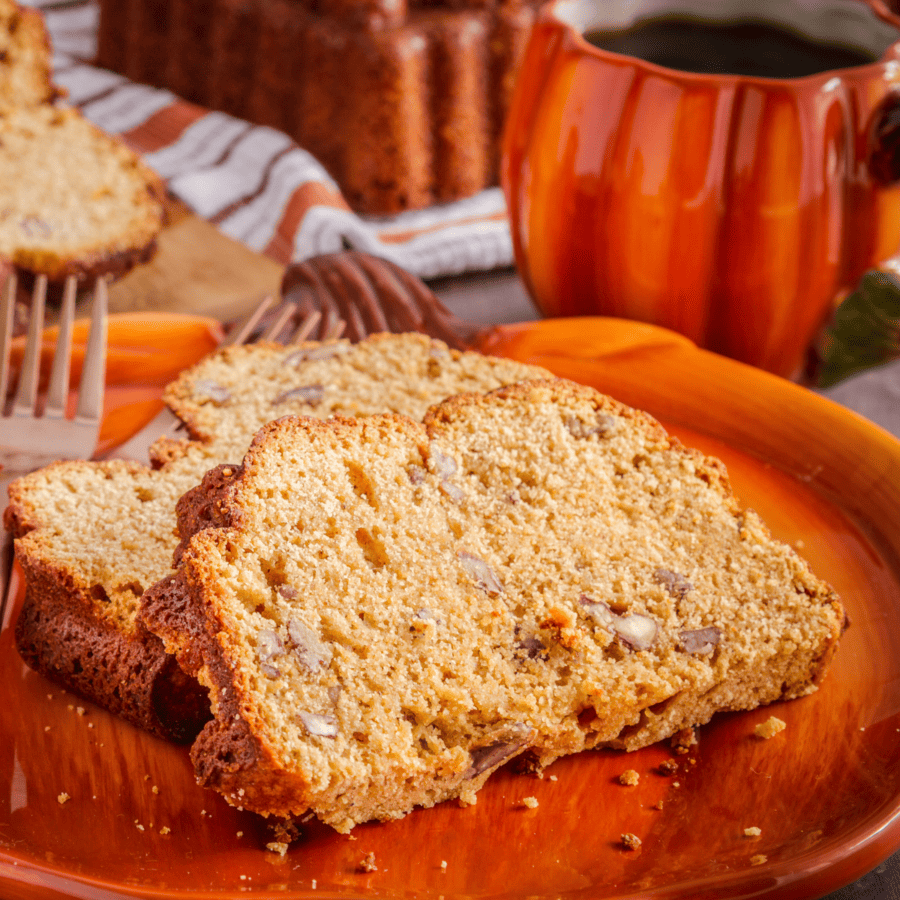
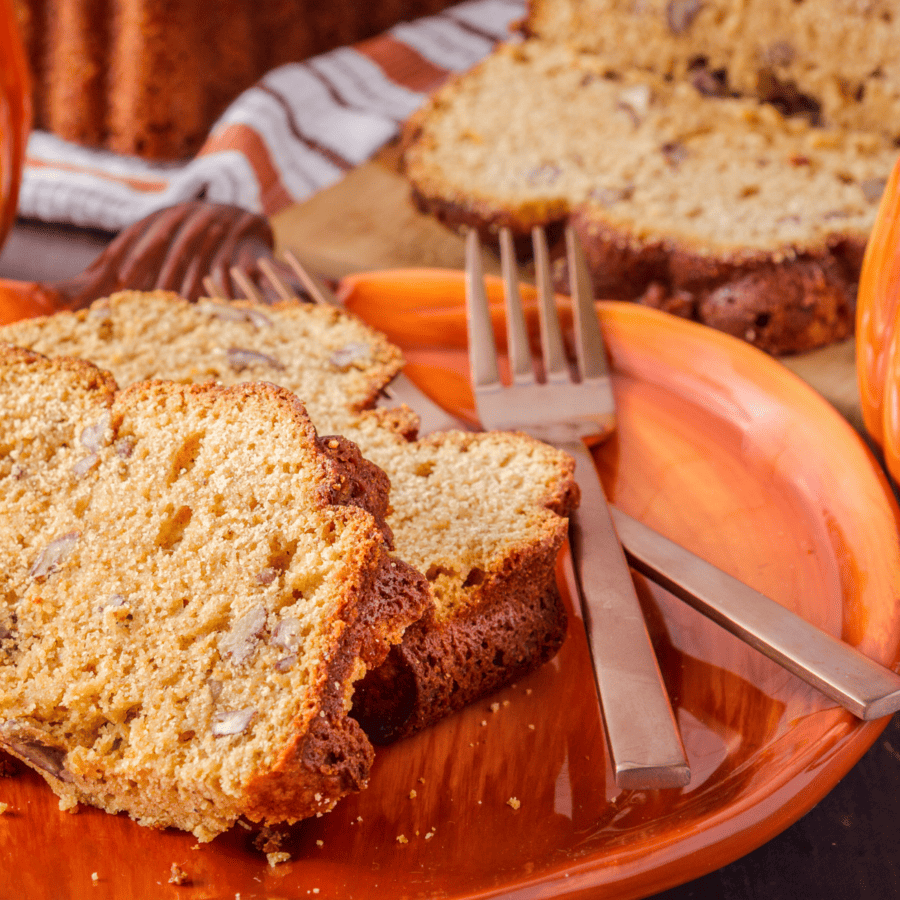
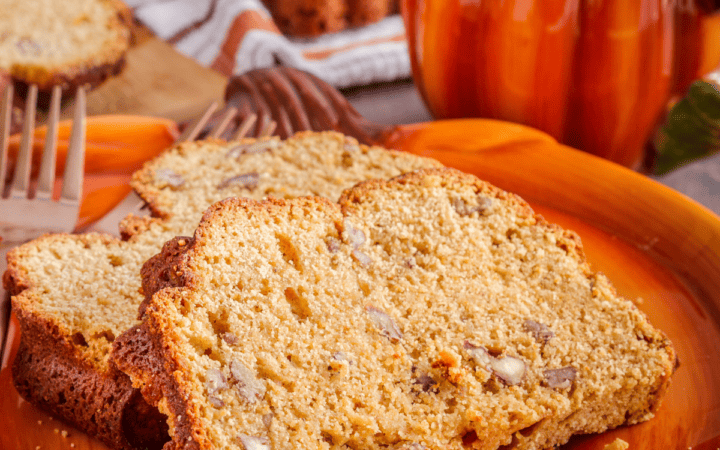
If you’re seeking the ultimate autumn-inspired baked treat, you’ve come to the right place. Our Pumpkin Banana Bread is a delightful fusion of two beloved flavors, creating a moist, aromatic, and utterly delicious bread that’s perfect for cozy mornings, holiday gatherings, or whenever you want to savor a slice of fall.
Why You’ll Love This Pumpkin Twist
- Irresistible Fusion . This recipe combines the earthy warmth of pumpkin with the sweet, mellow flavor of ripe bananas. It’s a match made in baking heaven.
- Easy Baking. You don’t need to be a pro baker to create this delightful bread. With simple ingredients and easy-to-follow steps, it’s a perfect choice for both beginners and experienced bakers.
- Aromatherapy in Your Kitchen . While this bread bakes, your kitchen will fill with the inviting scents of pumpkin, cinnamon, and nutmeg. It’s like having a cozy autumn candle come to life in your oven.
- Versatile. Serve it as a breakfast treat, an afternoon snack, or even as a dessert. It pairs wonderfully with a cup of coffee or hot apple cider.
Our Pumpkin Banana Bread recipe is the epitome of fall flavors, bringing together the heartiness of pumpkin and the sweetness of ripe bananas in a delightful loaf. Bake a few and share them with loved ones, or keep a stash in your freezer to enjoy the cozy vibes of autumn whenever you desire. Whether for breakfast, snack time, or dessert, this bread is a seasonal treat worth savoring.
Is Pumpkin Bread Good For You?
pumpkin bread can be part of a balanced diet when consumed in moderation and prepared with healthier ingredients. It can offer some nutritional benefits, but it’s essential to be aware of the sugar and fat content and make adjustments to align with your health goals.
Why Is Banana Bread So Comforting?
the comforting nature of banana bread is a combination of sensory experiences, emotional connections, and its ability to provide a sense of warmth and familiarity. It’s a delightful and accessible baked good that brings people together and offers solace and pleasure.
Ingredients You’ll Need
- All-Purpose Flour- The primary dry ingredient in this recipe, flour provides the structure and foundation for the bread. It helps to create a stable crumb structure and holds the other ingredients together.
- Baking Soda- Baking soda is a leavening agent that helps the bread rise during baking.
- Baking Powder- Baking powder is another leavening agent that works in combination with baking soda to provide additional lift to the bread.
- Salt- Salt is a flavor enhancer that balances and enhances the overall taste of the bread.
- Ground Cinnamon- Cinnamon is a key spice that adds warmth and a delightful aroma to the bread. It complements the pumpkin and banana flavors, giving the bread its characteristic fall taste.
- Ground Nutmeg- Nutmeg is another warming spice that contributes to the bread’s cozy, autumnal flavor profile.
- Ripe Bananas- Ripe bananas not only add natural sweetness to the bread but also moistness and a distinct banana flavor. They work together with the pumpkin to create a harmonious fusion of flavors.
- Pumpkin Puree- Pumpkin puree infuses the bread with a rich, earthy taste and a moist texture.
- Unsalted Butter- Butter contributes to the bread’s moisture, tenderness, and flavor. It’s creamed with sugars to create a light and fluffy mixture that enhances the overall texture.
- Granulated Sugar- Granulated sugar provides sweetness to the bread, balancing the natural sugars from the bananas and pumpkin.
- Brown Sugar- Brown sugar adds a rich, caramel-like sweetness and a hint of molasses flavor to the bread.
- Eggs : Eggs act as binders, holding the ingredients together, and providing structure to the bread. They also contribute to its tenderness and help with rising.
- Chopped Pecans - Optional for texture.
- Vanilla Extract- Vanilla extract enhances the overall flavor of the bread, adding a subtle sweetness and a pleasant aroma. It complements the other warm spices and enriches the taste.
How To Make Pumpkin Banana Bread
- Preheat and Prep . Begin by preheating your oven to 350°F. Grease a 9x5-inch loaf pan and set it aside.
- Mix the Dry Ingredients . In a medium-sized bowl, whisk together the all-purpose flour, baking soda, baking powder, salt, ground cinnamon, and ground nutmeg. Set this mixture aside for later.
- Prepare the Wet Ingredients . In another bowl, combine the mashed bananas and pumpkin puree. These ingredients will add a rich, autumnal flavor and moisture to your bread.
- Cream the Butter and Sugar . In a separate large bowl, cream together the softened unsalted butter, granulated sugar, and brown sugar until the mixture becomes light and fluffy. This step is essential for achieving a moist and tender crumb.
- Add Eggs and Vanilla . Beat in the eggs one at a time, ensuring each egg is fully incorporated before adding the next. Then, mix in the vanilla extract.
- Combine Wet and Dry Ingredients . Gradually add the banana and pumpkin mixture to the butter and sugar mixture, mixing well. Slowly incorporate the dry ingredients, and stir until everything is thoroughly combined. Be careful not to overmix; a few lumps are okay.
- Bake to Perfection . Pour the batter into your prepared loaf pan. Bake in the preheated oven for about 60-70 minutes or until a toothpick inserted into the center comes out clean or with a few moist crumbs attached.
- Cool and Enjoy . Allow your Pumpkin Banana Bread to cool in the pan for about 10-15 minutes before transferring it to a wire rack to cool completely. Once it’s cooled, slice, serve, and savor the flavors of fall.
Tips And Tricks
- Use Ripe Bananas and Pumpkin - The flavor of your bread largely depends on the ripeness of your bananas and the quality of your pumpkin puree. Ripe bananas that are spotty or overripe work best as they are sweeter and more flavorful. Use canned pumpkin puree or homemade puree that’s well-drained for consistent results.
- Mixing - Be cautious not to overmix the batter. Overmixing can result in a tougher, denser bread. Mix until the ingredients are just combined.
- Baking Time - Keep a close eye on your bread as it bakes. Baking times can vary depending on your oven and the size of the loaf. The bread is done when a toothpick inserted into the center comes out clean with a few moist crumbs.
- Cooling - Let the bread cool in the pan for about 10-15 minutes before transferring it to a wire rack to cool completely. This helps prevent it from becoming soggy.
Variations
There are many creative variations you can try to put a unique twist on your banana pumpkin bread. Here are some delicious ideas:
- Chocolate Chip Banana Pumpkin Bread - Add semi-sweet or dark chocolate chips to the batter for a delightful chocolatey flavor. The combination of chocolate, banana, and pumpkin is heavenly.
- Cream Cheese Swirl - Create a cream cheese swirl by mixing softened cream cheese, sugar, and vanilla extract. Dollop the cream cheese mixture on top of the bread batter and use a knife to create a marbled effect.
- Streusel Topping - Make a sweet streusel topping with a mixture of brown sugar, butter, flour, and cinnamon. Sprinkle it over the batter before baking for a crunchy topping.
- Nutty Delight - Enhance the texture and flavor with chopped nuts like pecans, walnuts, or almonds. They add a satisfying crunch to every bite.
What To Serve With Pumpkin Banana Bread
Pumpkin banana bread is a delicious and comforting treat on its own, but you can enhance your experience by serving it with various accompaniments. Here are some ideas for what to serve with it:
- Butter - Spread a little softened unsalted butter on a warm slice of pumpkin banana bread. The butter adds a rich, creamy contrast to the bread’s sweetness.
- Cream Cheese - A schmear of cream cheese, either plain or sweetened with a touch of honey or maple syrup, pairs beautifully with the flavors of pumpkin and banana.
- Nut Butter - Peanut butter, almond butter, or cashew butter can add a nutty richness and extra protein to your snack. Drizzle a bit over each slice or serve it as a dip.
- Honey or Maple Syrup - A drizzle of honey or real maple syrup complements the bread’s sweetness and adds extra flavor depth.
How Long Does It Last?
Pumpkin bread that has been properly wrapped or stored in an airtight container can last at room temperature for about 2-4 days. It’s essential to keep it in a cool, dry place, away from direct sunlight and heat.
Can You Freeze It?
For longer storage, you can freeze pumpkin bread. Wrap it tightly in plastic wrap and place it in a resealable freezer bag. When stored in the freezer, pumpkin bread can maintain its quality for 2-3 months.
More Delicious Desserts

Pumpkin Banana Bread | The Best Banana Pumpkin Bread Recipe
Ingredients
- ▢ 2 cups All Purpose Flour
- ▢ 1 tsp Baking Soda
- ▢ 1 tsp Baking Powder
- ▢ 1/2 tsp Kosher Salt
- ▢ 1 tsp Ground Cinnamon
- ▢ 1/2 tsp Ground Nutmeg
- ▢ 3 Bananas , over ripe
- ▢ 1 cup Pumpkin Puree
- ▢ 1/2 cup Unsalted Butter , softened
- ▢ 1 cup Granulated Sugar
- ▢ 1/2 cup Brown Sugar
- ▢ 2 Eggs
- ▢ 1 tsp Vanilla Extract
- ▢ 1/2 cup Chopped Pecans
Instructions
- Preheat and Prep . Begin by preheating your oven to 350°F. Grease a 9x5-inch loaf pan and set it aside.
- Mix the Dry Ingredients . In a medium-sized bowl, whisk together the all-purpose flour, baking soda, baking powder, salt, ground cinnamon, and ground nutmeg. Set this mixture aside for later.
- Prepare the Wet Ingredients . In another bowl, combine the mashed bananas and pumpkin puree. These ingredients will add a rich, autumnal flavor and moisture to your bread.
- Cream the Butter and Sugar . In a separate large bowl, cream together the softened unsalted butter, granulated sugar, and brown sugar until the mixture becomes light and fluffy. This step is essential for achieving a moist and tender crumb.
- Add Eggs and Vanilla . Beat in the eggs one at a time, ensuring each egg is fully incorporated before adding the next. Then, mix in the vanilla extract.
- Combine Wet and Dry Ingredients . Gradually add the banana and pumpkin mixture to the butter and sugar mixture, mixing well. Slowly incorporate the dry ingredients, and stir until everything is thoroughly combined. Be careful not to overmix; a few lumps are okay.
- Bake to Perfection . Pour the batter into your prepared loaf pan. Bake in the preheated oven for about 60-70 minutes or until a toothpick inserted into the center comes out clean or with a few moist crumbs attached.
- Cool and Enjoy . Allow your Pumpkin Banana Bread to cool in the pan for about 10-15 minutes before transferring it to a wire rack to cool completely. Once it’s cooled, slice, serve, and savor the flavors of fall.
