


Whether you’re living low carb, gluten-free, or simply looking for a fresh and flavorful bowl recipe packed with protein and color, this keto-friendly bún thịt nướng delivers all the satisfaction of the original with none of the guilt.
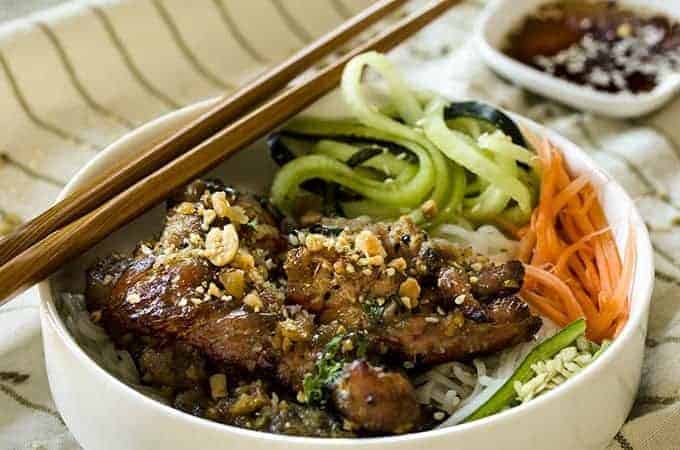
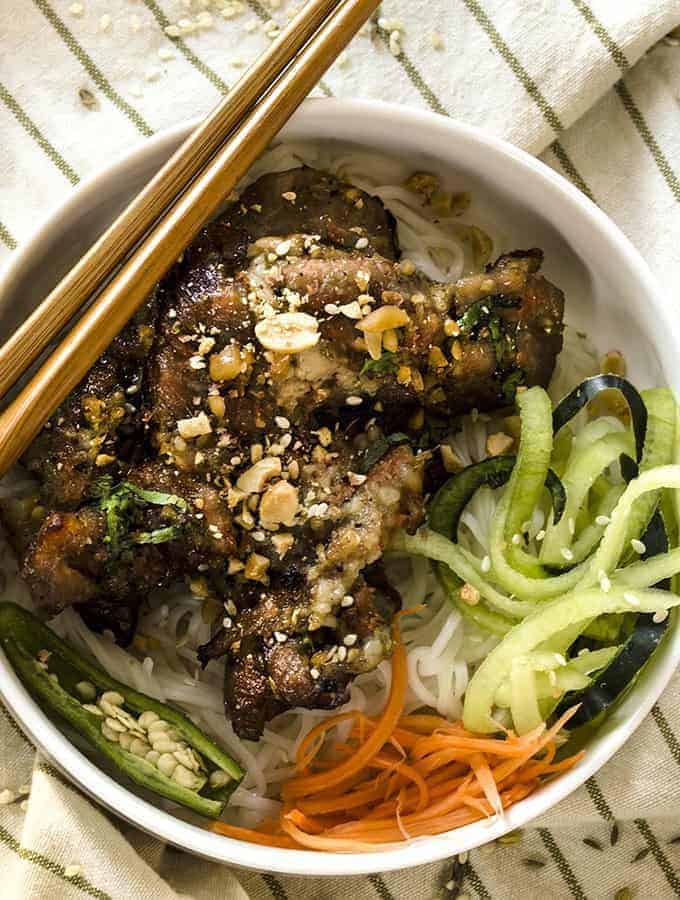
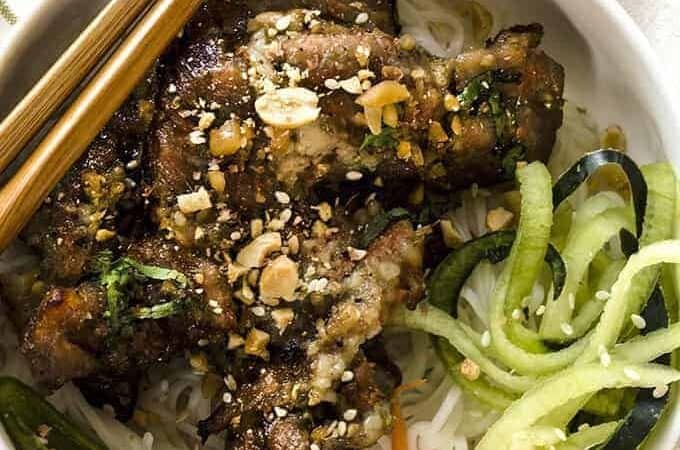
Low Carb Bun Thit Nuong may not be something you’ve ever heard of, but you’ll be so glad you found this recipe! It’s a low carb version of a classic Vietnamese cold noodle dish with crispy Vietnamese grilled caramelized pork strips, cold rice noodles, fresh herbs, and crunchy peanuts. The traditional dish is heavy in carbs, so I decided to make a Keto version in my Air Fryer!
Why You’re Going To Love This Dish
- Low Carb. Only 3 net carbs per serving.
- Fast. Less than 30 minutes of cook time.
- Easy. Prep your ingredients, marinade, and air fry. Just a few easy steps for a delightfully delicious dish.
What is Bun Thit Nuong In English?
Every time we go to a Vietnamese restaurant, what I really want is the bun thit nuong. That crispy, slightly sweet pork, the peanuts, the cucumbers! But restaurants give you LOTS Of noodles—and not as much meat. Which is yummy, but not exactly low carb. So I decided to make my own Low Carb Bun Thit Nuong.
Bun refers to the noodles, thit nuong is barbecued meat.
Is It High in Calories?
While you would think something this full of flavor would be high in calories, you would be wrong. With a little over 230 calories per serving, you can enjoy this dish virtually free of guilt.
Low in carbs AND low in calories. What more could you ask for?
Ingredients You’ll Need
- 1/4 cup Onions - These onions add aromatic sweetness and depth to the marinade. As they cook, they help tenderize the pork and infuse the meat with subtle savory flavor.
- 2 tablespoons Oil - Oil coats the pork and helps the marinade cling to the meat. It also promotes browning and caramelization during cooking, giving the pork its signature smoky–crispy edges.
- 1 tablespoon Splenda - Splenda provides sweetness without the carbs, balancing the salty and savory elements of the marinade.
- 2 teaspoons Dark Soy Sauce - Dark soy sauce adds color, umami richness, and deeper savory notes to the marinade. It gives the pork that characteristic deep, caramelized finish when grilled or air-fried.
- 1 tablespoon Minced Garlic - Garlic delivers bold aroma and flavor, infusing the pork with warm, savory complexity that complements the sweetness from Splenda and saltiness from fish sauce.
- 1 tablespoon Fish Sauce - Fish sauce is essential for authentic Vietnamese flavor. It provides salty, savory depth and enhances the overall umami profile of the marinade without overpowering the dish.
- 1 tablespoon Minced Lemongrass Paste - Lemongrass brings bright citrusy notes to the pork, cutting through richness and adding a fresh, fragrant flavor that makes bún thịt nướng so distinctive.
- 1/2 teaspoon Ground Black Pepper - Pepper adds gentle heat and warmth, rounding out the marinade with mild spice and enhancing the aroma of lemongrass and garlic.
- 1 pound Thinly Sliced Pork Shoulder - This is the centerpiece of the dish. It’s rich, juicy, and perfect for high-heat cooking. The marbling in pork shoulder allows it to caramelize beautifully while staying tender and flavorful.
- 1/4 cup Crushed Roasted Peanuts - Peanuts add crunch and nuttiness, contrasting with the tender pork and fresh vegetables. They’re a classic finishing element that adds richness and texture to each bite.
- 2 tablespoons Chopped Cilantro - Cilantro brings freshness, fragrance, and brightness to the final bowl. It cuts through the richness of the pork and balances the overall flavor. Parsley can be used as a milder alternative.
How To Cook Bun Thit Nuong
The air fryer is perfect for Thit Nuong because you’re looking at fairly thin slices of pork that need to crisp up at the edges. You can marinate this ahead of time if you like, and cook it just before you’re ready to eat.
- Combine onions, sugar, soy sauce, oil, garlic, fish sauce, lemongrass, and pepper.
- Thinly slice the pork shoulder.
- Let the pork marinate.
- Add the marinated pork to the air fryer basket.
- Air fry for 10 minutes, flipping half way through the cooking cycle.
- Place cooked pork on a serving tray and sprinkle with roasted peanuts and cilantro or parsley.
Tips and Tricks
This recipe is incredibly simple (as most of our recipes are) but for an even better first experience making this dish, check out these tips and tricks:
- Cut pork strips thin so they crisp easily in your Air Fryer.
- For the most flavor, marinate your pork for up to 24 hours.
- You can omit Lemongrass paste if it is not available at your grocery store.
Variations
Sometimes a simple twist in protein or toppings can transform this dish into something new and exciting while still preserving its classic Vietnamese balance of sweet, salty, smoky, and herbal flavors.
- Swap Pork for Chicken or Beef . Use thin-sliced chicken thighs or flank steak marinated the same way as the pork. Both caramelize beautifully on high heat and offer a leaner alternative.
- Make a Shrimp Version . Toss shrimp in the same marinade and grill just 2-3 minutes per side. It cooks quickly and pairs beautifully with fresh herbs and nuoc cham.
- Use Tofu for a Vegetarian Option . Press firm tofu, slice into slabs, and marinate before grilling or air frying. It soaks up flavor wonderfully—perfect for a veggie-forward bowl.
What Do You Serve With It?
Typically, you’d serve this with:
- Cold rice noodles (omit noodles or use zucchini noodles for low carb!) Yes, that’s right. Warm pork on top of cold noodles makes for a tasty and unexpected bite.
- Chopped fresh cilantro
- Chopped roasted peanuts
- Fresh mint
- Quick-pickled cucumbers and carrots
- Fish sauce poured over the top
How Long Does It Last?
For the best flavor and texture, I would suggest eating this Keto Bun Thit Nuong within 3-4 days after cooking it. The beauty of this dish is that it reheats wonderfully, and the flavor continues to develop even after it is cooked.
Can You Freeze It?
Yes, you can freeze low-carb Bún Thịt Nướng, but with a few considerations. The marinated and cooked pork freezes well for up to 2–3 months and reheats nicely without losing too much flavor or tenderness.
However, the fresh vegetables, herbs, and pickled components should not be frozen, as they will wilt, soften, and lose their crispness once thawed.
More Air Fryer Recipes
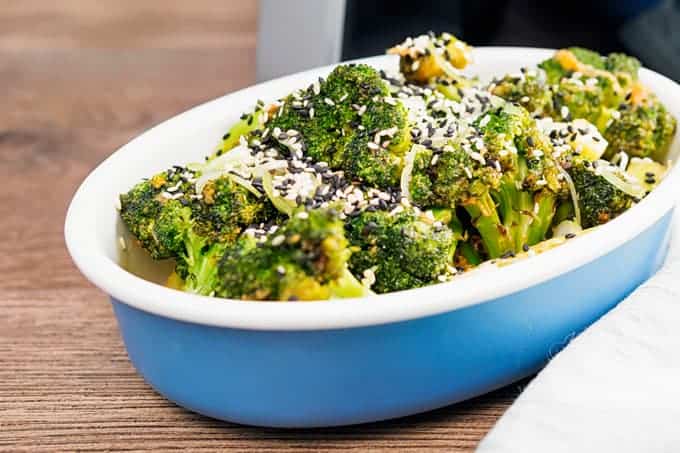
- AIR FRYER SESAME GINGER BROCCOLI - A low carb broccoli side dish that is bursting with Asian Flavor.
- SALADE NIçOISE - A salad of cooked vegetables and tuna.
- GERMAN ROULADEN - A crispy flank steak roll, with all of the flavors of a classic rouladen, but not the hours-long braise times.
If you’re looking for more adventurous ways to use your Air Fryer, this Low Carb Bun Thit Nuong recipe will delight your tastebuds. If you’re simply looking for a new delicious low carb recipe this should be at the top of your list.
Bun Thit Nuong | Low Carb Bun Thit Nuong Recipe
Equipment
- PHILLIPS AIR FRYER
- STAINLESS STEEL MEASURING CUPS
- Measuring Spoons
- Tongs
- WHISK
Ingredients
For the Marinade
- ▢ 1/4 cup ( 40 g ) onions, chopped
- ▢ 2 tablespoons ( 2 tablespoons ) Oil
- ▢ 1 tablespoon ( 1 tablespoon ) splenda , or 2 tablespoons sugar
- ▢ 2 teaspoons ( 2 teaspoons ) dark soy sauce
- ▢ 1 tablespoon ( 1 tablespoon ) Minced Garlic
- ▢ 1 tablespoon ( 1 tablespoon ) Fish Sauce
- ▢ 1 tablespoon ( 1 tablespoon ) minced lemongrass paste
- ▢ 1/2 teaspoon ( 0.5 teaspoon ) Ground Black Pepper
- ▢ 1 pound ( 453.59 g ) thinly sliced pork shoulder
For Finishing
- ▢ 1/4 cup ( 36.5 g ) crushed roasted peanuts
- ▢ 2 tablespoons ( 2 tablespoons ) chopped cilantro , or parsley
Instructions
- In a bowl, whisk together the onions, sugar, soy sauce, oil, garlic, fish sauce, lemongrass, and pepper.
- Thinly slice the pork shoulder into 1/2 in slices, and then cut crossways into 4-inch pieces.
- Add the pork to the marinade and let it rest for 30 minutes or for up to 24 hours.
- Remove the pork slices from the marinade, and place in single layer in the air fryer basket.
- Set the air fryer to 400ºF and cook the pork for 10 minutes, flipping over halfway.
- Test with a meat thermometer to ensure the pork has reached an internal temperature of 165ºF.
- Remove pork to a serving tray, sprinkle with the roasted peanuts and cilantro or parsley, and serve.
Watch The Video
Get support & connect with our community on Facebook!
Nutrition
And don’t forget to check out my air fryer cookbooks! Every day easy air fryer , and Air Fryer Revolution .


If you already signed up, you should have received an email with a password to give you unlimited access to our FREE Printable Library. The password is case sensitive. Enter it below and get printing!
Password:

Bun Thit Nuong | Low Carb Bun Thit Nuong Recipe
Ingredients
For the Marinade
- 1/4 cup onions, chopped
- 2 tablespoons Oil
- 1 tablespoon splenda or 2 tablespoons sugar
- 2 teaspoons dark soy sauce
- 1 tablespoon Minced Garlic
- 1 tablespoon Fish Sauce
- 1 tablespoon minced lemongrass paste
- 1/2 teaspoon Ground Black Pepper
- 1 pound thinly sliced pork shoulder
For Finishing
- 1/4 cup crushed roasted peanuts
- 2 tablespoons chopped cilantro or parsley
Instructions
- In a bowl, whisk together the onions, sugar, soy sauce, oil, garlic, fish sauce, lemongrass, and pepper.
- Thinly slice the pork shoulder into 1/2 in slices, and then cut crossways into 4-inch pieces.
- Add the pork to the marinade and let it rest for 30 minutes or for up to 24 hours.
- Remove the pork slices from the marinade, and place in single layer in the air fryer basket.
- Set the air fryer to 400ºF and cook the pork for 10 minutes, flipping over halfway.
- Test with a meat thermometer to ensure the pork has reached an internal temperature of 165ºF.
- Remove pork to a serving tray, sprinkle with the roasted peanuts and cilantro or parsley, and serve.
Bun Thit Nuong | Low Carb Bun Thit Nuong Recipe https://twosleevers.com/low-carb-bun-thit-nuong/
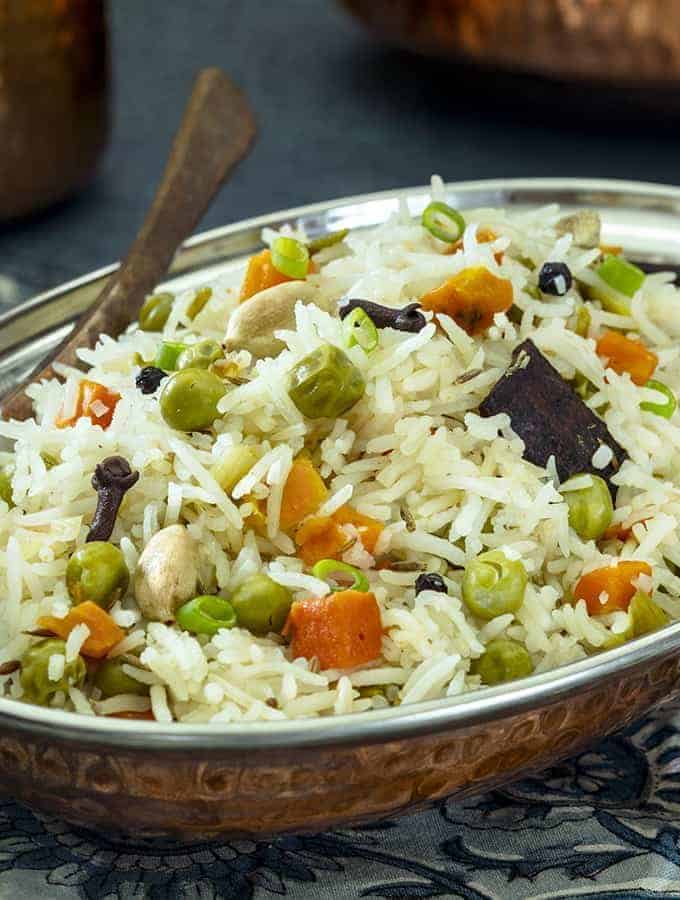
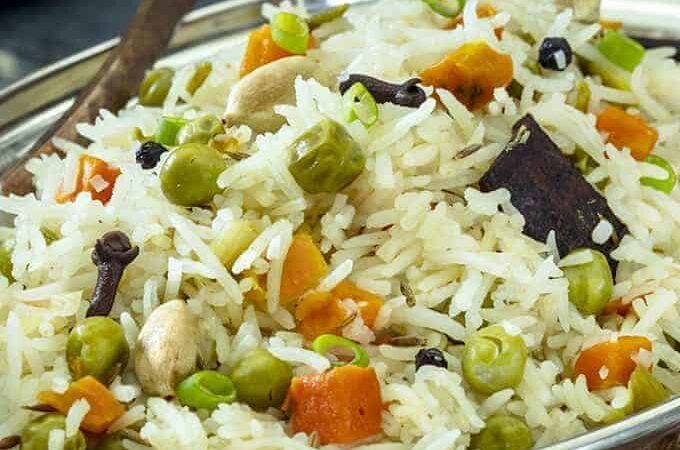
Make a delicious and authentic Indian Pilau easily and quickly in your Instant Pot! Peas and carrots with rice have never tasted so good!

What Makes This Indian Pilau So Good?
If you’re a fan of Indian Pilau, prepare to make the easiest, and arguably most delicious pilau you’ve ever made! And if you’ve never had pilau before, you’re in for quite the treat! This is a deliciously authentic and easy Indian recipe that you’ll want to make over and over again.
Now I know this recipe is certainly not low carb, but sometimes you just NEED to have some rice in your life. It’s one of those dishes that is just so good and comforting (and also vegetarian )that you have cravings for it from time to time. And trust me, once you’ve tried it you’re sure to have cravings as well.
From the savory sweetness of the spices, peas, and carrots to the tender deliciousness of the rice, you’ll find yourself savoring every bite.
Did I forget to mention that this recipe is an Instant Pot recipe as well? So not only is in oh-so-good, but it’s so easy to make and much faster than traditional methods. This might be the easiest Indian Pilau you’ve ever made!
What’s The Difference Between Biryani And Pilau?
While there are many differences, there are a few things that stand out to me.
- First of all, Biryani is a main dish, whereas Pilau is typically just a side dish.
- Biryani contains meat, and sauce and is all mixed together with a variety of spices and seasonings and in general, is an entree, which makes it far different from Pilau.
- Biryani is a heavily seasoned dish and Pilau is only mildly seasoned. While Pilau is a delicious rice dish that’s also Indian, it’s nothing like Biryani.
How To Make Indian Pilau
- Turn the Instant Pot to sauté. When it’s hot add ghee, cumin, cloves , cinnamon, peppercorns and stir to flavor the ghee. Allow them to sizzle for 30 seconds. Then add the green onions and stir.
- If you’re using ground garam masala , add it to the pot along with the onions.
- Add in the rice water and salt and mix well.
- Then add the frozen onion peas and carrots on top. Do not stir.
- Close the lid and cook on high pressure for four minutes. When the cooking time is over allow the pot to rest undisturbed for 10 minutes. Then release all remaining pressure.
- Using a very light, hand mix the peas carrots and rice together and tip into a large serving dish to serve.
Tips And Tricks For Making Indian Pilau
- Make sure you don’t bite directly into any of the whole spices! If you weren’t raised eating traditional Indian food, we are trained from a young age to eat around the whole spices. So do yourself a favor and try not to chomp on any of the whole spices while you’re inhaling this delicious goodness.
- You can use Garam Masala if you’d like, and in doing so you’ll save yourself the extra effort of having to eat around the whole spices, but it really is that much better when you use whole spices. The spices flavor the rice around it and the water in a gentle fashion, with different tastes in different bites.
- If you decide to use Garam Masala instead of the whole spices, I highly recommend you make it yourself. Here is a great Garam Masala recipe for you to use!
- You can sub any other frozen veggie that you’d like.
- You can add paneer for protein if you’d like.
- Typically for 2 cups of rice, you’d only use 1.75 cups of water. But in this case, we’re using two cups of water to account for steaming the additional vegetables. My Perfect Pressure Cooker Rice post has some great tips on cooking rice in the Instant Pot.
What Can I Serve With Indian Pilau?

- Make this restaurant-quality Matar Paneer recipe in your Instant Pot or pressure cooker at home in minutes!
- This traditional Langar Ki Dal combines two types of dal to make a hearty dish that’s just perfect!
- Check out this authentic Chicken Vindaloo Recipe made from scratch with no spice pastes! Once you try this, you will be able to use this recipe as a base to make Pork Vindaloo or Beef Vindaloo.
- You may also be interested in this Kashmiri Yakhni Pulao
- If you’re craving something sweet, finish off your meal with some Halva .
Indian Pilau
Equipment
- Instant Pot
Ingredients
Whole Garam Masala Ingredients
- ▢ 4 green cardamom pods
- ▢ 4 Whole Cloves
- ▢ 8 Whole Black Peppercorns
- ▢ 2-3 inch Indian Cinnamon Cassia Bark
- ▢ 1-2 Black Cardamom Pods , {optional)
(or 1 tablespoon Garam Masala instead of all the spices)
For The Rice
- ▢ 2 tablespoons Ghee
- ▢ 1 teaspoon cumin seeds
- ▢ 1 cup Chopped Green Scallions , chopped
- ▢ 1 bag Frozen Peas and Carrots
- ▢ 2 cups Basmati Rice , long grain, rinsed and drained
- ▢ 2 cups Water
Instructions
Turn the instant pot to sauté. When it’s hot add ghee, cumin, cloves, cinnamon, peppercorns and stir to flavor the ghee. Allow them to sizzle for 30 seconds. Then add the green onions and stir.
If you’re using ground garam masala, add it to the pot along with the onions.
Add in the rice water and salt and mix well.
Then add the frozen onion peas and carrots on top. Do not stir.
Close the lid and cook on high pressure for four minutes. When the cooking time is over allow the pot to rest undisturbed for 10 minutes. Then release all remaining pressure.
Using a very light, hand mix the peas carrots and rice together and tip into a large serving dish to serve.
Make sure you don’t bite directly into any of the whole spices! If you weren’t raised eating traditional Indian food, we are trained from a young age to eat around the whole spices. So do yourself a favor and try not to chomp on any of the whole spices while you’re inhaling this delicious goodness.
You can use Garam Masala if you’d like, and in doing so you’ll save yourself the extra effort of having to eat around the whole spices, but it really is that much better when you use whole spices. The spices flavor the rice around it and the water in a gentle fashion, with different tastes in different bites.
If you decide to use Garam Masala instead of the whole spices, I highly recommend you make it yourself. Here is a great Garam Masala recipe for you to use!
You can sub any other frozen veggie that you’d like.
You can add paneer for protein if you’d like.
Typically for 2 cups of rice, you’d only use 1.75 cups of water. But in this case, we’re using two cups of water to account for steaming the additional vegetables. My Perfect Pressure Cooker Rice post has some great tips on cooking rice in the Instant Pot.
