
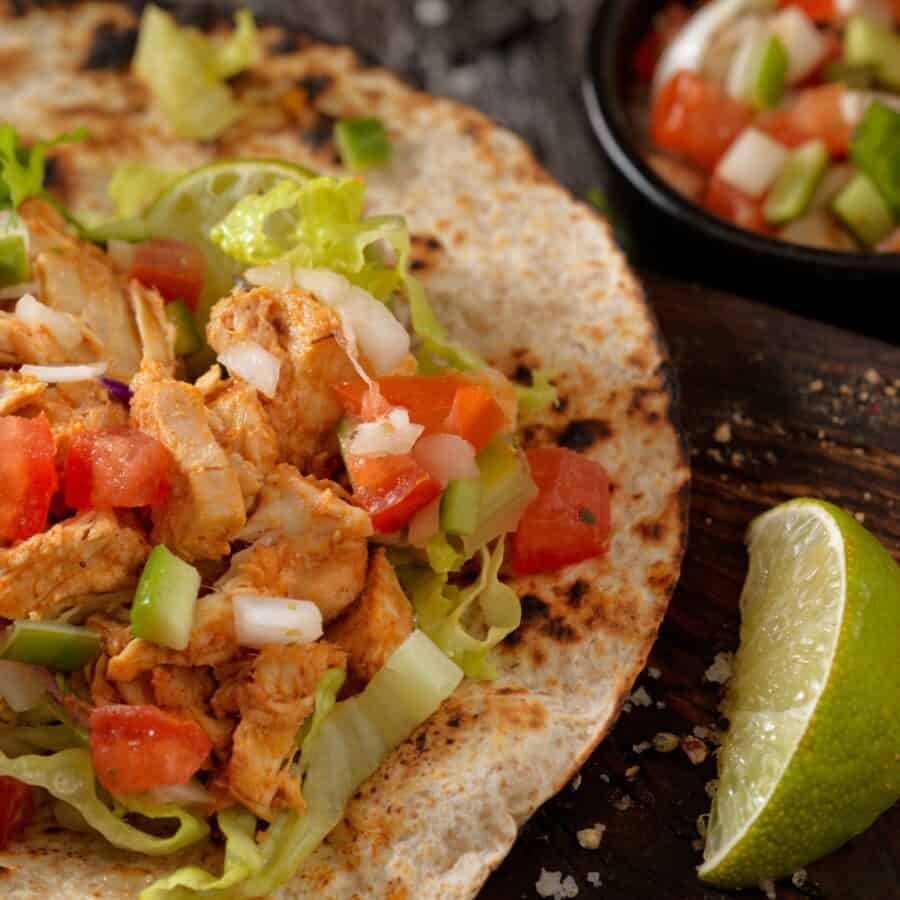
Love the bold, spicy flavor of Buffalo wings? These Buffalo Chicken Tacos take everything you crave, tender chicken, tangy hot sauce, and creamy ranch, and wrap it in a soft tortilla for a weeknight-friendly meal that’s impossible to resist.

Why You’ll Love This Spicy Meal Idea
- Fast. A main course that’s ready in just 30 minutes and perfect for busy weeknights.
- Easy. Use rotisserie chicken or cook your own. A great no stress meal solution!
- Customizable. Make them mild or fiery, load them with toppings, or keep it simple.
- Delicious. Classic Buffalo chicken flavor in taco form? Say less.
Whether you’re feeding a crowd or looking for a fun dinner idea, these tacos are guaranteed to hit the spot.
What Do Buffalo Chicken Tacos Taste Like?
These tacos are the perfect mash-up of spicy, creamy, and crunchy. They’re everything you love about Buffalo wings, delivered in a tortilla.
Ingredients You’ll Need
- Cooked Chicken - Acts as the hearty, protein-rich base. Shredded rotisserie or cooked chicken breast absorbs the bold flavors of the Buffalo sauce beautifully.
- Buffalo Sauce - The key flavor driver, delivering that signature tangy heat. It transforms a plain chicken recipe into the spicy, savory taco.
- Butter - Combines with the hot sauce to mellow the heat slightly and create a rich, smooth coating for the chicken.
- Ranch or Blue Cheese Dressing - Adds cool, creamy contrast to the heat of the Buffalo sauce, balancing the flavors and making each bite irresistible.
- Shredded Lettuce - Provides refreshing crunch and helps tone down the heat for a more balanced bite.
- Diced Celery - Optional, but offers a crisp texture and subtle bitterness that echoes the traditional Buffalo wing pairing.
- Crumbled Blue Cheese - Adds a sharp, tangy punch and creamy texture, ideal for blue cheese fans who love bold flavor.
- Tortillas - The vehicle that holds it all together. Soft, warm flour or corn tortillas make it easy to enjoy all the flavors in one satisfying bite.
- Green Onions - A fresh, zippy garnish that adds mild onion flavor and a pop of color to the finished tacos.
- Lime - A bright and fresh finish for your handheld zesty bite.
How To Make Buffalo Chicken Tacos
- Prepare the Chicken. In a skillet over medium heat, combine shredded chicken with Buffalo sauce and a bit of melted butter. Heat until warmed through and well coated.
- Warm the Tortillas. Heat your tortillas in a dry skillet or microwave until soft and pliable.
- Assemble the Tacos. Fill each tortilla with the Buffalo chicken mixture, then top with shredded lettuce, celery, ranch dressing, blue cheese crumbles, and green onions.
- Serve. Serve immediately while warm with extra dressing or sauce on the side.
Tips And Tricks
Buffalo Chicken Tacos are quick, flavorful, and perfect for weeknight dinners or game day spreads, but a few smart tips can take them from good to unforgettable:
- Use Rotisserie Chicken for Speed . Save time by shredding store-bought rotisserie chicken. It soaks up Buffalo sauce beautifully and makes prep a breeze.
- Warm the Tortillas . Lightly warming your tortillas (in a dry skillet or microwave wrapped in a damp towel) makes them more pliable and enhances their flavor.
- Balance the Heat . Adjust the spiciness to your preference by tweaking the ratio of hot sauce to butter. More butter = milder flavor.
- Add Crunch Wisely . Include shredded lettuce or diced celery just before serving to keep them crisp and fresh.
Variations
Buffalo Chicken Tacos are endlessly customizable, making them perfect for every palate. Here are some fun and flavorful variations to try:
- Cauliflower Tacos - Swap the chicken for roasted cauliflower florets for a vegetarian option.
- Spicy Ranch Slaw - Replace lettuce with a spicy slaw for extra crunch and creaminess.
- Buffalo Chicken Bowls - Ditch the tortillas and serve everything over rice or greens.
- Cheesy - Sprinkle shredded cheddar over the chicken and melt under the broiler.
- Buffalo Chicken Sliders - Use the chicken on slider rolls instead of stuffing tortillas.
What To Eat With Buffalo Chicken Tacos
Buffalo Chicken Tacos pack a spicy punch, so pairing them with the right sides can balance the heat and round out your meal. Here are some tasty and complementary options:
- Sweet Potato Fries - Their natural sweetness balances the heat.
- Celery & Carrot Sticks – Classic Buffalo wing accompaniments.
- Corn Salad - Light and refreshing with citrusy zing.
- Coleslaw - Creamy or vinegar-based versions work great.
- Chips & Guacamole - Because tacos and guac are a match made in heaven.
How Long Do They Last?
Buffalo chicken can be stored in an airtight container in the fridge for up to 4 days. Assemble tacos just before serving to prevent fogginess.
Can You Freeze Them?
You can freeze the shredded chicken in the Buffalo sauce, but freeze it without the toppings or tortillas.
Defrost and reheat the meat before assembling fresh tacos.
More Of OurBest Taco Recipes
- Potato Tacos
- Shrimp Tacos
- Korean Beef Tacos
- Chorizo Tacos
- Wonton Tacos
- Mushroom Tacos


Buffalo Chicken Tacos | Zesty Chicken Taco Recipe
Ingredients
- ▢ 3 cups Rotisserie Chicken
- ▢ 1/2 cup Buffalo Sauce
- ▢ 2 tbsp Unsalted Butter
- ▢ 1/2 cup Ranch Dressing
- ▢ 2 cups Shredded Lettuce
- ▢ 1/2 cup Crumbled Blue Cheese
- ▢ 12 Tortillas , small, corn or flour
- ▢ 2 Green Onions , thinly sliced
- ▢ 2 Limes , cut into wedges
Instructions
- Prepare the Chicken. In a skillet over medium heat, combine shredded chicken with Buffalo sauce and a bit of melted butter. Heat until warmed through and well coated.
- Warm the Tortillas. Heat your tortillas in a dry skillet or microwave until soft and pliable.
- Assemble the Tacos. Fill each tortilla with the Buffalo chicken mixture, then top with shredded lettuce, celery, ranch dressing, blue cheese crumbles, and green onions.
- Serve. Serve immediately while warm with extra dressing or sauce on the side.
Get support & connect with our community on Facebook!
Nutrition

If you already signed up, you should have received an email with a password to give you unlimited access to our FREE Printable Library. The password is case sensitive. Enter it below and get printing!
Password:

Buffalo Chicken Tacos | Zesty Chicken Taco Recipe
Ingredients
- 3 cups Rotisserie Chicken
- 1/2 cup Buffalo Sauce
- 2 tbsp Unsalted Butter
- 1/2 cup Ranch Dressing
- 2 cups Shredded Lettuce
- 1/2 cup Crumbled Blue Cheese
- 12 Tortillas small, corn or flour
- 2 Green Onions thinly sliced
- 2 Limes cut into wedges
Instructions
- Prepare the Chicken. In a skillet over medium heat, combine shredded chicken with Buffalo sauce and a bit of melted butter. Heat until warmed through and well coated.
- Warm the Tortillas. Heat your tortillas in a dry skillet or microwave until soft and pliable.
- Assemble the Tacos. Fill each tortilla with the Buffalo chicken mixture, then top with shredded lettuce, celery, ranch dressing, blue cheese crumbles, and green onions.
- Serve. Serve immediately while warm with extra dressing or sauce on the side.
Buffalo Chicken Tacos | Zesty Chicken Taco Recipe https://twosleevers.com/buffalo-chicken-tacos/

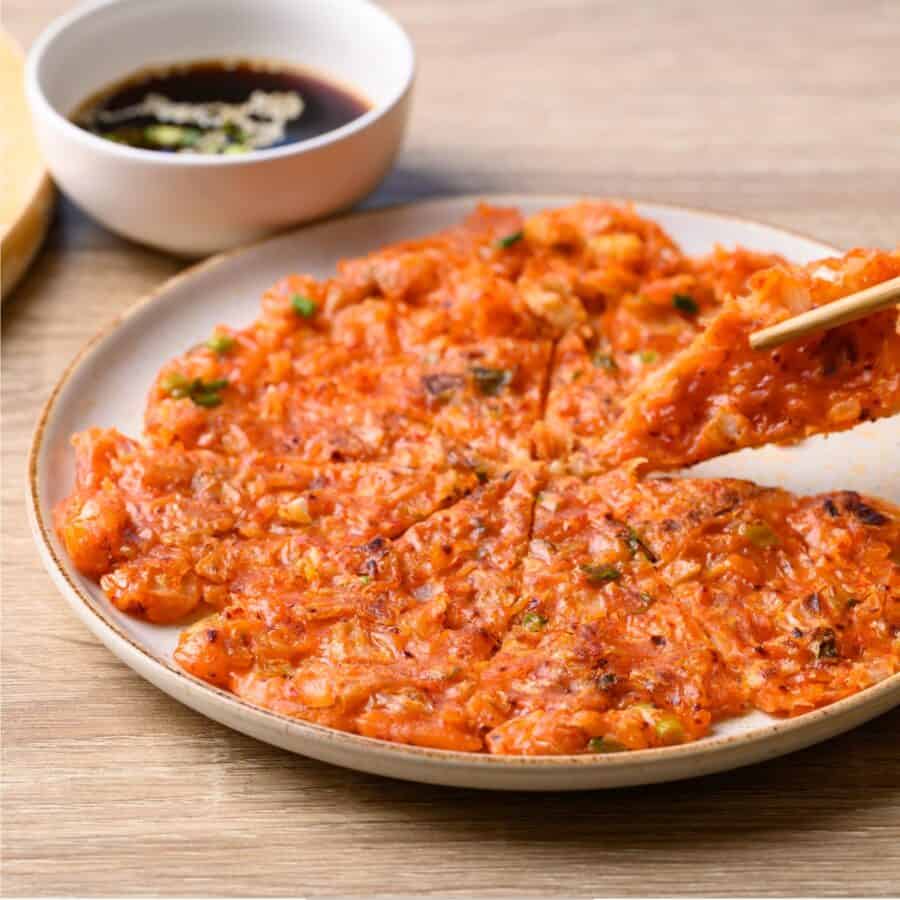
If you’re a fan of bold, savory flavors and crave a snack that’s crispy on the outside and packed with flavor on the inside, you’re going to love this Kimchi Pancake recipe. Known as Kimchi Jeon (김치전) in Korean, these addictive savory pancakes are a popular comfort food that’s quick, easy, and absolutely delicious.
Why You’ll Love This Spectacular Side Dish
- Fast. These come together in under 20 minutes, making them perfect for a quick lunch or snack.
- Crispy. The edges get delightfully crisp while the inside stays tender and flavorful.
- Bold Flavor. Thanks to the fermented kimchi and scallions, every bite is tangy, spicy, and satisfying.
- Pantry-Friendly. Made with common ingredients you likely already have on hand.
Whether you serve them as an appetizer, side dish, or a late-night snack, these Kimchi Pancakes are always a hit.
What Does A Kimchi Pancake Taste Like?
This kimchi pancake recipe offers a savory, spicy, and slightly sour flavor from the kimchi, balanced by a crispy batter made with flour and seasonings. They’re satisfying without being heavy and can be customized with added vegetables or proteins.
Serve them with a simple soy dipping sauce and you’ve got an umami-rich dish you’ll want to make again and again.
Are They Healthy?
Kimchi pancakes are relatively healthy, especially if made with wholesome ingredients and mindful cooking methods. They’re a flavorful, veggie-rich way to enjoy a Korean classic without going overboard on calories.
Ingredients You’ll Need
- Kimchi - The star ingredient. Use well-fermented kimchi for the best depth of flavor. Chop it into small pieces.
- All-Purpose Flour - Forms the base of the pancake batter.
- Cornstarch (Optional) - Helps increase crispiness.
- Egg - Binds the batter together.
- Cold Water - Keeps the batter light and helps crisp the edges.
- Kimchi Juice - Adds even more flavor and that signature red hue.
- Scallions - Adds freshness and a bit of sharpness.
- Sugar - Just a pinch to balance the tanginess of the kimchi.
- Sesame Oil - Adds nutty richness.
- Neutral Oil (for frying) - Use a high-heat oil like vegetable or canola.
How To Make A Kimchi Pancake
- Prepare the Batter. In a bowl, whisk together all-purpose flour, cornstarch (if using), egg, cold water, kimchi juice, and a pinch of sugar. Stir in the chopped kimchi and scallions until just combined.
- Heat the Pan. Add enough oil to a skillet to coat the bottom and heat it over medium-high heat until shimmering.
- Cook the Pancakes. Pour about ⅓ cup of the batter into the pan and spread it out into a thin circle. Fry for 2–3 minutes on each side or until golden brown and crispy.
- Drain and Serve. Remove the pancake and place it on paper towels to drain excess oil. Repeat with the remaining batter.

Tips And Tricks
Here are some tips and tricks for making perfect Kimchi Pancake that is crispy, flavorful, and satisfying every time:
- Use Fermented Kimchi. The older, the better. Fermented kimchi has a stronger flavor and gives the pancakes their signature tang.
- Cold Batter = Crispier Texture. Cold water helps create a light batter that crisps up nicely in the pan.
- Don’t Overcrowd the Pan. Cook one pancake at a time to ensure even browning.
- Thin is Best. Spread the batter thinly for maximum crispiness.
- Double the Recipe. These go fast! Make extra and reheat in a pan to bring back the crisp.
Variations
Want to put your own twist on classic kimchi pancakes? Try one of these variations:
- Seafood - Add chopped shrimp or squid for a protein boost.
- Cheese - Stir in shredded mozzarella for a gooey fusion version.
- Vegan Version - Omit the egg and use water + 1 tbsp ground flaxseed as a binder.
- Spicy Kick - Mix in a bit of gochugaru (Korean chili flakes) for extra heat.
What To Eat With Kimchi Pancakes
Kimchi pancakes are amazing on their own, but even better with:
- Soy Dipping Sauce - Mix soy sauce, rice vinegar, a dash of sesame oil, and a sprinkle of sesame seeds.
- Korean Pickles - Light and tangy banchan to balance the richness.
- Miso Soup - A warm, comforting addition to the table.
- Bibimbap or Korean BBQ - Serve as part of a larger Korean meal spread.
How Long Do They Last?
Store leftover kimchi pancakes in the refrigerator for up to 3 days. To reheat, place in a skillet with a splash of oil over medium heat until warmed through and crisp again. Avoid microwaving, as it can make them soggy.
Can You Freeze Them?
Yes! Once cooled, stack them between layers of parchment paper and freeze in a sealed bag for up to 1 month. Reheat in a pan or air fryer for best results.
More Korean-Inspired Dishes
- Korean Beef Bowls
- Cucumber Kimchi
- Korean Cucumber Salad
- Gochujang Chicken
- Korean Beef Tacos


Kimchi Pancake Recipe | Crispy Korean Kimchi Jeon
Ingredients
- ▢ 1 1/2 cups Kimchi
- ▢ 3/4 cup All Purpose Flour
- ▢ 2 tbsp Cornstarch
- ▢ 1 Egg
- ▢ 1/3 cup Cold Water
- ▢ 1/3 cup Kimchi Juice
- ▢ 2 Scallions , chopped
- ▢ 1/2 tsp Sugar
- ▢ 1 tsp Sesame Oil
- ▢ 1 tbsp Vegetable Oil , for frying
Instructions
- Prepare the Batter. In a bowl, whisk together all-purpose flour, cornstarch (if using), egg, cold water, kimchi juice, and a pinch of sugar. Stir in the chopped kimchi and scallions until just combined.
- Heat the Pan. Add enough oil to a skillet to coat the bottom and heat it over medium-high heat until shimmering.
- Cook the Pancakes. Pour about ⅓ cup of the batter into the pan and spread it out into a thin circle. Fry for 2–3 minutes on each side or until golden brown and crispy.
- Drain and Serve. Remove the pancake and place it on paper towels to drain excess oil. Repeat with the remaining batter.
