
If you’re looking for a mouth-watering appetizer to impress your guests, then you can’t go wrong with Buffalo Chicken Dip Crock Pot Recipe. This delicious and easy-to-make recipe is perfect for any occasion, from game day parties to family gatherings. So grab your crockpot and get ready to whip up a buffalo chicken dip that will knock your socks off.

Why This Will Be Your Go-To Appetizer
- Easy. This slow cooker recipe is a super simple pour and cook recipe that takes minimal effort.
- Low Carb . Only 3 net carbs per serving!
- High Protein . If you need a delicious chicken recipe to meet your daily protein macros, enjoy a hearty serving of this tasty dip.
- Delicious. A creamy bite that is loaded with spicy, zingy, savory flavors and will keep you coming back for more.
This buffalo chicken dip crock pot recipe is the perfect combination of spicy and cheesy, and it’s sure to be a hit at any party or gathering. Plus, because it’s made in a crockpot, it’s effortless to make and requires minimal effort on your part.
Is It Ok To Put Raw Chicken In The Slow Cooker?
Yes, it is okay to put raw chicken in the slow cooker, but it’s crucial to ensure it is fully cooked to avoid any risk of foodborne illness.
When cooking raw chicken in the slow cooker, it’s recommended to cook it on high heat for at least 3-4 hours or on low heat for 6-8 hours,
It’s also essential to use a food thermometer to ensure that the internal temperature of the chicken reaches at least 165F before serving it to your family and friends.
Is It Better To Cook Chicken On High Or Low In The Crock Pot?
Whether you cook chicken on high or low in the crock pot depends on the recipe and how quickly you want to enjoy your dish. In general, chicken can be cooked on either high or low heat in the crock pot, but the cooking time will vary.
Cooking chicken on high heat in the crock pot will result in a faster cooking time, usually around 3-4 hours, and can be a good option when you need the chicken cooked quickly. However, cooking on high heat may also cause the chicken to become dry or tough, especially if it’s left in the crock pot for too long.
On the other hand, cooking chicken on low heat in the crock pot will result in a longer cooking time, usually around 6-8 hours, but can result in more tender and juicy chicken. Cooking on low heat allows the chicken to cook slowly and retain more of its moisture, resulting in a more flavorful dish.
Should Liquid Cover Chicken In The Crock Pot?
You will get a variety of answers to this question depending on who you ask, but I will give you the pros and cons of covering the chicken with liquid when you cook it in the slow cooker.
- Without covering the chicken. You can choose to cook your chicken in the slow cooker with a small amount of liquid without covering it, and you will still get good results. Since the lid to your crock pot has a sealing ring, it will hold in moisture and prevent it from drying out.
- With covering the chicken. Covering the chicken with water or broth while cooking will lock in even more moisture. Unfortunately, you will need to remove all the liquid before adding the rest of your ingredients. This method prevents you from cooking the chicken with hot sauce. This step adds a depth of flavor you will not achieve by adding it in after the chicken cooks.
Ingredients You’ll Need
I love this recipe, not only because it is super easy to make, and low carb, but also because it takes so few ingredients to create! Double-check your fridge for the ingredients below before you get started:
- Chicken Breasts - You can also use chicken thighs or chicken tenderloins for this dish if you prefer.
- Buffalo Sauce - I prefer Frank’s Red Hot, but feel free to use any hot sauce of your choice.
- Cream Cheese - This recipe uses full-fat cream cheese. If you want to reduce the calories per serving, you can substitute a low fat version.
- Ranch Dressing - Any brand or flavor variation will work. You can even make your own keto ranch dressing to keep the carbs as low as possible. It is just to add a little more creaminess and a bit of a zing to the dip.
- Shredded Cheddar Cheese - To reduce the carbs even more, shred your own cheese instead of using pre-shredded cheese.
- Blue cheese - If blue cheese isn’t your thing, you can easily omit it. I prefer to crumble it on top of the dip after it is cooked before serving, so all you will need to do is skip that step.
How To Make This Buffalo Dip Crock Pot Recipe
- Place the raw chicken breasts in the bottom of your slow cooker.
- Pour the buffalo sauce over the chicken, making sure it’s evenly coated.
- Cover the slow cooker with its lid and cook on high heat for 4-6 hours, or until the chicken is fully cooked and tender.
- Remove the chicken from the slow cooker and shred it using two forks.
- Return the shredded chicken to the slow cooker.
- Add the softened cream cheese and ranch dressing to the slow cooker. Stir everything together until the cream cheese is fully melted and incorporated.
- Next, add the shredded cheddar cheese to the slow cooker. Mix well to combine all the ingredients.
- Cover the slow cooker with its lid and cook on low heat for an additional 30 minutes to an hour, or until the cheese is fully melted and the dip is heated through.
- Serve the dip hot with blue cheese crumbles, and baguettes or celery sticks for dipping, and enjoy!

Variations
- Use Ranch Mix. If you’re a fan of the zesty flavor of ranch dressing, stir in a ranch seasoning packet for a more concentrated flavor.
- Omit The Blue Cheese. Blue cheese isn’t a flavor that everyone loves, so if you’re not a fan, just omit the blue cheese crumble on top before serving your crock pot dip.
- Make A Bubbly Crust. Straight out of the slow cooker, this isn’t the prettiest bite (though you’re not likely to care once you taste it). So if you want to make it even prettier, top it with shredded cheddar and blue cheese crumbles. Toss it in the oven at 450F for 5 minutes, or until the top layer of cheese is melted.
What To Serve With It
- Tortilla chips - Tortilla chips are a classic pairing and their salty crunch pairs perfectly with the spicy, creamy dip.
- Celery and carrot sticks - For a healthier option, serve buffalo dip with fresh celery and carrot sticks. The crisp vegetables provide a refreshing contrast to the rich and spicy dip.
- Pita chips or crackers - Pita chips or crackers are another great options for dipping into buffalo chicken dip, providing a sturdy base that can hold up to the thick and creamy texture of the dip.
- Toasted baguette slice s- If you’re looking for something a little more substantial, toasted baguette slices or crostini can be a great option for serving with it. The crispy bread provides a nice contrast to the creamy dip. It can be a great way to add some variety to your spread.
- Pork Rinds - For a low carb option that gives all of the crunchy texture you need, but not all of the carbs, grab a bag and get to dipping.
Overall, the key to serving this buffalo chicken dip crock pot recipe is to offer a variety of options. They should accommodate different tastes and dietary preferences. Whether you’re looking for something crunchy, fresh, or more substantial, there are plenty of options to choose from.
How Long Does It Last?
Buffalo chicken dip can last for up to 3-4 days in the refrigerator when stored in an airtight container.
To reheat buffalo chicken dip, transfer it to a microwave-safe dish and heat on high for 1-2 minutes. Stir it occasionally until heated through. You can also reheat it in the oven. Transfer it to a baking dish and heat it at 350F for 10-15 minutes.
More Chicken Recipes
If you’re looking for more chicken recipes that you will fall in love with, check out some of my favorite recipes!
- Crockpot BBQ Chicken
- Slow Cooker White Chicken Chili
- Crock Pot Chicken Noodle Soup
- Slow Cooker Chipotle Chicken
- Slow Cooker Butter Chicken


Buffalo Chicken Dip Crock Pot Recipe | Easy Low Carb Appetizer
Ingredients
- ▢ 2 chicken breasts
- ▢ 16 oz cream cheese
- ▢ 1 cup hot sauce
- ▢ 1/2 cup Ranch Dressing
- ▢ 1 cup shredded sharp cheddar cheese
- ▢ 1/4 cup blue cheese
Instructions
- Place the raw chicken breasts in the bottom of your slow cooker.
- Pour the buffalo sauce over the chicken, making sure it’s evenly coated.
- Cover the slow cooker with its lid and cook on high heat for 4-6 hours, or until the chicken is fully cooked and tender.
- Remove the chicken from the slow cooker and shred it using two forks.
- Return the shredded chicken to the slow cooker.
- Add the softened cream cheese and ranch dressing to the slow cooker. Stir everything together until the cream cheese is fully melted and incorporated.
- Serve the dip hot with blue cheese crumbles, and baguettes or celery sticks for dipping, and enjoy!
Get support & connect with our community on Facebook!
Nutrition
Don’t forget to check out my other Ketocookbooks.
Keto Instant Pot, Keto Fat Bombs, Sweets, & Treats , and Easy keto in 30 minutes.


If you already signed up, you should have received an email with a password to give you unlimited access to our FREE Printable Library. The password is case sensitive. Enter it below and get printing!
Password:

Buffalo Chicken Dip Crock Pot Recipe | Easy Low Carb Appetizer
Ingredients
- 2 chicken breasts
- 16 oz cream cheese
- 1 cup hot sauce
- 1/2 cup Ranch Dressing
- 1 cup shredded sharp cheddar cheese
- 1/4 cup blue cheese
Instructions
- Place the raw chicken breasts in the bottom of your slow cooker.
- Pour the buffalo sauce over the chicken, making sure it’s evenly coated.
- Cover the slow cooker with its lid and cook on high heat for 4-6 hours, or until the chicken is fully cooked and tender.
- Remove the chicken from the slow cooker and shred it using two forks.
- Return the shredded chicken to the slow cooker.
- Add the softened cream cheese and ranch dressing to the slow cooker. Stir everything together until the cream cheese is fully melted and incorporated.
- Serve the dip hot with blue cheese crumbles, and baguettes or celery sticks for dipping, and enjoy!
Buffalo Chicken Dip Crock Pot Recipe | Easy Low Carb Appetizer https://twosleevers.com/buffalo-chicken-dip-crock-pot-recipe/
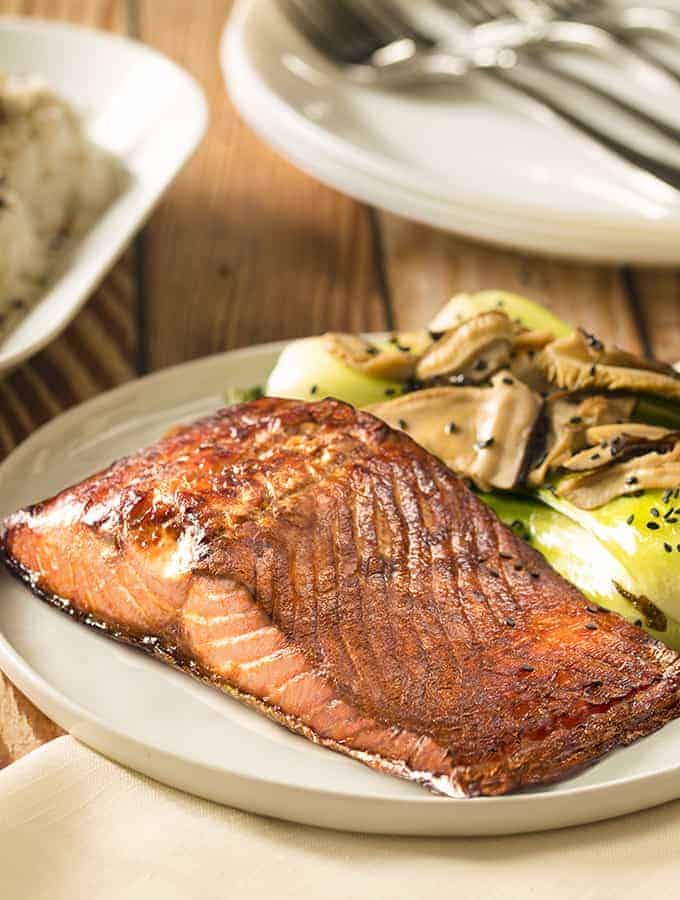
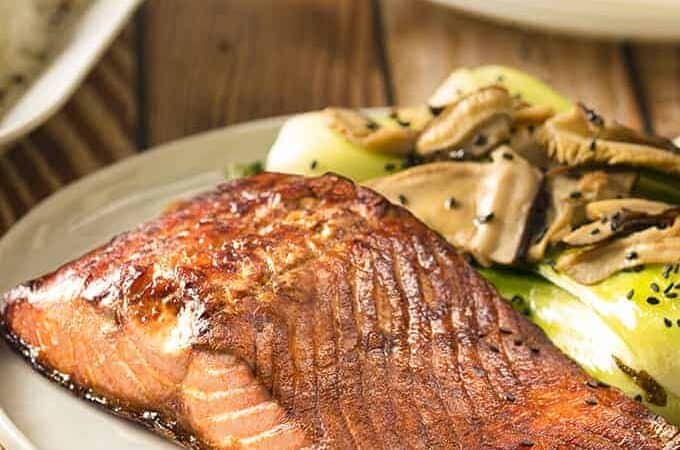
If you like salmon and Asian food, and you’re doing keto, you’re going to love this Air Fryer Salmon Bok Choy recipe. It’s an entire dinner that can be cooked in your air fryer, and is done in about half an hour–and you will see why air fryer salmon is the way to go.
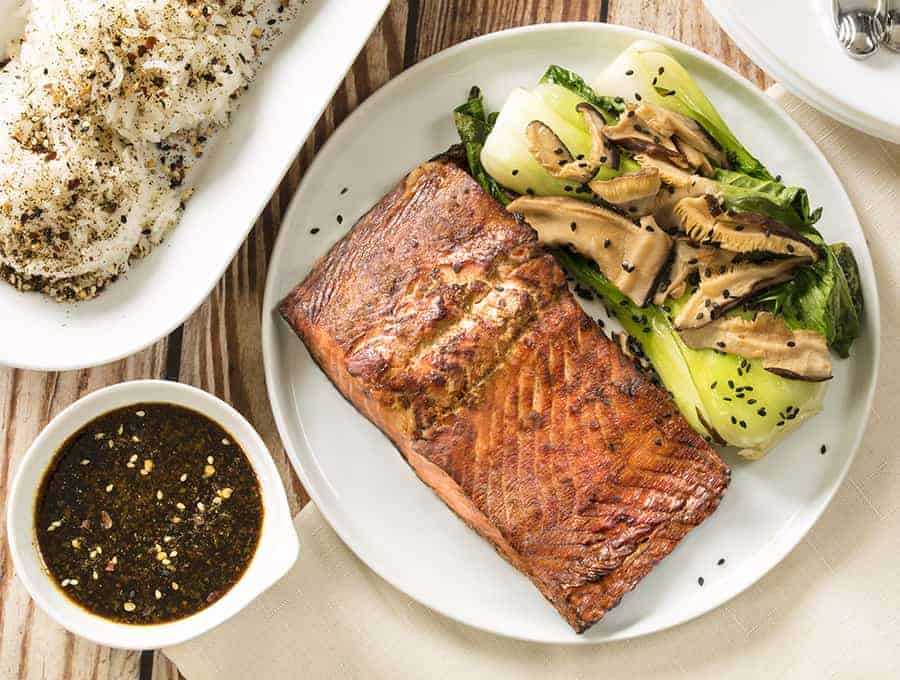
This Air Fryer Salmon is full of beautiful umami flavor. The salmon pairs beautifully with the bok choy and the shiitake mushrooms making a gorgeous meal you can be proud to serve.
If you’re apprehensive about cooking the salmon in the air fryer, don’t be. The skin turns so crispy and amazing, and the marinating step makes sure all those amazing flavors are soaked up in the salmon before it’s even cooked.
Why You’ll Love This Recipe
- Quick. Omitting the time to marinate the salmon, you can have a tasty and healthy main course in 30 minutes or less with the help of your air fryer .
- Easy. Marinate the salmon, prep the veggies, and air fry.
- Tasty. Rich seafood with flavor with minimal effort.
- Pescatarian-friendly. Wanting to skip the beef, chicken, pork, and lamb? You can still have a meal that is incredibly filling and high in protein.
One of my favorite things about this Air Fryer Salmon Recipe with Bok Choy is that it’s cooked in one pan. The only thing you will need to clean after dinner is the air fryer basket and your dinner plates.
This is why I value my air fryer so much, is because outside of making beautiful food and recipes, it also makes cleaning up so much easier.
Make sure that you don’t stick the Bok Choy and mushrooms in for the whole time with the salmon. I note this in the recipe but wanted to make sure you saw this here. Your vegetables will only need to cook for about 6 minutes in the air fryer because any longer than that they will be overcooked and turn to mush.
Ingredients You’ll Need
For The Salmon
- Garlic Cloves
- Minced Ginger
- Grated orange zest
- Orange juice
- Soy Sauce
- Rice Vinegar
- Vegetable Oil
- Kosher Salt
- Salmon Fillets
For the Vegetables
- Baby bok choy, halved lenghtwise
- Dried Shiitake Mushrooms
- Dark Sesame Oil
- Kosher Salt
- Sesame Seeds
Can You Make Salmon in an Air Fryer?
Not only can you make salmon in the air fryer, but it is actually my preferred way to make it.
- For one, it’s a lot easier to clean up than cleaning the splatters off the stove top.
- Secondly–and this to me is the much more important reason to do it–your whole house doesn’t smell like fish. I know I should eat more fish, and I try–but I really can’t stand that lingering smell of fish in my house. To get rid of that fish smell–okay, well. It’s easier to NOT have the fish smell in your house in the first place! Using an air fryer keeps that smell confined, and since the mess is easy to clean up, you don’t have fishy splatters to contend with .
But the main reason to make air fryer salmon?
- Taste. Yup what else would you expect from a foodie like me? AIr fryer salmon is perfect, flaky, and if you use a good marinade, the top can be beautifully caramelized and sweet, and lightly crispy.
How To Make Air Fryer Salmon
- In a bowl whisk together garlic, ginger, orange zest and juice, soy sauce, vinegar, vegetable oil, and salt. Remove half of the marinade and set aside.
- Place salmon in a gallon-size resealable bag. Pour remaining half of marinade over salmon. Seal and massage to coat. Allow to marinate at room temperature for 30 minutes.
- Place salmon in air fryer basket. Set fryer to 400°F for 12 minutes.
- Brush bok choy and mushroom caps all over with sesame oil and season lightly with salt. After 6 minutes of cook time, add vegetables around salmon in air fryer basket. Continue cooking for remaining 6 minutes.
- Drizzle salmon with some of the reserved marinade and sprinkle vegetables with sesame seeds to serve.
More Of Our Best Salmon Recipes
- Salmon Croquettes
- Honey Lemon Salmon
- Honey Glazed Salmon
- Miso Salmon
- Smoked Salmon Dip
If you love this Air Fryer Salmon as much as I do, make sure you share it with your friends on Facebook and Pinterest so they can try it too.
Air Fryer Keto Salmon Bok Choy Recipe
Ingredients
- ▢ 2 ( 2 ) Garlic Cloves , minced
- ▢ 1 tablespoon ( 1 tablespoon ) Minced Ginger
- ▢ 2 teaspoons ( 2 teaspoons ) finely grated orange zest
- ▢ 1/2 cup ( 124 ml ) fresh orange juice
- ▢ 1/4 cup ( 58 ml ) Soy Sauce
- ▢ 3 tablespoons ( 3 tablespoons ) Rice Vinegar
- ▢ 1 tablespoon ( 1 tablespoon ) Vegetable Oil
- ▢ 1/2 teaspoon ( 0.5 teaspoon ) Kosher Salt
- ▢ 2 5 ounce ( 708.74 g ) Salmon Fillets
For the Vegetables
- ▢ 2 heads ( 2 heads ) baby bok choy , halved lenghtwise
- ▢ 2 ounces ( 56.7 g ) Dried Shiitake Mushrooms , stemmed (stems discarded)
- ▢ 1 tablespoon ( 1 tablespoon ) Dark Sesame Oil
- ▢ Kosher Salt
- ▢ 1/2 teaspoon ( 0.5 teaspoon ) Sesame Seeds , toasted
Instructions
For the fish: In a small bowl whisk together garlic, ginger, orange zest and juice, soy sauce, vinegar, vegetable oil, and salt. Remove half of the marinade and reserve. Place salmon in a gallon-size resealable bag. Pour remaining half of marinade over salmon. Seal and massage to coat. Allow to marinate at room temperature for 30 minutes.
Place salmon in air fryer basket. Set fryer to 400°F for 12 minutes.
Meanwhile, for the vegetables: Brush bok choy and mushroom caps all over with sesame oil and season lightly with salt. After 6 minutes of cook time, add vegetables around salmon in air fryer basket. Continue cooking for remaining 6 minutes.
Drizzle salmon with some of the reserved marinade and sprinkle vegetables with sesame seeds to serve.
The recipe probably has fewer carbs and calories since you’re unlikely to be eating all of the sauce/marinade, but I’m not sure how to account for that.
Get support & connect with our community on Facebook!
Nutrition
And don’t forget to check out my air fryer cookbooks! Every day easy air fryer , and Air Fryer Revolution .

