
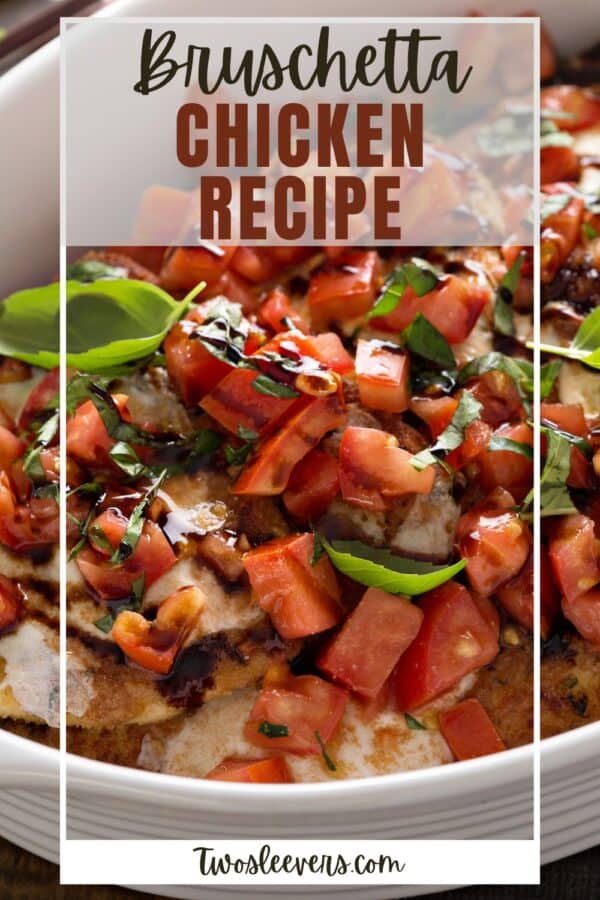
If you’re a fan of the delectable combination of juicy chicken, fresh tomatoes, and basil, you’re in for a treat! Learn how to make the easiest Baked Chicken Bruschetta. You’ll achieve that perfect balance between tender chicken and a vibrant, flavorful topping while indulging in Italian-inspired flavors.

Why You’ll Love This Flavorful Chicken
- Fast. Ready in under 40 minutes with simple ingredients.
- Easy. Bake the chicken, prepare the bruschetta topping, and assemble for a delightful meal.
- Healthy. Packed with fresh ingredients and lean protein!
- Delicious. Bursting with flavors that are absolutely irresistible.
With the convenience of the oven, you’ve achieved a restaurant-quality dish that will leave your friends and family craving more. Whether you’re hosting a dinner party or simply treating yourself to a delicious meal, this Chicken Bruschetta is guaranteed to be a hit.
What Does Chicken Bruschetta Taste Like?
Chicken Bruschetta is absolutely delicious and insanely popular among Italian cuisine enthusiasts. This dish offers a delectable combination of flavors that appeals to a wide range of palates.
The juicy tomatoes, fragrant basil, and tangy balsamic vinegar create a mouthwatering and satisfying eating experience.
What Is Bruschetta Chicken Made Of?
- Chicken Breasts - Boneless, skinless chicken breasts work best for this recipe.
- Tomatoes - Fresh Roma tomatoes, diced for the topping.
- Basil - Fresh basil leaves, chopped for a burst of flavor.
- Garlic - Minced garlic cloves for a punch of flavor.
- Balsamic Vinegar - Adds a tangy and sweet flavor to the bruschetta topping.
- Olive Oil - Enhances the flavor and helps to cook the chicken.
- Salt and Pepper - To taste, for seasoning.
- Mozzarella Cheese -Optional, for a cheesy topping.
How To Make Bruschetta Chicken
- Prepare the Chicken . Start by preheating your oven to 375°F. Season the chicken breasts with salt and pepper on both sides. Place them in a baking dish and drizzle with olive oil.
- Bake the Chicken . Bake the chicken breasts in the preheated oven for 25-30 minutes, or until the chicken is cooked through and no longer pink in the center.
- Make the Bruschetta Topping . While the chicken is baking, prepare the bruschetta topping. In a bowl, combine diced tomatoes, chopped basil, minced garlic, balsamic vinegar, olive oil, salt, and pepper. Toss until well mixed.
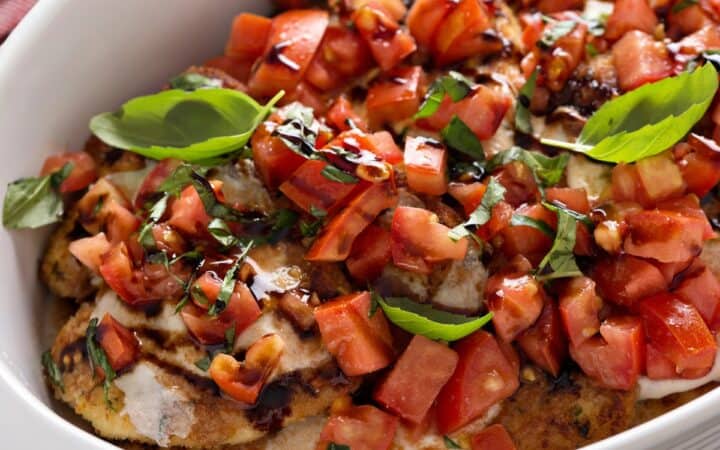
- Assemble the Dish . Once the chicken is baked, remove it from the oven and top each breast with a generous amount of the bruschetta mixture. If using mozzarella cheese, add a slice on top of each chicken breast.
- Broil for Extra Flavor . Return the baking dish to the oven and broil for an additional 3-5 minutes, or until the cheese is melted and bubbly, and the bruschetta topping is slightly caramelized.
- Garnish and Serve . Transfer the Chicken Bruschetta to a serving platter. Garnish with extra chopped basil and a drizzle of balsamic glaze for added flavor and presentation. Serve with a side of pasta or a fresh salad.

Tips And Tricks
Making Chicken Bruschetta is a simple endeavor, and a few tips and tricks can help you achieve the best possible results. Here are some pointers to ensure your chicken turns out juicy, flavorful, and utterly irresistible:
- Use Fresh Ingredients . Fresh tomatoes and basil make a significant difference in the taste of the bruschetta topping.
- Don’t Overcook the Chicken . To keep the chicken moist and tender, use a meat thermometer to check that the internal temperature reaches 165°F.
- Let the Flavors Marinate . Allow the bruschetta topping to sit for a few minutes to let the flavors meld together before topping the chicken.
Variations
If you’re a fan of Chicken Bruschetta and want to try some creative variations, here are a few delicious ideas to explore:
- Caprese- Add fresh mozzarella and a drizzle of balsamic glaze to create a Caprese-inspired bruschetta topping.
- Avocado- Mix diced avocado with the tomatoes and basil for a creamy twist.
- Greek- Add feta cheese, Kalamata olives, and cucumber for a Mediterranean flavor profile.
What To Eat With Bruschetta Chicken
Chicken Bruschetta is a flavorful and savory dish that pairs well with a variety of sides and accompaniments. Here are some delicious options to consider serving alongside it:
- Pasta - Serve with a side of pasta tossed in olive oil and garlic for a complete meal.
- Salad - A fresh green salad with a light vinaigrette complements the rich flavors of the chicken.
- Bread - Serve with a side of crusty bread to soak up the delicious bruschetta topping.
How Long Does It Last?
Cooked Chicken Bruschetta can be stored in the refrigerator in an airtight container for up to 3 to 4 days. The flavors may intensify over time, so for the best bite, they are best enjoyed as soon as possible.
Can You Freeze It?
Yes, you can freeze Chicken Bruschetta to extend its shelf life and enjoy it at a later time. Freezing is a great way to preserve the flavors and texture of the dish.
Properly frozen Chicken Bruschetta can last in the freezer for up to 2 to 3 months without significant loss of quality. However, for the best taste and texture, try to enjoy it within a few weeks of freezing.
More Simple Chicken Dishes
- Chicken Tikka Masala
- Instant Pot Chicken Tacos
- Bourbon Chicken
- Firecracker Chicken
- Instant Pot Butter Chicken
- Chicken Piccata
Bruschetta Chicken Recipe | Italian Herbed Chicken Recipe
Ingredients
- ▢ 4 Boneless Skinless Chicken Breasts
- ▢ 1 tbsp Olive Oil
- ▢ 1/2 tsp Kosher Salt
- ▢ 1/4 tsp Ground Black Pepper
- ▢ 3 Roma Tomatoes , diced
- ▢ 2 cloves Garlic , minced
- ▢ 2 tbsp Balsamic Vinegar
- ▢ 1/4 cup Basil , chopped
- ▢ 1/2 cup Mozzarella Cheese , optional
Instructions
- Prepare the Chicken . Start by preheating your oven to 375°F. Season the chicken breasts with salt and pepper on both sides. Place them in a baking dish and drizzle with olive oil.
- Bake the Chicken . Bake the chicken breasts in the preheated oven for 25-30 minutes, or until the chicken is cooked through and no longer pink in the center.
- Make the Bruschetta Topping . While the chicken is baking, prepare the bruschetta topping. In a bowl, combine diced tomatoes, chopped basil, minced garlic, balsamic vinegar, olive oil, salt, and pepper. Toss until well mixed.
- Assemble the Dish . Once the chicken is baked, remove it from the oven and top each breast with a generous amount of the bruschetta mixture. If using mozzarella cheese, add a slice on top of each chicken breast.
- Broil for Extra Flavor. Return the baking dish to the oven and broil for an additional 3-5 minutes, or until the cheese is melted and bubbly, and the bruschetta topping is slightly caramelized.
- Garnish and Serve . Transfer the Chicken Bruschetta to a serving platter. Garnish with extra chopped basil and a drizzle of balsamic glaze for added flavor and presentation. Serve with a side of pasta or a fresh salad.
Get support & connect with our community on Facebook!

If you already signed up, you should have received an email with a password to give you unlimited access to our FREE Printable Library. The password is case sensitive. Enter it below and get printing!
Password:

Bruschetta Chicken Recipe | Italian Herbed Chicken Recipe
Ingredients
- 4 Boneless Skinless Chicken Breasts
- 1 tbsp Olive Oil
- 1/2 tsp Kosher Salt
- 1/4 tsp Ground Black Pepper
- 3 Roma Tomatoes diced
- 2 cloves Garlic minced
- 2 tbsp Balsamic Vinegar
- 1/4 cup Basil chopped
- 1/2 cup Mozzarella Cheese optional
Instructions
- Prepare the Chicken . Start by preheating your oven to 375°F. Season the chicken breasts with salt and pepper on both sides. Place them in a baking dish and drizzle with olive oil.
- Bake the Chicken . Bake the chicken breasts in the preheated oven for 25-30 minutes, or until the chicken is cooked through and no longer pink in the center.
- Make the Bruschetta Topping . While the chicken is baking, prepare the bruschetta topping. In a bowl, combine diced tomatoes, chopped basil, minced garlic, balsamic vinegar, olive oil, salt, and pepper. Toss until well mixed.
- Assemble the Dish . Once the chicken is baked, remove it from the oven and top each breast with a generous amount of the bruschetta mixture. If using mozzarella cheese, add a slice on top of each chicken breast.
- Broil for Extra Flavor. Return the baking dish to the oven and broil for an additional 3-5 minutes, or until the cheese is melted and bubbly, and the bruschetta topping is slightly caramelized.
- Garnish and Serve . Transfer the Chicken Bruschetta to a serving platter. Garnish with extra chopped basil and a drizzle of balsamic glaze for added flavor and presentation. Serve with a side of pasta or a fresh salad.
Bruschetta Chicken Recipe | Italian Herbed Chicken Recipe https://twosleevers.com/bruschetta-chicken-recipe/

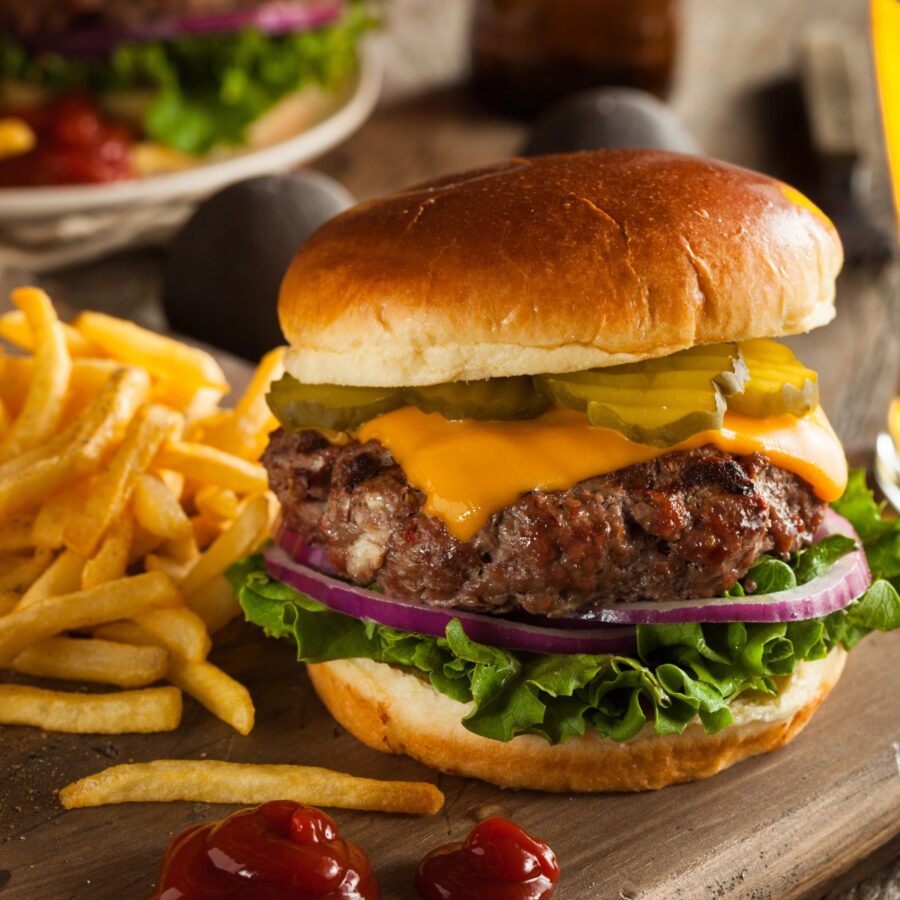
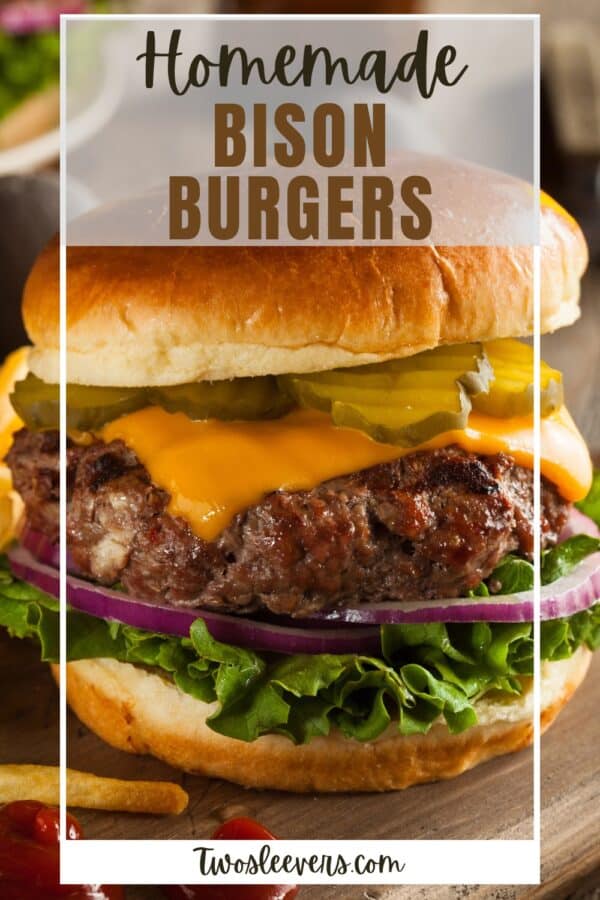
If you’re craving a burger that’s packed with flavor and a little different from the usual beef patty, you’re in for a treat! Learn how to make the most delicious Bison Burgers.
Why You’ll Love This Brilliant Burger
- Healthy . Bison meat is leaner than beef, making it a healthier option for your burger cravings.
- Flavorful . Bison meat has a rich, slightly sweet flavor that pairs perfectly with a variety of toppings and seasonings.
- Quick & Easy . These burgers are ready in under 30 minutes, perfect for a weeknight dinner or a summer BBQ.
- Versatile . You can customize these burgers with your favorite toppings, from classic lettuce and tomato to gourmet additions like avocado and blue cheese.
With the ease of grilling, you’ll have a restaurant-quality dish that will impress your friends and family. Whether you’re hosting a backyard BBQ or simply treating yourself to a delicious meal, these bison burgers are guaranteed to be a hit.
Are Bison Burgers Better For You Than Beef?
Switching to bison burgers can be a healthier alternative to beef, providing leaner meat, higher nutrient density, and fewer calories.
Whether you’re looking to improve your diet or simply try something new, bison burgers are a great option to consider.
How Do You Keep Bison Burgers From Falling Apart?
Creating a bison burger that holds together well requires a few key techniques, given that bison meat is leaner and can be more prone to falling apart than beef. Here are some tips to help you make perfect bison burgers:
- Add a Binder . Adding an egg to the bison meat helps bind the mixture together. Mixing in breadcrumbs absorbs moisture and helps hold the patties together.
- Keep the Meat Cold . After forming the patties, place them in the refrigerator for at least 30 minutes. This helps the patties firm up and hold their shape during cooking.
- Avoid Over-Mixing . Mix the ingredients gently to avoid breaking down the meat fibers too much, which can make the patties fall apart.
Ingredients You’ll Need
- Ground Bison - Look for lean ground bison, which is widely available at most grocery stores.
- Garlic - Fresh minced garlic adds a robust flavor.
- Onion Powder - Enhances the savory taste.
- Salt & Pepper - Simple seasonings that bring out the natural flavors of the bison.
- Worcestershire Sauce - Adds a depth of umami to the burgers.
- Buns - Choose your favorite hamburger buns. Brioche buns are a great option for a touch of sweetness.
- Toppings - Customize with lettuce, tomato, cheese, avocado, and your favorite condiments.
How To Make Bison Burgers
- Mix the Ingredients . In a large bowl, combine the ground bison, minced garlic, onion powder, salt, pepper, and Worcestershire sauce. Mix gently until the ingredients are just combined.
- Form the Patties . Divide the mixture into equal portions and shape them into patties. Make a slight indentation in the center of each patty to prevent them from puffing up during cooking.
- Preheat the Grill . Preheat your grill to medium-high heat. Clean and oil the grates to prevent sticking.
- Grill the Patties . Place the bison patties on the grill and cook for about 4-5 minutes per side, or until they reach your desired level of doneness. Bison cooks faster than beef, so keep an eye on them.
- Add Cheese . If using cheese, add a slice to each patty during the last minute of cooking and cover the grill to melt the cheese.
- Toast the Buns . Lightly toast the hamburger buns on the grill until they’re golden and slightly crispy.
- Assemble . Place the cooked bison patties on the bottom half of the buns. Top with your favorite toppings and condiments, then add the top bun.

Tips And Tricks
Making Bison Burgers is a straightforward process, but a few tips can help you achieve the best possible results. Here are some pointers to ensure your burgers turn out juicy, flavorful, and utterly irresistible:
- Don’t Overwork the Meat . Mix the bison meat and seasonings gently to avoid tough burgers.
- Use a Thermometer . To ensure perfectly cooked burgers, use a meat thermometer. Bison burgers are best cooked to medium, about 140°F.
- Rest the Patties . Let the patties rest for a few minutes after grilling to allow the juices to redistribute.
Variations
If you’re a fan of Bison Burgers and want to try some creative variations, here are a few delicious ideas to explore:
- Spicy- Add some heat by mixing in chopped jalapeños and a dash of hot sauce into the bison mixture.
- Herb-Infused- Incorporate fresh herbs like rosemary, thyme, or parsley for an aromatic twist.
- Stuffed- Create a pocket in each patty and stuff it with cheese, sautéed mushrooms, or caramelized onions for a flavorful surprise.
What To Eat With Bison Burgers
Bison Burgers are a versatile main dish that pairs well with a variety of sides and accompaniments. Here are some delicious options to consider serving alongside them:
- Sweet Potato Fries - Crispy and slightly sweet, they complement the rich flavor of bison.
- Coleslaw - A creamy and tangy coleslaw adds a refreshing contrast.
- Grilled Vegetables - Seasonal grilled vegetables make a healthy and colorful side.
- Pickles - Crunchy pickles add a zesty bite.
How Long Do They Last?
Cooked Bison Burgers can be stored in the refrigerator in an airtight container for up to 3 to 4 days. Reheat them gently in a skillet or the microwave to maintain their juiciness.
Can You Freeze Them?
Yes, you can freeze uncooked bison patties to enjoy at a later time. Freezing is a great way to meal prep and have a quick dinner option on hand.
- Freeze Uncooked Patties - Place the formed patties on a baking sheet lined with parchment paper and freeze until solid. Transfer the frozen patties to a resealable freezer bag, removing as much air as possible to prevent freezer burn. They can last in the freezer for up to 3 months.
- Cooking from Frozen - When ready to cook, you can grill the patties directly from frozen. Just add a few extra minutes to the cooking time.
More Of Our Best Burgers
- Smash Burgers
- Lamb Burgers
- Chicken Burgers
- Air Fryer Turkey Burgers
- Montreal Steak Burgers

Bison Burgers | Easy and Juicy Bison Burger Recipe
Ingredients
- ▢ 4 Hamburger Buns
- ▢ 1 pound Ground Bison
- ▢ 2 cloves Garlic , minced
- ▢ 1 tsp Onion Powder
- ▢ 1 tsp Kosher Salt
- ▢ 1/2 tsp Ground Black pepper
- ▢ 1 tbsp Worcestershire Sauce
Instructions
- Mix the Ingredients . In a large bowl, combine the ground bison, minced garlic, onion powder, salt, pepper, and Worcestershire sauce. Mix gently until the ingredients are just combined.
- Form the Patties . Divide the mixture into equal portions and shape them into patties. Make a slight indentation in the center of each patty to prevent them from puffing up during cooking.
- Preheat the Grill . Preheat your grill to medium-high heat. Clean and oil the grates to prevent sticking.
- Grill the Patties . Place the bison patties on the grill and cook for about 4-5 minutes per side, or until they reach your desired level of doneness. Bison cooks faster than beef, so keep an eye on them.
- Add Cheese . If using cheese, add a slice to each patty during the last minute of cooking and cover the grill to melt the cheese.
- Toast the Buns . Lightly toast the hamburger buns on the grill until they’re golden and slightly crispy.
- Assemble . Place the cooked bison patties on the bottom half of the buns. Top with your favorite toppings and condiments, then add the top bun.
