
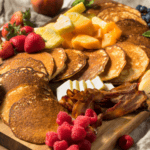
Are you tired of the same old breakfast routine? Want to make your mornings more exciting? Enter the Breakfast Charcuterie Board! Whether you’re looking to upgrade your weekend brunch game or prepare a delightful morning spread for guests, this is the answer. With a few tips and tricks, you can create a visually stunning and delicious morning feast that will impress everyone at the table.
Why You’ll Love This Family-Style Breakfast
- Fast and Easy . Say goodbye to the hassle of cooking a big breakfast. A charcuterie board allows you to assemble a delicious morning spread without the need for extensive cooking.
- Versatile . Customize your Breakfast Charcuterie Board with your favorite breakfast items, ensuring that everyone’s cravings are satisfied.
- Delicious . With a variety of flavors and textures, a well-curated board offers a delightful culinary experience that appeals to both sweet and savory breakfast lovers.
What Is The 3 3 3 3 Rule For A Charcuterie Board?
The “3-3-3-3 Rule” for a charcuterie board is a helpful guideline for creating a balanced and visually appealing assortment of ingredients on your board. It ensures variety in flavors, textures, and colors, making your charcuterie board more enticing and enjoyable. Here’s what each “3” represents:
- 3 Types of Cheese - Including three different types of cheese provides diversity in flavors and textures. Typically, you’ll want to include a mix of soft, semi-soft, and hard cheeses. For example, you might choose brie (soft), cheddar (semi-soft), and gouda (hard) to cover a range of tastes.
- 3 Types of Meat - Incorporating three varieties of cured or smoked meats adds a savory dimension to your charcuterie board. Consider options like prosciutto, salami, and chorizo for a well-rounded selection. These meats can vary in saltiness and spiciness to cater to different palates.
- 3 Types of Condiments or Spreads - Offering three different condiments or spreads complements the cheeses and meats. You can include items like honey, mustard, fig jam, or chutney. These condiments provide sweetness, tanginess, or spiciness, enhancing the overall flavor experience.
- 3 Types of Extras - The last “3” refers to additional elements that add variety and balance to your board. These extras can consist of fruits (like grapes, apple slices, or figs), nuts (such as almonds or walnuts), and crackers or bread (to serve as a vessel for cheese and spreads). These components add freshness, crunch, and a variety of textures to your board.
What Do You Serve On A Breakfast Board?
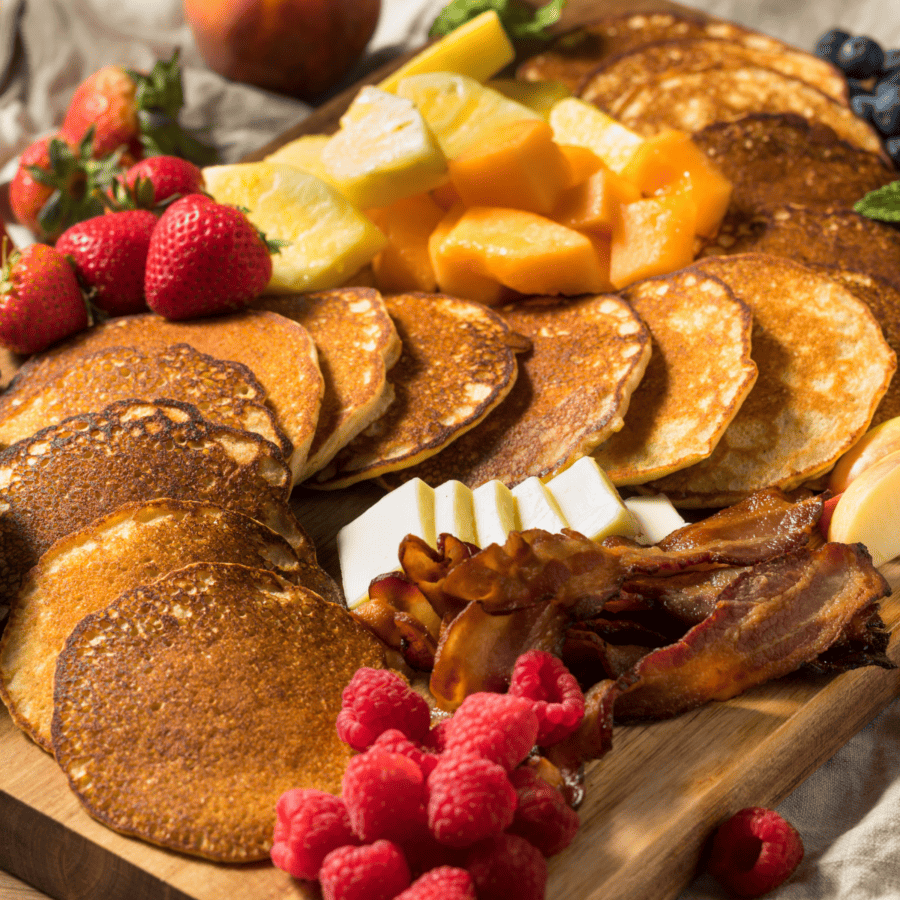
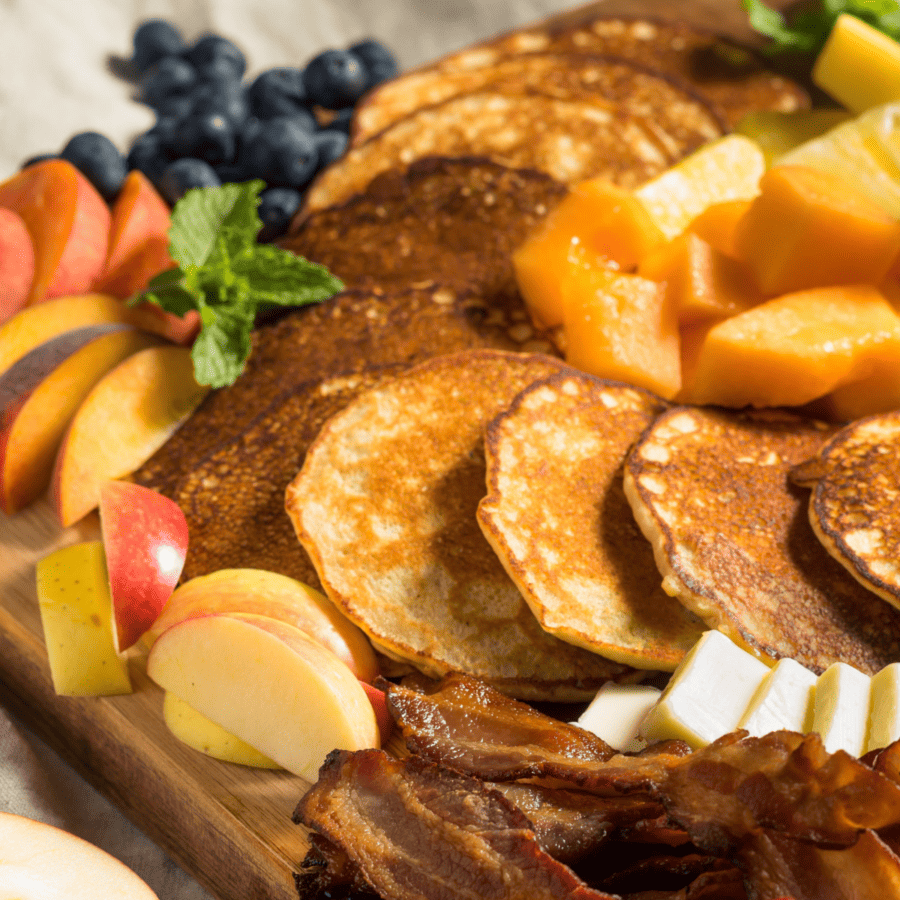
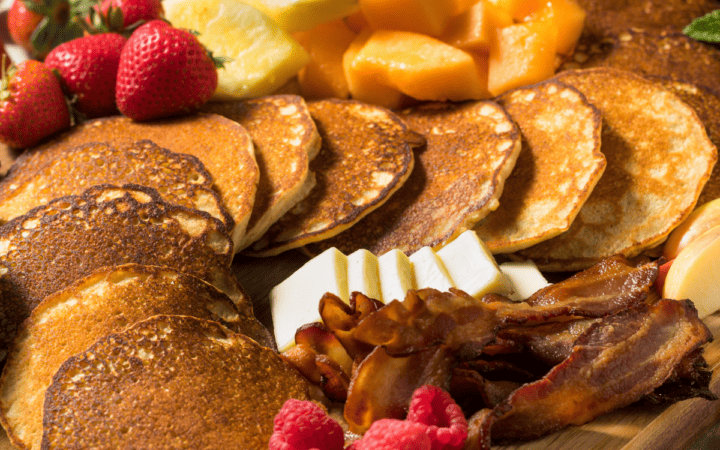
A delicious and impressive Breakfast Charcuterie Board generally includes a wide array of ingredients to mix and match to create fun and exciting flavors. Use combinations of some of the following ingredients to customize your breakfast adventure:
- Breakfast Meats- Include options like crispy bacon, sausage links, or prosciutto for a savory touch.
- Cheeses - Choose a mix of soft and hard cheeses, such as brie, cheddar, and gouda, to provide contrast in flavors and textures.
- Breads and Pastries - Offer a selection of fresh bread, bagels, croissants, and pastries. Sliced bread or toasted options can be perfect for spreads.
- Fruits - Add color and freshness with a variety of fruits like berries, grapes, sliced oranges, or apple wedges. Don’t forget a fruit dip or yogurt for dipping.
- Spreads and Condiments - Provide a range of spreads, such as cream cheese, butter, jam, honey, and nut butter. These can be used to enhance the flavor of bread or pastries.
- Hard-Boiled Eggs - A protein-packed addition that adds substance to your board.
- Nuts - Offer a mix of nuts like almonds, walnuts, or pecans for some crunch.
How Do You Assemble A Breakfast Board?
The beauty of a Breakfast Charcuterie Board is that there are no strict rules – it’s an opportunity to express your creativity and cater to your preferences. Here are some tips and tricks to help you assemble a stunning morning feast:
- Choose the Right Board or Tray . Select a serving board or tray that suits your style and the number of guests you’re serving. Whether it’s a rustic wooden platter, a sleek marble board, or a colorful ceramic tray, your choice of serving vessel can enhance the overall presentation.
- Include a Variety of Ingredients . A well-rounded Breakfast Charcuterie Board should feature a diverse selection of ingredients to please everyone’s taste buds.
- Create a Visual Appeal . Arrange your ingredients thoughtfully to create an enticing display.
- Balance Flavors and Textures . A successful Breakfast Charcuterie Board balances sweet and savory elements, as well as various textures. Ensure there’s a harmonious blend of flavors, from the richness of cheese and bacon to the sweetness of fruit and pastries. Including crunchy nuts can also add a satisfying contrast.
- Consider Dietary Preferences . Be mindful of dietary restrictions and preferences. If you have guests with dietary limitations, provide options like gluten-free bread or dairy-free cheese to accommodate their needs.
Variations
Now that you have the basic framework, you can get creative and personalize your Breakfast Charcuterie Board for any occasion. Here are some thematic ideas to inspire your morning feasts:
Classic Breakfast Spread
- Meats - Bacon and sausage links
- Cheeses - Cheddar and gouda
- Breads - Sliced baguette and croissants
- Fruits - Berries and melon
- Spreads - Butter, cream cheese, and strawberry jam
Mediterranean Morning
- Meats - Prosciutto and salami
- Cheeses - Feta and mozzarella
- Breads - Pita bread and olive ciabatta
- Fruits - Sliced cucumber and cherry tomatoes
- Spreads - Hummus and tzatziki
Healthy Start
- Meats - Turkey or chicken breast slices
- Cheeses - Greek yogurt and cottage cheese
- Breads - Whole-grain toast and multigrain crackers
- Fruits - Sliced apple and banana
- Spreads - Almond butter and honey
Kids’ Breakfast Party
- Meats - Mini sausages
- Cheeses - Mild cheddar and string cheese
- Breads - Mini pancakes and cinnamon toast sticks
- Fruits - Sliced strawberries and grapes
- Spreads - Nutella and whipped cream
Elegant Brunch
- Meats - Smoked salmon and prosciutto
- Cheeses - Brie and herbed cream cheese
- Breads - Fresh bagels and crispy croutons
- Fruits - Sliced pear and figs
- Spreads - Creme fraiche and lemon zest
What To Serve With It
A breakfast charcuterie board is a delightful morning spread that can be elevated with complementary items to create a well-rounded breakfast experience. Here are some ideas for what to serve alongside a breakfast charcuterie board:
- Coffee or espresso - A classic morning choice.
- Tea - Offer a selection of herbal, black, or green teas.
- Fresh fruit juices - Orange, grapefruit, or cranberry juice.
- Mimosa or Bellini bar - Provide champagne or sparkling wine alongside fruit juices for a DIY mimosa or Bellini station.
How Long Does It Last?
To maximize the freshness and safety of your breakfast charcuterie board, it’s a good practice to set it up just before your guests arrive or shortly before serving.
If you anticipate that the board will be out for an extended period, consider using ice packs or placing the board on a larger tray filled with ice to keep perishable items chilled.
More Recipes To Feed A Crowd
- How To Make A Charcuterie Board
- Crockpot Little Smokies
- Cranberry Meatballs
- Instant Pot BBQ Chicken
- Buffalo Dip Crockpot Recipe
Breakfast Charcuterie Board | How To Make A Breakfast Board
Ingredients
- ▢ 4 oz Cooked Bacon
- ▢ 4 oz Cooked Sausage Links
- ▢ 4 oz Blueberries
- ▢ 4 oz Strawberries
- ▢ 4 oz Raspberries
- ▢ 8 Pancakes
- ▢ 4 tbsp Butter
- ▢ 8 oz Maple Syrup
- ▢ 8 oz Cheese
- ▢ 4 Hard Boiled Eggs
- ▢ 4 oz Nuts
Instructions
- Choose the Right Board or Tray . Select a serving board or tray that suits your style and the number of guests you’re serving. Whether it’s a rustic wooden platter, a sleek marble board, or a colorful ceramic tray, your choice of serving vessel can enhance the overall presentation.
- Include a Variety of Ingredients . A well-rounded Breakfast Charcuterie Board should feature a diverse selection of ingredients to please everyone’s taste buds.
- Create a Visual Appeal . Arrange your ingredients thoughtfully to create an enticing display.
- Balance Flavors and Textures . A successful Breakfast Charcuterie Board balances sweet and savory elements, as well as various textures. Ensure there’s a harmonious blend of flavors, from the richness of cheese and bacon to the sweetness of fruit and pastries. Including crunchy nuts can also add a satisfying contrast.
- Consider Dietary Preferences . Be mindful of dietary restrictions and preferences. If you have guests with dietary limitations, provide options like gluten-free bread or dairy-free cheese to accommodate their needs.
Get support & connect with our community on Facebook!

If you already signed up, you should have received an email with a password to give you unlimited access to our FREE Printable Library. The password is case sensitive. Enter it below and get printing!
Password:
Breakfast Charcuterie Board | How To Make A Breakfast Board
Ingredients
- 4 oz Cooked Bacon
- 4 oz Cooked Sausage Links
- 4 oz Blueberries
- 4 oz Strawberries
- 4 oz Raspberries
- 8 Pancakes
- 4 tbsp Butter
- 8 oz Maple Syrup
- 8 oz Cheese
- 4 Hard Boiled Eggs
- 4 oz Nuts
Instructions
- Choose the Right Board or Tray . Select a serving board or tray that suits your style and the number of guests you’re serving. Whether it’s a rustic wooden platter, a sleek marble board, or a colorful ceramic tray, your choice of serving vessel can enhance the overall presentation.
- Include a Variety of Ingredients . A well-rounded Breakfast Charcuterie Board should feature a diverse selection of ingredients to please everyone’s taste buds.
- Create a Visual Appeal . Arrange your ingredients thoughtfully to create an enticing display.
- Balance Flavors and Textures . A successful Breakfast Charcuterie Board balances sweet and savory elements, as well as various textures. Ensure there’s a harmonious blend of flavors, from the richness of cheese and bacon to the sweetness of fruit and pastries. Including crunchy nuts can also add a satisfying contrast.
- Consider Dietary Preferences . Be mindful of dietary restrictions and preferences. If you have guests with dietary limitations, provide options like gluten-free bread or dairy-free cheese to accommodate their needs.
Breakfast Charcuterie Board | How To Make A Breakfast Board https://twosleevers.com/breakfast-charcuterie-board/
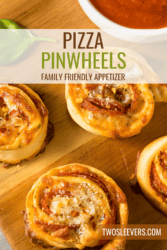
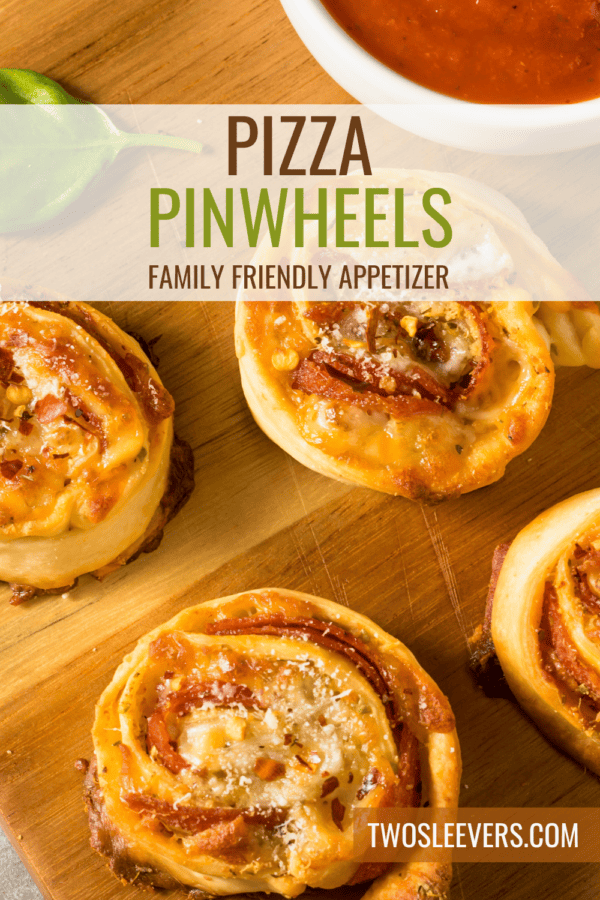
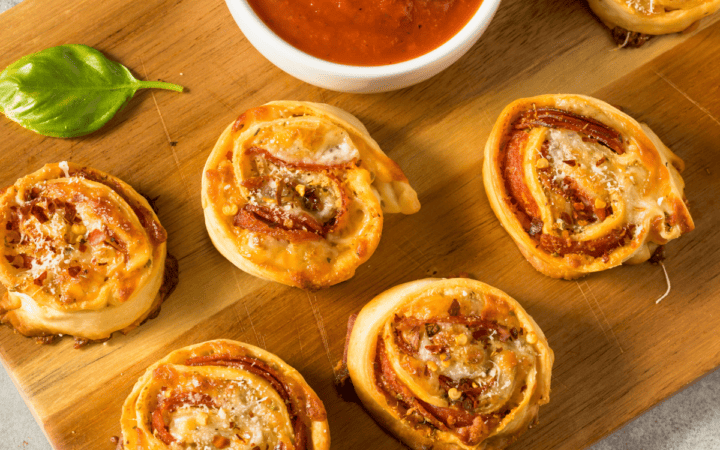
If you’re a fan of pizza (who isn’t?), you’re in for a treat! Learn how to make the easiest Air Fryer Pizza Pinwheels. You’ll achieve that perfect balance between crispy, cheesy, and oh-so-delicious. These pinwheels are perfect for parties, game nights, or anytime you’re craving a pizza-inspired snack.
Why This Will Be A Family Favorite
- Quick and Easy . Ready in under 20 minutes with the help of your air fryer, these pizza pinwheels are perfect for when you need a speedy and satisfying snack.
- Customizable . You can get creative with the toppings, adding your favorite ingredients to make these pinwheels truly your own. Whether you’re a pepperoni lover or a veggie enthusiast, there’s a pinwheel for you.
- Kid-Friendly . These pizza pinwheels are kid-approved and make for a fantastic after-school snack or lunchbox addition.
- Crowd-Pleaser . Whether you’re hosting a gathering or simply enjoying a cozy movie night, these pinwheels are guaranteed to disappear fast.
Whether you’re hosting a party, craving a savory snack, or looking for a kid-friendly meal, these Air Fryer Pizza Pinwheels are sure to satisfy your pizza cravings. Give them a try and watch them disappear!
How Do You Keep Pinwheels Together?
To ensure your Pizza Pinwheels stay securely together while cooking, consider using one or multiple of the following tips before adding them to the air fryer basket:
- Roll the Dough Tightly . When spreading the filling and rolling up the dough, be sure to roll it as tightly as possible. A tight roll will help hold the pinwheels together during baking or cooking.
- Seal the Edges . Before slicing the rolled-up dough into individual pinwheels, seal the edges of the roll. You can do this by gently pressing the seam where the dough meets itself. This will help prevent the filling from oozing out during cooking.
- Use Toothpicks . For particularly large or delicate pinwheels, you can use toothpicks to secure the roll. Place toothpicks through the pinwheel at regular intervals, then slice the pinwheels in between the toothpicks. Be sure to remove the toothpicks before serving.
Ingredients You’ll Need
- Pizza Dough- You can use store-bought pizza dough or make your own if you’re feeling ambitious.
- Pizza Sauce- Choose your favorite pizza sauce for spreading over the dough.
- Mozzarella Cheese- Shredded mozzarella cheese provides that gooey, melty goodness we all love.
- Toppings- Get creative! Use toppings like pepperoni, sliced olives, bell peppers, mushrooms, or any other pizza toppings you adore.
- Olive Oil- A light brushing of olive oil helps the pinwheels turn golden brown and crispy.
- Italian Seasoning- A sprinkle of Italian seasoning adds that authentic pizza flavor.
How To Make Pizza Pinwheels
- Roll Out the Dough . Start by rolling out the pizza dough into a rectangle on a lightly floured surface. Aim for about 1/4-inch thickness.
- Spread the Sauce . Evenly spread pizza sauce over the dough, leaving a small border along the edges.
- Add Cheese and Toppings . Sprinkle a generous layer of shredded mozzarella cheese over the sauce. Then, add your favorite pizza toppings. This is where you can get creative!
- Roll It Up . Carefully roll up the dough, starting from the long edge. Roll it tightly to ensure your pinwheels hold together.
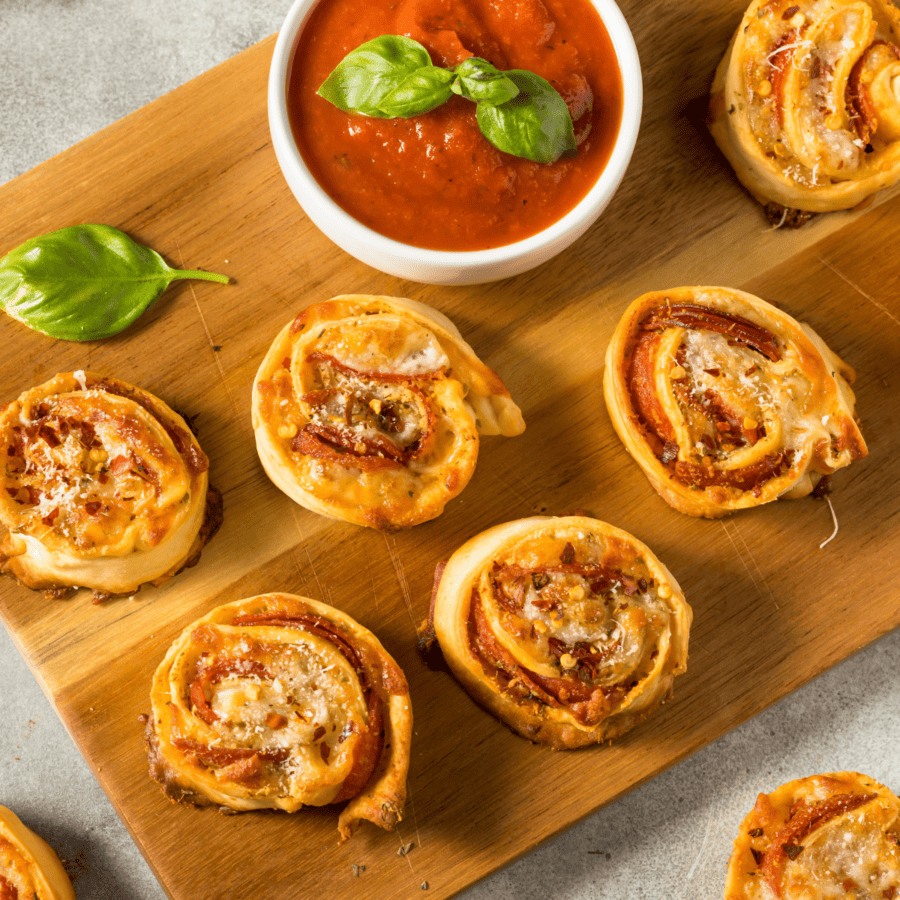
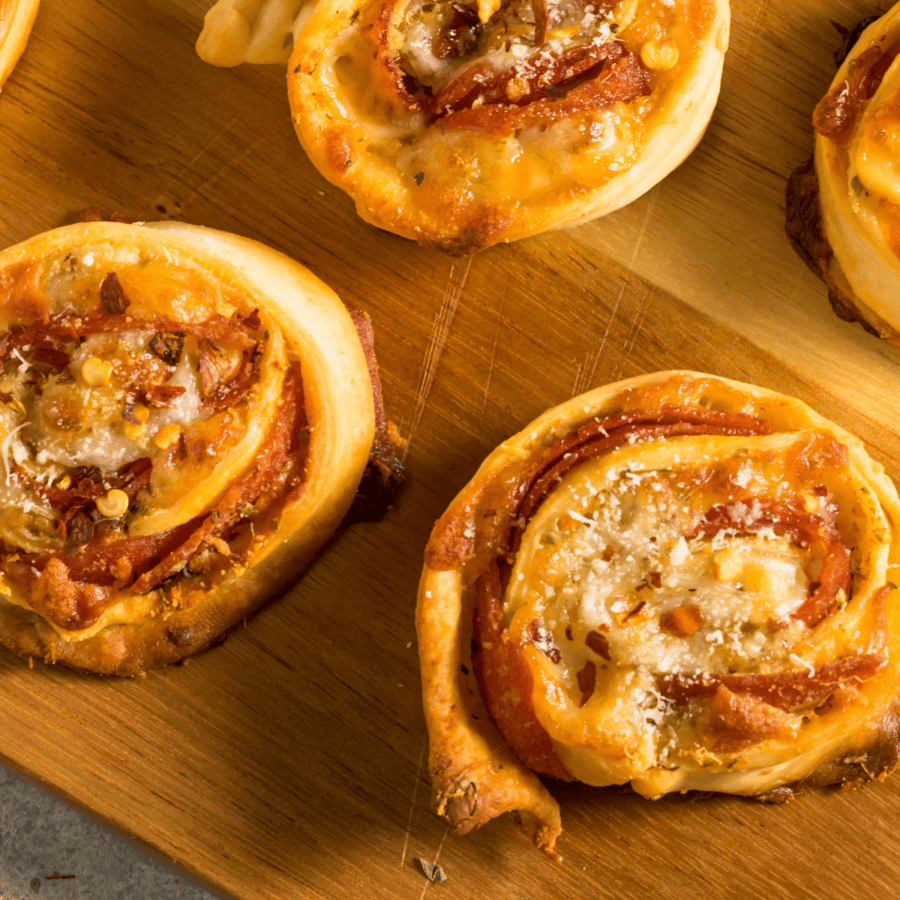
- Slice into Pinwheels. Use a sharp knife to slice the rolled dough into pinwheels, about 1-inch thick.
- Brush with Olive Oil . Lightly brush the tops of the pinwheels with olive oil, and sprinkle with Italian seasoning.
- Air Fry to Perfection . Preheat your air fryer to 350°F. Place the pizza pinwheels in a single layer in the air fryer basket, making sure they don’t touch. You may need to cook them in batches, depending on the size of your air fryer.
- Cook Until Golden . Air fry the pinwheels for about 6-8 minutes, or until they are golden brown and crispy on the outside, and the cheese is melted on the inside.
- Serve and Enjoy . Remove the pizza pinwheels from the air fryer, let them cool slightly, and then serve them with your favorite dipping sauce.
Tips And Tricks
Making Air Fryer Pizza Pinwheels is a breeze, but here are some tips to ensure your pinwheels turn out perfect every time:
- Don’t Overfill . While it’s tempting to pile on the toppings, be cautious not to overfill the pinwheels. Overfilling can make them difficult to roll and may result in a mess in your air fryer.
- Seal the Edges . To prevent the filling from oozing out during cooking, make sure to seal the edges of the dough well when rolling up the pinwheels.
- Use Parchment Paper . Placing a piece of parchment paper in the air fryer basket can help prevent any cheese or sauce from sticking to the basket.
- Watch the Cooking Time . Cooking times can vary depending on your air fryer, so keep a close eye on the pinwheels. They should be golden brown and crispy on the outside and cooked through on the inside.
- Serve with Dipping Sauce . Pizza pinwheels are even more delicious when served with marinara sauce, ranch dressing, or your favorite pizza dip.
Variations
Feel free to get creative with your pizza pinwheels! Here are some tasty variations to try:
- Margherita Pinwheels - Use tomato sauce, fresh mozzarella cheese, fresh basil leaves, and a drizzle of olive oil for a classic Margherita flavor.
- BBQ Chicken Pinwheels - Swap the tomato sauce for barbecue sauce, and add cooked shredded chicken, red onion slices, and cheddar cheese.
- Veggie Lover’s Pinwheels - Load up on your favorite vegetables like bell peppers, onions, spinach, and tomatoes for a vegetarian delight.
- Meat Lovers Pinwheels - Go all out with pepperoni, cooked sausage, and bacon bits for a carnivore’s dream.
What To Serve With Pizza Pinwheels
Pizza pinwheels are satisfying on their own, but you can enhance your snack or meal by serving them with:
- Marinara Sauce - A classic choice for dipping.
- Ranch Dressing - Creamy ranch pairs perfectly with pizza flavors.
- Garlic Butter - A garlic butter dip is heavenly for garlic bread lovers.
- Mixed Greens - Balance the meal with a side salad or fresh greens.
How Long Do They Last?
While pizza pinwheels are best enjoyed fresh, you can store any leftovers in an airtight container in the refrigerator for up to 2-3 days.
How Do You Reheat Pinwheels?
To reheat, simply pop them in the air fryer for a few minutes until they’re crispy again.
Can You Freeze Them?
Yes, you can freeze pizza pinwheels! Place them in a single layer on a baking sheet and freeze until solid. Once frozen, transfer them to a freezer-safe bag or container, separating each layer with parchment paper to prevent sticking.
They can be stored in the freezer for up to 2 months. To reheat, air fry them from frozen until heated through.
Best Pizza Recipes
- Low Carb Pizza
- Keto Pizza Casserole
- Buffalo Chicken Pizza
- Mexican Pizza
- French Bread Pizza
Pizza Pinwheels | Air Fryer Pizza Roll Up Recipe
Ingredients
- ▢ 14 oz Refrigerated Pizza Dough
- ▢ 1 cup Pizza Sauce
- ▢ 2 cups Mozzarella Cheese
- ▢ 6 oz Pepperoni
- ▢ 2 tbsp Olive Oil
- ▢ 1 tbsp Italian Seasoning
Instructions
- Roll Out the Dough . Start by rolling out the pizza dough into a rectangle on a lightly floured surface. Aim for about 1/4-inch thickness.
- Spread the Sauce . Evenly spread pizza sauce over the dough, leaving a small border along the edges.
- Add Cheese and Toppings . Sprinkle a generous layer of shredded mozzarella cheese over the sauce. Then, add your favorite pizza toppings. This is where you can get creative!
- Roll It Up . Carefully roll up the dough, starting from the long edge. Roll it tightly to ensure your pinwheels hold together.
- Slice into Pinwheels. Use a sharp knife to slice the rolled dough into pinwheels, about 1-inch thick.
- Brush with Olive Oil . Lightly brush the tops of the pinwheels with olive oil, and sprinkle with Italian seasoning.
- Air Fry to Perfection . Preheat your air fryer to 350°F. Place the pizza pinwheels in a single layer in the air fryer basket, making sure they don’t touch. You may need to cook them in batches, depending on the size of your air fryer.
- Cook Until Golden . Air fry the pinwheels for about 6-8 minutes, or until they are golden brown and crispy on the outside, and the cheese is melted on the inside.
- Serve and Enjoy . Remove the pizza pinwheels from the air fryer, let them cool slightly, and then serve them with your favorite dipping sauce.
Get support & connect with our community on Facebook!
And don’t forget to check out my air fryer cookbooks! Every day easy air fryer , and Air Fryer Revolution .

