
If you’re craving a savory dish that’s as versatile as it is delicious, look no further than this Bacon Quiche recipe! With its buttery crust, creamy filling, and smoky bacon, this quiche is perfect for breakfast, brunch, or even dinner.

Why You’ll Love This Brilliant Breakfast Recipe
- Fast and Easy . With simple ingredients and straightforward steps, this recipe comes together in just under an hour.
- Make-Ahead Friendly. Prep it ahead of time and enjoy it throughout the week.
- Customizable. Swap or add your favorite ingredients for a personalized dish.
- Perfectly Savory. The bacon adds a smoky, salty flavor that complements the creamy filling beautifully.
It’s simple to make, customizable, and guaranteed to be a crowd-pleaser.
What Does Bacon Quiche Taste Like?
Bacon quiche is a savory pie made with a rich custard filling of eggs, cream, and cheese, poured over crispy bacon and baked to perfection in a flaky pie crust.
It’s a classic French-inspired dish that’s both hearty and elegant, making it ideal for any occasion.
Do I Need To Prebake The Pie Crust For Quiche?
Yes, prebaking the pie crust, a process known as blind baking, is highly recommended when making a quiche. This step ensures that the crust stays crisp and doesn’t become soggy from the moisture in the custard filling.
Ingredients You’ll Need
- Bacon - The key ingredient that provides a savory, crispy, and smoky flavor. It’s the highlight of the dish, adding both texture and taste.
- Eggs - These form the base of the custard filling, binding all the ingredients together and adding a rich, creamy consistency.
- Heavy Cream and Milk - Together, these create a smooth and velvety custard, balancing the richness of the bacon and cheese while giving the quiche its signature creamy texture.
- Cheddar Cheese - Offers a bold, sharp flavor that enhances the savory notes of the bacon while adding a gooey, cheesy layer to the filling.
- Onion - Sautéed to bring out its natural sweetness, onion adds depth and a mild sweetness that complements the smoky bacon and rich custard.
- Salt and Pepper - Essential for seasoning, these simple ingredients bring out the natural flavors of the filling without overpowering the dish.
- Pie Crust - The foundation of the quiche, providing structure and a buttery, flaky texture that perfectly contrasts the creamy filling. Whether store-bought or homemade, it ensures a sturdy base for slicing and serving.
How To Make Bacon Quiche
- Prepare the Crust . Roll out the pie crust into a 9-inch pie pan, trimming any excess. Pre-bake the crust at 375°F for about 10 minutes.
- Cook the Bacon . Fry the bacon in a skillet over medium heat until crispy. Remove and let it drain on paper towels. Crumble into bite-sized pieces.
- Sauté the Onion . In the same skillet, sauté the onion in the bacon drippings until soft and translucent.
- Mix the Custard . Whisk together the eggs, heavy cream, milk, salt, and pepper in a large bowl until smooth.
- Assemble the Quiche . Layer the crumbled bacon, sautéed onion, and shredded cheddar cheese evenly in the pre-baked crust. Pour the custard mixture over the top.
- Bake to Perfection . Bake the quiche at 375°F for 35–40 minutes, or until the filling is set and the top is golden.
- Cool and Serve . Let the quiche cool for 10 minutes before slicing. Serve warm or at room temperature.

Tips And Tricks
Making a bacon quiche that’s rich, creamy, and full of flavor doesn’t have to be intimidating. Follow these tips and tricks to ensure it is a success every time:
- Pre-Bake the Crust . This prevents a soggy bottom and ensures a crisp, golden crust.
- Don’t Overfill . Leave a little space at the top of the crust to prevent spilling.
- Check for Doneness . The quiche is ready when the center is slightly jiggly but set.
- Cool Before Slicing . Allowing the quiche to rest ensures clean slices.
Variations
Bacon quiche is a versatile dish that can be customized to suit your taste or make the most of the ingredients you have on hand. Here are some creative variations to try:
- Vegetarian Quiche - Swap the bacon for sautéed spinach, mushrooms, or roasted red peppers.
- Cheese Swap - Try Gruyère, Swiss, or feta for a new flavor profile.
- Meaty Upgrade - Add cooked sausage or diced ham along with the bacon.
- Herb-Infused - Sprinkle fresh herbs like thyme, parsley, or chives into the custard.
What To Eat With Bacon Quiche
Bacon quiche is a versatile dish that pairs beautifully with a variety of sides, whether you’re serving it for breakfast, brunch, lunch, or dinner. Here are some delicious options to round out your meal:
- Salad - A light, tangy vinaigrette complements the richness of the quiche.
- Fresh Fruit Salad - Adds a refreshing, sweet contrast.
- Roasted Potatoes - Perfect for a hearty brunch spread.
How Long Does It Last?
Properly stored in an airtight container, your bacon quiche will remain delicious for 3-4 days. This makes it a great make-ahead dish for busy mornings or easy lunches!
Can You Freeze It?
Yes, bacon quiche freezes beautifully! Cool completely before wrapping and freezing. To reheat, bake in a 350°F oven until warmed through.
More Of Our Best Breakfast Recipes
- Keto Blueberry Muffins
- Cinnamon French Toast
- Swedish Pancakes
- Chocolate Cinnamon Rolls
- Mini Muffins


Bacon Quiche Recipe | Easy Bacon And Cheddar Quiche
Ingredients
- ▢ 1 Refrigerated Pie Crust
- ▢ 6 slices Bacon
- ▢ 1 Onion , chopped
- ▢ 4 Eggs
- ▢ 1 cup Heavy Cream
- ▢ 1/2 cup Milk
- ▢ 1 cup Cheddar Cheese , shredded
- ▢ 1/2 tsp Kosher salt
- ▢ 1/4 tsp Ground Black Pepper
Instructions
- Prepare the Crust . Roll out the pie crust into a 9-inch pie pan, trimming any excess. Pre-bake the crust at 375°F for about 10 minutes.
- Cook the Bacon . Fry the bacon in a skillet over medium heat until crispy. Remove and let it drain on paper towels. Crumble into bite-sized pieces.
- Sauté the Onion . In the same skillet, sauté the onion in the bacon drippings until soft and translucent.
- Mix the Custard . Whisk together the eggs, heavy cream, milk, salt, and pepper in a large bowl until smooth.
- Assemble the Quiche . Layer the crumbled bacon, sautéed onion, and shredded cheddar cheese evenly in the pre-baked crust. Pour the custard mixture over the top.
- Bake to Perfection . Bake the quiche at 375°F for 35–40 minutes, or until the filling is set and the top is golden.
- Cool and Serve . Let the quiche cool for 10 minutes before slicing. Serve warm or at room temperature.
Get support & connect with our community on Facebook!
Nutrition

If you already signed up, you should have received an email with a password to give you unlimited access to our FREE Printable Library. The password is case sensitive. Enter it below and get printing!
Password:

Bacon Quiche Recipe | Easy Bacon And Cheddar Quiche
Ingredients
- 1 Refrigerated Pie Crust
- 6 slices Bacon
- 1 Onion chopped
- 4 Eggs
- 1 cup Heavy Cream
- 1/2 cup Milk
- 1 cup Cheddar Cheese shredded
- 1/2 tsp Kosher salt
- 1/4 tsp Ground Black Pepper
Instructions
- Prepare the Crust . Roll out the pie crust into a 9-inch pie pan, trimming any excess. Pre-bake the crust at 375°F for about 10 minutes.
- Cook the Bacon . Fry the bacon in a skillet over medium heat until crispy. Remove and let it drain on paper towels. Crumble into bite-sized pieces.
- Sauté the Onion . In the same skillet, sauté the onion in the bacon drippings until soft and translucent.
- Mix the Custard . Whisk together the eggs, heavy cream, milk, salt, and pepper in a large bowl until smooth.
- Assemble the Quiche . Layer the crumbled bacon, sautéed onion, and shredded cheddar cheese evenly in the pre-baked crust. Pour the custard mixture over the top.
- Bake to Perfection . Bake the quiche at 375°F for 35–40 minutes, or until the filling is set and the top is golden.
- Cool and Serve . Let the quiche cool for 10 minutes before slicing. Serve warm or at room temperature.
Bacon Quiche Recipe | Easy Bacon And Cheddar Quiche https://twosleevers.com/bacon-quiche-recipe/

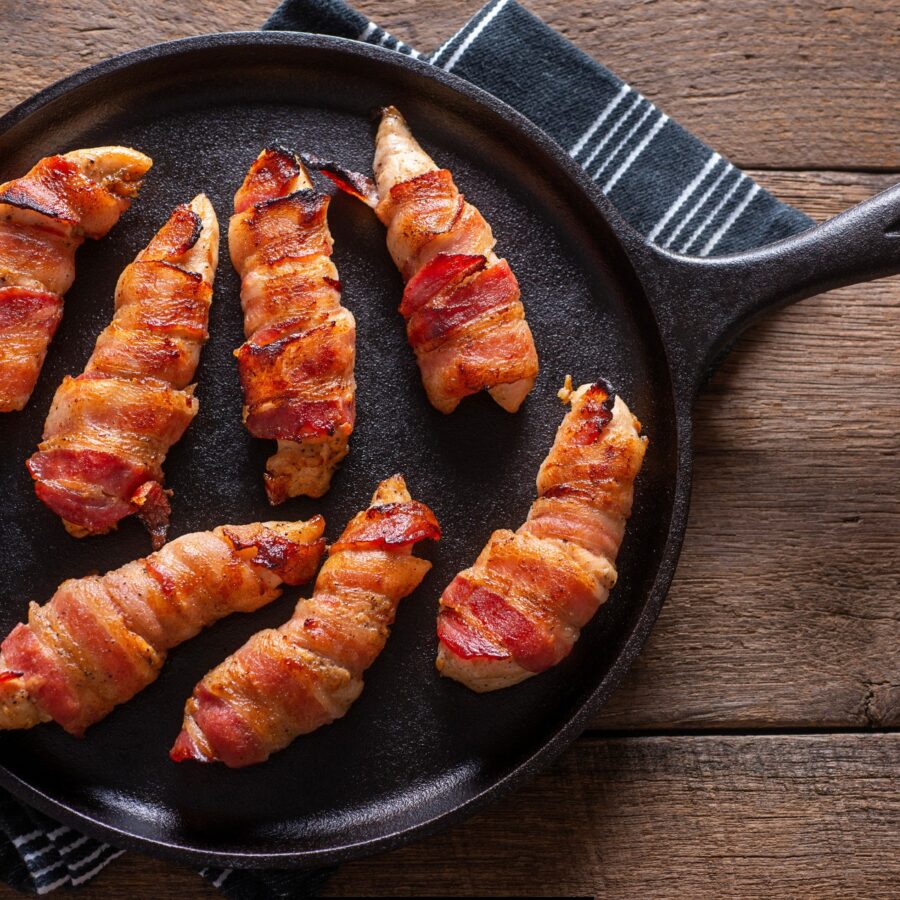
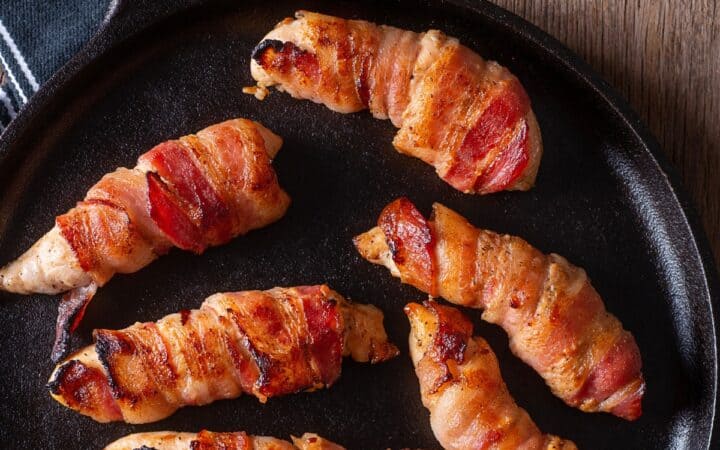
If you’re searching for a show-stopping dish that’s easy to prepare, these Bacon Wrapped Chicken Tenders are a must-try! Crispy, smoky bacon wrapped around tender, juicy chicken – it’s the ultimate combination of flavor and texture.
Why You’ll Love This Simple Chicken Recipe
- Fast and Simple. Ready in under 30 minutes with minimal prep time.
- Versatile. Perfect for game day, weeknight dinners, or holiday gatherings.
- Flavor-Packed. Smoky bacon paired with tender chicken and optional seasoning makes each bite irresistible.
Whether served as a crowd-pleasing appetizer or a hearty main course, this recipe is guaranteed to impress.
What Do Bacon Wrapped Chicken Tenders Taste Like?
These tenders combine the smoky, savory flavor of bacon with the juicy, tender texture of chicken. They are a hit with kids and adults alike, making them an excellent choice for any occasion.
Serve them with your favorite dipping sauces for a customizable flavor experience.
Can You Cook Raw Chicken And Raw Bacon Together?
Yes, you can cook raw chicken and raw bacon together, but there are some key considerations to ensure safety and delicious results.
Both chicken and bacon must be cooked to their safe internal temperatures.
Chicken should reach an internal temperature of 165°F to ensure it’s fully cooked and safe to eat. Bacon typically becomes crispy at lower temperatures, but when paired with chicken, it will cook to a safe temperature along with the chicken.
Ingredients You’ll Need
- Chicken Tenders - These are lean and tender cuts of chicken, making them ideal for wrapping. Their mild flavor absorbs the seasoning and bacon’s smoky taste, ensuring a juicy and flavorful bite.
- Bacon - Thin-cut bacon crisps up beautifully in the oven while wrapping the chicken, keeping it moist and infusing it with its signature smoky, savory flavor. The combination of crispy bacon and tender chicken creates a perfect texture contrast.
- Brown Sugar (Optional) - Adds a touch of sweetness that balances the smoky and savory notes of the bacon. As it caramelizes during baking, it creates a glossy, slightly sticky coating that enhances the overall flavor.
- Paprika or Chili Powder (Optional) - These spices provide an optional layer of smoky or spicy flavor. Paprika brings warmth and depth, while chili powder adds a mild kick for those who enjoy a touch of heat.
- Salt and Black Pepper - These essential seasonings enhance the natural flavors of the chicken and bacon, ensuring the dish is perfectly balanced and savory.
How To Make Bacon Wrapped Chicken Tenders
- Prepare the Ingredients . Preheat your oven to 400°F and line a baking sheet with parchment paper or foil. Pat the chicken tenders dry with paper towels. This helps the bacon stick better and ensures even cooking.
- Season the Chicken . Season the chicken tenders with salt, pepper, and optional paprika or chili powder for extra flavor.
- Wrap with Bacon . Wrap each chicken tender with a slice of bacon, slightly overlapping the edges. If desired, sprinkle brown sugar over the bacon for a sweet glaze.
- Bake to Perfection . Place the wrapped tenders seam-side down on the prepared baking sheet. Bake for 20–25 minutes, flipping halfway through, until the bacon is crispy and the chicken is cooked through (internal temperature of 165°F).
- Optional Broil . For extra crispiness, broil the tenders for 1–2 minutes at the end of cooking.

Tips And Tricks
Follow these practical tips to ensure your bacon-wrapped chicken tenders turn out crispy, juicy, and full of flavor every time:
- Choose Thin Bacon. It crisps up faster and more evenly than thick-cut bacon.
- Use a Wire Rack. Placing the tenders on a rack ensures even cooking and prevents sogginess.
- Don’t Overcrowd. Leave space between each tender on the baking sheet for proper air circulation.
Variations
Bacon-wrapped chicken tenders are incredibly versatile, allowing you to customize flavors to suit any occasion. Here are some creative variations to elevate this dish:
- Spicy Honey Glaze - Drizzle the tenders with a mix of honey and hot sauce before baking for a sweet and spicy twist.
- Cheesy Delight - Stuff the tenders with a slice of mozzarella or cream cheese before wrapping in bacon.
- Herb Infusion - Sprinkle fresh rosemary or thyme on the tenders before wrapping for an herby flavor boost.
What To Eat With Bacon Wrapped Chicken Tenders
Bacon-wrapped chicken tenders are a versatile and flavorful dish that pairs well with a variety of sides. Here are some delicious options to complement their smoky, savory flavor:
- Dipping Sauces - Ranch , honey mustard , barbecue , or spicy aioli .
- Side Dishes - Pair with roasted vegetables , mashed potatoes , or a fresh green salad .
- Drinks - Serve with lemonade, iced tea , or your favorite beer for a complete meal.
How Long Do They Last?
Cooked bacon wrapped chicken tenders can be stored in an airtight container in the refrigerator for 3–4 days.
Reheat them in the oven or air fryer for the best texture.
Can You Freeze Them?
These tenders freeze beautifully! Store them in a freezer-safe bag for up to 3 months.
Reheat the chicken tenders directly from frozen for a quick meal or snack.
More Flavor Packed Recipes
- Instant Pot Butter Chicken
- Mississippi Pot Roast
- Mexican Ground Beef Casserole
- Homemade Gyro Meat
- Chicken Stroganoff
- Mediterranean Chicken Thighs

Bacon Wrapped Chicken Tenders | Wrapped Chicken Tenders
Ingredients
- ▢ 8 Chicken Tenders
- ▢ 8 slices Bacon
- ▢ 1 tbsp Brown Sugar
- ▢ 1/2 tsp Paprika
- ▢ 1/2 tsp Chili Powder
- ▢ 1/2 tsp Kosher Salt
- ▢ 1/4 tsp Ground Black Pepper
Instructions
- Prepare the Ingredients . Preheat your oven to 400°F and line a baking sheet with parchment paper or foil. Pat the chicken tenders dry with paper towels. This helps the bacon stick better and ensures even cooking.
- Season the Chicken . Season the chicken tenders with salt, pepper, and optional paprika or chili powder for extra flavor.
- Wrap with Bacon . Wrap each chicken tender with a slice of bacon, slightly overlapping the edges. If desired, sprinkle brown sugar over the bacon for a sweet glaze.
- Bake to Perfection . Place the wrapped tenders seam-side down on the prepared baking sheet. Bake for 20–25 minutes, flipping halfway through, until the bacon is crispy and the chicken is cooked through (internal temperature of 165°F).
- Optional Broil . For extra crispiness, broil the tenders for 1–2 minutes at the end of cooking.
Get support & connect with our community on Facebook!
Nutrition
Don’t forget to check out my other Ketocookbooks.
Keto Instant Pot, Keto Fat Bombs, Sweets, & Treats , and Easy keto in 30 minutes.

